- Products

- Developers
- User stories
- Blog
- Pricing

Build an activity feed using .NET
- Introduction
- Prerequisites
- Setting up a Pusher Channels application
- Creating an ASP.NET Core MVC project
- Adding models
- Creating the database context
- Setting up the database and running migrations
- Running the migration
- Adding our controllers
- The Product controller
- The Feedback controller
- Adding the views
- Creating the feed page
- Subscribing to a channel, triggering and listening for events
- Installing the Pusher library
- Import the ChannelHelper class to ProductController.cs
- Trigger an event when a new product is added
- Trigger an event when a product is deleted
- Trigger an event when a product status is changed
- Listening and responding to events
- Conclusion
Introduction
Getting a notification for an important event hours after the event is over is really annoying. To be responsive, you need to be in sync with what is happening and as soon as it happens. Activity feeds allow you to visualize activities in your application and see what is happening in realtime.
In this tutorial, I'll show you how to integrate an activity feed into your project using ASP.NET Core and Pusher’s Channels. We’ll start by building an application that will allow a user to add a product, view, change status, and delete a product. Then, we'll create a new page that displays in realtime what is happening in the app.
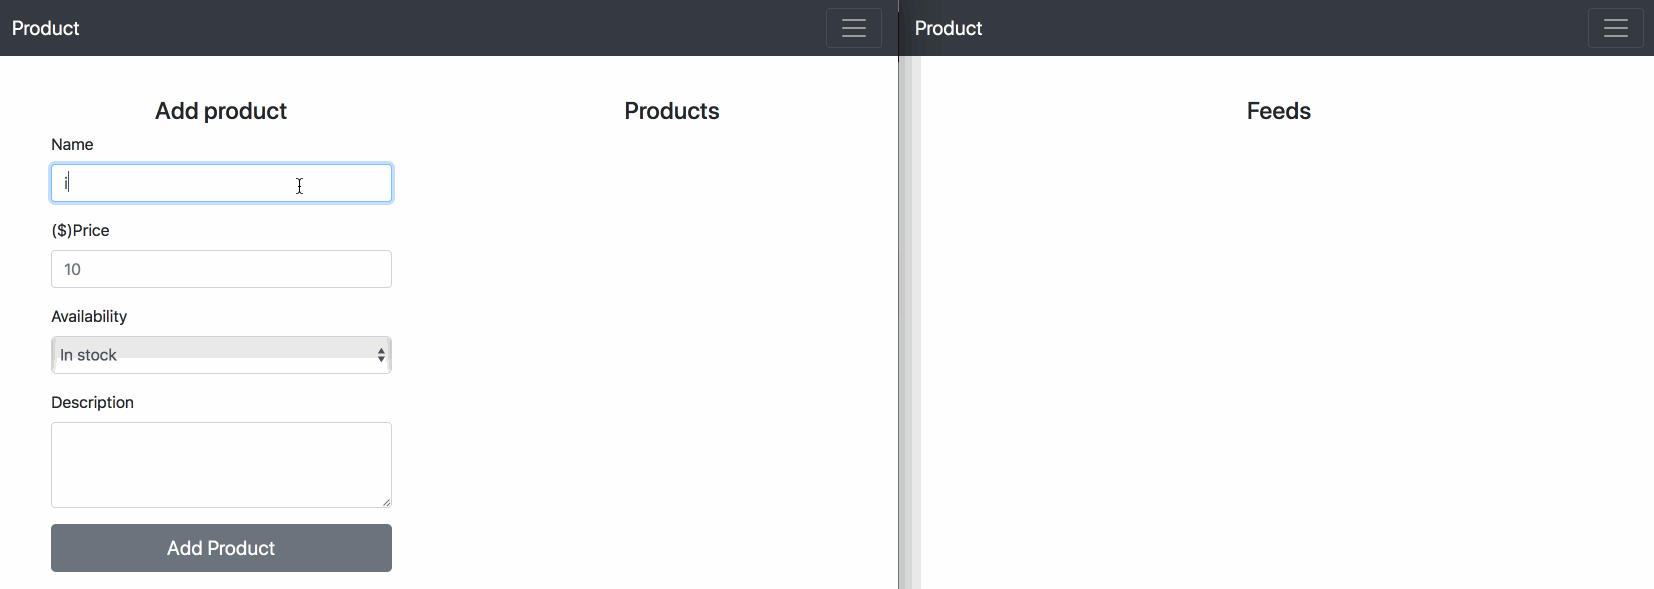
Here is what the final app will look like:
Prerequisites
This tutorial uses the following technologies:
- JavaScript (jQuery)
- ASP.NET Core
- Visual Studio Code
- .NET Core SDK >= 2.0 (Download and install it here if you don’t have it)
- Visual Studio Code C# extension (Install C# extension from the Visual Studio Code Marketplace if you don’t have it installed)
- A Pusher account
Before we move on, verify that your installation is complete by typing the below command:
dotnet --version
If everything worked correctly, the above command will have an output like below:

Setting up a Pusher Channels application
To start utilizing Pusher’s technology, you need to create a Pusher app and get the app keys. Log in or sign up (if you don’t have an account already) for a free account.
Once you are logged in, create a new app then note down your app_id, key, secret and cluster. We’ll need it later.
Creating an ASP.NET Core MVC project
We'll set up an ASP.NET Core project using the dotnet command.
Open up a command line, and enter the below commands:
1mkdir ProdFeed 2 cd ProdFeed 3 dotnet new mvc
In the above command,
- The first command will create a new folder named
ProdFeed - The second command will change your current directory to the folder you just created
- And the last command will create a new ASP.NET Core MVC project in your current folder
Next,
- Open the
ProdFeedfolder in Visual Studio Code editor and select theStartup.csfile.
💡 If your Visual Studio Code has been added to your system path, you can open the project by typing
code .in your command prompt.
- Select Yes to the Warn message "Required assets to build and debug are missing from
ProdFeed. Add them?" - Select Restore to the Info message "There are unresolved dependencies" if you got the message.
Now, press Debug (F5) to build and run the program. The address in which the project is running will open automatically if there is no error. In case it does not open automatically, navigate to http://localhost:5000/ from your browser. You should see a default page.
Next, update ProdFeed.csproj with the following code:
1<Project Sdk="Microsoft.NET.Sdk.Web"> 2 <PropertyGroup> 3 <TargetFramework>netcoreapp2.0</TargetFramework> 4 </PropertyGroup> 5 <ItemGroup> 6 <PackageReference Include="Microsoft.AspNetCore.All" Version="2.0.3" /> 7 <PackageReference Include="Microsoft.VisualStudio.Web.CodeGeneration.Design" Version="2.0.0" /> 8 </ItemGroup> 9 <ItemGroup> 10 <DotNetCliToolReference Include="Microsoft.EntityFrameworkCore.Tools.DotNet" Version="2.0.0" /> 11 <DotNetCliToolReference Include="Microsoft.VisualStudio.Web.CodeGeneration.Tools" Version="2.0.1" /> 12 </ItemGroup> 13 </Project>
Save the file and select Restore to the Info message "There are unresolved dependencies". This will prepare the project for scaffolding and enable entity framework tooling. Now we are ready to start building our application.
Adding models
A model is an object that represents the data in our application. For this project, we’ll create a model - Product - which will hold our business logic for products.
Now, create a new file named Product.cs in the Models folder and add the below code to it:
1using System; 2 3 namespace ProdFeed.Models 4 { 5 public class Product 6 { 7 public int ID { get; set; } 8 public string Name { get; set; } 9 public string Description { get; set; } 10 public bool Status { get; set; } 11 public decimal Price { get; set; } 12 } 13 }
Creating the database context
The database context is the main class that coordinates Entity Framework functionality for a given data model. We’ll derive from the Microsoft.EntityFrameworkCore.DbContext to create this class. When we run our migration, a table named Products will be created which we’ll use to save products.
Create a new file called ProdFeedContext.cs in the Models folder and add the following code to it:
1using Microsoft.EntityFrameworkCore; 2 3 namespace ProdFeed.Models 4 { 5 public class ProdFeedContext : DbContext 6 { 7 public ProdFeedContext (DbContextOptions<ProdFeedContext> options) 8 : base(options) 9 { 10 } 11 public DbSet<Product> Products { get; set; } 12 } 13 }
Setting up the database and running migrations
Now that we have created our models, we can easily generate a migration file that will contain code for creating and updating our table schema.
In this tutorial, we’ll make use of SQLite for our database.
We’ll register the database context with the dependency injection container. Services (such as the DB context) that are registered with the dependency injection container are available to the controllers.
Update the code in ConfigureServices method of /Startup.cs file with the following code:
1[...] 2 public void ConfigureServices(IServiceCollection services) 3 { 4 [...] 5 services.AddDbContext<ProdFeedContext>(options => 6 options.UseSqlite("Data Source=ProdFeed.db")); 7 [...] 8 } 9 [...]
This tells Entity Framework which model classes are included in the data model.
Finally, add the following usings to the header of Startup.cs file:
1using ProdFeed.Models; 2 using Microsoft.EntityFrameworkCore;
You can see the database context as a database connection and a set of tables, and the Dbset as a representation of the tables themselves.
The database context allows us to link our model properties to our database with a connection string (in our case, we are using SQLite)
Running the migration
From your command line, run the following command:
1dotnet ef migrations add ProdFeed 2 dotnet ef database update
- The first command will create a migration script that will be used for managing our database tables
- The second command will execute the migration script, thereby applying the migration to the database to create the schema
💡 If you got an error while running the command, stop the debugging or the server and try again.
Adding our controllers
We’ll need two controllers - ProdctController and FeedController. The ProductController will be responsible for all product-related logic while the FeedController will be responsible for feeds related logic.
The Product controller
Now let’s create the ProductController. Create a new file called ProductController.cs in the Controllers folder and add the below code to it:
1using System; 2 using System.Collections.Generic; 3 using System.Diagnostics; 4 using System.Linq; 5 using System.Threading.Tasks; 6 using Microsoft.AspNetCore.Mvc; 7 using Microsoft.EntityFrameworkCore; 8 using ProdFeed.Models; 9 10 namespace ProdFeed.Controllers 11 { 12 public class ProductController : Controller 13 { 14 private readonly ProdFeedContext _context; 15 public ProductController(ProdFeedContext context) 16 { 17 _context = context; 18 } 19 } 20 }
Here, we have injected ProdFeedContext class into the ProductController class.
Next, let’s add a method for listing all the products to the views. Add the following code to ProductController.cs:
1[...] 2 public async Task<IActionResult> Index() 3 { 4 // get all products.. 5 return View(await _context.Products.ToListAsync()); 6 } 7 [...]
This will fetch all the products on the Products table and pass it down to the view.
Next, add the following code to add the Create method in ProductController.cs:
1[...] 2 [HttpPost] 3 public async Task<IActionResult> Create([Bind("ID,Name,Description,Status,Price")] Product product) 4 { 5 if (ModelState.IsValid) 6 { 7 _context.Products.Add(product); 8 await _context.SaveChangesAsync(); 9 } 10 return RedirectToAction(nameof(Index)); 11 } 12 [...]
This method will add a new product to the database.
Next, add the following code to add the Delete method in ProductController.cs:
1[...] 2 [HttpGet] 3 public async Task<IActionResult> Delete(int id) 4 { 5 var product = new Product { ID = id }; 6 _context.Products.Remove(product); 7 await _context.SaveChangesAsync(); 8 return RedirectToAction(nameof(Index)); 9 } 10 [...]
This method will delete a product from the database using the product ID.
Next, add the following code to add the ChangeStatus method in ProductController.cs:
1[...] 2 [HttpGet] 3 public async Task<IActionResult> ChangeStatus(int id) 4 { 5 var product = await _context.Products.SingleOrDefaultAsync(m => m.ID == id); 6 product.Status = !product.Status; 7 await _context.SaveChangesAsync(); 8 return RedirectToAction(nameof(Index)); 9 } 10 [...]
In this method, we’ll change the product status, either from “In stock” to “Out of stock” or vice versa.
With this, we now have four routes available:
- http://localhost:5000/Product/Index - for listing products
- http://localhost:5000/Product/Create - for creating new product
- http://localhost:5000/Product/Delete/{id} - for deleting a product
- http://localhost:5000/Product/ChangeStatus/{id} - for changing a product status
Although, if you visit any of the routes, you’ll get an error because we are yet to create their respective views.
The Feedback controller
Next, let’s create the controller for feeds.
Create a new file named FeedController.cs in the Controllers folder and add the following code to it:
1using Microsoft.AspNetCore.Mvc; 2 3 namespace ProdFeed.Controllers 4 { 5 public class FeedController : Controller 6 { 7 public IActionResult Index() 8 { 9 return View(); 10 } 11 } 12 }
Adding the views
Now, let’s craft out our views. The layout view allows us to define a common site template, which can be inherited in multiple views to provide a consistent look and feel across multiple pages of our application.
Replace the content in Views/Shared/_Layout.cshtml with the below:
1<!doctype html> 2 <html lang="en"> 3 <head> 4 <!-- Required meta tags --> 5 <meta charset="utf-8"> 6 <meta name="viewport" content="width=device-width, initial-scale=1, shrink-to-fit=no"> 7 <!-- Bootstrap CSS --> 8 <link rel="stylesheet" href="https://stackpath.bootstrapcdn.com/bootstrap/4.1.0/css/bootstrap.min.css"> 9 <title>Hello, world!</title> 10 </head> 11 <body> 12 <nav class="navbar navbar-expand-lg navbar-dark bg-dark"> 13 <a class="navbar-brand" href="#">Product</a> 14 <button class="navbar-toggler" type="button" data-toggle="collapse" data-target="#navbarText" aria-controls="navbarText" aria-expanded="false" aria-label="Toggle navigation"> 15 <span class="navbar-toggler-icon"></span> 16 </button> 17 <div class="collapse navbar-collapse" id="navbarText"> 18 <ul class="navbar-nav mr-auto"> 19 <li class="nav-item active"> 20 <a class="nav-link" href="#">Home <span class="sr-only">(current)</span></a> 21 </li> 22 </ul> 23 </div> 24 </nav> 25 <div class="container-fluid"> 26 @RenderBody() 27 </div> 28 <script src="https://code.jquery.com/jquery-3.3.1.slim.min.js"></script> 29 </body> 30 </html>
For the product page, create a new folder named Product in the Views folder then create a new file called Index.cshtml to the Product folder.
Now, add the below code to Views``/Product/Index.cshtml:
1@model IEnumerable<ProdFeed.Models.Product> 2 3 <div class="row"> 4 <div class="col"> 5 <div style="padding: 40px;"> 6 <h4 class="text-center">Add product</h4> 7 <form method="POST" action="/product/Create"> 8 <div class="form-group"> 9 <label for="name">Name</label> 10 <input 11 type="text" 12 class="form-control" 13 name="Name" 14 id="name" 15 placeholder="Gala" 16 > 17 </div> 18 <div class="form-group"> 19 <label for="product_name">($)Price</label> 20 <input 21 type="text" 22 class="form-control" 23 name="Price" 24 id="Price" 25 placeholder="10" 26 > 27 </div> 28 <div class="form-group"> 29 <label for="status">Availability</label> 30 <select class="form-control" id="Status" name="Status"> 31 <option value="true">In stock</option> 32 <option value="false">Out of Stock</option> 33 </select> 34 </div> 35 <div class="form-group"> 36 <label for="description">Description</label> 37 <textarea 38 class="form-control" 39 id="description" 40 name="Description" 41 rows="3" 42 ></textarea> 43 </div> 44 <button 45 type="submit" 46 role="submit" 47 class="btn btn-secondary btn-lg btn-block" 48 > 49 Add Product 50 </button> 51 </form> 52 </div> 53 </div> 54 <div class="col"> 55 <div class="products" style="padding: 40px;"> 56 <h4 class="text-center">Products</h4> 57 @foreach (var product in Model) { 58 <div class="product"> 59 <div class="card" style="margin-bottom: 5px;"> 60 <img 61 class="card-img-top" 62 height="250" 63 src="https://www.africalinked.com/images/product-default.png" 64 alt="Product image" 65 > 66 <div class="card-body"> 67 <h5 class="card-title">@product.Name</h5> 68 <p class="card-text">@product.Description</p> 69 <p class="card-text">$@product.Price</p> 70 @if (product.Status) { 71 <span style="color: green">In Stock</span> 72 } else { 73 <span style="color: red"> Out of Stock </span> 74 } 75 </div> 76 <div class="card-footer"> 77 <div class="row"> 78 <div class="col"> 79 <a 80 type="link" 81 asp-controller="Product" 82 asp-route-id="@product.ID" 83 asp-action="Delete" 84 role="button" 85 class="btn btn-secondary btn-lg btn-block" 86 > 87 Delete 88 </a> 89 </div> 90 <div class="col"> 91 <a 92 type="link" 93 asp-controller="Product" 94 asp-route-id="@product.ID" 95 asp-action="ChangeStatus" 96 role="button" 97 class="btn btn-secondary btn-lg btn-block" 98 > 99 @if (!product.Status) { 100 <span>In stock</span> 101 } 102 else 103 { 104 <span>Out of Stock</span> 105 } 106 </a> 107 </div> 108 </div> 109 </div> 110 </div> 111 </div> 112 } 113 </div> 114 </div> 115 </div>
Now, we have our product page where users can add, delete or change the status of a product. The page will have two columns. The first column is for adding a new product while the second column will be used to display products.
Creating the feed page
Create a new folder named Feed in the Views folder then add a new file called Index.cshtml to the Feed folder.
Now, add the below code to Views``/Feed/Index.cshtml:
1<style> 2 .feed { 3 padding: 2px 10px; 4 background-color:#6c757d; 5 margin: 4px; 6 color:aliceblue; 7 border-radius: 3px; 8 } 9 </style> 10 <div class="row"> 11 <div class="col"> 12 <div class="container" style="padding: 40px;"> 13 <h4 class="text-center">Feeds</h4> 14 <div id="feeds"> 15 <!-- feeds --> 16 </div> 17 </div> 18 </div> 19 </div> 20 <script src="https://js.pusher.com/4.2/pusher.min.js"></script>
Subscribing to a channel, triggering and listening for events
We’ll subscribe to a channel called feed on the feed page. Then we’ll continuously listen for new_feed events. When there is any activity, we’ll trigger an event to Pusher's server so that Pusher will broadcast the event to the client (our feed page). Then we’ll act on the event to display the feed for that activity.
Installing the Pusher library
Pusher has a .NET library that makes it easy to interact with its API. We need to add this to the project.
From your command line, install the library by running the below command:
dotnet add package PusherServer
Channel helper class and events Let’s create a helper class that we’ll use to trigger event to Pusher.
Create a new folder called Helpers in the root folder of the project then create a new file named ChannelHelper.cs in the folder you just created.
Then, add the following code to ChannelHelper.cs:
1using System.Threading.Tasks; 2 using Microsoft.AspNetCore.Mvc; 3 using PusherServer; 4 5 namespace ProdFeed.Helpers 6 { 7 public class Channel 8 { 9 public static async Task<IActionResult> Trigger(object data, string channelName, string eventName) 10 { 11 var options = new PusherOptions 12 { 13 Cluster = "<PUSHER_APP_CLUSTER>", 14 Encrypted = true 15 }; 16 var pusher = new Pusher( 17 "<PUSHER_APP_ID>", 18 "<PUSHER_APP_KEY>", 19 "<PUSHER_APP_SECRET>", 20 options 21 ); 22 23 var result = await pusher.TriggerAsync( 24 channelName, 25 eventName, 26 data 27 ); 28 return new OkObjectResult(data); 29 } 30 } 31 }
In the preceding code,
- We created a method called
Triggerwhich acceptsdata,channelNameandeventNameas parameters. We’ll use this method to trigger events to Pusher - Then, we included the Pusher library. Although we’ve not yet installed the library, we’ll do so in the next step
- Next, we initialized the .NET library
- Finally, we triggered an event to Pusher using the parameters passed to the method
Make sure to update the code with your correct Pusher keys.
Import the ChannelHelper class to ProductController.cs
Add the bellow using to ProductController.cs:
using ProdFeed.Helpers;
Trigger an event when a new product is added
Update the Create method in the ProductController.cs with the folowing code:
1[HttpPost] 2 public async Task<IActionResult> Create([Bind("ID,Name,Description,Status,Price")] Product product) 3 { 4 if (ModelState.IsValid) 5 { 6 _context.Products.Add(product); 7 await _context.SaveChangesAsync(); 8 9 var data = new { 10 message = System.String.Format("New product with ID of #{0} added", product.ID) 11 }; 12 await Channel.Trigger(data, "feed", "new_feed"); 13 } 14 return RedirectToAction(nameof(Index)); 15 }
Here we added code for triggering an event to Pusher once a new product has been created using await Channel.Trigger(data, "feed", "new_feed");.
Trigger an event when a product is deleted
Next, update the Delete method in the ProductController.cs class with the following code:
1[HttpGet] 2 public async Task<IActionResult> Delete(int id) 3 { 4 var product = new Product { ID = id }; 5 _context.Products.Remove(product); 6 await _context.SaveChangesAsync(); 7 var data = new { 8 message = System.String.Format("Product with ID of #{0} deleted", product.ID) 9 }; 10 await Channel.Trigger(data, "feed", "new_feed"); 11 return RedirectToAction(nameof(Index)); 12 }
When we delete a product, we’ll trigger an event to Pusher.
Trigger an event when a product status is changed
Finally, update the ChangeStatus method in the ProductController.cs class with the following code:
1[HttpGet] 2 public async Task<IActionResult> ChangeStatus(int id) 3 { 4 var product = await _context.Products.SingleOrDefaultAsync(m => m.ID == id); 5 product.Status = !product.Status; 6 await _context.SaveChangesAsync(); 7 8 var status = product.Status ? "In stock" : "Out of Stock"; 9 var data = new { 10 message = System.String.Format("Status of product with ID #{0} status changed to '{1}'", product.ID, status) 11 }; 12 13 await Channel.Trigger(data, "feed", "new_feed"); 14 15 return RedirectToAction(nameof(Index)); 16 }
When the status of a product changes, we’ll trigger an event to Pusher using await Channel.Trigger(data, "feed", "new_feed");
Listening and responding to events
Now we can trigger events on the server side when there is an activity going on. Next, we'll respond to those events on the client side. We’ll do this using the Pusher JavaScript library we’ve included earlier.
Initiate the Pusher JavaScript library by adding the below code to Views/Feed/Index.cshtml file:
1[...] 2 <script type="text/javascript"> 3 const pusher = new Pusher('<PUSHER_APP_KEY>', { 4 cluster: '<PUSHER_APP_CLUSTER>' 5 }); 6 </script>
Make sure to update the code with your correct Pusher keys.
Next, subscribe to a channel. Add the below code to Views/Feed/Index.cshtml between the <script> tag:
1[...] 2 const channel = pusher.subscribe('feed'); 3 [...]
Next, listen for new_feed events and respond to them when they happen. Add the below code to Views/Feed/Index.cshtml between the <script> tag:
1[...] 2 channel.bind('new_feed', function(data) { 3 $("#feeds").append(` 4 <div class="feed"> 5 <div class="feed" style="margin-bottom: 5px;"> 6 ${data.message} 7 </div> 8 </div> 9 `); 10 }); 11 [...]
And that’s it! There you have your working activity feed. Load up the pages (the product page - http://localhost:5000/Product and the feed page - http://localhost:5000/Feed) in a different tab in your browser then add or delete a product.
Conclusion
In this tutorial, we built a simple app to demonstrate how you can add an activity feed to your apps. Feeds will be visible to every user using the app. But at times, this might not be what you want. You may want to send the notification to some targeted user. This means you need to subscribe to a private channel instead of a public channel. You can read more about the private channels here. Also, you can get the complete code of this app on Github.


© 2024 Pusher Ltd. All rights reserved.
Pusher Limited is a company registered in England and Wales (No. 07489873) whose registered office is at MessageBird UK Limited, 3 More London Riverside, 4th Floor, London, United Kingdom, SE1 2AQ.