- Products

- Developers
- User stories
- Blog
- Pricing

Pusher Beams client API demo for Android
- Introduction
- Introduction
- Prerequisites
- Demo setup
- How to send a notification
- SDK
- start()
- stop()
- Testing it out
- Device Interests
- getDeviceInterests()
- setDeviceInterests()
- clearDeviceInterests()
- addDeviceInterest()
- removeDeviceInterest()
- Testing it out
- User
- setUserId()
- clearAllState()
- Testing it out
- Listeners
- setOnDeviceInterestsChangedListener()
- setOnMessageReceivedListenerForVisibleActivity()
- MessagingService
- Test it out
- Conclusion
Introduction
Introduction
The purpose of this tutorial is to help you understand what each part of the Beams API does in a client Android app. Consider this a supplement to the Beams documentation if you need a little extra explanation. I'll take you through code examples and explain what each method does. The whole demo project is available on GitHub so that you can see the code in context.
Prerequisites
This is more of a reference material rather than a step-by-step tutorial, but since it does contain an Android project demonstrating the full API of the Android Beams SDK, I’ll give you some pointers for how to set the demo up and how to send push notifications to test it.
If you running the demo project, these are the prerequisites:
- Knowledge of Android development. (I used Android Studio 3.4, Kotlin, and the AndroidX support library to make the demo.)
- Able to set up a basic Beams project.
- Familiarity with sending POST requests. I’ll give you the curl commands to initiate push notifications, but you are welcome to use another tool like Postman.
- Knowledge of server side development (mostly optional). You do not need a backend server to send push notifications to device interests. However, to send notifications to authenticated users, a server is required. This will only apply to the “setUserId()” section of this article (the Set ID button of the demo). The other parts of the demo app do not require a server. I’ll be using the Dart server from a previous tutorial, but you are free to port that code to any server language that Pusher supports.
This project was tested with Pusher Beams Android SDK version 1.4.2.
Demo setup
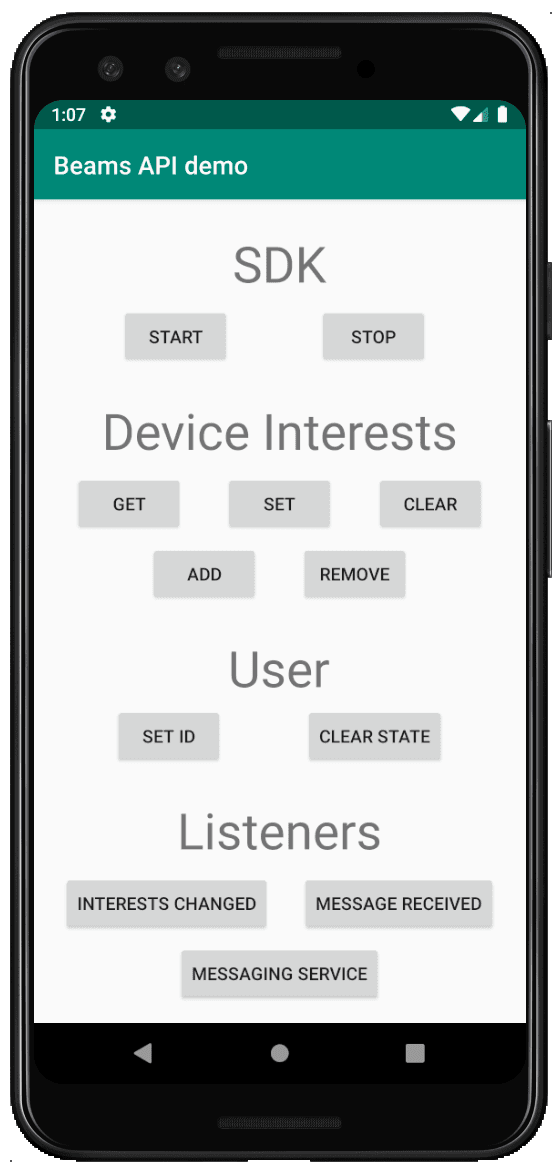
The demo app I’ll be using has a layout with buttons to show each part of the Beams SDK.
To set up this demo app, perform the following tasks:
- Clone the GitHub repo
- Create a Beams instance and configure FCM. You can follow the quick start guide. The Android package name is
com.example.beamsapidemo. Enter the FCM Server Key and download thegoogle-service.jsonfile. At that point you can quit the quick start wizard. Go to your Pusher dashboard, open your new instance, and go to the Credentials tab. You will find your Instance ID and Secret Key there. - In the cloned repo, replace
app/google-services.jsonwith the one you downloaded from the FCM setup. - In the cloned repo’s
MainActivity.ktfile, set theINSTANCE_IDconstant to your Instance ID. - Run the app on the Android emulator.
The interesting parts of the repo (with code comments) are here:
I will describe the aspects related to sending push notifications below.
How to send a notification
In the descriptions throughout this article I will direct you to send push notifications to test the app. You could do that from a server, but for simplicity we'll use curl. (Alternatively, you could use Postman if you are more comfortable with that.)
Below are some curl commands that you will find useful. Replace the SSSSSSSSSSSSSSSSS with your Beams Secret Key and replace IDIDIDIDIDIDID with your Beams Instance ID, both of which you can find in your Pusher dashboard under the Credentials tab for your instance.
Sending an FCM push notification for the device interest apple:
1curl -H "Content-Type: application/json" \ 2 -H "Authorization: Bearer SSSSSSSSSSSSSSSSS" \ 3 -X POST "https://IDIDIDIDIDIDID.pushnotifications.pusher.com/publish_api/v1/instances/IDIDIDIDIDIDID/publishes/interests" \ 4 -d '{"interests":["apple"],"fcm":{"notification":{"title":"My title","body":"Body message"}}}'
You can change apple to something else or include multiple interests. That is, replace ["apple"] with ["apple","pear"].
Sending an FCM push notification to an authenticated user Mary:
1curl -H "Content-Type: application/json" \ 2 -H "Authorization: Bearer SSSSSSSSSSSSSSSSS" \ 3 -X POST "https://IDIDIDIDIDIDID.pushnotifications.pusher.com/publish_api/v1/instances/IDIDIDIDIDIDID/publishes/users" \ 4 -d '{"users":["Mary"],"fcm":{"notification":{"title":"My title","body":"Hey, Mary"}}}'
This one is the same as the interests request, except that the string interests is replaced with users (in the path and in the JSON key), and the JSON value for users includes "Mary" in the array. I changed the message body a little, too.
SDK
In each section below I’ll describe what the methods of the SDK do.
start()
You always need to call the start() method first. If you try to run other methods before calling this one, your app will crash. Normally you would call it in your activity's onCreate() method, but in the demo app I put it in a button clicked method. This lets you see the app crash if you are so inclined.
PushNotifications.start(this, INSTANCE_ID)
The start method takes two parameters. The first is the context. Since we are in an Activity, I used this. The second is the instance ID. I added the instance ID as a constant at the top of the class:
1companion object { 2 // replace this with your Beams instance ID 3 const val INSTANCE_ID = "xxxxxxxx-xxxx-xxxx-xxxx-xxxxxxxxxxxx" 4 }
My instance ID is different than yours will be. You can get it from your Beams dashboard.
stop()
Calling stop() means that you won't get any more notifications. The state (device interests and Beams token) is deleted on the local device and on the remote Pusher server.
PushNotifications.stop()
If you want to start getting messages again, you will need to call start() and resubscribe to any interests that you want (since the state was deleted). Calling another method without calling start() first may cause the app to crash (Although, in my tests I could manipulate the device interests without causing a crash. At best, the state should be considered undefined.)
One use case for stop would be if a user wanted to opt out of receiving all notifications.
When a user logs out, prefer using clearAllState(). See the “User” section below.
Testing it out
Start must be called first:
- Do a fresh run of the app
- Don't click the Start button
- Click some other buttons
- See the app crash
Stopping clears the state:
- Click the Start button
- Click the Add button
- Add the "apple" device interest
- Click the Get button
- Note that "apple" is an interest
- Click the Stop button
- Click the Get button
- Note that there are no interests
Stopping prevents notifications from being delivered:
- Click the Start button
- Click the Add button
- Choose "apple"
- Click the Stop button
- Exit the app to put it in the background
- Send a notification to users subscribed to the "apple" interest (Refer back to the "How to send a notification" section for help)
- You should not receive a message
Device Interests
Interests are topics that a device can subscribe to. A device can subscribe to multiple topics in the form of a list of strings. When the server sends a push notification for a string that is in the device's list of interests, that device will receive a notification.
getDeviceInterests()
This method returns Set<String>, which is a list of all of the interests that the device is subscribed to.
val interests = PushNotifications.getDeviceInterests()
As long as you don't call stop(), clearInterests(), or clearAllState(), the interests will still be available between runs of the app, even if the device powers down and restarts.
setDeviceInterests()
With setDeviceInterests you can choose a new list of interests to subscribe to. This replaces any old list that the device might have had. The device will receive push notifications for all interests in this list, but not for any interests outside of this list.
PushNotifications.setDeviceInterests(interests)
The type of the parameter interests is Set<String>. In the case of the demo app, this Set is obtained from a CheckBox alert dialog.
clearDeviceInterests()
There is nothing difficult about clearDeviceInterests(). It does what it says and removes any interests that the device is subscribed to. The device will no longer receive push notifications for any interests.
PushNotifications.clearDeviceInterests()
addDeviceInterest()
This method adds an interest to the list of interests that the device is already subscribed to. The device will receive push notifications for this interest.
PushNotifications.addDeviceInterest(interest)
The type for the parameter interest is a String.
Adding the same interest twice does not cause a crash. It's the same as adding it once.
removeDeviceInterest()
This method removes an interest from the list of interests that the device is already subscribed to. The device will no longer receive push notifications for this interest.
PushNotifications.removeDeviceInterest(interest)
The type for the parameter interest is a String.
Trying to remove an interest that the device is not subscribed to does not cause a crash.
Testing it out
These tests assume that you have already clicked the Start button to start the SDK.
Adding an interest allows the device to receive a notification
- Click the Add button
- Choose "apple"
- Put the app in the background
- Send a push notification for "apple"
- Note that the device receives the notification
Removing an interest causes the device to not receive notification:
- Continuing from the last test, click the Remove button.
- Choose "apple".
- Put the app in the background.
- Send a push notification for "apple".
- Note that the device doesn't receive a notification.
Setting a list of interests replaces the old list:
- Click the Set button
- Choose "apple" and "banana"
- Click the Get button
- Note that "apple" and "banana" are in the list
- Click the Set button again
- Choose "banana" and "orange"
- Click the Get button again
- Note that "banana" and "orange" are in the list but "apple" is not
User
While interests are for sending push notifications to a large numbers devices by topic, user notifications can be sent to specific authenticated users. The notification will go to every device on which the user is logged in.
setUserId()
Of all the methods in the Beams SDK, this one is the most complex. Part of the reason is security. You have to prove who you are before Pusher will send you user specific notifications. Otherwise you could just say you're me and then get all of my private notifications.
The way it works is like this. First of all, a user who wants to receive private notifications gets a Beams token from the app server (not Pusher). This could be a one-step process using basic authentication with a username and password. Or it could be a two-step process of first logging in to get a session token and then using it to get a Pusher token. The server creates the Pusher token by signing a JWT payload with the instance's secret key. After the user has the Pusher token, it is sent to Pusher to prove they are who they say are. Only then will Pusher send them personal notifications.
Here is the sequence diagram taken from the Beams documentation:
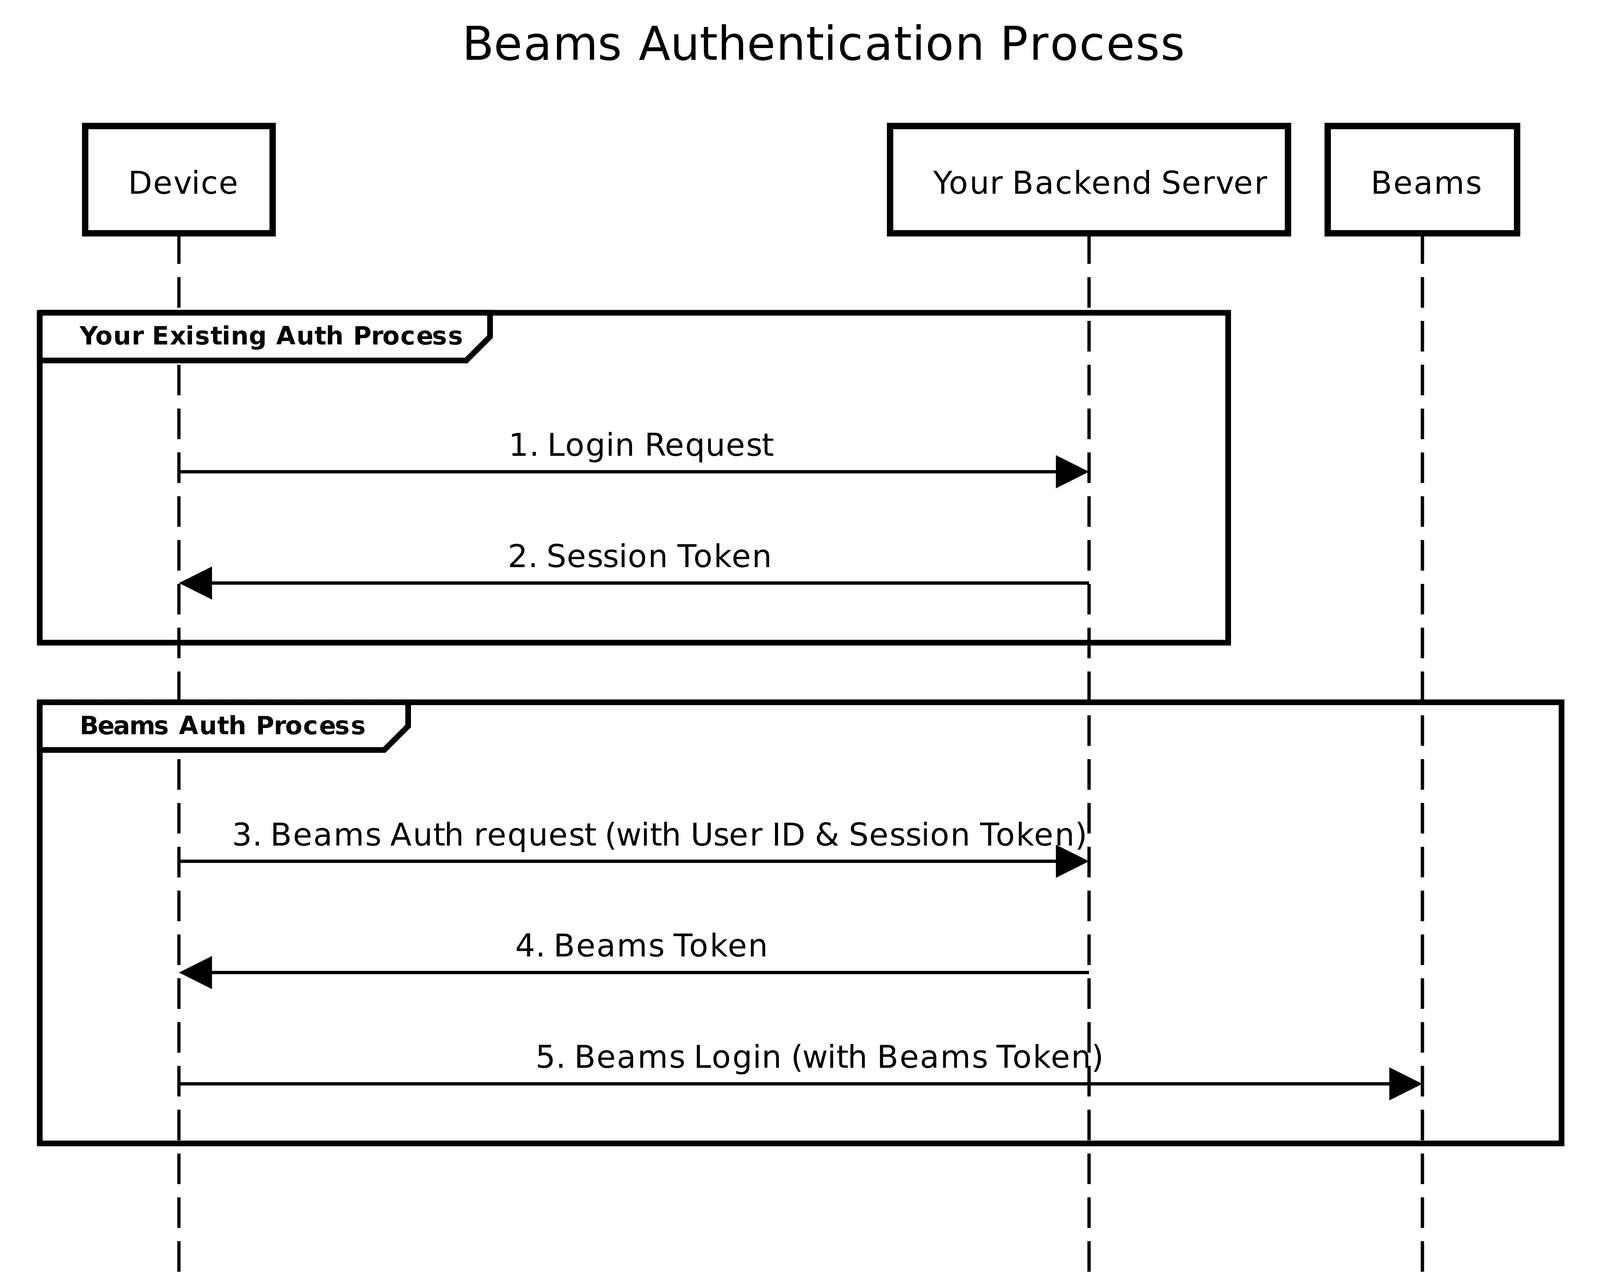
The process above is somewhat hidden by the Beams Android client API. The setUserId method takes three parameters:
1PushNotifications.setUserId( 2 userId: String, 3 tokenProvider: TokenProvider, 4 callback: BeamsCallback<Void, PusherCallbackError> 5 )
- The
userIdis the username that the app server knows the user as, and also what Pusher will use. When the app server wants to send a notification to a user, it will use this ID. - The
TokenProvideris an interface with a single method, that is,fetchToken(userId: String). You pass in the user ID and get back the Beams token. The Android SDK uses this method to get the Beams token from your server whenever it needs it. You could write your own implementation of theTokenProviderinterface, but the SDK already has one calledBeamsTokenProvider. The source code is here if you want to see what it does. - The
callbackallows you to handle the success or failure of thesetUserIdrequest.
Since setUserId requires a TokenProvider and most people will use the BeamsTokenProvider, lets take a look at it. It has two parameters:
1BeamsTokenProvider( 2 authUrl: String, 3 authDataGetter: AuthDataGetter 4 )
- The
authUrlis the endpoint on your server where you request the Beams token. It could be something likehttps://www.example.com/beamstoken. - Your server also needs other authentication data like an auth header or query parameters. This is where
AuthDataGettercomes in. It’s an interface with a single methodgetAuthData(), which returns anAuthDatainstance.AuthDatais data class to hold the headers and query parameters.
1AuthData( 2 headers: Map<String, String>, 3 queryParams: Map<String, String> 4 )
- The
headersare a map of whatever auth data your server uses to authenticate a user. For example, the key would probably beAuthorizationand the value might beBearer sometoken. - Some authentication setups provide the session token as a query parameter, in which case you would set it in
queryParams. If you are not using it, though, you can leave this parameter out.
So after all that explanation, here is what setting the user ID looks like in the demo app:
1// basic authentication credentials 2 val userId = "Mary" 3 val password = "mypassword" 4 val text = "$userId:$password" 5 val data = text.toByteArray() 6 val base64 = Base64.encodeToString(data, Base64.NO_WRAP) 7 8 // Token Provider 9 val serverUrl = "http://10.0.2.2:8888/token" 10 val tokenProvider = BeamsTokenProvider( 11 serverUrl, 12 object: AuthDataGetter { 13 override fun getAuthData(): AuthData { 14 return AuthData( 15 headers = hashMapOf( 16 "Authorization" to "Basic $base64" 17 ) 18 ) 19 } 20 } 21 ) 22 23 // Get the Beams token and send it to Pusher 24 PushNotifications.setUserId( 25 userId, 26 tokenProvider, 27 object : BeamsCallback<Void, PusherCallbackError> { 28 override fun onFailure(error: PusherCallbackError) { 29 Log.e("BeamsAuth", 30 "Could not login to Beams: ${error.message}") 31 } 32 override fun onSuccess(vararg values: Void) { 33 Log.i("BeamsAuth", "Beams login success") 34 } 35 } 36 )
I'm just using basic authentication to simplify the code.
Before publishing this article, I reached out to the Pusher team (at support@pusher.com) for advice. Here is one of their comments:
One final thing to explain in the
setUserIdmethod is that you should always call it whenever the app starts and you know the user is logged in.For example, consider the Facebook app. When you open it, it will check if the previous logged in user still has a valid session, and if so, proceed to display the news feed. It is at this point that
setUserIdshould be called again. If at this point, the app realises the user is no longer logged in, thenclearAllStateshould be called.This keeps the device in sync with the server and deletes with cases such as server-side user deletion.
clearAllState()
I could have put this method with the other SDK methods because internally it basically just calls stop() and then start(). However, the main use for clearAllState() is for when a user is logging out.
PushNotifications.clearAllState()
The Beams token (and any interests) will be deleted and the user will not receive any personal notifications on this device. In my tests, calling clearAllState did not remove the listeners (see next section).
Testing it out
With how the Android SDK is set up, there isn't really a way to use curl or Postman alone. You need to have a backend server to provide Beams tokens. Doing that is beyond the scope of this article, but you can find documentation for many server SDKs in the Beams documentation. Make special note of the generateToken() method. If you want to use a Dart server that is already configured for this demo, check out my previous tutorial. You will need to replace the Secrert Key and Instance ID with your own.
These tests assume that you have already clicked the Start button to start the SDK. Make sure your server is running, too.
Setting the user ID allows user to receive personal notification
- Click the Set ID button
- Put the app the background
- Send a personal notification (See the "How to send a notification" section for help.)
- Note that the device receives a personal notification

Clearing the state prevents the device from receiving a notification:
- Click the Clear State button
- Put the app the background
- Send a personal notification
- Note that the device does not receive the notification
Listeners
You have a few options for getting updates about incoming messages and changes in the SDK.
setOnDeviceInterestsChangedListener()
Setting this listener allows you to handle changes to the list of interests that the device is subscribed to. This method is Activity specific. That is, you should set the listener in each activity that you need it.
1PushNotifications.setOnDeviceInterestsChangedListener(object : SubscriptionsChangedListener { 2 override fun onSubscriptionsChanged(interests: Set<String>) { 3 Toast.makeText(applicationContext, 4 "interests changed to: $interests", 5 Toast.LENGTH_SHORT).show() 6 } 7 })
The SubscriptionsChangedListener is an interface with a single method onSubscriptionsChanged, which provides you with the new list of interests. Subscriptions is the old way to refer to device interests. For example, the deprecated version of this method is called setOnSubscriptionsChangedListener.
setOnMessageReceivedListenerForVisibleActivity()
The thing about push notifications is that they only appear when your app is in the background. So if a user gets one while they are using your app, they won't see it. You can overcome this problem by setting a listener to tell you when a message comes in.
You should set this listener in your activity's onResume() method. Like the previous listener, this listener must be set in every activity where you want to handle it.
1override fun onResume() { 2 super.onResume() 3 4 PushNotifications.setOnMessageReceivedListenerForVisibleActivity(this, object : 5 PushNotificationReceivedListener { 6 override fun onMessageReceived(remoteMessage: RemoteMessage) { 7 showInSnackBar(rootView, 8 "Message received: " + 9 "Title: \"${remoteMessage.notification?.title}\"" + 10 "Body \"${remoteMessage.notification?.body}\"" 11 ) 12 } 13 }) 14 }
PushNotificationReceivedListener is an interface with one method, onMessageReceived, which provides you with a RemoteMessage. This is a Firebase object that you can read more about here.
By extracting the data from the RemoteMessage, you are able to update the UI or make a custom notification.
MessagingService
The two previous listeners were activity specific. If you want to make a general listener that works no matter what activity you are in and even while the app is in the background, you can create a MessagingService subclass.
To do that, as I noted earlier, you need to register the service in your AndroidManifest:
1<service android:name=".NotificationsMessagingService"> 2 <intent-filter android:priority="1"> 3 <action android:name="com.google.firebase.MESSAGING_EVENT" /> 4 </intent-filter> 5 </service>
where NotificationsMessagingService is a Kotlin class:
1// app/src/main/java/com/example/beamsapidemo/NotificationsMessagingService.kt 2 3 package com.example.beamsapidemo 4 5 import android.util.Log 6 import com.google.firebase.messaging.RemoteMessage 7 import com.pusher.pushnotifications.fcm.MessagingService 8 9 class NotificationsMessagingService : MessagingService() { 10 override fun onMessageReceived(remoteMessage: RemoteMessage) { 11 Log.i("MessagingService", "Remote message was received") 12 } 13 // This method is only for integrating with other 3rd party services. 14 // For most use cases you can omit it. 15 override fun onNewToken(token: String) { 16 Log.i("MessagingService", "FCM token was changed") 17 } 18 }
MessagingService is a wrapper (with some extra processing) around FirebaseMessagingService. It exposes onMessageReceived and onNewToken.
In the demo app I just print messages to the log output, but you could use this service to create a custom notification in onMessageReceived. Here is a related example for Firebase. Note that if the app is in the background, this method will not get called unless the notification has a data-only payload. By "data" I mean a custom JSON structure for the data key in the FCM.
1{ 2 "data": { 3 "key": "value", 4 }, 5 }
This one is not a data-only FCM because there is a notification key:
1{ 2 "notification": { 3 "title": "Hello", 4 "body": "Hello, World!", 5 } 6 "data": { 7 "key": "value", 8 }, 9 }
The MessagingService listener would not respond for that FCM while the app is in the background. It would display as a normal notification. While the app is in the foreground, though, the message would be caught.
Overriding onNewToken provides you with an FCM device token. If you don’t know what that is for, then you probably don’t need it. It’s not necessary to override this method for the majority of use cases. Pusher already takes care of handling the FCM token for you behind the scenes. However, if you need the token to integrate with other 3rd party push notification services, you can get it here.
Test it out
These tests assume that you have already clicked the Start button to start the SDK.
Activity listener handles changed interests:
- Click the Interests Changed button to set the listener
- Click the Add button
- Add any interest
- Note that a Toast is displayed, indicating a change
- Add the same interest again
- Note that there is no Toast because there was no change
Activity listener handles received messages while in foreground:
- Click the Message Received button to set the listener
- Click the Add button
- Add the "apple" interest
- Keep the activity in the foreground
- Send a push notification for the "apple" interest
- Note that the activity UI responds with a snackbar message

Messaging service handles received messages in foreground app:
- Make sure you are still subscribed to the "apple" interest
- Click the Messaging Service button to start a new activity
- Keep the app in the foreground
- Send a push notification for the "apple" interest
- Note the logcat message when the push notification is received
Messaging service handles data only payload notifications while app in background:
- Make sure you are still subscribed to the "apple" interest
- Put the app in the background
- Send a push notification for the "apple" interest, but use a data only FCM payload (See the “MessagingService” section above.)
- Note the logcat message when the push notification is received
Messaging service does not handle notifications while app in background when the FCM has a notification payload:
- Make sure you are still subscribed to the "apple" interest
- Put the app in the background
- Send a push notification for the "apple" interest, where the FCM payload includes the
notificationkey (See the “MessagingService” section above.) - Note the absence of a logcat message and the existence of the standard notification
Conclusion
I hope this explanation of the full Android client API for the Beams SDK has helped you to understand it better. Bookmark this page for future reference.
The demo app is available on GitHub.


© 2024 Pusher Ltd. All rights reserved.
Pusher Limited is a company registered in England and Wales (No. 07489873) whose registered office is at MessageBird UK Limited, 3 More London Riverside, 4th Floor, London, United Kingdom, SE1 2AQ.