- Products

- Developers
- User stories
- Blog
- Pricing

Track Bitcoin prices on a live graph with Python
Introduction
Graphs and charts are great for representing information in a clear and concise way. They can be used in various apps to show data to users when needed. Quickly changing data can be better represented using realtime graphs and charts as users can quickly see both current and historical data easily.
In this tutorial, we will be making use of Pusher Channels, Plotly and Flask to build a simple app for displaying the price of a Bitcoin in a realtime graph and bar chart.
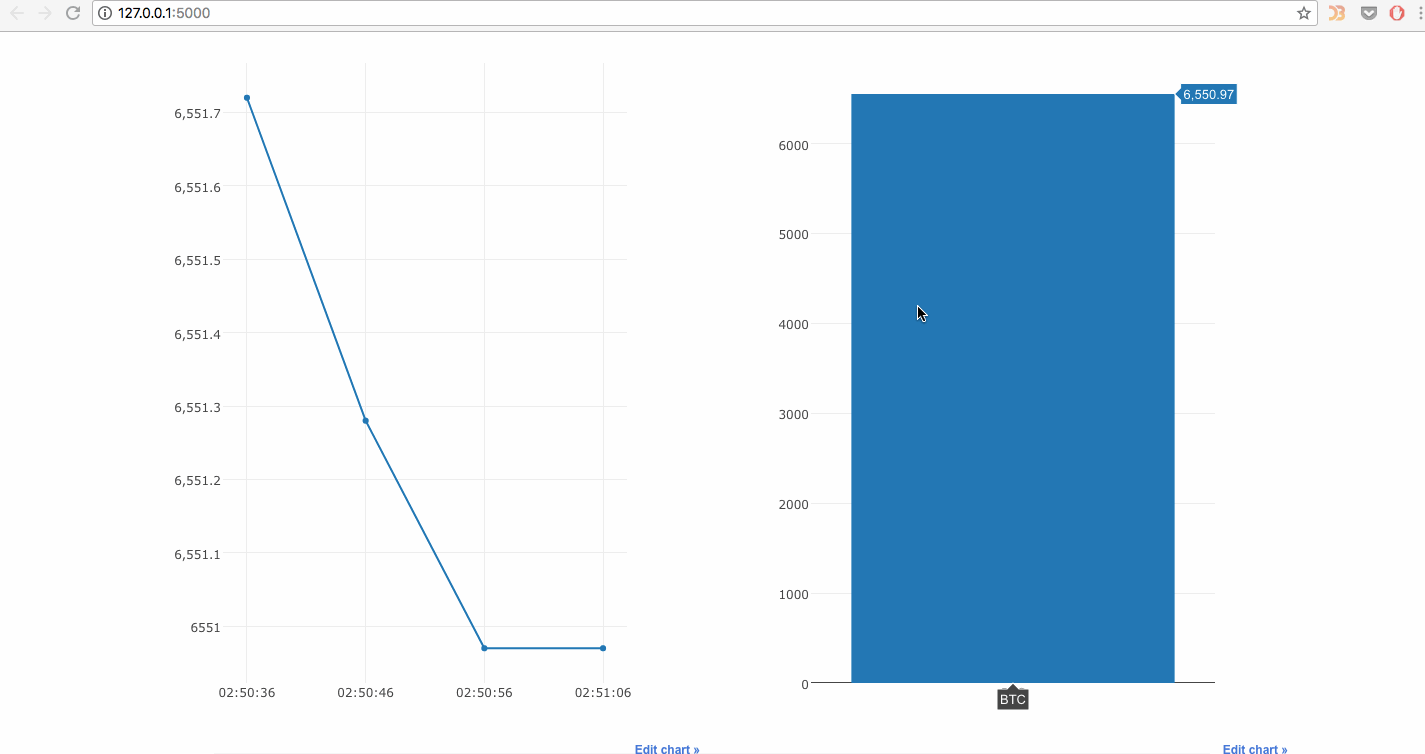
Here is what the final app will look like:
Prerequisites
To follow along properly, basic knowledge of Python, Flask and JavaScript (ES6 syntax) is needed. You will also need to install Python and virtualenv locally.
Virtualenv is a tool that helps us create isolated Python environments. This makes it possible for us to install dependencies (like Flask) in an isolated environment, and not pollute our global packages directory. To install virtualenv:
pip install virtualenv
Setup and configuration
Installing Flask
As stated earlier, we will be developing using Flask, a web framework for Python. In this step, we will activate a virtual Python environment and install Flask for use in our project.
To activate a virtual environment:
1mkdir realtime-graph 2 cd realtime-graph 3 virtualenv .venv 4 source .venv/bin/activate
Note: To activate the virtual environment on a Windows machine, you would need to enter the path to the activate file (in
.venv/Scripts) in Powershell / command prompt.
To install Flask:
pip install flask
We will also need the Requests library. Let us install it now:
pip install requests
Setting up Pusher
Pusher Channels is a service that makes it easy for us to supercharge our web and mobile applications with realtime updates. We will be using it primarily for powering the realtime updates to our graphs. Create a free sandbox Pusher account or sign in.
Next, create a Channels app on the dashboard and copy out the app credentials (App ID, Key, Secret and Cluster), as we would be needing these in our app.
Now we can install the Pusher Python library to help our backend communicate with the Pusher service:
pip install pusher
Installing Plotly
Plotly is a tool that helps to easily display visual data on the web. According to their website:
Plotly creates leading open source tools for composing, editing, and sharing interactive data visualization via the Web.
We will be making use of Plotly to create our graph and chart. To install Plotly to our app:
pip install plotly
File and folder structure
Here is the folder structure for the app. We will only limit it to things necessary so as to avoid bloat. Let us go ahead and create the following files and folders:
1├── realtime-graph 2 ├── app.py 3 └── templates 4 └── index.html
The templates folder contains our index.html template file, while app.py will house all our server-side code.
Building the backend
Now, we can start writing server-side code to perform our various app functions. Our app will get the prices for Bitcoin every 10 seconds. We will use Pusher to broadcast an event, along with the new prices every time data is retrieved.
We will start by importing the needed modules, configuring the Pusher object, and initialising some needed variables:
1# ./app.py 2 from flask import Flask, render_template 3 from apscheduler.schedulers.background import BackgroundScheduler 4 from apscheduler.triggers.interval import IntervalTrigger 5 from pusher import Pusher 6 import requests, json, atexit, time, plotly, plotly.graph_objs as go 7 8 # create flask app 9 app = Flask(__name__) 10 11 # configure pusher object 12 pusher = Pusher( 13 app_id='YOUR_APP_ID', 14 key='YOUR_APP_KEY', 15 secret='YOUR_APP_SECRET', 16 cluster='YOUR_APP_CLUSTER', 17 ssl=True 18 ) 19 20 # define variables for data retrieval 21 times = [] 22 currencies = ["BTC"] 23 prices = {"BTC": []}
In the code block above, first we import the needed modules and libraries, including the Pusher and Plotly libraries. We also configure the Pusher object with the credentials gotten from the Pusher dashboard. Remember to replace YOUR_APP_ID and similar values with the actual values for your own app.
Some variables are also defined to hold values we will need later in our app. times stores the values of the time when we retrieve price data in a list. currencies holds the list of currencies we will be fetching data for. In our case, this is just BTC but you can add any number of currencies you want. prices is a dictionary that holds the list of prices for currency defined.
Next, let us define a simple route to serve our app’s view:
1# ./app.py 2 # ... 3 4 @app.route("/") 5 def index(): 6 return render_template("index.html")
In the code block above, we use Flask’s render_template() function to serve index.html from the ./templates folder on the index route.
Now we can get to the core of our app, which is creating a function that will retrieve Bitcoin prices and then broadcast that data in graph and chart form. Let us update app.py with the function:
1# ./app.py 2 # ... 3 4 def retrieve_data(): 5 # create dictionary for saving current prices 6 current_prices = {} 7 for currency in currencies: 8 current_prices[currency] = [] 9 # append new time to list of times 10 times.append(time.strftime('%H:%M:%S')) 11 12 # make request to API and get response as object 13 api_url = "https://min-api.cryptocompare.com/data/pricemulti?fsyms={}&tsyms=USD".format(",".join(currencies)) 14 response = json.loads(requests.get(api_url).content) 15 16 # append new price to list of prices for graph 17 # and set current price for bar chart 18 for currency in currencies: 19 price = response[currency]['USD'] 20 current_prices[currency] = price 21 prices[currency].append(price) 22 23 # create an array of traces for graph data 24 graph_data = [go.Scatter( 25 x=times, 26 y=prices.get(currency), 27 name="{} Prices".format(currency) 28 ) for currency in currencies] 29 30 # create an array of traces for bar chart data 31 bar_chart_data = [go.Bar( 32 x=currencies, 33 y=list(current_prices.values()) 34 )] 35 36 data = { 37 'graph': json.dumps(list(graph_data), cls=plotly.utils.PlotlyJSONEncoder), 38 'bar_chart': json.dumps(list(bar_chart_data), cls=plotly.utils.PlotlyJSONEncoder) 39 } 40 41 # trigger event 42 pusher.trigger("crypto", "data-updated", data)
In the code block above, we define a function retrieve_data() that does the following:
- Makes a request to a remote API to retrieve current Bitcoin prices. We make use of the CryptoCompare API and the Requests library.
- Generates traces for the graph and bar chart using the Plotly plotly.graph_objs.Scatter and plotly.graph_objs.Bar.
- Encode the graph and bar chart data as JSON using the Plotly Json Encoder.
- Trigger a
data-updatedevent using the configuredpusherobject, broadcasting the needed data on thecryptochannel.
We use the configured pusher object for broadcasting events on specific channels. To broadcast an event, we use the trigger() method with the following syntax:
pusher.trigger('a_channel', 'an_event', {'some': 'data'})
Note: You can find the docs for the Pusher Python library here.
Pusher also grants us the ability to trigger events on various types of channels including Public, Private and Presence channels. Read about them here.
Scheduling the data retrieval function
A major part of our app is making sure our data retrieval functions runs at a 10 second interval, so as to keep users updated of the most current prices. To create this schedule, we make use of AppScheduler. To install AppScheduler:
pip install apscheduler
The following piece of code will register the job and run our retrieve_data() function every 10 seconds:
1# ./app.py 2 # ... 3 4 # create schedule for retrieving prices 5 scheduler = BackgroundScheduler() 6 scheduler.start() 7 scheduler.add_job( 8 func=retrieve_data, 9 trigger=IntervalTrigger(seconds=10), 10 id='prices_retrieval_job', 11 name='Retrieve prices every 10 seconds', 12 replace_existing=True) 13 # Shut down the scheduler when exiting the app 14 atexit.register(lambda: scheduler.shutdown())
Running the Flask app
Finally, to start the app in debug mode, while disabling the auto reloader:
1# ./app.py 2 # ... 3 4 # run Flask app 5 app.run(debug=True, use_reloader=False)
Note: We disable the auto reloader so as to prevent our scheduled function from running twice at every interval. You can read more on this here.
Creating our app view
We will now write some markup and JavaScript code to display the graph and chart to our users. Editing the index.html file:
1<!-- ./templates/index.html --> 2 <!DOCTYPE html> 3 <html> 4 <head> 5 <meta name="viewport" content="width=device-width, initial-scale=1"> 6 <title>CryptoLiveChart!</title> 7 <link rel="stylesheet" href="https://cdnjs.cloudflare.com/ajax/libs/bulma/0.7.1/css/bulma.min.css"> 8 <style> 9 .chart { 10 height: 800px; 11 } 12 </style> 13 </head> 14 <body> 15 <section class="section"> 16 <div class="container"> 17 <h1 class="title">Welcome to <strong>Crypto</strong>LiveChart!</h1> 18 <p class="subtitle">View live prices for <strong>Bitcoin</strong> and <strong>Ethereum</strong> in real time!</p> 19 <hr> 20 <div class="columns"> 21 <div class="column"> 22 <h5 class="title is-6">Prices (in USD)</h5> 23 <div id="price_chart" class="chart"> 24 Graph 25 </div> 26 </div> 27 <div class="column"> 28 <h5 class="title is-6">Market Cap</h5> 29 <div id="market_cap_chart" class="chart"> 30 Bar Chart 31 </div> 32 </div> 33 </div> 34 </div> 35 </section> 36 </body> 37 </html>
The above code contains the basic markup for the homepage. We imported Bulma (a cool CSS framework) to take advantage of some pre-made styles.
Next, we will write some JavaScript code to display our charts:
1<!-- ./templates/index.html --> 2 <!-- ... --> 3 4 <!-- D3.js --> 5 <script src="https://cdnjs.cloudflare.com/ajax/libs/d3/3.5.6/d3.min.js"></script> 6 <!-- jQuery --> 7 <script src="https://code.jquery.com/jquery-2.1.4.min.js"></script> 8 <!-- Plotly.js --> 9 <script src="https://d14fo0winaifog.cloudfront.net/plotly-basic.js"></script> 10 <!-- import Pusher-js library --> 11 <script src="https://js.pusher.com/4.1/pusher.min.js"></script> 12 <script type="text/javascript"> 13 // connect to Pusher 14 const pusher = new Pusher('YOUR_APP_KEY', { 15 cluster: 'YOUR_APP_CLUSTER', // gotten from Pusher app dashboard 16 encrypted: true // optional 17 }); 18 // subscribe to crypto channel 19 const channel = pusher.subscribe('crypto') 20 // listen for relevant events 21 channel.bind('data-updated', data => { 22 const graph = JSON.parse(data.graph); 23 Plotly.newPlot('price_chart', graph); 24 const bar_chart = JSON.parse(data.bar_chart); 25 Plotly.newPlot('market_cap_chart', bar_chart); 26 }); 27 </script> 28 </body> 29 </html>
In the code above, first we import the needed libraries - D3.js, Plotly and Pusher. Then we do the following:
- Connect to our Pusher app by creating an instance with
new Pusher(). Remember to replaceYOUR_APP_KEYandYOUR_APP_CLUSTERwith the actual values gotten from your dashboard. - Subscribe to the
cryptochannel on which we will be broadcasting events withpusher.subscribe() - We bind the
data-updatedevent on the channel and define a callback function to plot our graph and chart anytime data is received.
And that’s it! To run our app:
python app.py
Conclusion
In this tutorial we have learned how to create beautiful realtime charts and graphs in our Flask Apps using Plotly and Pusher. You can check out the Plotly Python documentation to see how to create other graphs quickly in Python!
You can find the entire code for this tutorial on GitHub.


© 2024 Pusher Ltd. All rights reserved.
Pusher Limited is a company registered in England and Wales (No. 07489873) whose registered office is at MessageBird UK Limited, 3 More London Riverside, 4th Floor, London, United Kingdom, SE1 2AQ.