- Products

- Developers
- User stories
- Blog
- Pricing

Build a chat app in Flask and Vue with sentiment analysis - Part 1: Setting up the project
Introduction
In this tutorial, I will walk you through building a one-to-one private chat with sentiment analysis using Pusher Channels, Vue.js and Flask. You can get the code for the complete app on GitHub.
Machine learning is still the rave at the moment with more and more companies using it to solve complex problems in the communication, entertainment, health sectors and so on, proving that it has come to stay. Let’s see how we can use it to analyze text and determine the mood of an individual from their chat message.
Vue.js is a frontend framework for building user interfaces. It handles DOM manipulations seamlessly. We’ll use it to build the app user interface while Flask handles the server side implementation.
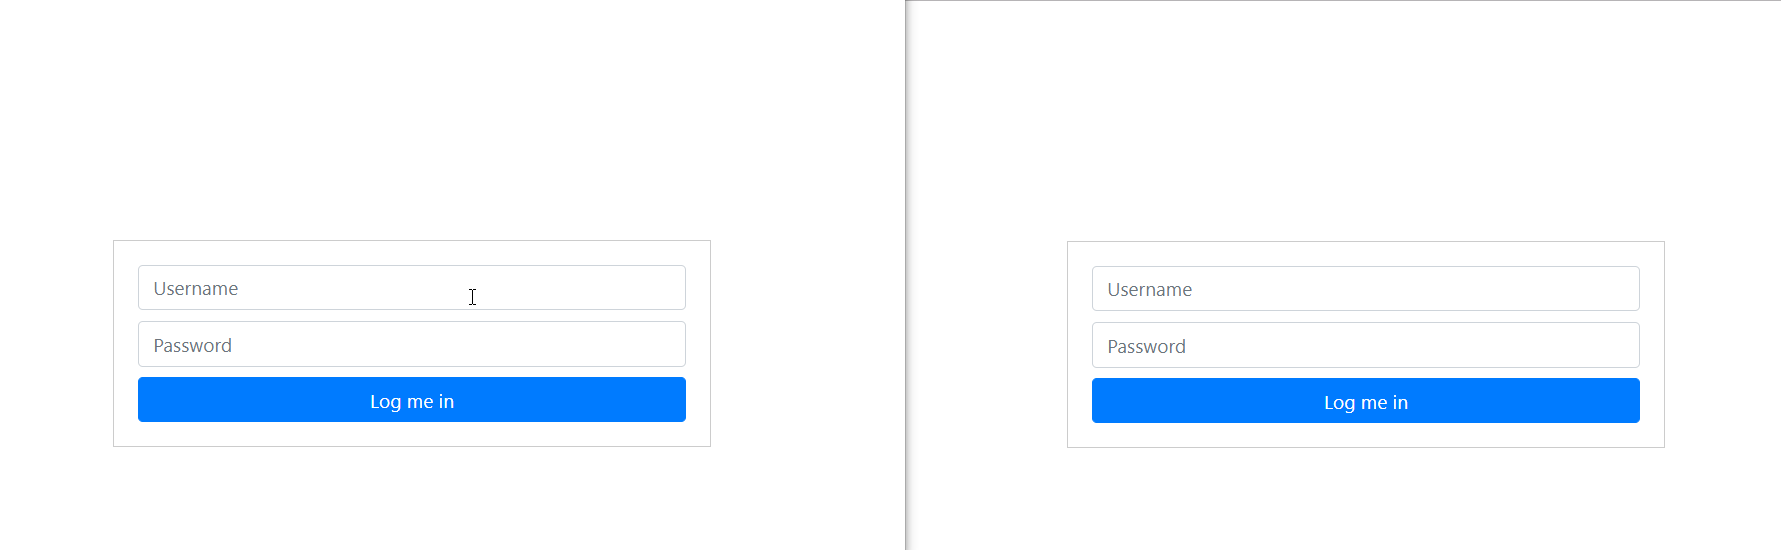
Here is a preview of the final app will be build:
This tutorial is a four-part series:
- Part one: Setting up the project
- Part two: Create the chat interface, database design, login and registration endpoints
- Part three: Realtime chat with sentiment analysis
- Part four: Adding a “who’s online” feature
Prerequisites
This tutorial uses the following:
- JavaScript
- Vue.js
- Python 3.6+
- Node.js (version 8.9 or above)
You should have some familiarity with Python development to follow along with this tutorial. If you are not familiar with Vue but still want to follow along, you can go through the basics of Vue in the documentation to get you up to speed in a couple of minutes.
Before we start, let’s get your environment ready. Check that you have the appropriate installation and setup on your machine.
Open up a terminal on your machine and execute the below code:
$ python --version
If you have a Python 3.6+ installed on your machine, you will have a similar text printed out as python 3.6.0. If you got an output similar to “Command not found”, you need to install Python on your machine. Head over to Python’s official website to download and get it installed.
Vue CLI requires a Node.js version of 8.9 or above. To check that you have Node installed, enter the following command:
$ node --version
If you have Node.js installed on your machine, you will get an output showing the version of Node.js you have installed otherwise an output similar to “Command not found” will be displayed on your terminal. If the latter is the case, you need to install Node.js. Head over to Node.js and install the latest version.
If you have gotten all that installed, let's proceed.
Our Vue app will communicate to our backend via an API call which we are going to build using Flask.
Creating a Pusher account
We'll use Pusher Channels to handle all realtime functionalities. Before we can start using Pusher Channels, we need to get our API key. We need an account to be able to get the API key.
Head over to Pusher and log in to your account or create a new account if you don’t have one already. Once you are logged in, create a new app and then copy the app API keys.
Setting up the frontend app
Vue provides a CLI for scaffolding a new Vue project. First, you'll need to install the Vue CLI globally on your system (if you don't have it installed already). After that, we’ll create a new Vue project with the CLI commands.
Create a new Vue project by running the following commands in any convenient location on your system:
1# Install Vue CLI globally on your system 2 $ npm install -g @vue/cli 3 4 # Create a new Vue project (In the prompt that appears, press enter to select the default preset.) 5 $ vue create pusher-chat-sentiment-analysis 6 7 # Change your directory to the project directory 8 $ cd pusher-chat-sentiment-analysis 9 10 # Run the app! 11 $ npm run serve
If the commands were successful, you will get an output similar below:
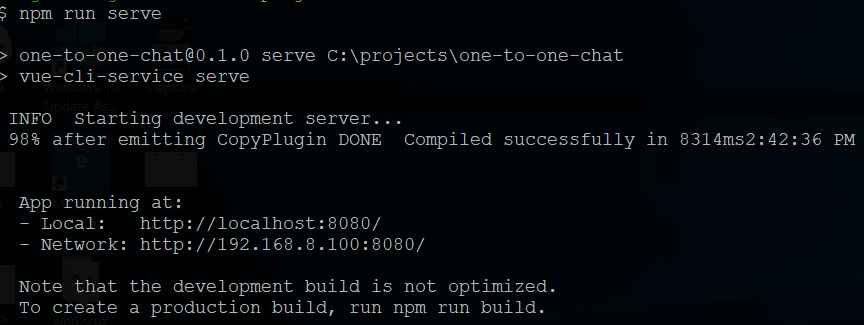
Accessing the URL displayed on your terminal will take you to a Vue default page.
Setting up the backend app
Next, let’s create our back-end app that will be responsible for handling all communication to Pusher Channels and the Database operations.
Create the following files and folder in pusher-chat-sentiment-analysis:
1pusher-chat-sentiment-analysis 2 ├── api 3 ├── .env 4 ├── .flaskenv 5 ├── app.py 6 ├── database.py 7 ├── models.py 8 ├── requirements.txt
If you prefer the command line, you can use the below command on Mac or Linux to create the files:
1# Create folders and files 2 $ mkdir api && cd api && touch .env .flaskenv app.py database.py models.py requirements.txt
Creating a virtual environment
It’s a good idea to have an isolated environment when working with Python. virtualenv is a tool to create an isolated Python environment. It creates a folder which contains all the necessary executables to use the packages that a Python project would need.
From your command line, change your directory to the Flask project root folder - api - then execute the below command:
$ python3 -m venv env
Or:
$ python -m venv env
The command to use depends on which associates with your Python 3 installation.
Then, activate the virtual environment:
$ source env/bin/activate
If you are using Windows, activate the virtualenv with the below command:
> \path\to\env\Scripts\activate
This is meant to be a full path to the activate script. Replace \path\to with your correct path name.
Next, add the Flask configuration setting to the api/.flaskenv file:
1FLASK_APP=app.py 2 FLASK_ENV=development
This will instruct Flask to use app.py as the main entry file and start up the project in development mode.
Now, add your Pusher API keys to the .env file:
1PUSHER_APP_ID=app_id 2 PUSHER_KEY=key 3 PUSHER_SECRET=secret 4 PUSHER_CLUSTER=cluster
Make sure to replace app_id, key, secret and cluster with your own Pusher keys which you have noted down earlier.
Next, create a Flask instance by adding the below code to api/app.py:
1# app.py 2 3 from flask import Flask, request, jsonify, render_template, redirect 4 import os 5 import pusher 6 7 app = Flask(__name__) 8 9 @app.route('/') 10 def index(): 11 return jsonify("Pong!") 12 13 # run Flask app 14 if __name__ == "__main__": 15 app.run()
Now, add the following python packages to the api/requirements.txt file:
1Flask==1.0.2 2 python-dotenv==0.8.2 3 pusher==2.0.1 4 SQLAlchemy==1.2.0 5 Flask-SQLAlchemy==2.1 6 Flask-JWT-Extended==3.13.0
The packages we added:
- python-dotenv: this library will be used by Flask to load environment configurations files
- pusher: this is the Pusher Python library that makes it easy to interact with its API
- Flask: the Python framework we are using to build the app
- SQLALchemy: a Python SQL toolkit and Object Relational Mapper that gives application developers the full power and flexibility of SQL
- Flask-JWT-Extended: package for adding JWT authentication
Now install the library by executing the below command:
$ pip install -r requirements.txt
Once the packages are done installing, start-up Flask:
$ flask run
If there is no error, our Flask app will now be available on port 5000. If you visit http://localhost:5000, you will get a text: “Pong!”
Setting up a proxy
Since we are going to run the Vue and Flask app side by side, we will set up a proxy to enable us access Flask endpoints on the Vue app as if they live in the Vue app. This way we don’t have to include the full URL of our Flask app nor the port. All we’ll do is use the endpoint for example /api/users without having to add full app URL as http://localhost:5050/api/users. This is done by proxying.
We’ll set this up using the Vue config file. Create the config file in the root directory of the pusher-chat-sentiment-analysis root folder:
$ touch vue.config.js
Then add the below config to the file:
1// vue.config.js 2 3 module.exports = { 4 devServer: { 5 proxy: { 6 "/api": { 7 target: "http://localhost:5000", 8 ws: false, 9 changeOrigin: true 10 } 11 } 12 } 13 };
Now any URL we call on the Vue app that has a prefix of “/api” will be proxied for us to our Flask app which is running on http://localhost:5000.
Install the Pusher JavaScript library and axios
We’ll use the axios library for making HTTP requests. Add the axios library by executing the below command in the pusher-chat-sentiment-analysis root folder:
$ vue add axios
Add the Pusher JavaScript library:
$ npm install pusher-js
Our project is all set up now. The Vue app lives in the pusher-chat-sentiment-analysis root folder while the Flask app lives in the api subfolder.
Set up the Vue environment config
Let’s keep things in order so that we don’t have to add our Pusher key to our code directly. With Vue environment setup, we can set our Pusher key and easily access it.
Create a .env file in the root folder of the project:
$ touch .env
Then add your Pusher key:
1VUE_APP_PUSHER_KEY=<PUSHER_APP_KEY> 2 VUE_APP_PUSHER_CLUSTER=<PUSHER_APP_CLUSTER>
Make sure to replace <PUSHER_APP_KEY> and <PUSHER_APP_CLUSTER> with your actual Pusher App credentials.
Conclusion
In this tutorial, we have been able to set up our Vue app to communicate with our Flask application. We also installed the Python and JavaScript libraries that we’ll be using in the app.
In the next part of this tutorial series, we will design the database for the chat app, build the chat interface and also implement login and registration endpoint.


© 2024 Pusher Ltd. All rights reserved.
Pusher Limited is a company registered in England and Wales (No. 07489873) whose registered office is at MessageBird UK Limited, 3 More London Riverside, 4th Floor, London, United Kingdom, SE1 2AQ.