- Products

- Developers
- User stories
- Blog
- Pricing

How to build a chatbot with Preact and Wit.ai
- Introduction
- Prerequisites
- Getting started
- Create your application frontend with Preact
- Add the styles for the application
- Setup your Wit.ai application
- Create your first entity
- Create a custom entity
- Test your Wit.ai chatbot with curl
- Set up the server component
- Set up responses for your chatbot
- Set up Pusher Channels for realtime responses
- Integrate Pusher Channels into your Preact application
- Trigger events from the server
- Conclusion
Introduction
In this tutorial, we will consider how to build a realtime chatbot that incorporates NLP using Preact, Wit.ai and Pusher Channels. You can find the entire source code of the application in this GitHub repository.
Chatbots have become more and more prevalent over the past few years, with several businesses taking advantage of them to serve their customers better.
Many chatbots integrate natural language processing (NLP) which adds a more human touch to conversations, and helps them understand a wider variety of inputs.
Prerequisites
Before you continue, make sure you have Node.js, npm and curl installed on your computer. You can find out how to install Node.js and npm here.
The versions I used while creating this tutorial are as follows:
- Node.js v10.4.1
- npm v6.3.0
You can view the version of Node and npm you have installed by running the following commands in your terminal:
1node -v 2 npm -v
I believe the code will still work even if you’re on an older version of Node, but if you have any trouble completing the tutorial, try upgrading to the versions I used to see if it fixes your problem.
Also investigate how to install curl on your favorite operating system, or use this website.
Finally, you need to have a basic understanding of JavaScript and Preact or React, but no prior experience with Pusher Channels or Wit.ai is required. Create a free sandbox Pusher account or sign in.
Getting started
Let's bootstrap our project using the preact-cli tool which allows us to quickly get a Preact application up and running.
Open up your terminal, and run the following command to install preact-cli on your machine:
npm install -g preact-cli
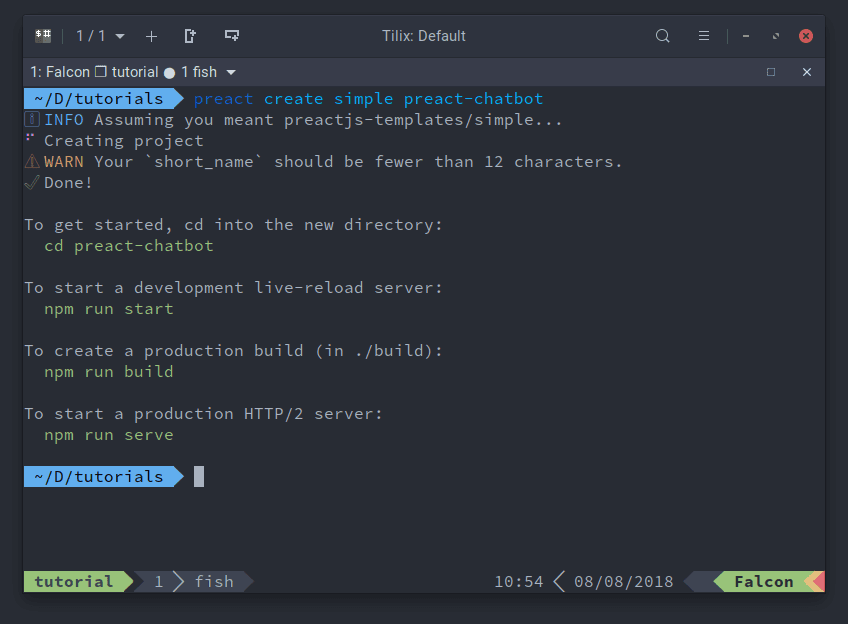
Once the installation completes, you'll have access to the preact command that will be used to setup the project. Run the following command in the terminal to create your Preact app:
preact create simple preact-chatbot
The above command will create a new directory called preact-chatbot and install preact as well as its accompanying dependencies. It may take a while to complete, so sit tight and wait. Once it’s done, you should see a some information in the terminal informing you of what you can do next.
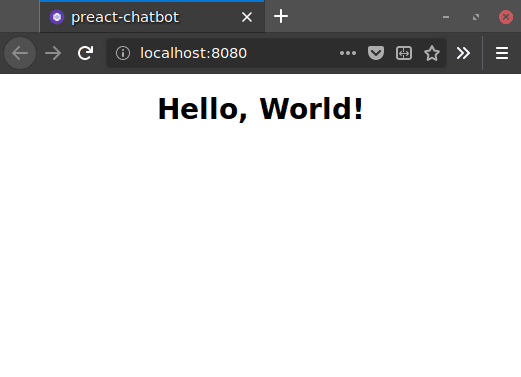
Next, change into the newly created directory and run npm run start to start the development server.
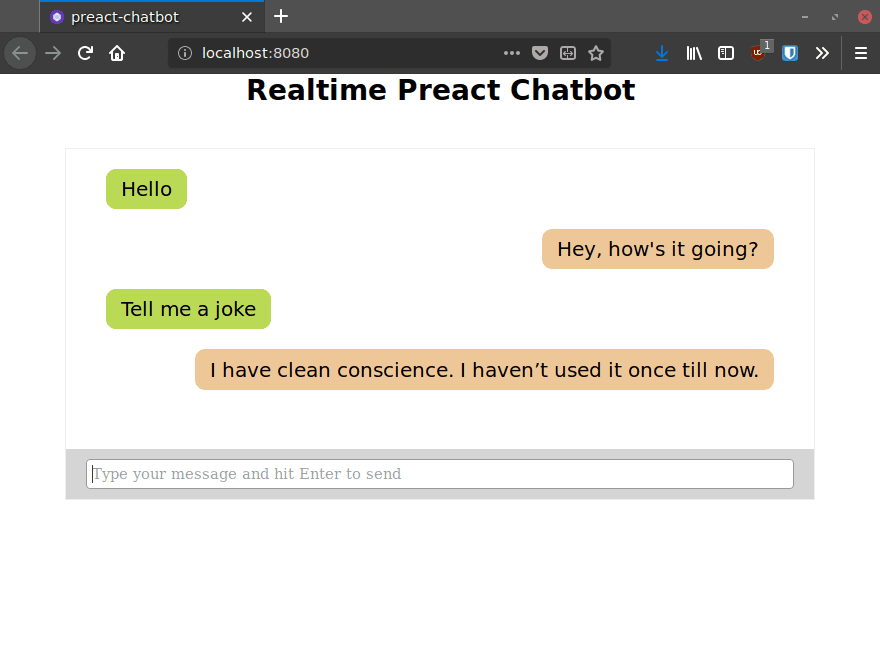
Once the application compiles, you will be able to view it at http://localhost:8080. When you open up that URL in your browser, you should see a page on your screen that looks like this:
Create your application frontend with Preact
Open up index.js in your text editor, and change its contents to look like this:
1// index.js 2 3 import './style'; 4 import { Component } from 'preact'; 5 6 export default class App extends Component { 7 constructor(props) { 8 super(props); 9 this.state = { 10 userMessage: '', 11 conversation: [], 12 }; 13 14 this.handleChange = this.handleChange.bind(this); 15 this.handleSubmit = this.handleSubmit.bind(this); 16 } 17 18 handleChange(event) { 19 this.setState({ userMessage: event.target.value }); 20 } 21 22 handleSubmit(event) { 23 event.preventDefault(); 24 const msg = { 25 text: this.state.userMessage, 26 user: 'user', 27 }; 28 29 this.setState({ 30 conversation: [...this.state.conversation, msg], 31 }); 32 33 fetch('http://localhost:7777/chat', { 34 method: 'POST', 35 headers: { 'Content-Type': 'application/json' }, 36 body: JSON.stringify({ 37 message: this.state.userMessage, 38 }), 39 }); 40 41 this.setState({ userMessage: '' }); 42 } 43 44 render() { 45 const ChatBubble = (text, i, className) => { 46 const classes = `${className} chat-bubble`; 47 return ( 48 <div key={`${className}-${i}`} class={`${className} chat-bubble`}> 49 <span class="chat-content">{text}</span> 50 </div> 51 ); 52 }; 53 54 const chat = this.state.conversation.map((e, index) => 55 ChatBubble(e.text, index, e.user) 56 ); 57 58 return ( 59 <div> 60 <h1>Realtime Preact Chatbot</h1> 61 <div class="chat-window"> 62 <div class="conversation-view">{chat}</div> 63 <div class="message-box"> 64 <form onSubmit={this.handleSubmit}> 65 <input 66 value={this.state.userMessage} 67 onInput={this.handleChange} 68 class="text-input" 69 type="text" 70 autofocus 71 placeholder="Type your message and hit Enter to send" 72 /> 73 </form> 74 </div> 75 </div> 76 </div> 77 ); 78 } 79 }
If you have some experience with Preact or React, the above code should be straightforward to understand. The state of the application is initialized with two values: userMessage which contains the value of whatever the user types into the input field, and conversation which is an array that will hold each message in the conversation.
The handleChange function runs on every keystroke to update userMessage which allows the displayed value to update as the user types. When the user hits the Enter button the form will be submitted and handleSubmit will be invoked.
handleSubmit updates the conversation state with the contents of the user's message and sends the message in a POST request to the /chat endpoint which we will soon setup in our app’s server component, before clearing the input field by setting userMessage to an empty string.
Add the styles for the application
Let's add the styles for the app’s frontend. Open up style.css in your editor and replace its contents with the following styles:
1// style.css 2 3 html, body { 4 font: 14px/1.21 'Helvetica Neue', arial, sans-serif; 5 font-weight: 400; 6 box-sizing: border-box; 7 } 8 9 *, *::before, *::after { 10 box-sizing: inherit; 11 margin: 0; 12 padding: 0; 13 } 14 15 h1 { 16 text-align: center; 17 margin-bottom: 40px; 18 } 19 20 .chat-window { 21 width: 750px; 22 margin: auto; 23 border: 1px solid #eee; 24 } 25 26 .conversation-view { 27 width: 100%; 28 min-height: 300px; 29 padding: 20px 40px; 30 } 31 32 .message-box { 33 width: 100%; 34 background-color: #d5d5d5; 35 padding: 10px 20px; 36 } 37 38 .text-input { 39 width: 100%; 40 border-radius: 4px; 41 border: 1px solid #999; 42 padding: 5px; 43 } 44 45 .chat-bubble { 46 font-size: 20px; 47 margin-bottom: 20px; 48 width: 100%; 49 display: flex; 50 } 51 52 .chat-bubble.ai { 53 justify-content: flex-end; 54 } 55 56 .chat-bubble.ai .chat-content { 57 background-color: #eec799; 58 } 59 60 .chat-content { 61 display: inline-block; 62 padding: 8px 15px; 63 background-color: #bada55; 64 border-radius: 10px; 65 }
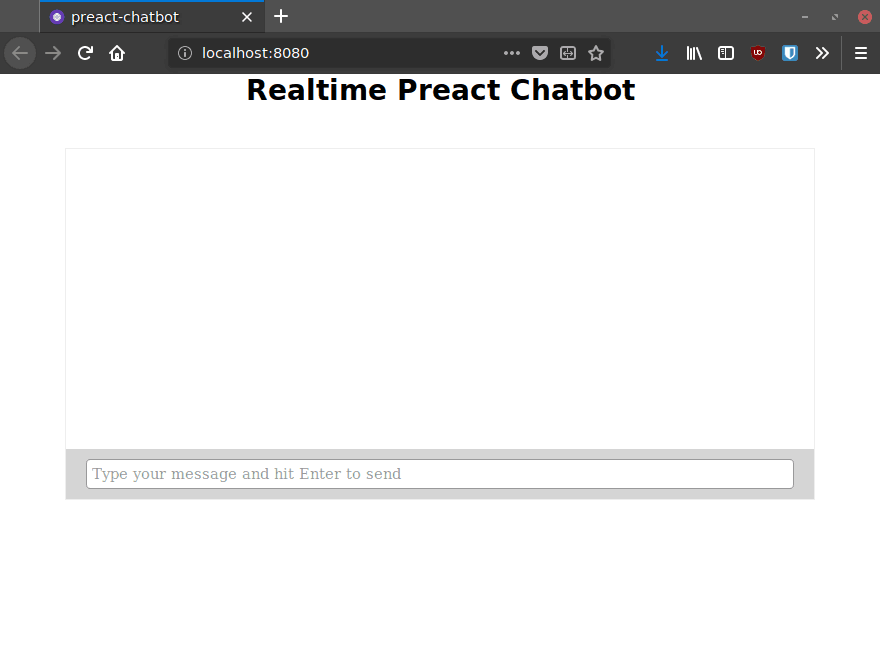
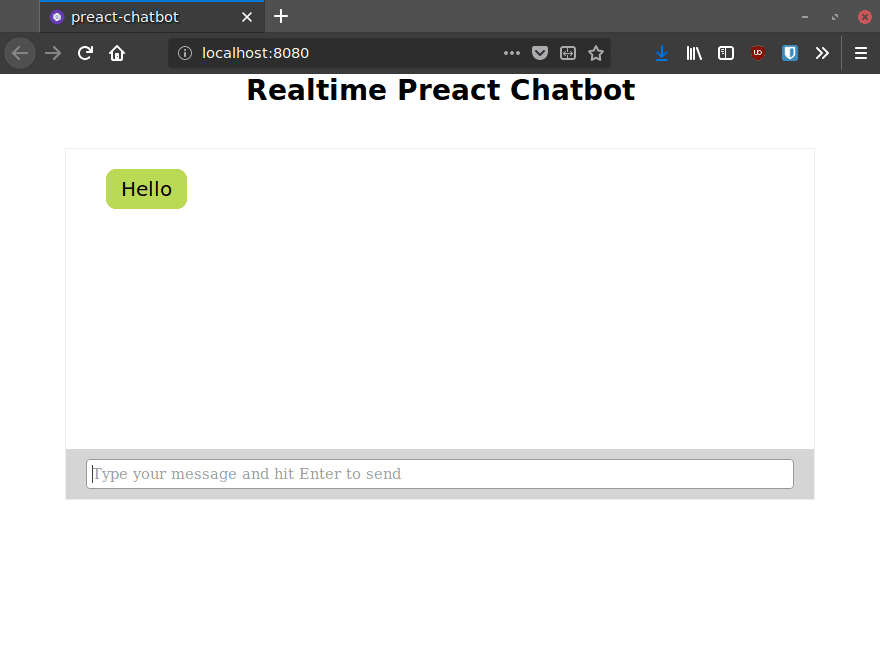
Now, the application should look like this:
Setup your Wit.ai application
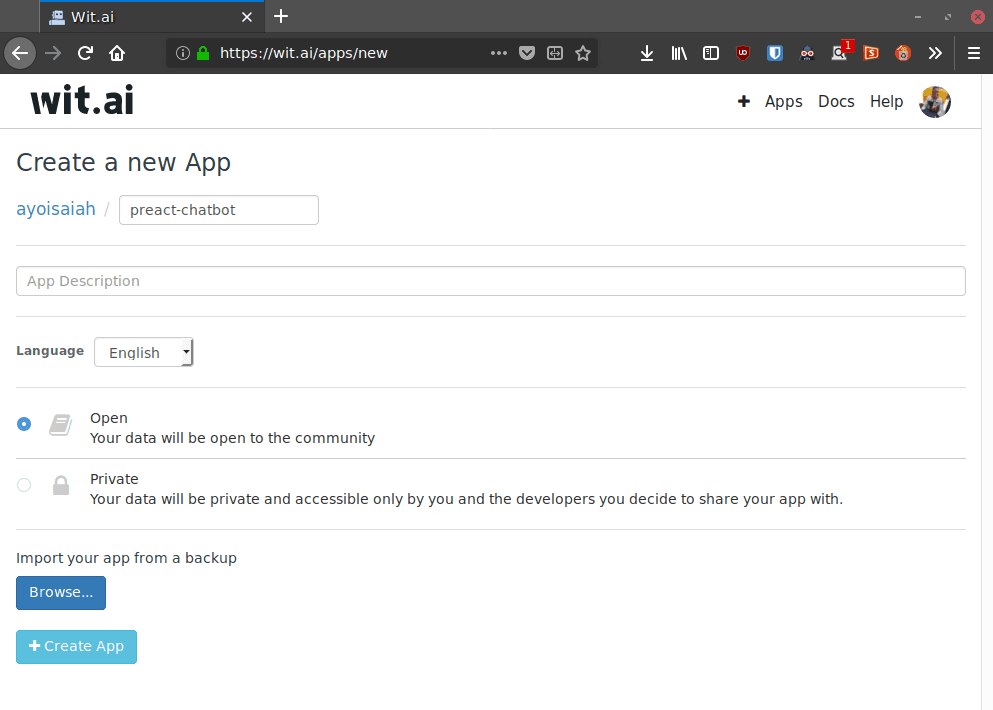
Head over to the Wit.ai website and create a free account.
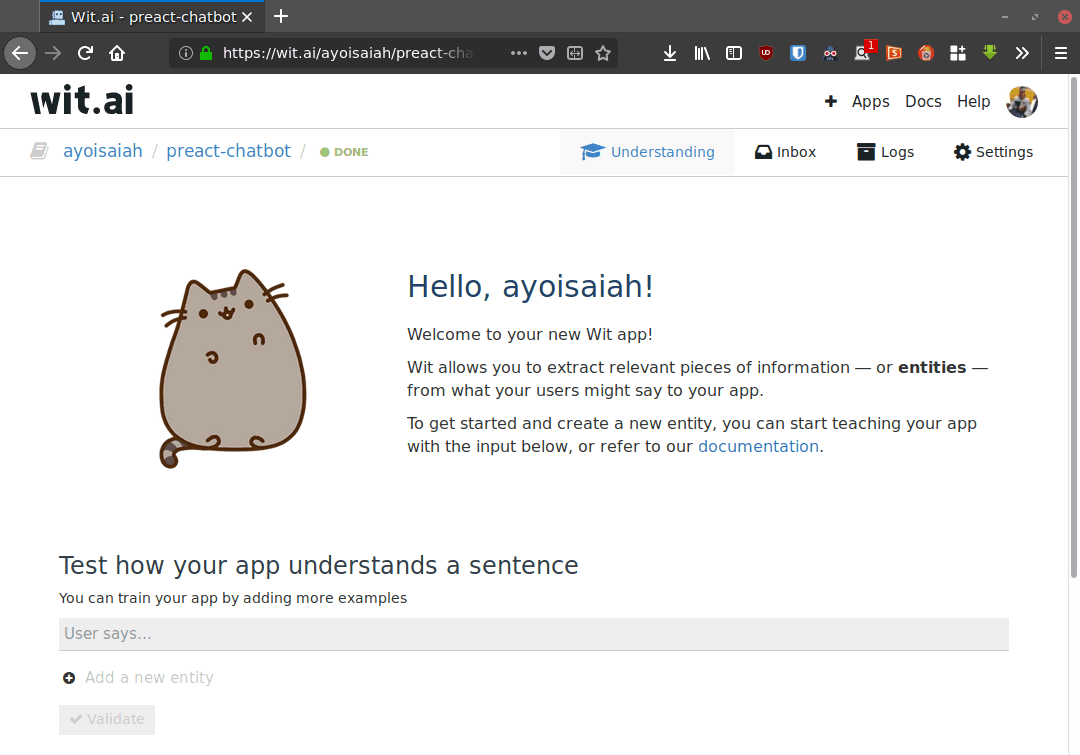
Once you are signed in, hit the + icon at the top right of the page to create a new application. Enter your app name and click the +Create App button at the bottom.
You should see the following page once your app has been created.
Create your first entity
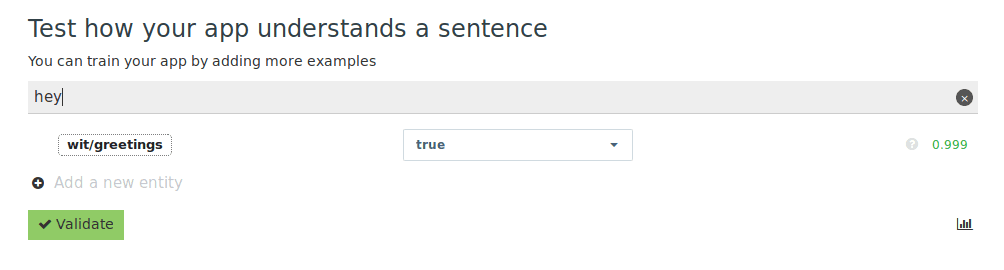
Wit.ai uses entities to help you understand user queries and extract meaningful information from them. Let's setup an entity that will enable our bot to understand common greetings like "Hi" or "Hello".
Type the word "Hello" in the "User says…" input field, then select the “wit/greetings” entity in the Add a new entity field. Use the dropdown on the right to set the value of the entity to true.
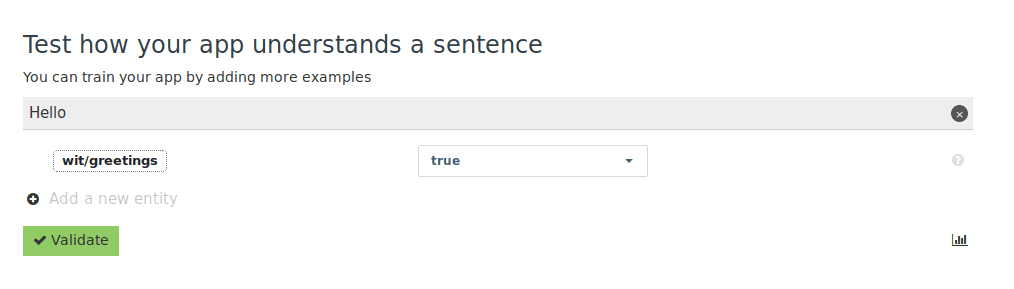
Once done, hit the Validate button to add the entity to your application. You can repeat the steps for other greetings such as "Hi", "Hey", "Good morning" etc.
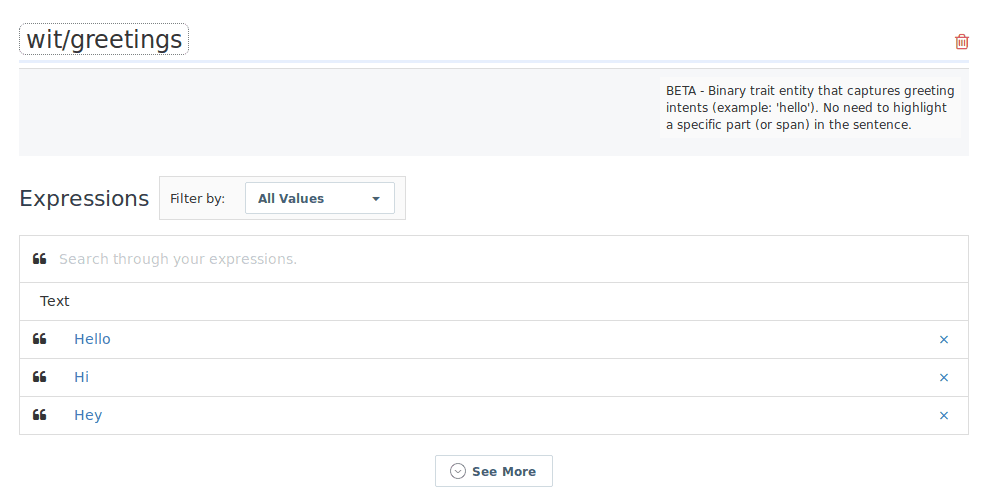
If you click on the wit/greetings entry at the bottom, you will be directed to the entity page that contains all the expressions under that entity.
Create a custom entity
wit/greetings is an example of a built-in entity. These built-in entities are prefixed by wit/, and are defined to extract common expressions from messages. Things like age, money, email address, location and the likes are all covered by Wit.ai’s built-in entities.
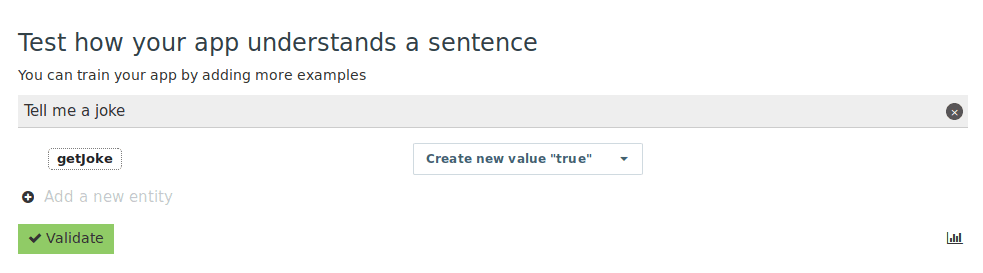
You can train our bot to understand other things that the built-in entities do not cover. For example, let's add an entity that allows our bot to understand a request for a joke.
Type "Tell me a joke" in the User says... input field, and add a new entity called "getJoke". As before, use the dropdown on the right to set the value of the entity to true and hit the Validate button.
Test your Wit.ai chatbot with curl
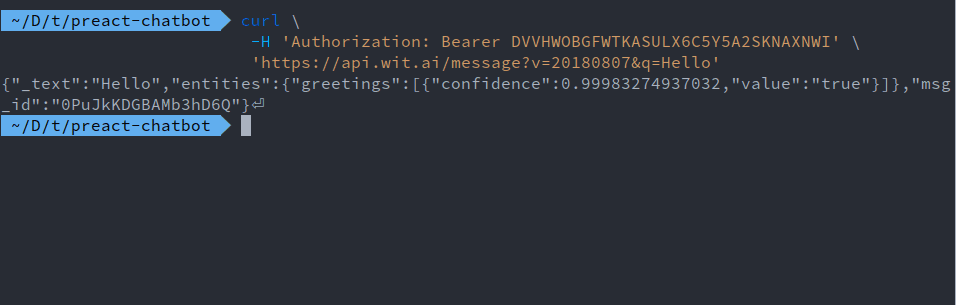
Go to the settings page, and type "Hello" in the input field that says Type something to cURL, then copy the command to your clipboard using the copy icon on the right.

Open a terminal window and paste in the command, then press Enter. This would produce some output in your terminal that shows the entity that your query matches.
Set up the server component
We need to setup a server component so that we can pass messages sent through the frontend of the app to Wit.ai for processing.
Run the following command to install the dependencies we’ll be needing on the server side:
npm install --save express body-parser cors node-wit dotenv
Next, create a new file called server.js in the root of your project directory and paste in the following code to set up a simple express server:
1// server.js 2 3 require('dotenv').config({ path: 'variables.env' }); 4 5 const express = require('express'); 6 const bodyParser = require('body-parser'); 7 const cors = require('cors'); 8 const { Wit } = require('node-wit'); 9 10 const client = new Wit({ 11 accessToken: process.env.WIT_ACCESS_TOKEN, 12 }); 13 14 const app = express(); 15 16 app.use(cors()); 17 app.use(bodyParser.json()); 18 app.use(bodyParser.urlencoded({ extended: true })); 19 20 app.post('/chat', (req, res) => { 21 const { message } = req.body; 22 23 client 24 .message(message) 25 .then(data => { 26 console.log(data); 27 }) 28 .catch(error => console.log(error)); 29 }); 30 31 app.set('port', process.env.PORT || 7777); 32 const server = app.listen(app.get('port'), () => { 33 console.log(`Express running → PORT ${server.address().port}`); 34 });
We've also set up a /chat endpoint that receives messages from the frontend of our app and sends it off to the Wit message API. Whatever response is received is then logged to the console.
Before you start the server, create a variables.env file in the root of your project directory. You should add this file to your .gitignore so that you do not commit it into your repository by accident.
Here’s how your variables.env file should look like:
1// variables.env 2 3 PORT=7777 4 WIT_ACCESS_TOKEN=<your server access token>
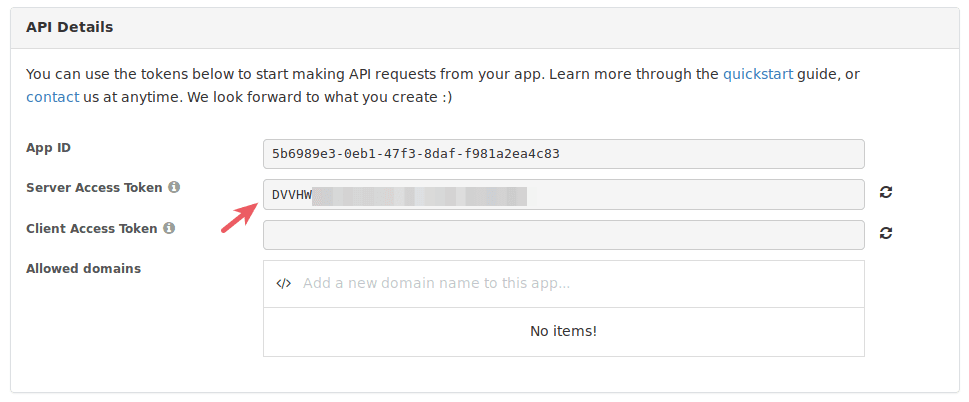
You can grab your Wit.ai server access token by heading to the settings under API Details.
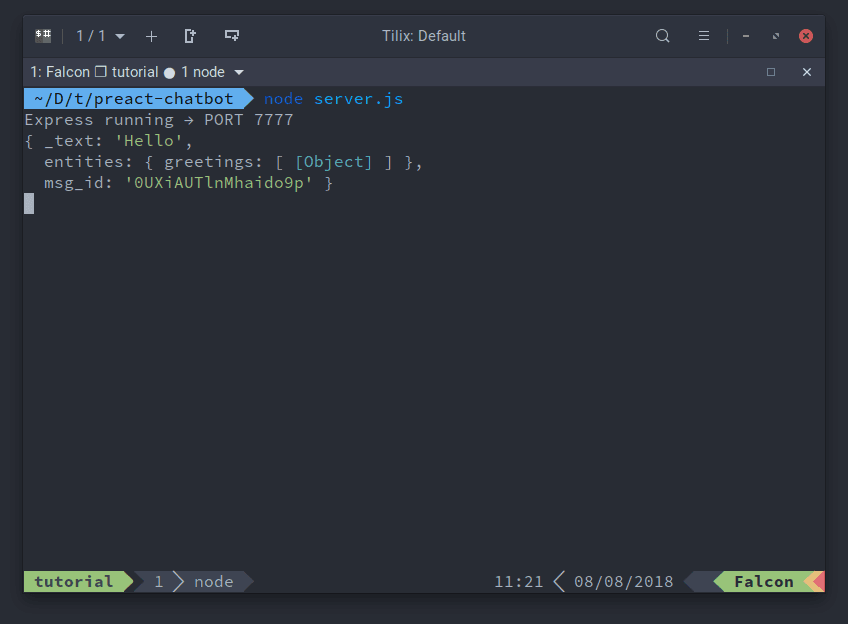
Save the file and run node server.js from the root of your project directory to start the server.
Now, send a few messages in the chat window, and watch the terminal where your Node server is running. You should see some output in your terminal that shows the entity that your query matches.
Set up responses for your chatbot
Now that user messages are being passed on to Wit.ai successfully, we need to add a way to detect which entity was matched and send an appropriate response to the user.
We'll achieve that by setting up a responses object that contains a variety of responses for each entity that we defined, and then send a random message when the appropriate entity is matched.
Inside the /chat route and under the message variable, paste in the following code:
1// server.js 2 3 const responses = { 4 greetings: ["Hey, how's it going?", "What's good with you?"], 5 6 jokes: [ 7 'Do I lose when the police officer says papers and I say scissors?', 8 'I have clean conscience. I haven’t used it once till now.', 9 'Did you hear about the crook who stole a calendar? He got twelve months.', 10 ], 11 }; 12 13 const firstEntityValue = (entities, entity) => { 14 const val = 15 entities && 16 entities[entity] && 17 Array.isArray(entities[entity]) && 18 entities[entity].length > 0 && 19 entities[entity][0].value; 20 21 if (!val) { 22 return null; 23 } 24 25 return val; 26 }; 27 28 const handleMessage = ({ entities }) => { 29 const greetings = firstEntityValue(entities, 'greetings'); 30 const jokes = firstEntityValue(entities, 'getJoke'); 31 32 if (greetings) { 33 return console.log(responses.greetings[ 34 Math.floor(Math.random() * responses.greetings.length) 35 ]); 36 } 37 38 if (jokes) { 39 return console.log(responses.jokes[ 40 Math.floor(Math.random() * responses.jokes.length) 41 ]); 42 } 43 44 return console.log('I can tell jokes! Say \'tell me a joke\'') 45 };
Then change the line that says console.log(data) to handleMessage(data):
1// server.js 2 3 client 4 .message(message) 5 .then(data => { 6 handleMessage(data); 7 }) 8 .catch(error => console.log(error));
Once we find an entity that matches, a random message from the appropriate property in the responses object is logged to the console. Otherwise the default response is logged.
Set up Pusher Channels for realtime responses
Now, let's integrate Pusher into the app so that our bot can respond to the user in realtime. Head over to the Pusher website and sign up for a free account. Select Channels apps on the sidebar, and hit Create Channels app to create a new app.
Once your app is created, retrieve your credentials from the API Keys tab, then add the following to your variables.env file:
1PUSHER_APP_ID=<your app id> 2 PUSHER_APP_KEY=<your app key> 3 PUSHER_APP_SECRET=<your app secret> 4 PUSHER_APP_CLUSTER=<your app cluster>
Integrate Pusher Channels into your Preact application
First, install the Pusher Channels client library by running the command below:
npm install pusher-js
Then import it at the top of index.js:
import Pusher from 'pusher-js';
Next, we’ll open a connection to Channels and use the subscribe() method from Pusher to subscribe to a new channel called bot. Finally, we’ll listen for the bot-response on the bot channel using the bind method and update the application state once we receive a message.
Don’t forget to replace the <your app key> and <your app cluster> placeholder with the appropriate details from your Pusher account dashboard.
1// index.js 2 3 componentDidMount() { 4 const pusher = new Pusher('<your app key>', { 5 cluster: '<your app cluster>', 6 encrypted: true, 7 }); 8 9 const channel = pusher.subscribe('bot'); 10 channel.bind('bot-response', data => { 11 const msg = { 12 text: data.message, 13 user: 'ai', 14 }; 15 this.setState({ 16 conversation: [...this.state.conversation, msg], 17 }); 18 }); 19 }
Trigger events from the server
Add the Pusher server library though npm:
npm install pusher
Then import it at the top of server.js:
1// server.js 2 3 const Pusher = require('pusher'); 4 5 const pusher = new Pusher({ 6 appId: process.env.PUSHER_APP_ID, 7 key: process.env.PUSHER_APP_KEY, 8 secret: process.env.PUSHER_APP_SECRET, 9 cluster: process.env.PUSHER_APP_CLUSTER, 10 encrypted: true, 11 });
Change the handleMessage function to look like this:
1// server.js 2 3 onst handleMessage = ({ entities }) => { 4 const greetings = firstEntityValue(entities, 'greetings'); 5 const jokes = firstEntityValue(entities, 'getJoke'); 6 7 if (greetings) { 8 return pusher.trigger('bot', 'bot-response', { 9 message: 10 responses.greetings[ 11 Math.floor(Math.random() * responses.greetings.length) 12 ], 13 }); 14 } 15 16 if (jokes) { 17 return pusher.trigger('bot', 'bot-response', { 18 message: 19 responses.jokes[ 20 Math.floor(Math.random() * responses.jokes.length) 21 ], 22 }); 23 } 24 25 return pusher.trigger('bot', 'bot-response', { 26 message: 'I can tell jokes! Say \'tell me a joke\'', 27 }); 28 };
Stop the node server if it is currently running by pressing Ctrl + C in the terminal and restart it with node server.js. Now you can go ahead and test your bot! Send messages like “hey”, or “Tell me a joke” and you will get replies from the bot.
Conclusion
You have now learned how easy it is to create a chatbot that incorporates natural language processing with Wit.ai and how to respond in realtime with Pusher Channels.
Thanks for reading! Remember that you can find the source code of this app in this GitHub repository.


© 2024 Pusher Ltd. All rights reserved.
Pusher Limited is a company registered in England and Wales (No. 07489873) whose registered office is at MessageBird UK Limited, 3 More London Riverside, 4th Floor, London, United Kingdom, SE1 2AQ.