- Products

- Developers
- User stories
- Blog
- Pricing

Build a Chrome extension to track cryptocurrency prices - Part 1: Build the app
Introduction
In this tutorial, we will build a Chrome application that will serve cryptocurrency prices in realtime. We will use CryptoCompare that provides a free cryptocurrency API to get the live prices. We will use Pusher Channels to update the prices we fetch from CryptoCompare.
A Chrome extension is a very handy tool. It is a small program that can enhance a user’s browsing experience or provide on demand information. There are several million extensions on the Chrome web store by different developers. Some provide a unique solution, others provide a feature of a standalone application.
Prerequisites
- Knowledge of HTML, CSS and JavaScript
- Knowledge of Node.js and Node.js(^4.*) installed on your local computer
- A Pusher app for realtime price tracking
- A Heroku account
- Heroku CLI tool kit installed on your local computer
Setting up the project
To get started with Pusher Channels, sign up for a free Pusher account. Then go to the dashboard and create a new Channels app. Keep note of the keys. We will use the keys subsequently.
Create a new Node project
Create a directory that will hold our application files:
1$ mkdir cryptowatcher 2 $ cd cryptowatcher
Now, create a new node.js project in that directory:
$ npm init -y
Here is what my setup looks like when I finished:
1{ 2 "name": "crytowatcher", 3 "version": "1.0.0", 4 "description": "A simple application to track live cryptocurrency prices", 5 "main": "index.js", 6 "scripts": { 7 "test": "echo \"Error: no test specified\" && exit 1", 8 "start": "node index.js" 9 }, 10 "keywords": [ 11 "crypto", 12 "pusher", 13 "chrome-extension" 14 ], 15 "author": "A retired superhero", 16 "license": "ISC" 17 }
Install Pusher and set it up
Now, let us install pusher:
$ npm install pusher --save
After installing pusher, create an index.js file in the root directory and add the following file:
1// /cryptowatcher/index.js 2 "use strict"; 3 const Pusher = require('pusher') 4 const https = require('https'); 5 const config = require('./config') 6 const cryptos = require('./cryptos.json') 7 const pusher = new Pusher(config)
We have imported all the packages and configuration files we need to run our application. You may wonder “Why are we not using Express?” and that would be an excellent observation. For this application, we only want a server that will make requests to the API and return the modified response as we please. We do not intend for this application to receive any external requests, so there is no need to create a server.
Now, let us assume we want to extend the application and add a database to store these prices as we fetch them. We might also want to store cryptos we want to track and currencies we want to check them against. We can even go further and decide to allow users customise the cryptos they want to watch and the currencies they want to get the prices in. At this point, it will be wise to create a server to allow external requests to our application. But for this guide, we are keeping things very simple.
Call the CryptoCompare API
Next, let us define the call to the CryptoCompare API:
1// /cryptowatcher/index.js 2 [...] 3 setInterval(() => { 4 https.get(`https://min-api.cryptocompare.com/data/pricemulti?fsyms=${cryptos.coins.join()}&tsyms=${cryptos.currencies.join()}`, (response) => { 5 response.setEncoding('utf8') 6 .on('data', data => handleResponse(data)) 7 .on('error', e => console.error(e.message)) 8 }) 9 }, 10000)
We are using Node’s built-in https get request function to make the call. We have to set the encoding to utf8. If we do not do this, it will return gibberish data. When we receive data, we pass the data to the handleResponse method that handles the response.
Let us define the handleResponse method:
1// /cryptowatcher/index.js 2 [...] 3 let handleResponse = data => { 4 pusher.trigger('cryptowatch', 'prices', { 5 "update": data 6 }); 7 }
The handleResponse triggers a Pusher broadcast over the cryptowatch channel. On the channel, we will broadcast the message using the prices event. If you are thinking “Uhm… Can we have multiple events on a single Pusher channel?” then I am pleased to inform you that you are absolutely right. It is like having multiple channels on a cable TV.
Create an HTTPS server to allow us bind our application to a port when we deploy it:
1// /cryptowatcher/index.js 2 [...] 3 https.createServer().listen(process.env.PORT || 8080)
Define config and crypto files
Next, we will define the config.js file. Create the file:
$ touch config.js
Open the file and add the following to it:
1// /cryptowatcher/config.js 2 module.exports = { 3 appId: 'YOUR-APP-ID', 4 key: 'YOUR-APP-KEY', 5 secret: 'YOUR-APP-SECRET', 6 cluster: 'YOUR-APP-CLUSTER', 7 encrypted: true 8 };
Please replace the values in the object above with the values you received after creating your Pusher application.
Now, create the cryptos.json file:
$ touch cryptos.json
Open the file and add the following:
1// /cryptowatcher/cryptos.json 2 { 3 "coins" : ["BTC","ETH","LTC","XRP"], 4 "currencies" : ["USD","EUR","GBP"] 5 }
If there are more coins or currencies you will like to track, just add them to the list.
The last thing we need to do is define the start script in our package.json file. Open the file and edit the scripts sections:
1// /cryptowatcher/index.js 2 [...] 3 "scripts": { 4 "test": "echo \"Error: no test specified\" && exit 1", 5 "start": "node index" 6 }, 7 [...]
Making the Chrome extension
There is one thing that defines a Chrome extension, without which your extension is never going to work — manifest.json file. It is to Chrome extensions what package.json is to Node applications (and even more).
The file contains important information the Chrome extension requires to function. Many extensions might not use the manifest file for so much more than starting up. The manifest specifies the popup for your extension shows, it gives it a name, sets the display icon and a host of other things.
Creating the manifest file
We will create a new directory inside our project folder to hold the extension files.
$ mkdir extension
Now, create the /cryptowatcher/extension/manifest.json file and add the following to it:
1// /cryptowatcher/extension/manifest.json 2 { 3 "manifest_version": 2, 4 "name": "Cryptowatcher", 5 "description": "A simple application to track live cryptocurrency prices", 6 "version": "1.0", 7 "browser_action": { 8 "default_icon": "icon.png", 9 "default_popup": "index.html", 10 "default_title": "Cryptowatcher" 11 }, 12 "permissions": [ 13 "activeTab" 14 ] 15 }
We need to make a tiny logo and replace icon.png with it. 19x19 logo would do just fine. For this tutorial, we will use this.
Now, let us make the index.html file. Create the file in the directory and add the following:
1// /cryptowatcher/extention/index.html 2 <!DOCTYPE html> 3 <html lang="en"> 4 <head> 5 <meta charset="UTF-8"> 6 <title>Crypto Watcher</title> 7 <style type="text/css"> 8 body { 9 min-width: 200px; 10 height: 300px; 11 } 12 </style> 13 </head> 14 <body> 15 <h1>Coin Prices</h1> 16 <ol id="crypto-prices"></ol> 17 <script src="./pusher.min.js"></script> 18 <script src="./scripts.js"></script> 19 </body> 20 </html>
Chrome extension security policy disallows the use of inline scripts or scripts from external sources, that is why we did not call Pusher script from Pusher’s CDN. This is to prevent XSS or any form of attack on a user. So, download the pusher.min.js file from here, save it in this directory /cryptowatcher/extensions/.
Now, create the scripts.js file and add the following:
1// /cryptowatcher/extensions/scripts.js 2 3 const pusher = new Pusher('Your-App-Key', { 4 cluster: 'Your-cluster-key', 5 encrypted: true 6 }) 7 8 let channel = pusher.subscribe('cryptowatch'); 9 channel.bind('prices', (data) => { 10 let priceLists = "" 11 let obj = JSON.parse(data.update) 12 Object.keys(obj).forEach( (key, index) => { 13 priceLists += `<li>${key}: </br>` 14 let currencies = obj[key] 15 let currencyLists = "<ul>" 16 Object.keys(currencies).forEach( (currency, index) => { 17 currencyLists += `<li>${currency} : ${currencies[currency]}</li>` 18 }); 19 currencyLists += "</ul>" 20 priceLists += `${currencyLists}</li>` 21 }); 22 document.getElementById('crypto-prices').innerHTML = priceLists 23 });
Remember to replace ‘Your-App-Key’ and ‘Your-cluster-key’ with the values you generated from Pusher’s dashboard
We subscribed to the Pusher channel we created on our Node application and bind it to an event. When our Node application broadcasts data, we take it and present it on the popup. Think of it like buying a cable TV subscription (Pusher channel), tuning into a particular station (subscribing to event) then arguing with your friends about what is showing on TV (using the data broadcast).
To view the what we have achieved so far, run this command on your terminal
$ npm start
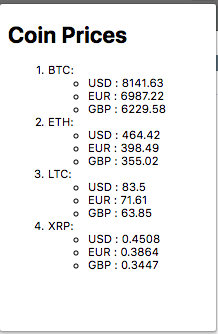
Once Node is up, open up the extensions/index.html file on your browser, your output should look like this. It will take up to ten seconds before it fetches our coin details

Deploy to Heroku
We are going to deploy the application to Heroku. This will ensure our service keeps running and everyone that installs our Chrome extension will always get a price update.
First, you need to create a Heroku app. If you have Heroku installed on your local system, then you can use your terminal. If not, you can visit Heroku’s website and deploy the application directly from GitHub.
For this tutorial, we will deploy the application using the terminal. First, we need to log in:
$ heroku login
Supply your Heroku email address and password when prompted to log in on your local. This will allow you perform all the necessary actions from your terminal.
Next, let us create an application. Run this command in the root of your application
$ heroku create
We did not specify an application name so that Heroku will automatically generate a name for us. However, if you have a name in mind, you can add it after … create and Heroku would use that name instead.
Heroku app names are unique. There can be no two applications with the same name even if they are created by different users. Your app URL will take your app name, and that is a strong reason for this.
Please note the name of the app and git URL Heroku generates as we will use it for deployment.
Next, we will initialize git and commit all the files in we have created. Because we do not want to commit our node_modules folder, we will add it to our gitignore file.
1$ touch .gitgnore 2 $ echo "node_modules/*" > .gitignore 3 $ git init 4 $ git add . 5 $ git commit -am "initial commit"
Next, add the heroku app to your git remote
$ heroku git:remote -a #app-name
Remember to change “app-name” to the name provided by Heroku
You can then push to your application to Heroku:
$ git push heroku master
When the application is deployed, we need to scale it to keep it running.
$ heroku ps:scale web=1
Heroku free accounts are equipped with 1 dyno. The caveat is that the dyno runs 18 out of 24 hours a day. When you want to take the application live, subscribe to any of Heroku’s plans to get full 24 hour uptime and heroku’s support.
With our implementation, anybody with the Chrome extension will automatically receive an update whenever our application publishes one.
From your browser, open chrome://extensions/ and click Load Unpacked

Then select the directory containing your extension from the dropdown. Chrome will launch the extension and an icon will pop up on your extension bar.
Click on it and see what our extension looks like at the moment
Conclusion
In this tutorial, we have built a working Chrome extension. I know it is way simpler than you might have imagined, but best believe this is real. We used Node. and Pusher to enable us build upon this current extension and make it robust.
In the next part of this tutorial, we will allow users set the preference for the coin they wish to track and we equally send them aggregates of price shifts over a month period to enable them know more about the coins. We can personalise this data feed in realtime, all thanks to Pusher’s realtime API.
The source code to the application in this article is available on GitHub.


© 2024 Pusher Ltd. All rights reserved.
Pusher Limited is a company registered in England and Wales (No. 07489873) whose registered office is at MessageBird UK Limited, 3 More London Riverside, 4th Floor, London, United Kingdom, SE1 2AQ.