- Products

- Developers
- User stories
- Blog
- Pricing

Getting started with continuous integration in React Native - Part 1: Introduction
Introduction
As React Native continues to grow as a platform, so do the tools and development practices revolving around it. One such practice is continuous integration. It has been a staple for the web development community for quite some time, and for good reason. Manual processes tend to be brittle, and mistakes can’t really be avoided if things are done by hand. One can say that it’s only natural for the React Native community to embrace the continuous integration practice, after all, we use the same language (JavaScript) to develop React Native apps.
In this series, we’ll take a look at how we can implement continuous integration in React Native. Specifically, we’re going to tackle the following topics:
- Part 1: Introduction to continuous integration
- Part 2: Starting CI with App Center
- Part 3: Advanced CI with Bitrise
Note that we’ll only cover continuous integration in this series. Continuous deployment is a whole other topic.
In this part, I’ll introduce you to continuous integration. You’ll learn what CI is, its importance, and how CI is done in React Native. Next, I'll introduce you to the CI services that we will be using. Lastly, I'll introduce you to the app that we’re going to work on throughout the series.
You can find the code used in this series on its GitHub repo. The starter branch contains the pre-coded app. While the final output for each part will have their own branch (part2 and part3). There’s no part1 because we’re not really making any changes to the starter project in this part. The master branch contains the final output for the entire series.
Prerequisites
To follow this series, you need to have basic knowledge of React and React Native. Since continuous integration is more of like an advanced topic, I assume that you have already developed a few apps before. It doesn’t matter if it was released in the app stores or not.
The project that we will be working on uses Redux, so experience on using that will be helpful as well.
Knowledge of testing tools such as Jest and Detox will be helpful but not required.
You also need to have experience in using version control software such as Git. We’ll be specifically using Git in this series.
Your machine should also be set up for React Native development. So either Android or Xcode needs to be installed. This series will provide instructions for both platforms. We’ll be using Yarn to install packages, so you should have that installed as well.
What is continuous integration?
Continuous integration is the practice of frequently committing small changes to a shared repository. This can range from once per day to multiple times per day.
Automated tests (unit, functional, integration) are then run to check if the whole system is still working correctly. If it is, the changes can either be deployed to production or reviewed further. If it doesn’t work, then the developer can easily fix the problem because the change is only minimal.
The main benefit of using continuous integration is to be able to detect errors early so that they can be fixed immediately. That way, we can put more time into developing new features and making sure our apps are as user-friendly as possible.
CI workflow in React Native
If you’re coming from a web development background, the continuous integration workflow in React Native should be fairly familiar.
One huge part of the CI workflow is the server which will ensure that the app is running correctly. But unlike in a web project where the CI server usually only installs dependencies then performs some tests, in a mobile CI setup, the server also has the responsibility to build the app. That is, to come up with the .apk or .ipa file. This ensures that the app is building correctly each time new code is introduced.
Here’s what the workflow looks like. This assumes that you already have an existing React Native project, and a code repository:
- You connect your code repo to the CI server.
- You set up your CI server to build the app every time new code is committed to the
developbranch of your repo. - You create a new branch called
awesome-feature-1off of yourdevelopbranch. - You add the code for the new feature and add some tests.
- You test the changes locally by running the tests, building the app, and manually testing the new feature.
- Once you’re fairly sure that the app is working, you merge the
awesome-feature-1branch to thedevelopbranch and push it to your repo. - The CI server “sees” that a new code has been added to the
developbranch so it installs the dependencies and builds the app. - After the app is successfully built, it runs the unit and functional tests.
- Once the tests pass, the
.apkor.ipafiles become available for download. - If at some point, an error occurred while the CI server is doing all of those, an email is automatically sent to inform you that the build broke.
- You create a new branch off of the
awesome-feature-1branch and call itawesome-feature-1-fix-1. From there, you work on the fix and merge it back to theawesome-feature-1branch and then to thedevelopbranch once you’re done with the local tests. - You push the
developbranch to your repo and the cycle continues.
Note that the steps above are highly dependent on the Git workflow that you’ve adopted. Your branching model might look different from the one used above, and that’s ok. But no matter which model you’ve adopted or CI services you use, the general workflow will pretty much look the same: you implement a new feature → you push it to the code repo → CI server builds the app.
CI services for React Native
In this section, I’ll give you an overview of the services that we’re going to use throughout the series:
Visual Studio App Center
App Center is a platform that allows you to continuously build, test, release, and monitor apps. It supports GitHub, Bitbucket, and Visual Studio Team Services. That means you can connect your code repo to any of these services. So every time you push some changes to a specific branch, it will automatically build your app.
App Center supports the following mobile app development platforms:
- Swift
- Objective-C
- Java
- Xamarin
- React Native
If you’re doing any sort of development in any of these platforms, expect that there is some form of support that allows you to implement continuous integration in an easier way (compared to when you’re doing it by hand).
For example, App Center supports automated UI testing with frameworks such as Espresso, Appium, and XCUITest. Those frameworks are great if you’re developing a native Android or iOS app because you’re most likely using them already. But if you’re a React Native developer and you’re using something like Detox, you have no choice but to implement it by hand.
The good thing about App Center is that it supports custom build scripts which allows you to use tools which aren’t supported by default.
Lastly, App Center is also a continuous delivery platform so it provides the following services as well:
- Beta app distribution via Test Flight and Google Play Store
- Live code updates via CodePush
- App monitoring
- App analytics
- Push notifications
You might say that’s all well and good but how much is it? Well, fret not, because they have a very generous free tier so we can test most (if not all) of its services without having to dish out a few dollars.
Bitrise
Bitrise is a continous integration and delivery platform. Its main focus is on mobile app development so the following platforms are supported:
- Native iOS and Android
- Cordova
- Xamarin
- React Native
The main power of Bitrise comes from its 180+ integrations. Any tool or service that you’re already using for the continuous integration and delivery of your app is supported. Well, maybe not all, but in those 180+ integrations, there’s bound to be a handful of those that support what you need to accomplish.
Bitrise is also beginner-friendly. When it’s your first time using it, their built-in project scanner automatically detects the platform that you’re working with. From there, it creates a base workflow that builds, tests, and deploys your app.
Once you’re ready to explore, you can use their workflow editor to customize each step of the build process. There is already a ton of scripts you can choose from. For example, you want to deploy a specific release to App Center’s CodePush. Or upload the .apk or .ipa file to your Dropbox account.
Once you become confident in using the workflow editor, you can actually start editing the bitrise.yml directly in order to customize the build script. This is where the real power of Bitrise comes in. Because other developers who have dealt with a specific problem you’re having have already written a script which allows you to solve that. From there, you can just customize it to fit your own needs.
In case you’re wondering if Bitrise is free to try. Yes, it is. They even have a specific pricing tier for that. Though the maximum amount of time that each of your builds can take is limited to 10 minutes. Don’t worry though, their servers are pretty fast and they use a smart cache so it doesn’t need to install your project dependencies for every build. To give you an example of how fast it is, the project that we will be working on only took 1.5 minutes to build.
Introduction to the project
Throughout the series, we will be working on a single project which we will use for testing the CI services. Here’s what the project looks like:
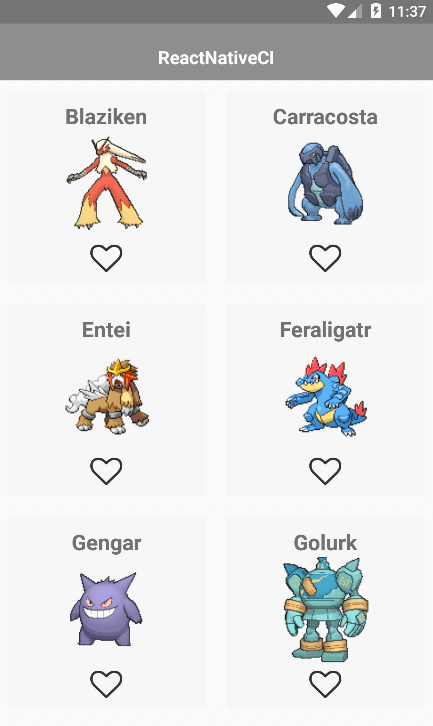
To keep the focus on continuous integration, the project is fairly simple. The users can scroll through a list of Pokemon and mark their favorites. Those favorites will be kept in local storage so the next time the user opens the app, they will still be marked as favorite.
If you switched to the starter branch, all of the features aren’t implemented yet. We will be implementing those as we progress through this series.
Conclusion
That’s it! In this tutorial, you’ve learned what continuous integration is and why it’s important. You also learned how CI is done in React Native and a couple of tools you can use to make it easier to set up.
Stay tuned for the second part where we’ll actually start to get our hands dirty with continuous integration.
You can find the code used in this tutorial on its GitHub repo.


© 2024 Pusher Ltd. All rights reserved.
Pusher Limited is a company registered in England and Wales (No. 07489873) whose registered office is at MessageBird UK Limited, 3 More London Riverside, 4th Floor, London, United Kingdom, SE1 2AQ.