- Products

- Developers
- User stories
- Blog
- Pricing

Implementing desktop notifications in your Laravel app
Introduction
Realtime notifications are now very common in modern web applications, as site owners want to keep users engaged and informed of happenings on their platform. Notifications are also a great way to build addiction, and make sure users keep coming back to your platform to see "what's new".
With Laravel and some Pusher magic, I will be demonstrating how to build a realtime app, with desktop notifications, utilising the Notification API.
Our application
We will build a simple News notification module which will alert everyone on a website when a new post is published. Ideally, this would be part of a larger app, but we will build it in isolation here to showcase our desktop notifications.
At the end of this tutorial, you will have learned how to:
- Broadcast events in Laravel, using Pusher
- Listen for events on channels, using Laravel Echo and Vue.js
- Use the Notification API to display desktop notifications
To follow along, you will need a working knowledge of PHP and JavaScript. Basic knowledge of Laravel and Vue.js are also needed. Laravel 5.4 and Vue.js 2.3 are used.
Introduction to Pusher
Pusher is a service that makes it super easy to add realtime functionality to web and mobile applications. We will be using it in our application, so sign up for a free Pusher account, create an app, and copy out the app credentials (App ID, Key and Secret) from the App Keys section.
Setup and configuration
For starters, let us set up our app, and do the necessary configuration. We will call the app news-talk.
To create a new app with the Laravel installer, run this command:
laravel new news-talk
The next set of commands should be run in the app's root directory.
Installing the Pusher PHP library:
composer require pusher/pusher-php-server
Installing the Laravel Frontend Dependencies (these include Bootstrap, Axios, Vue.js and a couple of other things which are nice to have):
npm install
Installing Laravel Echo and Pusher-js which we will use to listen for broadcast events:
npm install -S laravel-echo pusher-js
Next, we will do some more minor configuration to let Laravel know we will be using Pusher to manage our broadcasts.
Editing the .env:
1# ./.env 2 3BROADCAST_DRIVER=pusher 4 5PUSHER_APP_ID=your_pusher_add_id 6PUSHER_APP_KEY=your_pusher_app_key 7PUSHER_APP_SECRET=your_pusher_app_secret
Edit some more optional configuration for Pusher in the ./config/broadcasting.php file generated by Laravel. Refer to Driver prerequisites. options.
NOTE: If you created your app in a different cluster to the default
us-east-1, you must configure the cluster option. It is optional if you chose the default option.
Finally, we will configure Echo to use Pusher. We do that by uncommenting and editing the values at the bottom of resources/assets/js/bootstrap.js:
1// ./resources/assets/js/bootstrap.js 2 3import Echo from "laravel-echo" 4 5 window.Echo = new Echo({ 6 broadcaster: 'pusher', 7 key: 'your_pusher_key' 8});
Building the backend
Let's create a table for our posts. This is where data we create via our app will be persisted to. We will use a Laravel migration file, and an Eloquent model for communication with the database.
To create a Post model run this command:
php artisan make:model Post -m -c
The -m and c flags are for automatically generating the migration and controller files respectively.
Next, we edit the generated migration file located in the ./database/migrations folder. We adjust the up method to look like this:
1public function up() { 2 Schema::create('posts', function (Blueprint $table) { 3 $table->increments('id'); 4 $table->string('title'); 5 $table->text('description'); 6 $table->timestamps(); 7 }); 8}
Then, after editing the .env with your database details, you can create the table with this command:
php artisan migrate
Tip: Read more on the Laravel .env file
We should also edit the mass-assignable properties on the model:
1# ./app/Post.php 2 3class Post extends Model 4{ 5 6 /** 7 * The attributes that are mass assignable. 8 * 9 * @var array 10 */ 11 protected $fillable = ['title', 'description']; 12}
Saving a post
Next, we will add a route and controller method to save a new post.
We will be making an API call from the front-end to save our posts, so we can add the new route to the API routes at ./routes/api.php. Whatever route defined here will be prefixed by api, and belongs to the api middleware group.
1# ./routes/api 2 3Route::post('/post', 'PostController@store');
Adding the corresponding controller method:
1# ./app/Http/Controllers/PostController.php 2 3use App\Post; 4 5class PostController extends Controller { 6 7 /** 8 * Saves a new post to the database 9 */ 10 public function store(Request $request) { 11 // ... 12 // validation can be done here before saving 13 // with $this->validate($request, $rules) 14 // ... 15 16 // get data to be saved in an associative array using $request->only() 17 $data = $request->only(['title', 'description']); 18 19 // save post and assign return value of created post to $post array 20 $post = Post::create($data); 21 22 // return post as response, Laravel automatically serializes this to JSON 23 return response($post, 201); 24 } 25}
Working with events
Events are a great way to separate out application logic. We can define events to be triggered in our application when an action occurs, and we can define listeners, to listen for such events and carry out other activities.
Laravel allows for easy definition of events and listeners out of the box. It also includes helper functions and classes to allow us easily trigger and broadcast events.
We can create a new event with this command:
php artisan make:event PostPublished
The event class file is created at ./app/Events.
We can then edit it to suit our needs:
1# ./app/Events/PostPublished.php 2 3class PostPublished implements ShouldBroadcast { 4 use Dispatchable, InteractsWithSockets, SerializesModels; 5 6 public $post; 7 8 public function __construct($post) { 9 $this->post = $post; 10 } 11 12 /** 13 * Get the channels the event should broadcast on. 14 * 15 * @return Channel|array 16 */ 17 public function broadcastOn() { 18 return new Channel('posts'); 19 } 20 21 public function broadcastWith() { 22 return [ 23 'title' => $this->post->title, 24 ]; 25 } 26}
The Illuminate\Contracts\Broadcasting\ShouldBroadcast interface on the event class is used to inform Laravel that this event should be broadcast.
The broadcastOn method returns the channel that we want to broadcast our event on. The Channel class is used for broadcasting on public channels. PrivateChannel and PresenceChannel are for private channels (these require authentication for access). You can read more about the various Pusher channels here.
By default, Laravel broadcasts all of an event class’ public properties as its payload… broadcastWith helps us override that behaviour and choose what we want to send.
Dispatching events
In our app, we want to dispatch the PostPublished event after a post has been saved. In Laravel, we can dispatch events using the Event Facade, or the event() helper function.
To dispatch our PostPublished event, we can edit the store method in the PostController, and place the event call right after the post is saved:
1# ./app/Http/Controllers/PostController.php 2 3use App\Events\PostPublished; 4 5// save post and assign return value of created post to $post array 6$post = Post::create($data); 7 8// fire PostPublished event after post is successfully added to database 9event(new PostPublished($post)); 10// or 11// \Event::fire(new PostPublished($post))
The final PostController file will look like this:
1# ./app/Http/Controllers/PostController.php 2 3namespace App\Http\Controllers; 4 5use Illuminate\Http\Request; 6use App\Events\PostPublished; 7use App\Post; 8 9class PostController extends Controller { 10 11 /** 12 * Saves a new post to the database 13 */ 14 public function store(Request $request) { 15 // ... 16 // validation can be done here before saving 17 // with $this->validate($request, $rules) 18 // ... 19 20 // get data to save in an associative array using $request->only() 21 $data = $request->only(['title', 'description']); 22 23 // save post and assign return value of created post to $post array 24 $post = Post::create($data); 25 26 // fire PostPublished event after post is successfully added to database 27 event(new PostPublished($post)); 28 // or 29 // \Event::fire(new PostPublished($post)) 30 31 // return post as response, Laravel automatically serializes this to JSON 32 return response($post, 201); 33 } 34}
Now that we are done with building the backend, we can proceed to create our view and event listener on the Frontend.
Building the frontend
To create a basic page view for our app, we can edit the default welcome.blade.php file created by Laravel. We can replace its contents with the following:
1<!-- ./resources/views/welcome.blade.php --> 2 3<!DOCTYPE html> 4<html lang="{{ config('app.locale') }}"> 5<head> 6 <meta charset="utf-8"> 7 <meta http-equiv="X-UA-Compatible" content="IE=edge"> 8 <meta name="viewport" content="width=device-width, initial-scale=1"> 9 10 <!-- CSRF Token --> 11 <meta name="csrf-token" content="{{ csrf_token() }}"> 12 13 <title>News Talk</title> 14 15 <!-- Styles --> 16 <link href="{{ asset('css/app.css') }}" rel="stylesheet"> 17 18 <style> 19 .container { 20 padding-top: 100px; 21 } 22 </style> 23 24 <!-- Scripts --> 25 <script> 26 window.Laravel = {!! json_encode([ 'csrfToken' => csrf_token(), ]) !!}; 27 </script> 28</head> 29<body> 30 31 <div id="app"> 32 <!-- home Vue component --> 33 <home></home> 34 </div> 35 36 <!-- Scripts --> 37 <script src="{{ asset('js/app.js') }}"></script> 38</body> 39</html>
Most of the code above is boilerplate Laravel HTML content with relevant scripts and CSS files attached. We will generate them later on.
We also included a Vue component (home) which hasn't been defined yet. Let us go ahead to create and define it.
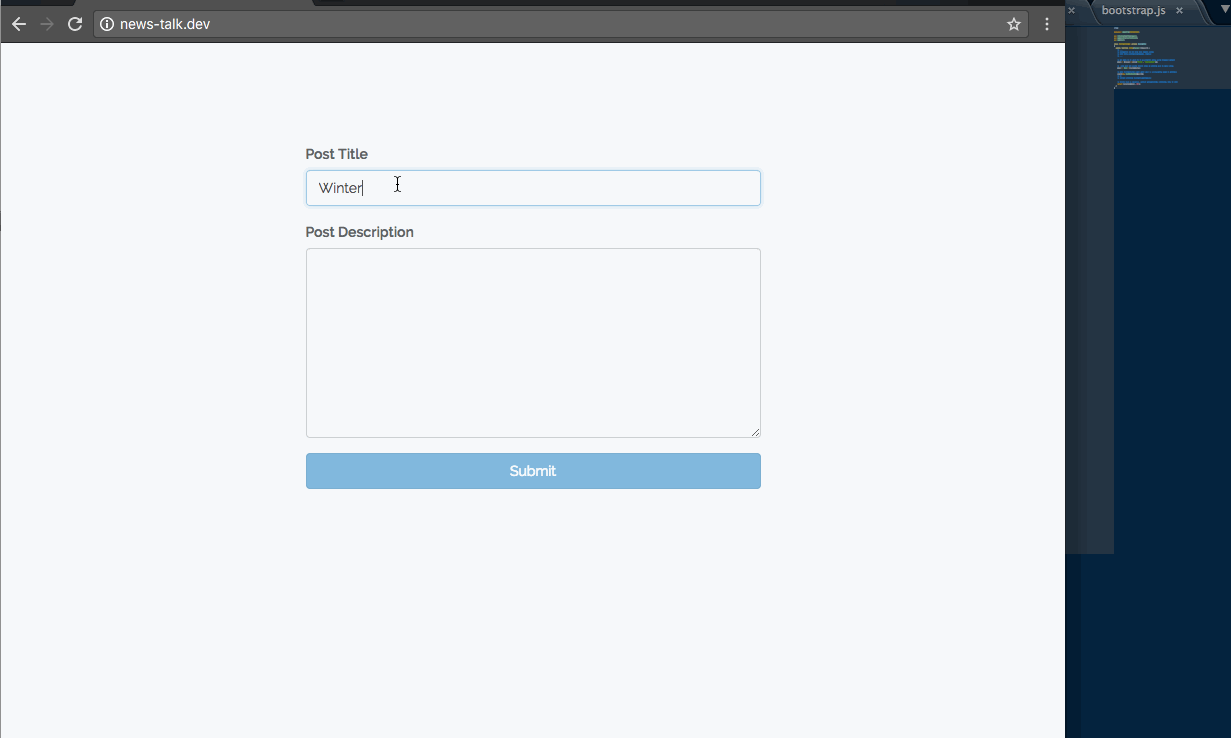
Creating the home Vue component:
1<!-- ./resources/assets/js/components/Home.vue --> 2<template> 3 <div class="container"> 4 <div class="row"> 5 <div class="col-sm-6 col-sm-offset-3"> 6 <div class="form-group"> 7 <label for="title">Post Title</label> 8 <input v-model="newPostTitle" id="title" type="text" class="form-control"> 9 </div> 10 <div class="form-group"> 11 <label for="description">Post Description</label> 12 <textarea v-model="newPostDesc" id="description" rows="8" class="form-control"></textarea> 13 </div> 14 <button @click="addPost(newPostTitle, newPostDesc)" 15 :class="{disabled: (!newPostTitle || !newPostDesc)}" 16 class="btn btn-block btn-primary">Submit</button> 17 </div> 18 </div> 19 </div> 20</template> 21 22<script> 23 export default { 24 data() { 25 return { 26 newPostTitle: "", 27 newPostDesc: "" 28 } 29 }, 30 created() { 31 this.listenForChanges(); 32 }, 33 methods: { 34 addPost(postName, postDesc) { 35 // check if entries are not empty 36 if(!postName || !postDesc) 37 return; 38 39 // make API to save post 40 axios.post('/api/post', { 41 title: postName, description: postDesc 42 }).then( response => { 43 if(response.data) { 44 this.newPostTitle = this.newPostDesc = ""; 45 } 46 }) 47 }, 48 listenForChanges() { 49 Echo.channel('posts') 50 .listen('PostPublished', post => { 51 if (! ('Notification' in window)) { 52 alert('Web Notification is not supported'); 53 return; 54 } 55 56 Notification.requestPermission( permission => { 57 let notification = new Notification('New post alert!', { 58 body: post.title, // content for the alert 59 icon: "https://pusher.com/static_logos/320x320.png" // optional image url 60 }); 61 62 // link to page on clicking the notification 63 notification.onclick = () => { 64 window.open(window.location.href); 65 }; 66 }); 67 }) 68 } 69 } 70 } 71</script>
In the above code, we define two methods. addPost() and listenForChanges. The addPost method makes a post request to our API with the required payload when a user adds a new post.
In the listenForChanges method, we use Echo to subscribe to the posts channel, which is the channel we are broadcasting to, from our backend. We also listen for PostPublished events, and define a callback that activates our desktop notification whenever an event is fired.
We are using the notifications API for desktop notifications. We first request permission to send desktop notifications, then notify the user once permission is granted.
We can also check if a browser supports desktop notifications this way:
1if (window.Notification) { 2 console.log('Notifications are supported!'); 3} else { 4 alert('Notifications aren\'t supported on your browser! :('); 5}
We create an instance of the Notification object with our post title as the body. An optional icon parameter can also be set, as we did.
Finally, we define the component as a global component in app.js:
1// ./resources/assets/js/app.js 2 3Vue.component('home', require('./components/Home.vue'));
Bringing it all together
We can compile our assets easily using Laravel Mix!:
npm run dev
Now, we can navigate to the app's homepage to see it in action. If you use Laravel Valet, you can also share the app, and visit it via another device to test the desktop notifications.
Conclusion
We have learned how to build an event-driven basic realtime app enabled with desktop notifications, thanks to Laravel and Pusher. As a next step, you could also learn how to build a chat application with Pusher, and integrate desktop notifications whenever a user receives a message... awesome, right?
If you’ve thought of any other great ways to use Pusher and Laravel, let us know in the comments!
The entire code for this tutorial is hosted on Github. You can look through and ask questions if you need more information.


© 2024 Pusher Ltd. All rights reserved.
Pusher Limited is a company registered in England and Wales (No. 07489873) whose registered office is at MessageBird UK Limited, 3 More London Riverside, 4th Floor, London, United Kingdom, SE1 2AQ.