- Products

- Developers
- User stories
- Blog
- Pricing

Build a floating hearts effect in Swift
- Introduction
- Requirements
- Creating the floating hearts application in Xcode
- Creating a background looping video in iOS using Swift
- Adding floating hearts to your iOS application
- Adding realtime functionality to our floating hearts using Pusher
- Creating the Node.js backend for our realtime floating hearts app
- Testing our floating hearts application
- Conclusion
Introduction
If you are a user of applications like Periscope, Instagram and Facebook, then you may have noticed they have a feature in their live streams where anytime someone likes the live content, the ‘likes’ float on your screen. This article will show you how you can implement the realtime floating hearts feature on your iOS application using Swift and Pusher.
Here is a screen recording of what we will be achieving in this tutorial using Swift and Pusher.
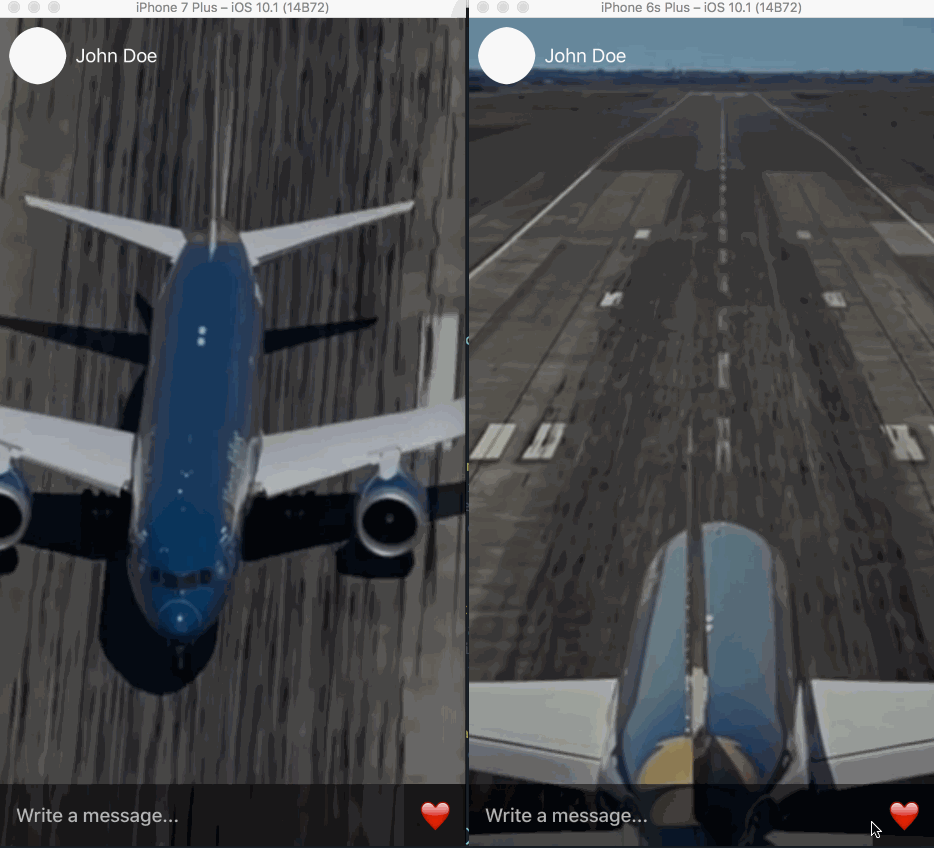
From the recording, you can see that when the like button is tapped, the likes float to the top and they are also replicated on another device viewing the video being played.
Now, let's begin the journey.
Requirements
To follow along in this tutorial you will need the following things:
- Knowledge of Swift and Xcode storyboards.
- Xcode installed on your machine.
- A Pusher application - you can create a free Pusher account here.
- Node.js and NPM installed on your machine.
- Cocoapods installed on your machine - install it using Ruby by running:
gem install cocoapods.
Hopefully, you have all the requirements checked off. Let’s get started.
Creating the floating hearts application in Xcode
Launch Xcode and in there create a new project. We are going to call the app streamlove (yes, it’s lame we know). When you are done with the initial setup, close Xcode and launch terminal. cd to the root directory of your application and run pod init. This will create a Podfile in the root directory. Open it in your text editor and replace the code there with the following:
1platform :ios, '9.0' 2 target 'streamlove' do 3 use_frameworks! 4 pod 'PusherSwift', '~> 4.0' 5 pod 'Alamofire', '~> 4.4' 6 end
After that save and close the file and run the command pod install. This should start installing all the dependencies required for the application we are creating. Now open the streamlove.xcworkspace file in Xcode.
The next thing we need to do is design our applications storyboard. Open the Main.storyboard file. We are going to add some mock views because we do not really want to implement anything on them and they are just there for the aesthetics. The main things we will focus on are the button and the background video. After designing our storyboard, this is what we hope to have:
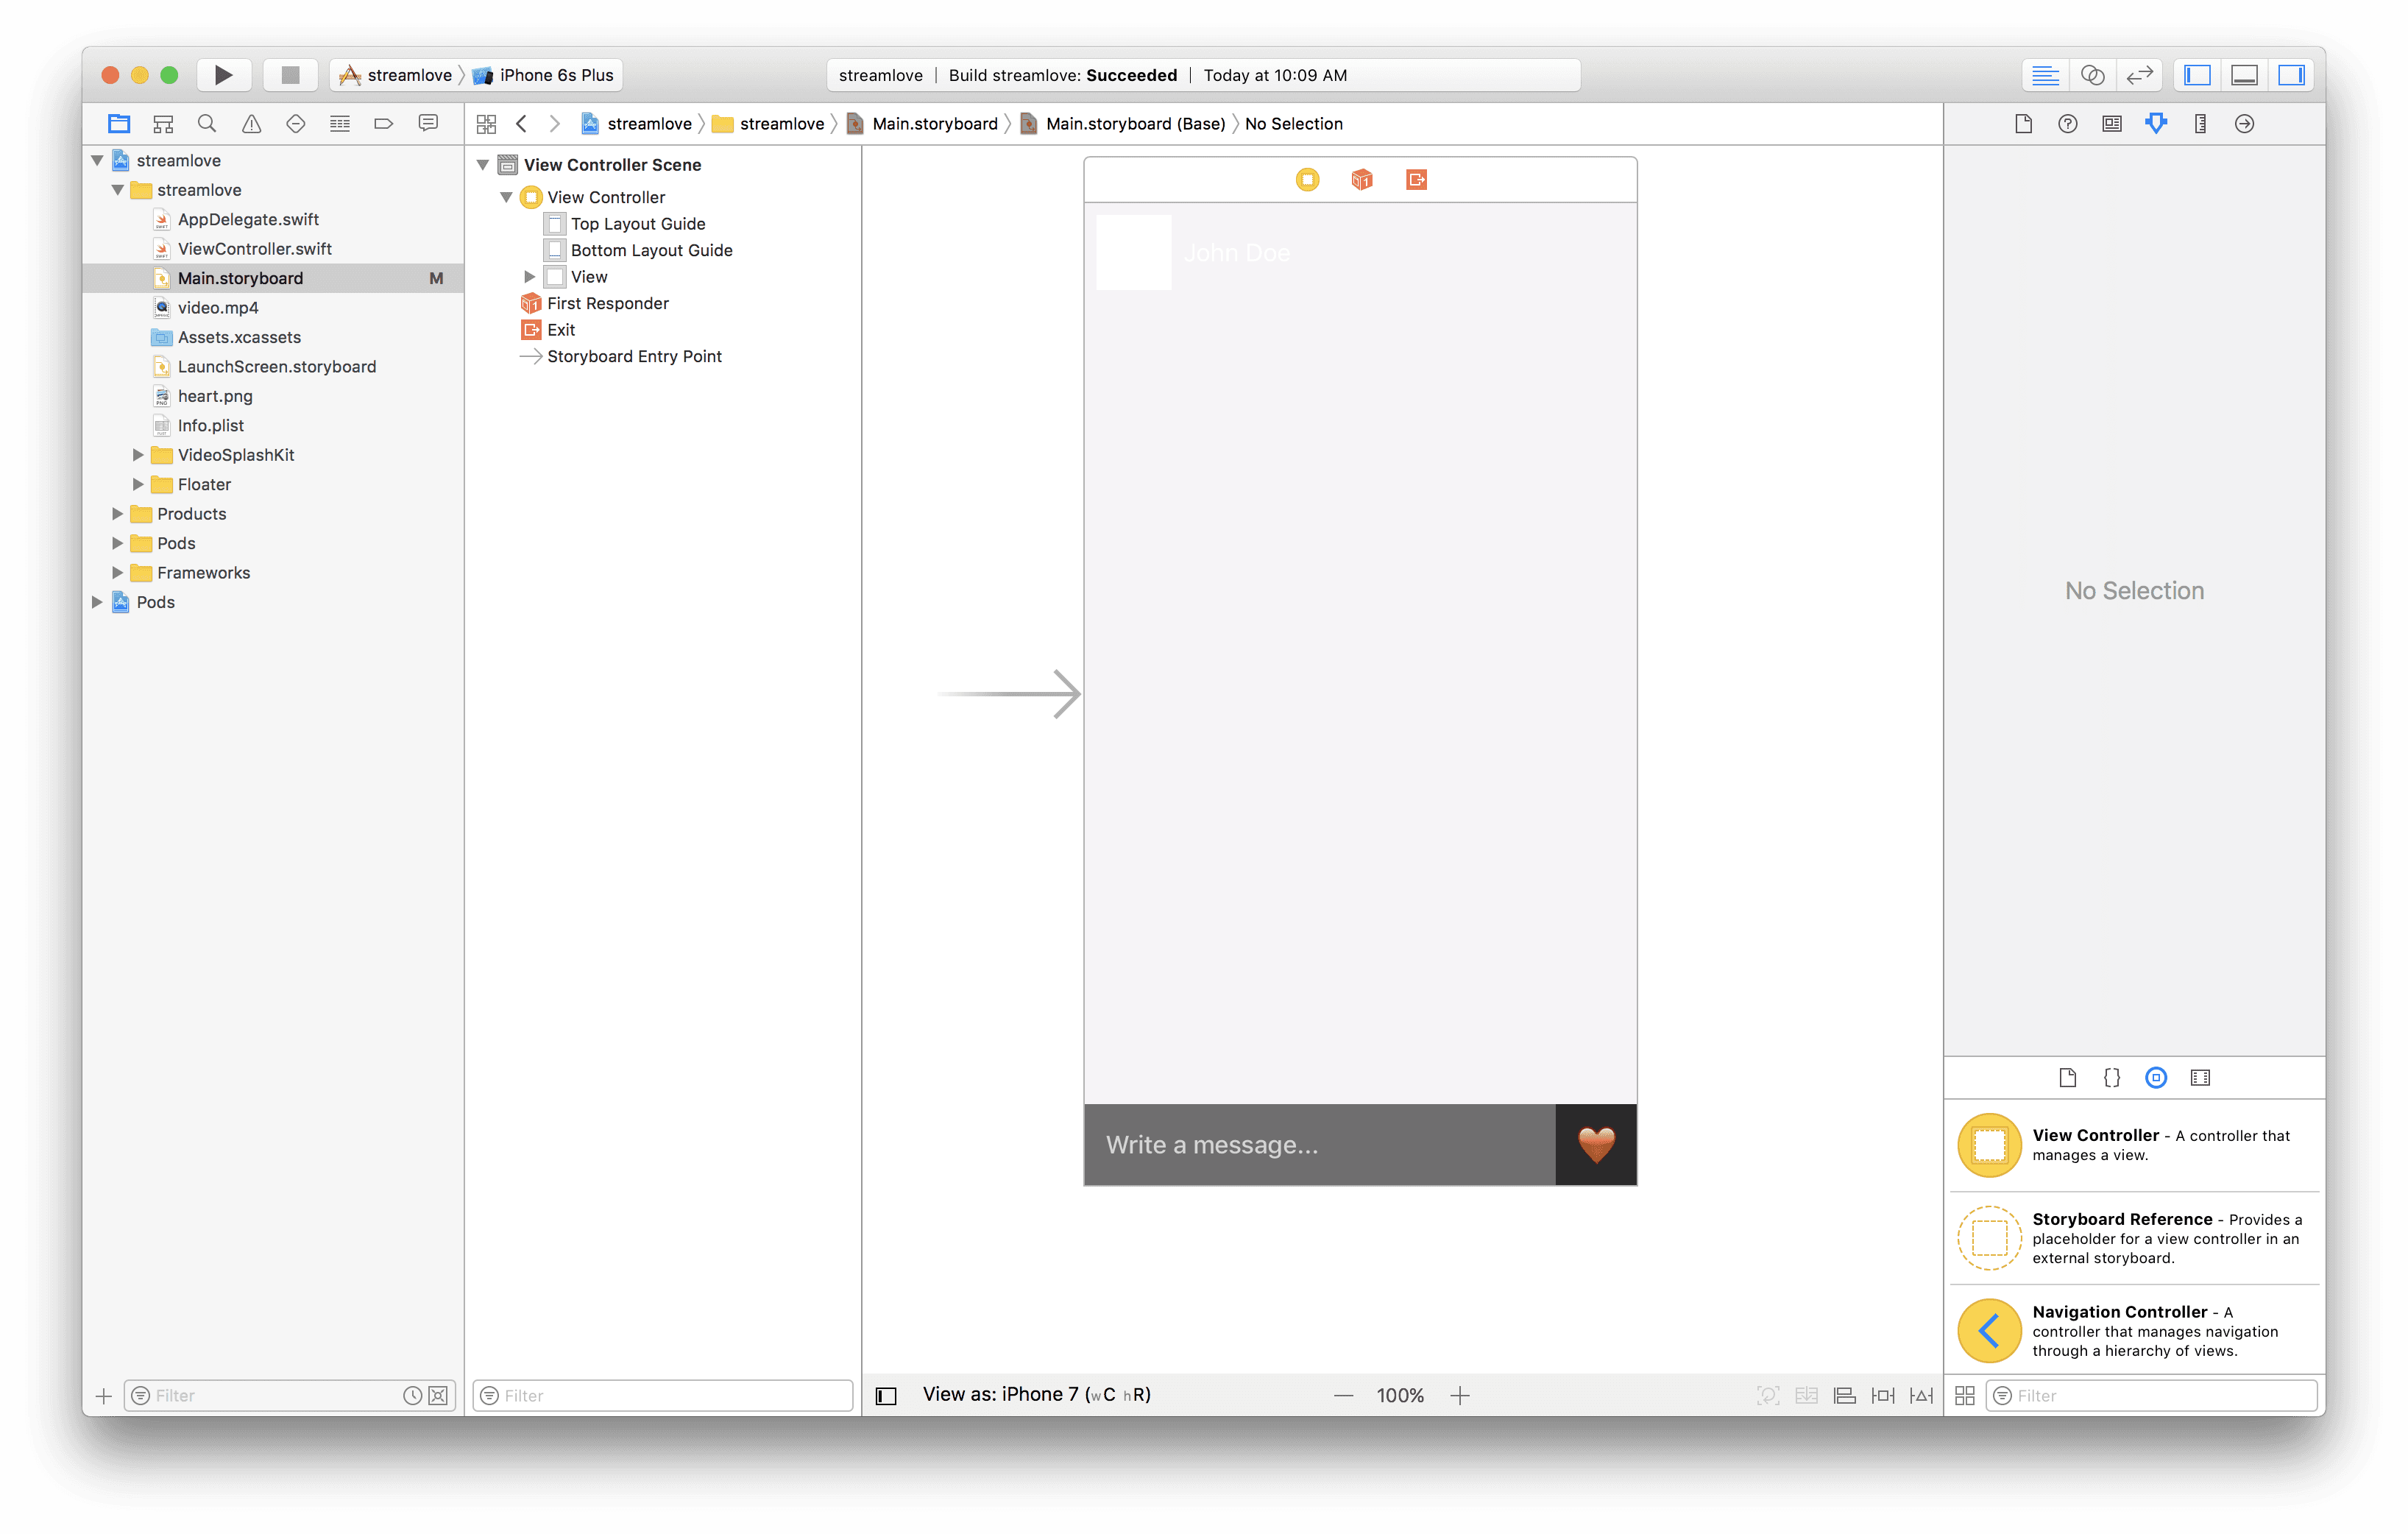
In this storyboard, we have a button to the bottom right of the screen, and that button has an @IBAction in the ViewController so you will need to ctrl+drag to make the connection between the button and the ViewController.
This should add the @IBAction to the ViewController as shown below:
1@IBAction func hearted(_ sender: Any) { 2 // This function will be fired every time the button is tapped! 3 }
Creating a background looping video in iOS using Swift
Next, we will create the video background that will just simulate a live stream (since creating an actual live stream falls far out of the scope of this article). Open the ViewController file and paste the following in it:
1import UIKit 2 import PusherSwift 3 import Alamofire 4 5 class ViewController: VideoSplashViewController { 6 7 override func viewDidLoad() { 8 super.viewDidLoad() 9 loadVideoStreamSample() 10 } 11 12 private func loadVideoStreamSample() { 13 let url = NSURL.fileURL(withPath: Bundle.main.path(forResource: "video", ofType: "mp4")!) 14 self.videoFrame = view.frame 15 self.fillMode = .resizeAspectFill 16 self.alwaysRepeat = true 17 self.sound = true 18 self.startTime = 0.0 19 self.duration = 10.0 20 self.alpha = 0.7 21 self.backgroundColor = UIColor.black 22 self.contentURL = url 23 self.restartForeground = true 24 } 25 26 override var prefersStatusBarHidden: Bool { 27 return true 28 } 29 30 @IBAction func hearted(_ sender: Any) { 31 // This function will be called everytime the button is tapped! 32 } 33 }
In the first line, we have imported the libraries we will need, but mostly later in the tutorial. Now, let us focus on the others. The ViewController extends a VideoSplashViewController that we have not yet created. In the viewDidLoad method we have called a method loadVideoStreamSample and in that method, we are basically loading a video and setting some parameters for the video. These parameters will be implemented in the VideoSplashViewController.
Now for the VideoSplashViewController, we will be using a Swift library that is available on Github. However, because the library does not support Swift 3, we will be picking out the files we need and converting them to support Swift 3. The first one is the VideoSplashViewController. Create a new file VideoSplashViewController that extends UIViewController and in there paste the following:
1import UIKit 2 import MediaPlayer 3 import AVKit 4 5 public enum ScalingMode { 6 case resize 7 case resizeAspect 8 case resizeAspectFill 9 } 10 11 public class VideoSplashViewController: UIViewController { 12 13 private let moviePlayer = AVPlayerViewController() 14 private var moviePlayerSoundLevel: Float = 1.0 15 16 public var videoFrame: CGRect = CGRect() 17 public var startTime: CGFloat = 0.0 18 public var duration: CGFloat = 0.0 19 public var backgroundColor = UIColor.black { didSet { view.backgroundColor = backgroundColor } } 20 public var contentURL: URL = URL(fileURLWithPath: "") { didSet { setMoviePlayer(url: contentURL) } } 21 public var sound: Bool = true { didSet { moviePlayerSoundLevel = sound ? 1 : 0 } } 22 public var alpha: CGFloat = 1 { didSet { moviePlayer.view.alpha = alpha } } 23 24 public var alwaysRepeat: Bool = true { 25 26 didSet { 27 28 if alwaysRepeat { 29 NotificationCenter.default.addObserver(forName:.AVPlayerItemDidPlayToEndTime, object:nil, queue:nil) { [weak self] (notification) in 30 self?.playerItemDidReachEnd() 31 } 32 return 33 } 34 35 if !alwaysRepeat { 36 NotificationCenter.default.removeObserver(self, name:.AVPlayerItemDidPlayToEndTime, object: nil) 37 } 38 } 39 } 40 41 public var fillMode: ScalingMode = .resizeAspectFill { 42 didSet { 43 switch fillMode { 44 case .resize: 45 moviePlayer.videoGravity = AVLayerVideoGravityResize 46 case .resizeAspect: 47 moviePlayer.videoGravity = AVLayerVideoGravityResizeAspect 48 case .resizeAspectFill: 49 moviePlayer.videoGravity = AVLayerVideoGravityResizeAspectFill 50 } 51 } 52 } 53 54 public var restartForeground: Bool = false { 55 didSet { 56 if restartForeground { 57 NotificationCenter.default.addObserver(forName:.UIApplicationWillEnterForeground, object:nil, queue:nil) { [weak self] (notification) in 58 self?.playerItemDidReachEnd() 59 } 60 } 61 } 62 } 63 64 override public func viewDidAppear(_ animated: Bool) { 65 super.viewDidAppear(animated) 66 moviePlayer.view.frame = videoFrame 67 moviePlayer.view.backgroundColor = self.backgroundColor; 68 moviePlayer.showsPlaybackControls = false 69 moviePlayer.view.isUserInteractionEnabled = false 70 view.addSubview(moviePlayer.view) 71 view.sendSubview(toBack: moviePlayer.view) 72 } 73 74 private func setMoviePlayer(url: URL){ 75 let videoCutter = VideoCutter() 76 videoCutter.cropVideoWithUrl(videoUrl: url, startTime: startTime, duration: duration) { [weak self] (videoPath, error) -> Void in 77 guard let path = videoPath, let strongSelf = self else { return } 78 strongSelf.moviePlayer.player = AVPlayer(url: path) 79 strongSelf.moviePlayer.player?.addObserver(strongSelf, forKeyPath: "status", options: .new, context: nil) 80 strongSelf.moviePlayer.player?.play() 81 strongSelf.moviePlayer.player?.volume = strongSelf.moviePlayerSoundLevel 82 } 83 } 84 85 public override func observeValue(forKeyPath keyPath: String?, of object: Any?, change: [NSKeyValueChangeKey : Any]?, context: UnsafeMutableRawPointer?) { 86 87 guard let player = object as? AVPlayer else { 88 super.observeValue(forKeyPath: keyPath, of: object, change: change, context: context) 89 return 90 } 91 92 if player.status == .readyToPlay { 93 movieReadyToPlay() 94 } 95 } 96 97 deinit{ 98 moviePlayer.player?.removeObserver(self, forKeyPath: "status") 99 NotificationCenter.default.removeObserver(self) 100 } 101 102 // Override in subclass 103 public func movieReadyToPlay() { } 104 105 func playerItemDidReachEnd() { 106 moviePlayer.player?.seek(to: kCMTimeZero) 107 moviePlayer.player?.play() 108 } 109 110 func playVideo() { 111 moviePlayer.player?.play() 112 } 113 114 func pauseVideo() { 115 moviePlayer.player?.pause() 116 } 117 }
Now create another file called VideoCutter that extends NSObject and paste in the following:
1import UIKit 2 import AVFoundation 3 4 extension String { 5 var convert: NSString { return (self as NSString) } 6 } 7 8 public class VideoCutter: NSObject { 9 10 /** 11 Block based method for crop video url 12 13 @param videoUrl Video url 14 @param startTime The starting point of the video segments 15 @param duration Total time, video length 16 17 */ 18 public func cropVideoWithUrl(videoUrl url: URL, startTime: CGFloat, duration: CGFloat, completion: ((_ videoPath:URL?, _ error: NSError?) -> Void)?) { 19 20 DispatchQueue.global().async { 21 22 let asset = AVURLAsset(url: url, options: nil) 23 var outputPath = NSHomeDirectory() 24 let documentPaths = NSSearchPathForDirectoriesInDomains(.documentDirectory, .userDomainMask, true) 25 if (documentPaths.count > 0) { 26 outputPath = documentPaths.first! 27 } 28 let fileManager = FileManager.default 29 30 guard let exportSession = AVAssetExportSession(asset: asset, presetName: "AVAssetExportPresetHighestQuality") else { return } 31 let outputFilePath = outputPath.convert.appendingPathComponent("output.mp4") 32 33 if fileManager.fileExists(atPath: outputFilePath) { 34 do { 35 try fileManager.removeItem(atPath: outputFilePath) 36 } catch let error { 37 print(error) 38 } 39 } 40 41 do { 42 try fileManager.createDirectory(atPath:outputPath, withIntermediateDirectories: true, attributes: nil) } 43 catch let error { 44 print(error) 45 } 46 47 let start = CMTimeMakeWithSeconds(Float64(startTime), 600) 48 let duration = CMTimeMakeWithSeconds(Float64(duration), 600) 49 let range = CMTimeRangeMake(start, duration) 50 let outputURL = URL(fileURLWithPath: outputFilePath) 51 exportSession.outputURL = outputURL 52 exportSession.timeRange = range 53 exportSession.shouldOptimizeForNetworkUse = true 54 exportSession.outputFileType = AVFileTypeMPEG4 55 exportSession.exportAsynchronously(completionHandler: { 56 switch exportSession.status { 57 case .completed: 58 DispatchQueue.main.async { completion?(exportSession.outputURL, nil) } 59 default: 60 DispatchQueue.main.async { completion?(nil, nil) } 61 } 62 }) 63 } 64 } 65 }
In the files above we just created, it basically helps you manage the video background and sets a video of your choosing as the background video and loops it forever. This can also be useful for application landing pages. However, we are just using it for a make-believe video stream.
💡 If you are using a Swift version below 3, then you can use the source code as is in the repository, however, if you use Swift 3 or above you may need these modifications to make it work.
Now the last thing we need to do is add an mp4 file to our workspace. You can use any mp4 file you wish to use. Drop the video file video.mp4 into the workspace and make sure it is copied and added to the application target.
If you build and preview your application now you should see the video looping in the background. Great.
Adding floating hearts to your iOS application
Now that we have the video looping in the background, the next thing we will do is add the floating heart functionality to the application. Basically, every time someone clicks the heart button, a heart icon should float to the top and slowly disappear.
Open the Main.storyboard file and in the bottom right above the heart button, add a View with no background. This will be the viewport where the floating hearts will travel. You can make it a rectangle of about 250x350.
Next, we will be using another library from Github to add the floating hearts functionality to the application. The file we actually need is the Floater.swift file. The library does not yet have any package manager way to install it so we will be copying the contents of the file and adding it to a file in our workspace.
We are building with Swift 3 so we need to make some modifications to the class, so copy and paste the code below if you are using Swift 3, and use as is if you are not. Create a new file Floater.swift and extend the UIView object. Paste this into the class:
1import UIKit 2 3 @IBDesignable public class Floater: UIView { 4 5 var image1: UIImage? 6 var image2: UIImage? 7 var image3: UIImage? 8 var image4: UIImage? 9 10 var isAnimating: Bool = false 11 var views: [UIView]! 12 var duration: TimeInterval = 1.0 13 var duration1: TimeInterval = 2.0 14 var duration2: TimeInterval = 2.0 15 var floatieSize = CGSize(width: 50, height: 50) 16 var floatieDelay: Double = 10 17 var delay: Double = 10.0 18 var startingAlpha: CGFloat = 1.0 19 var endingAlpha: CGFloat = 0.0 20 var upwards: Bool = true 21 var remove: Bool = true 22 23 @IBInspectable var removeAtEnd: Bool = true { 24 didSet { 25 remove = removeAtEnd 26 } 27 } 28 @IBInspectable var FloatingUp: Bool = true { 29 didSet { 30 upwards = FloatingUp 31 } 32 } 33 @IBInspectable var alphaAtStart: CGFloat = 1.0 { 34 didSet { 35 startingAlpha = alphaAtStart 36 } 37 } 38 @IBInspectable var alphaAtEnd: CGFloat = 0.0 { 39 didSet { 40 endingAlpha = alphaAtEnd 41 } 42 } 43 @IBInspectable var rotationSpeed: Double = 10 { 44 didSet { 45 duration2 = 20 / rotationSpeed 46 } 47 } 48 @IBInspectable var density: Double = 10 { 49 didSet { 50 floatieDelay = 1 / density 51 } 52 } 53 @IBInspectable var delayedStart: Double = 10 { 54 didSet { 55 delay = delayedStart 56 } 57 } 58 @IBInspectable var speedY: CGFloat = 10 { 59 didSet { 60 duration = Double(10/speedY) 61 } 62 } 63 @IBInspectable var speedX: CGFloat = 5 { 64 didSet { 65 duration1 = Double(10/speedX) 66 } 67 } 68 @IBInspectable var floatieWidth: CGFloat = 50 { 69 didSet { 70 floatieSize.width = floatieWidth 71 } 72 } 73 @IBInspectable var floatieHeight: CGFloat = 50 { 74 didSet { 75 floatieSize.height = floatieHeight 76 } 77 } 78 @IBInspectable var borderColor: UIColor = UIColor.clear { 79 didSet { 80 layer.borderColor = borderColor.cgColor 81 } 82 } 83 84 @IBInspectable var borderWidth: CGFloat = 0 { 85 didSet { 86 layer.borderWidth = borderWidth 87 } 88 } 89 90 @IBInspectable var cornerRadius: CGFloat = 0 { 91 didSet { 92 layer.cornerRadius = cornerRadius 93 } 94 } 95 96 @IBInspectable var floaterImage1: UIImage? { 97 didSet { 98 image1 = floaterImage1 99 } 100 } 101 @IBInspectable var floaterImage2: UIImage? { 102 didSet { 103 image2 = floaterImage2 104 } 105 } 106 @IBInspectable var floaterImage3: UIImage? { 107 didSet { 108 image3 = floaterImage3 109 } 110 } 111 @IBInspectable var floaterImage4: UIImage? { 112 didSet { 113 image4 = floaterImage4 114 } 115 } 116 117 override public func awakeFromNib() { 118 super.awakeFromNib() 119 } 120 121 func startAnimation() { 122 print("Start Animating") 123 isAnimating = true 124 views = [] 125 var imagesArray = [UIImage?]() 126 var actualImages = [UIImage]() 127 let frameW = self.frame.width 128 let frameH = self.frame.height 129 var startingPoint: CGFloat! 130 var endingPoint: CGFloat! 131 if upwards { 132 startingPoint = frameH 133 endingPoint = floatieHeight*2 134 } else { 135 startingPoint = 0 136 endingPoint = frameH - floatieHeight*2 137 } 138 imagesArray += [image1, image2, image3, image4] 139 if !imagesArray.isEmpty { 140 for i in imagesArray { 141 if i != nil { 142 actualImages.append(i!) 143 } 144 } 145 } 146 147 let deadlineTime = DispatchTime.now() + .seconds(Int(self.delay * Double(NSEC_PER_SEC))) 148 149 DispatchQueue.global().asyncAfter(deadline: deadlineTime, execute: { 150 var goToNext = true 151 while self.isAnimating { 152 if goToNext { 153 goToNext = false 154 155 DispatchQueue.main.asyncAfter(deadline: .now()+0.3, execute: { 156 let randomNumber = self.randomIntBetweenNumbers(firstNum:1, secondNum: 2) 157 var randomRotation: CGFloat! 158 if randomNumber == 1 { 159 randomRotation = -1 160 } else { 161 randomRotation = 1 162 } 163 let randomX = self.randomFloatBetweenNumbers(firstNum: 0 + self.floatieSize.width/2, secondNum: self.frame.width - self.floatieSize.width/2) 164 let floatieView = UIView(frame: CGRect(x: randomX, y: startingPoint, width: 50, height: 50)) 165 self.addSubview(floatieView) 166 167 let floatie = UIImageView(frame: CGRect(x: 0, y: 0, width: self.floatieSize.width, height: self.floatieSize.height)) 168 169 if !actualImages.isEmpty { 170 171 let randomImageIndex = (self.randomIntBetweenNumbers(firstNum: 1, secondNum: actualImages.count) - 1 ) 172 floatie.image = actualImages[randomImageIndex] 173 floatie.center = CGPoint(x: 0, y: 0) 174 floatie.backgroundColor = UIColor.clear 175 floatie.layer.zPosition = 10 176 floatie.alpha = self.startingAlpha 177 178 floatieView.addSubview(floatie) 179 var xChange: CGFloat! 180 if randomX < self.frame.width/2 { 181 xChange = randomX + self.randomFloatBetweenNumbers(firstNum: randomX, secondNum: frameW-randomX) 182 } else { 183 xChange = self.randomFloatBetweenNumbers(firstNum: self.floatieSize.width*2, secondNum: randomX) 184 } 185 186 187 self.views.append(floatieView) 188 UIView.animate(withDuration: self.duration, delay: 0, 189 options: [], animations: { 190 floatieView.center.y = endingPoint 191 floatie.alpha = self.endingAlpha 192 goToNext = false 193 }, completion: {(value: Bool) in 194 if self.remove { 195 floatieView.removeFromSuperview() 196 } 197 }) 198 UIView.animate(withDuration: self.duration1, delay: 0, 199 options: [.repeat, .autoreverse], animations: { 200 floatieView.center.x = xChange 201 }, completion: nil) 202 UIView.animate(withDuration: self.duration2, delay: 0, options: [.repeat, .autoreverse], animations: { floatieView.transform = CGAffineTransform(rotationAngle: CGFloat(M_PI_2)*randomRotation) 203 }, completion: nil) 204 } 205 }) 206 } 207 } 208 }) 209 } 210 211 func stopAnimation() { 212 print("Stop Animating") 213 views = [] 214 isAnimating = false 215 if !views.isEmpty { 216 for i in views { 217 i.removeFromSuperview() 218 } 219 } 220 } 221 222 func randomFloatBetweenNumbers(firstNum: CGFloat, secondNum: CGFloat) -> CGFloat{ 223 return CGFloat(arc4random()) / CGFloat(UINT32_MAX) * abs(firstNum - secondNum) + min(firstNum, secondNum) 224 } 225 226 func randomIntBetweenNumbers(firstNum: Int, secondNum: Int) -> Int{ 227 return firstNum + Int(arc4random_uniform(UInt32(secondNum - firstNum + 1))) 228 } 229 }
The library simply creates a floating heart when the startAnimation method is called and stops it when the stopAnimation method is called. Now that the file is created, open your Main.storyboard file and add the Floater.swift View to the floater view we created earlier. This should add some new options in the side bar. These options are due to @IBDesignable and @IBInspectable that were added to the Floater.swift class.
💡
**IBDesignable**and**IBInspectable**, a way to create custom elements and the attributes. This can be directly added to the iOS Interface Builder. Read more about IBDesignable and IBInspectable.
Now in the new options fields, add the following values:
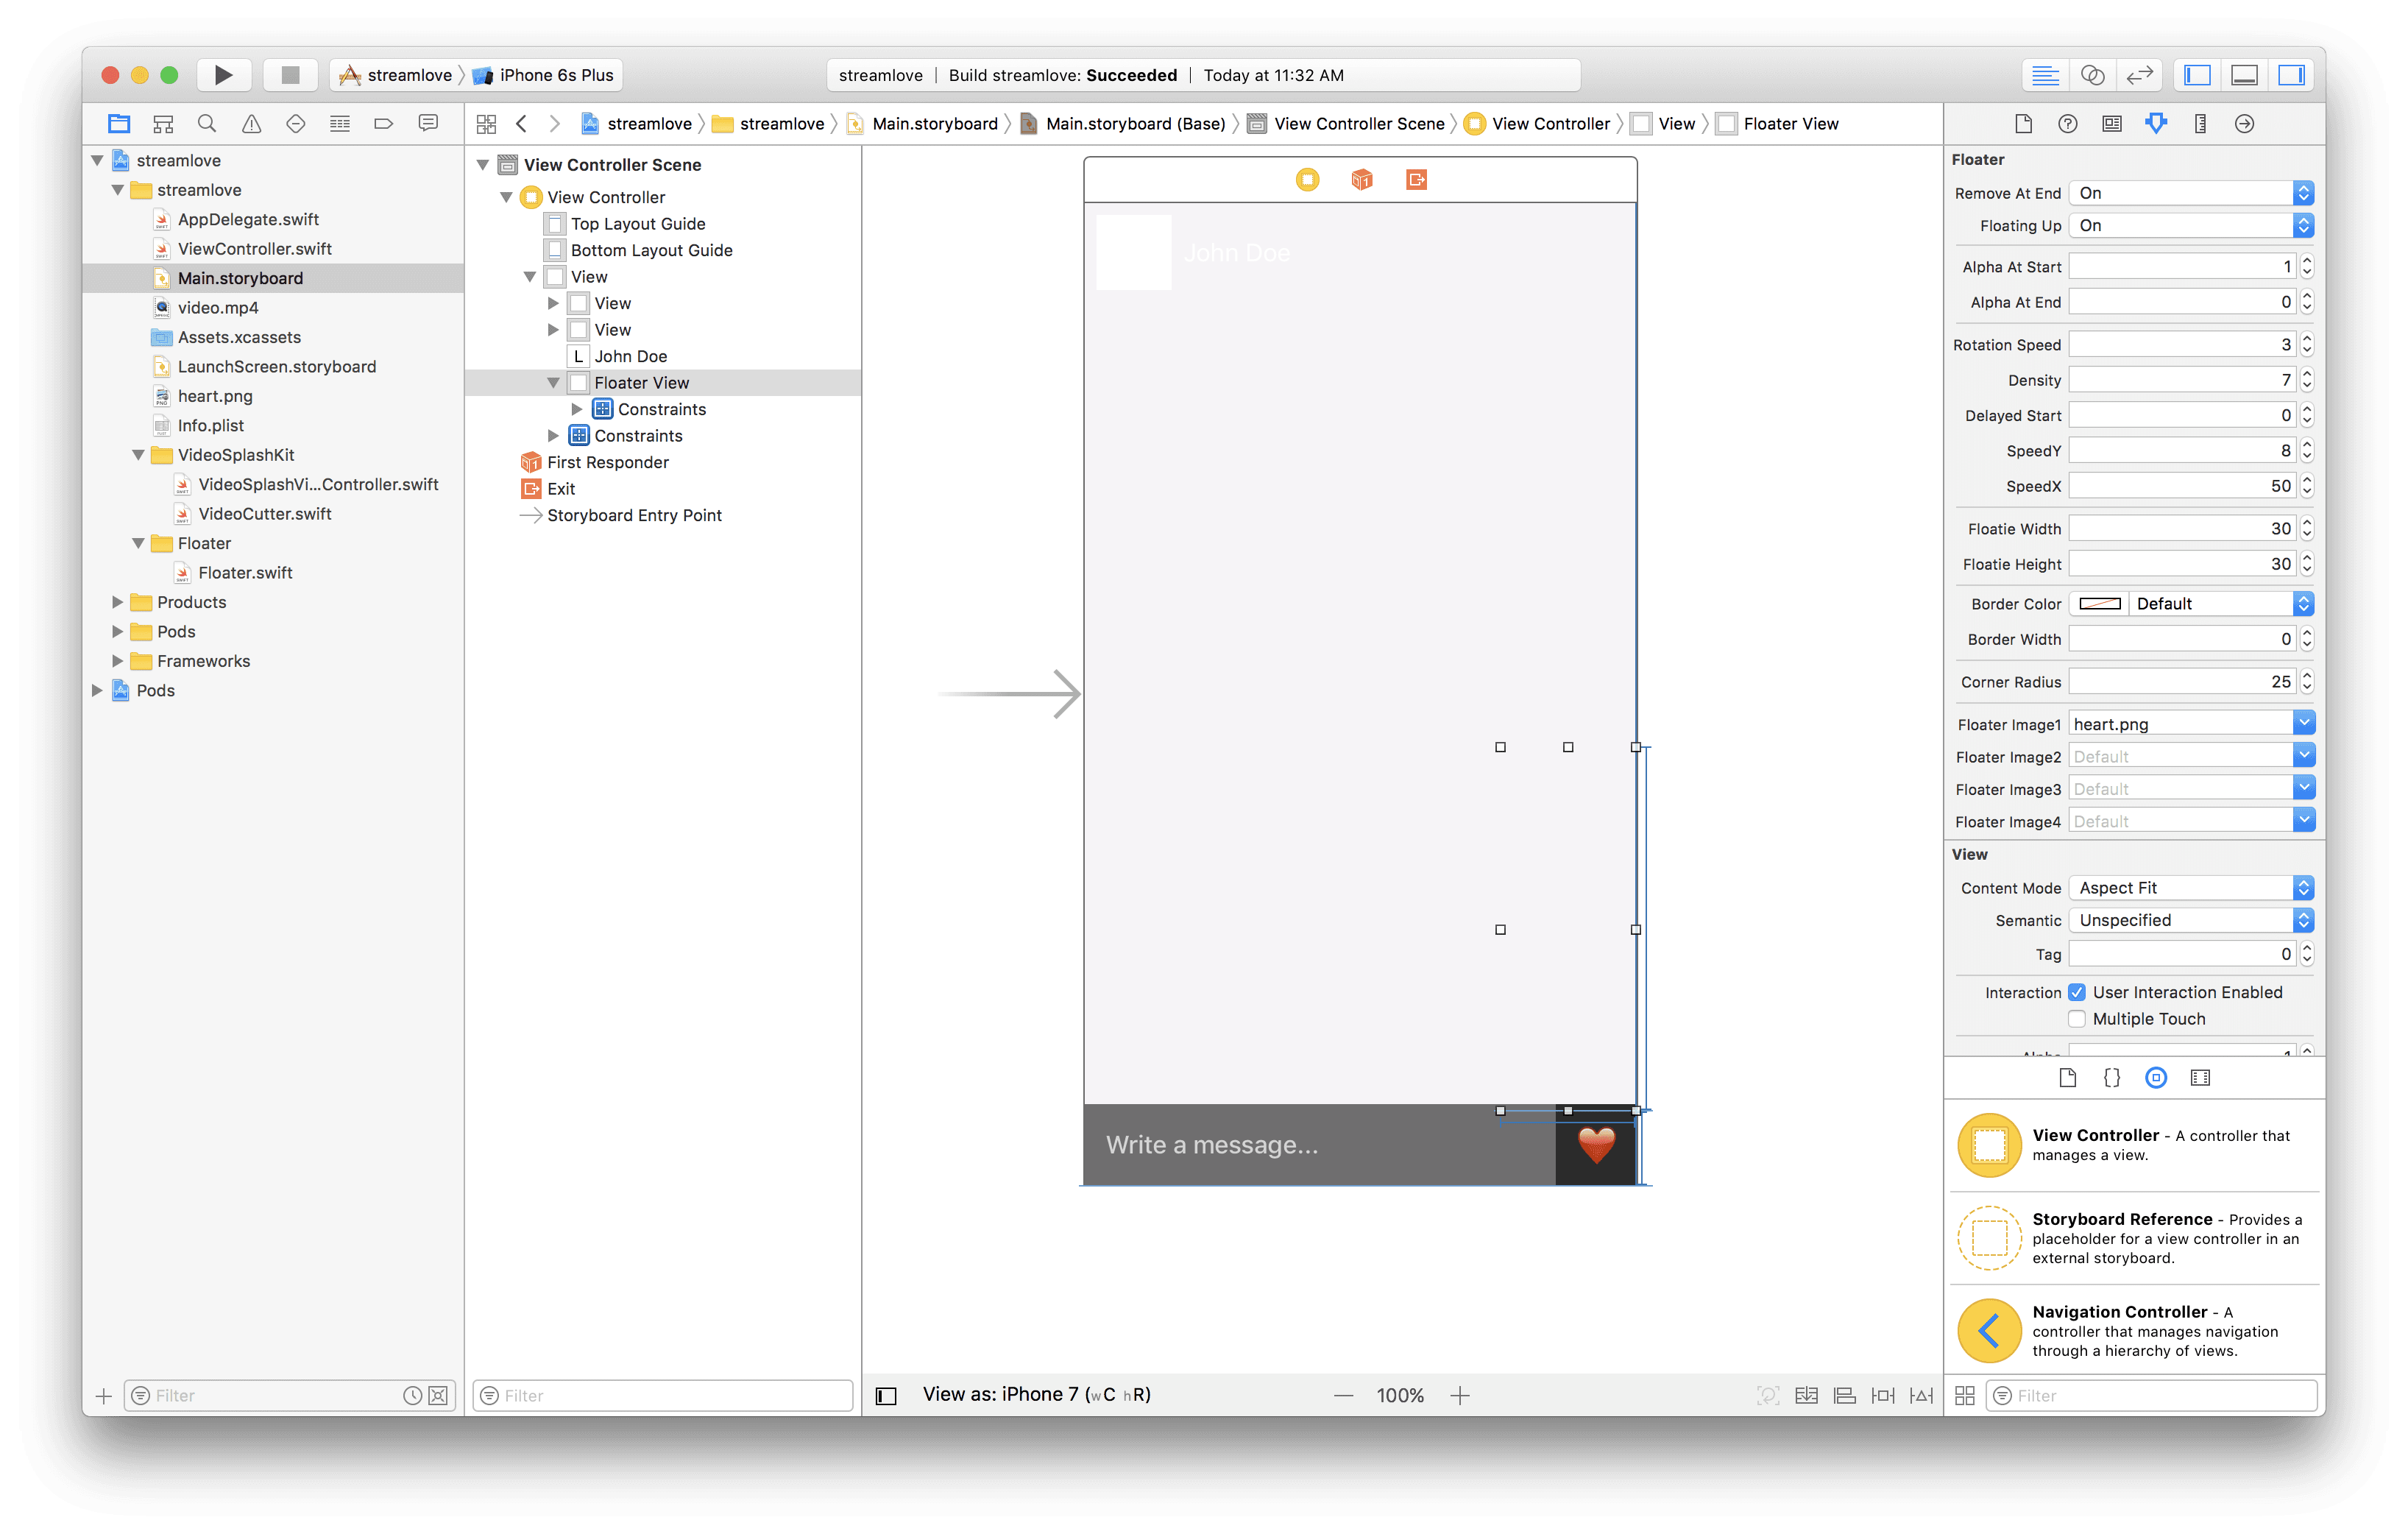
For the floater image, add a 30x30 heart image to your workspace and then select it in the floater image section.
Now open the ViewController and add the following methods:
1@IBOutlet weak var floaterView: Floater! 2 3 private func startEndAnimation() { 4 floaterView.startAnimation() 5 DispatchQueue.main.asyncAfter(deadline: .now() + 1, execute: { 6 self.floaterView.stopAnimation() 7 }) 8 }
Now call the startEndAnimation from the hearted method so it is invoked when the button is pressed. Make sure the @IBOutlet floaterView is linked to the view port that we created earlier in the article. Now, when you build and preview, you should see the heart floating every time the button is clicked.
Adding realtime functionality to our floating hearts using Pusher
Now that we have successfully added the floating hearts, the next thing to do is add realtime functionality using Pusher. If you have not already, create a Pusher account, create a new application and copy the credentials as you will need them.
Open the ViewController and in there add the following:
1static let API_ENDPOINT = "http://localhost:4000"; 2 3 var pusher : Pusher! 4 5 let deviceUuid : String = UIDevice.current.identifierForVendor!.uuidString 6 7 private func listenForNewLikes() { 8 pusher = Pusher(key: "PUSHER_KEY", options: PusherClientOptions(host: .cluster("PUSHER_CLUSTER"))) 9 10 let channel = pusher.subscribe("likes") 11 let _ = channel.bind(eventName: "like", callback: { (data: Any?) -> Void in 12 if let data = data as? [String: AnyObject] { 13 let uuid = data["uuid"] as! String 14 15 if uuid != self.deviceUuid { 16 self.startEndAnimation() 17 } 18 } 19 }) 20 pusher.connect() 21 } 22 23 private func postLike() { 24 let params: Parameters = ["uuid": deviceUuid] 25 26 Alamofire.request(ViewController.API_ENDPOINT + "/like", method: .post, parameters: params).validate().responseJSON { response in 27 switch response.result { 28 29 case .success: 30 print("Liked") 31 case .failure(let error): 32 print(error) 33 } 34 } 35 }
First, we define some class properties for storing the API endpoint base URL, the Pusher instance and the device UUID. The listenForNewLikes is where we define a listener that waits for events sent from Pusher and then fires a callback when it receives the event. We will be using that to trigger the floating hearts startAndEndAnimation method. The postLike method is where we use AlamoFire to hit an endpoint (we will create this next). The endpoint will be where we send “like” events to Pusher so they can be broadcast to other listeners on the channel.
If all is well, your ViewController should now look like this:
1import UIKit 2 import PusherSwift 3 import Alamofire 4 5 class ViewController: VideoSplashViewController { 6 7 @IBOutlet weak var floaterView: Floater! 8 9 static let API_ENDPOINT = "http://localhost:4000"; 10 11 var pusher : Pusher! 12 13 let deviceUuid : String = UIDevice.current.identifierForVendor!.uuidString 14 15 override func viewDidLoad() { 16 super.viewDidLoad() 17 loadVideoStreamSample() 18 listenForNewLikes() 19 } 20 21 @IBAction func hearted(_ sender: Any) { 22 postLike() 23 startEndAnimation() 24 } 25 26 private func startEndAnimation() { 27 floaterView.startAnimation() 28 DispatchQueue.main.asyncAfter(deadline: .now() + 1, execute: { 29 self.floaterView.stopAnimation() 30 }) 31 } 32 33 private func listenForNewLikes() { 34 pusher = Pusher(key: "PUSHER_KEY", options: PusherClientOptions(host: .cluster("PUSHER_CLUSTER"))) 35 36 let channel = pusher.subscribe("likes") 37 let _ = channel.bind(eventName: "like", callback: { (data: Any?) -> Void in 38 if let data = data as? [String: AnyObject] { 39 let uuid = data["uuid"] as! String 40 41 if uuid != self.deviceUuid { 42 self.startEndAnimation() 43 } 44 } 45 }) 46 pusher.connect() 47 } 48 49 private func postLike() { 50 let params: Parameters = ["uuid": deviceUuid] 51 52 Alamofire.request(ViewController.API_ENDPOINT + "/like", method: .post, parameters: params).validate().responseJSON { response in 53 switch response.result { 54 55 case .success: 56 print("Liked") 57 case .failure(let error): 58 print(error) 59 } 60 } 61 } 62 63 private func loadVideoStreamSample() { 64 let url = NSURL.fileURL(withPath: Bundle.main.path(forResource: "video", ofType: "mp4")!) 65 self.videoFrame = view.frame 66 self.fillMode = .resizeAspectFill 67 self.alwaysRepeat = true 68 self.sound = true 69 self.startTime = 0.0 70 self.duration = 10.0 71 self.alpha = 0.7 72 self.backgroundColor = UIColor.black 73 self.contentURL = url 74 self.restartForeground = true 75 } 76 77 override var prefersStatusBarHidden: Bool { 78 return true 79 } 80 }
⚠️ You should replace the “PUSHER_CLUSTER” and “PUSHER_KEY” with the actual values gotten from your Pusher application dashboard.
That should do it for the Xcode side of things. Now we need to create a backend application for our application. This backend app will just receive the payload from the application and send it to Pusher.
Creating the Node.js backend for our realtime floating hearts app
Create a directory for the web application and then create two new files:
The index.js file…
1let Pusher = require('pusher'); 2 let express = require('express'); 3 let app = express(); 4 let bodyParser = require('body-parser') 5 let pusher = new Pusher(require('./config.js')['config']); 6 7 app.use(bodyParser.json()); 8 app.use(bodyParser.urlencoded({ extended: false })); 9 10 app.post('/like', (req, res, next) => { 11 let payload = {uuid: req.body.uuid} 12 pusher.trigger('likes', 'like', payload) 13 res.json({success: 200}) 14 }) 15 16 app.get('/', (req, res) => { 17 res.json("It works!"); 18 }); 19 20 app.use((req, res, next) => { 21 let err = new Error('Not Found'); 22 err.status = 404; 23 next(err); 24 }); 25 26 app.listen(4000, function() { 27 console.log('App listening on port 4000!') 28 });
The index.js file also has one route where it receives messages from the iOS application and triggers the Pusher event which is picked up by the application.
The next file is the packages.json where we define the NPM dependencies:
1{ 2 "main": "index.js", 3 "dependencies": { 4 "body-parser": "^1.16.0", 5 "express": "^4.14.1", 6 "pusher": "^1.5.1" 7 } 8 }
Finally, we have the config.js where we will put our Pusher configuration:
1module.exports = { 2 appId: 'PUSHER_ID', 3 key: 'PUSHER_KEY', 4 secret: 'PUSHER_SECRET', 5 cluster: 'PUSHER_CLUSTER', 6 };
Now run npm install on the directory and then node index.js once the npm installation is complete. You should see App listening on port 4000! message.
Testing our floating hearts application
Once you have your local node web server running, you will need to make some changes so your application can talk to the local web server. In the info.plist file, make the following changes:
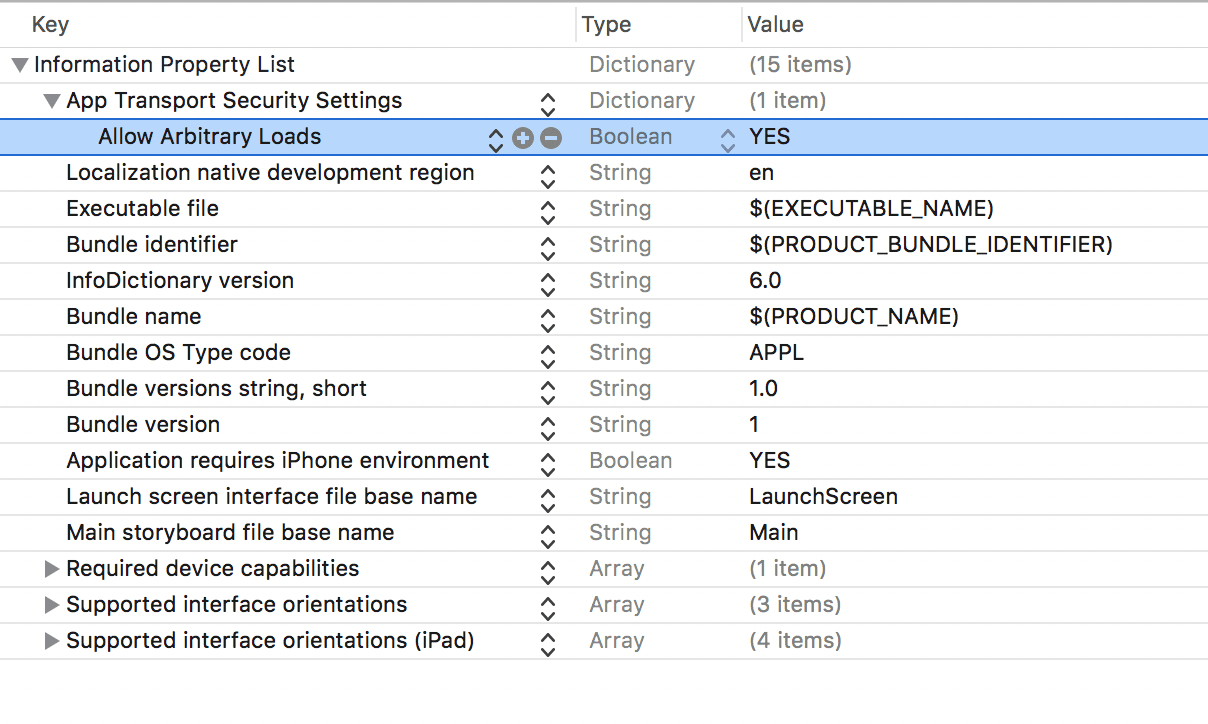
With this change, you can build and run your application and it will talk directly with your local web application.
Conclusion
In this article, we have been able to replicate the floating hearts feature that apps like Facebook, Instagram, Periscope etc have. You can use this as a base to expand the actual feature into a working application of your own.


© 2024 Pusher Ltd. All rights reserved.
Pusher Limited is a company registered in England and Wales (No. 07489873) whose registered office is at MessageBird UK Limited, 3 More London Riverside, 4th Floor, London, United Kingdom, SE1 2AQ.