- Products

- Developers
- User stories
- Blog
- Pricing

Build a geofencing web app using Angular
Introduction
A geo-fence is a virtual perimeter for a real-world geographic area. Geofencing is the use of GPS or RFID technology to create a virtual geographic boundary, enabling software to trigger a response when a mobile device enters or leaves a particular area.
To follow this tutorial a basic understanding of Angular and Node.js is required. Please ensure that you have Node and npm installed before you begin.
If you have no prior knowledge of Angular, kindly follow the tutorial here. Come back and finish the tutorial when you’re done.
We’ll be using these tools to build our application:
We’ll be creating an application for a fictional ranch called “The Ranch”. Our application will allow “The Ranch” employees track the location of each active guest in realtime. The application will alert employees when an active guest is exiting the boundaries of the ranch.
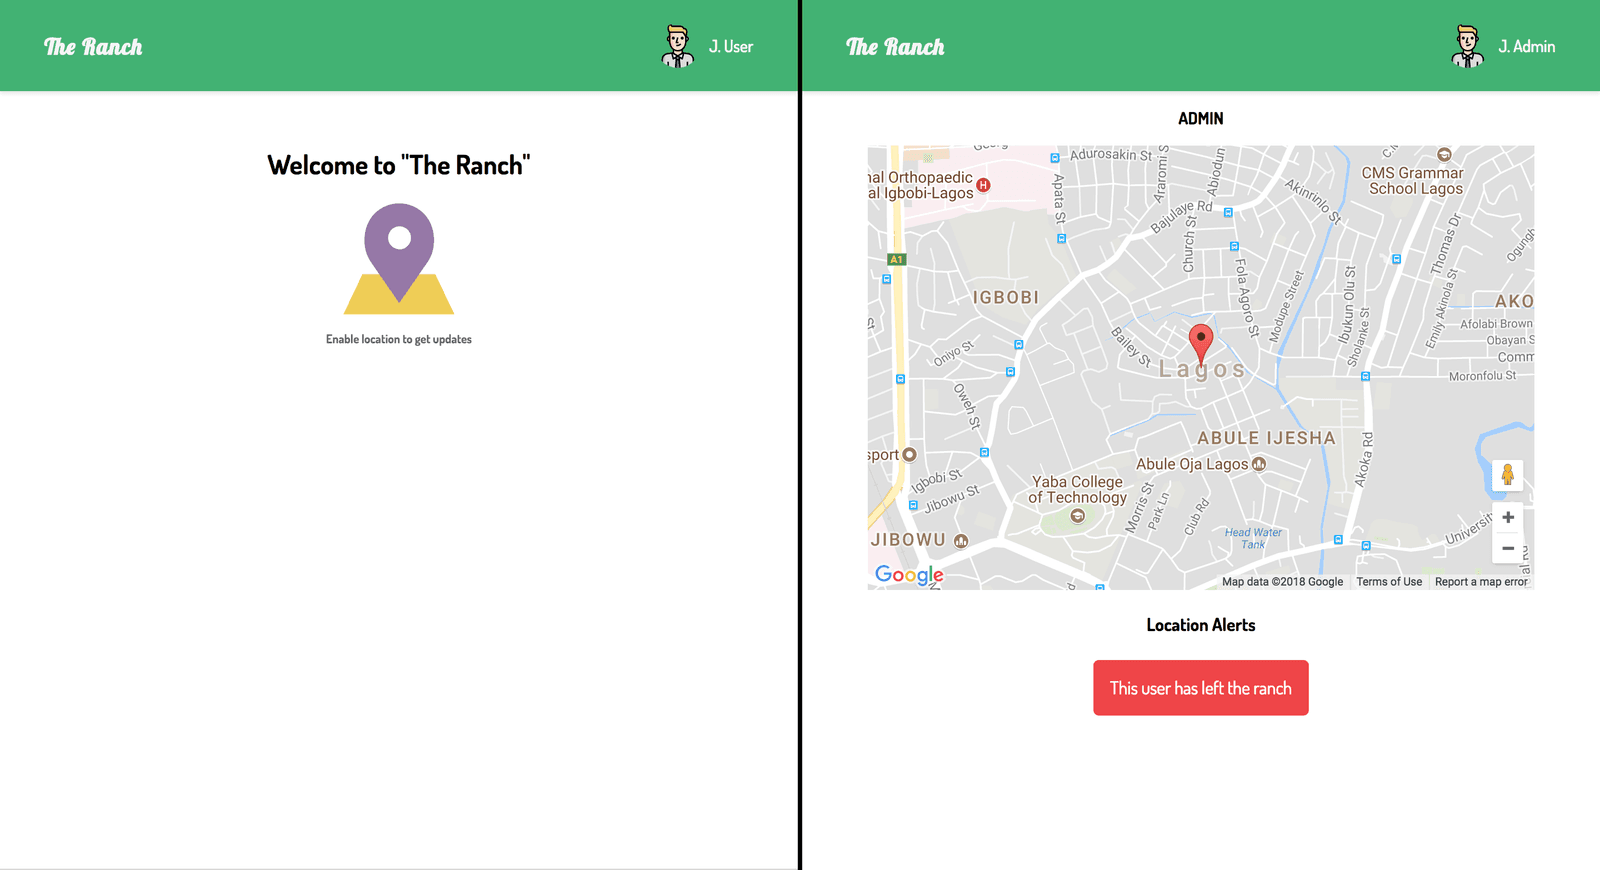
Here’s a screenshot of the final product:
Initializing the application and installing dependencies
To get started, we will use the CLI (command line interface) provided by the Angular team to initialize our project.
First, install the CLI by running npm install -g @angular/cli. NPM is a package manager used for installing packages. It will be available on your PC if you have Node installed.
To create a new Angular project using the CLI, open a terminal and run:
ng new pusher-geofencing --style=scss --``routing
This command is used to initialize a new Angular project with routing setup; the project will make use of SCSS for styling.
Next run the following command in the root folder of the project to install dependencies.
1// install depencies required to build the server 2 npm install express body-parser dotenv pusher 3 4 // front-end dependencies 5 npm install pusher-js
Start the Angular development server by running ng serve in a terminal in the root folder of your project.
Building our server
We’ll build our server using Express. Express is a fast, unopinionated, minimalist web framework for Node.js.
Create a file called server.js in the root of the project and update it with the code snippet below
1// server.js 2 3 require('dotenv').config(); 4 const express = require('express'); 5 const bodyParser = require('body-parser'); 6 const Pusher = require('pusher'); 7 8 const app = express(); 9 const port = process.env.PORT || 4000; 10 const pusher = new Pusher({ 11 appId: process.env.PUSHER_APP_ID, 12 key: process.env.PUSHER_KEY, 13 secret: process.env.PUSHER_SECRET, 14 cluster: 'eu', 15 }); 16 17 app.use(bodyParser.json()); 18 app.use(bodyParser.urlencoded({extended: false})); 19 app.use((req, res, next) => { 20 res.header('Access-Control-Allow-Origin', '*'); 21 res.header( 22 'Access-Control-Allow-Headers', 23 'Origin, X-Requested-With, Content-Type, Accept' 24 ); 25 next(); 26 }); 27 28 app.listen(port, () => { 29 console.log(`Server started on port ${port}`); 30 });
The calls to our endpoint will be coming in from a different origin. Therefore, we need to make sure we include the CORS headers (Access-Control-Allow-Origin). If you are unfamiliar with the concept of CORS headers, you can find more information here.
This is a standard Node application configuration, nothing specific to our app.
Create a Pusher account and a new Pusher Channels app if you haven’t done so yet and get your appId, key and secret.
Create a file in the root folder of the project and name it .env. Copy the following snippet into the .env file and ensure to replace the placeholder values with your Pusher credentials.
1// .env 2 3 // Replace the placeholder values with your actual pusher credentials 4 PUSHER_APP_ID=PUSHER_APP_ID 5 PUSHER_KEY=PUSHER_KEY 6 PUSHER_SECRET=PUSHER_SECRET
We’ll make use of the dotenv library to load the variables contained in the .env file into the Node environment. The dotenv library should be initialized as early as possible in the application.
Send votes
Let’s create a post route ping , the frontend of the application will send make a request to this route containing the current location of the user. This will be done whenever there’s a location change.
1// server.js 2 require('dotenv').config(); 3 ... 4 5 app.use((req, res, next) => { 6 res.header('Access-Control-Allow-Origin', '*'); 7 ... 8 }); 9 10 11 app.post('/ping', (req, res) => { 12 const { lat, lng } = req.body; 13 const data = { 14 lat, 15 lng, 16 }; 17 pusher.trigger('location', 'ping', data); 18 res.json(data); 19 }); 20 21 ...
- Using object destructuring, we got the
latandlngfrom the body of the request. - The
dataobject contains the coordinates sent in. This object will be sent as the data for the triggered Pusher event. The same object will be sent as a response to the user. - The trigger is achieved using the
triggermethod which takes the trigger identifier(location), an event name (ping), and a payload.
Home view
Run ng generate component home to create the home component. This component will be the view users see when they visit. It will request permission to get the user’s current location.
Open the home.component.html file and replace it with the content below.
1// home.component.html 2 3 <app-header [username]="username"></app-header> 4 <div class="content"> 5 <h2>Welcome to "The Ranch"</h2> 6 <img src="/assets/placeholder.svg" alt=""> 7 <h6>Enable location to get updates</h6> 8 </div>
Note: all assets used in the article are available in the GitHub repo
The view itself is static. There won’t be a lot happening in this particular view except the request to get the user’s current location. We referenced a header component in the markup. The component was created because the same header will be reused in the admin page. We’ll create the component shortly.
Styling
Copy the following styles into the home.component.scss file.
1// home.component.scss 2 3 .content { 4 display: flex; 5 flex-direction: column; 6 align-items: center; 7 padding: 30px 0; 8 img { 9 height: 100px; 10 } 11 h6 { 12 margin:15px 0; 13 opacity: 0.6; 14 } 15 }
Home component
Here, we’ll define methods to get the user’s location and sending the location to the server.
1// home.component.ts 2 3 import { Component, OnInit } from '@angular/core'; 4 import { HttpClient } from '@angular/common/http'; 5 @Component({ 6 selector: 'app-home', 7 templateUrl: './home.component.html', 8 styleUrls: ['./home.component.scss'], 9 }) 10 export class HomeComponent implements OnInit { 11 constructor(private http: HttpClient) {} 12 username = 'J. User' 13 pingServer(location) { 14 this.http 15 .post('http://localhost:4000/ping', location) 16 .subscribe((res) => {}); 17 } 18 ngOnInit() { 19 if ('geolocation' in navigator) { 20 navigator.geolocation.watchPosition((position) => { 21 this.pingServer({ 22 lat: position.coords.latitude, 23 lng: position.coords.longitude, 24 }); 25 }); 26 } 27 } 28 }
pingServer: this method makes use of the native HttpClient service to make requests to our server. It takes alocationparameter and sends it as the body of the request.- In the
OnInitlifecycle, we check if the current browser supports the geolocation API; we watch for location changes and send the
To make use of the HttpClient service, we’ll need to import the HttpClientModule into the app.module.ts file. Update your app module file as follows:
1// app.module.ts 2 ... 3 import { AppRoutingModule } from './app-routing.module'; 4 import { AppComponent } from './app.component'; 5 import { HomeComponent } from './home/home.component'; 6 import { HttpClientModule } from '@angular/common/http'; 7 8 @NgModule({ 9 ... 10 imports: [ 11 BrowserModule, 12 AppRoutingModule, 13 HttpClientModule 14 ], 15 ... 16 }) 17 export class AppModule { } 18 19 ...
Let’s create the header component by running ng generate component header in a terminal in the root folder of the project.
Replace the contents of the header.component.html with the following:
1<!-- header.component.html --> 2 3 <header> 4 <div class="brand"> 5 <h5>The Ranch</h5> 6 </div> 7 <div class="nav"> 8 <ul> 9 <li> 10 <img src="/assets/boy.svg" alt="avatar"> 11 <span>{{username}}</span> 12 </li> 13 </ul> 14 </div> 15 </header>
Note: all assets used in this article are available in the repo
Update the home.component.scss file with the following styles:
1// header.component.scss 2 3 header { 4 display: flex; 5 background: mediumseagreen; 6 margin: 0; 7 padding: 5px 40px; 8 color: whitesmoke; 9 box-shadow: 0 2px 4px 0 rgba(0, 0, 0, 0.1); 10 .brand { 11 flex: 1; 12 display: flex; 13 align-items: center; 14 h5 { 15 font-family: 'Lobster', cursive; 16 font-size: 20px; 17 margin: 0; 18 letter-spacing: 1px; 19 } 20 } 21 ul { 22 list-style: none; 23 padding-left: 0; 24 display: flex; 25 li { 26 display: flex; 27 align-items: center; 28 img { 29 height: 40px; 30 border-radius: 50%; 31 } 32 span { 33 margin-left: 8px; 34 font-size: 15px; 35 font-weight: 500; 36 } 37 } 38 } 39 }
The header.component.ts file should be updated to look like the snippet below:
1// header.component.ts 2 3 import { Component, OnInit, Input } from '@angular/core'; 4 @Component({ 5 selector: 'app-header', 6 templateUrl: './header.component.html', 7 styleUrls: ['./header.component.scss'], 8 }) 9 export class HeaderComponent implements OnInit { 10 constructor() {} 11 @Input() username = ''; 12 ngOnInit() {} 13 }
We’ll be using external fonts in our application. Include a link to the stylesheet in the index.html file.
1// index.html 2 3 <head> 4 ... 5 <meta name="viewport" content="width=device-width, initial-scale=1"> 6 <link href="https://fonts.googleapis.com/css?family=Dosis:400,500,700|Lobster" rel="stylesheet"> 7 ... 8 </head> 9 ...
Update the styles.scss file to use the external fonts throughout the project.
1// styles.scss 2 3 body{ 4 margin: 0; 5 font-family: 'Dosis', sans-serif; 6 }
Introducing Pusher
To make the pusher library available in our project, add the library as a third party script to be loaded by Angular CLI. All CLI config is stored in .angular-cli.json file. Modify the scripts property to include the link to pusher.min.js.
1// .angular-cli.json 2 ... 3 "scripts": [ 4 "../node_modules/pusher-js/dist/web/pusher.min.js", 5 ] 6 ...
After updating this file, you’ll need to restart the angular server so the CLI compiles the new script file added.
Create a Pusher service using the Angular CLI by running the following command:
ng generate service pusher
This command simply tells the CLI to generate a service named pusher. Now open the pusher.service.ts file and update it with the code below.
1// pusher.service.ts 2 import { Injectable } from '@angular/core'; 3 declare const Pusher: any; 4 @Injectable() 5 export class PusherService { 6 constructor() { 7 const pusher = new Pusher('PUSHER_KEY', { 8 cluster: 'eu', 9 }); 10 this.channel = pusher.subscribe('location'); 11 } 12 channel; 13 public init() { 14 return this.channel; 15 } 16 }
- First, we initialize Pusher in the constructor.
- The
initmethod returns the Pusher property we created.
Note: ensure you replace the
PUSHER_KEYstring with your actual Pusher key.
To make the service available application wide, import it into the app.module.ts file.
1// app.module.ts 2 ... 3 import { HttpClientModule } from '@angular/common/http'; 4 import {PusherService} from './pusher.service'; 5 6 @NgModule({ 7 .... 8 providers: [PusherService], 9 .... 10 }) 11 12 ...
Admin page
To monitor and track users using our application, we’ll need an admin page accessible to privileged employees. The page will use Google Maps to visualize the location of the user. Using Pusher, changes in the user’s location will be seen in realtime.
We’ll be using angular-google-maps, which has a set of reusable Angular components for Google Maps. Install the package by running npm install @agm/core.
To use the components in our project, we’ll need to include the angular-google-maps’ module in the app.module.ts file.
1//app.module.ts 2 ... 3 import {PusherService} from './pusher.service'; 4 import { AgmCoreModule } from '@agm/core'; 5 6 @NgModule({ 7 ... 8 imports: [ 9 BrowserModule, 10 AppRoutingModule, 11 HttpClientModule, 12 AgmCoreModule.forRoot({ 13 // please get your own API key here: https://developers.google.com/maps/documentation/javascript/get-api-key?hl=en 14 apiKey: 'GOOGLE_API_KEY', 15 libraries: ['geometry'] 16 }), 17 ... 18 }) 19 export class AppModule { }
Note: ensure to replace the placeholder value with your google API key
Now we’ll create the admin component using the CLI by running the following command:
ng generate component admin
Open the admin.component.html file and update it with the contents below:
1// admin.component.html 2 3 <app-header [username]="username"></app-header> 4 <div class="main"> 5 <h3>Admin</h3> 6 <agm-map [latitude]="center.lat" [longitude]="center.lng" [zoom]="zoom"> 7 <agm-marker [latitude]="center.lat" [longitude]="center.lng"></agm-marker> 8 </agm-map> 9 <h4>Location Alerts</h4> 10 <div class="alert" [hidden]="!showAlert"> 11 <p>This user has left the ranch</p> 12 </div> 13 <div class="location alert" [hidden]="!showLocationUpdate"> 14 <p>{{message}}</p> 15 </div> 16 </div>
Style up the component by adding the following styles to the admin.component.scss file:
1// admin.component.scss 2 3 .main { 4 display: flex; 5 flex-direction: column; 6 justify-content: center; 7 align-items: center; 8 margin: auto; 9 h3 { 10 font-size: 15px; 11 font-weight: bold; 12 text-transform: uppercase; 13 margin-bottom: 15px; 14 } 15 .alert { 16 background: #f14343; 17 color: white; 18 padding: 15px; 19 border-radius: 5px; 20 p{ 21 margin: 0; 22 } 23 } 24 .location{ 25 background: green; 26 margin-top: 20px; 27 } 28 } 29 agm-map { 30 height: 400px; 31 width: 600px; 32 }
Add the following content to the admin``.component.ts file:
1// admin.component.ts 2 import { Component, OnInit } from '@angular/core'; 3 import { MapsAPILoader } from '@agm/core'; 4 import { PusherService } from '../pusher.service'; 5 declare const google; 6 @Component({ 7 selector: 'app-admin', 8 templateUrl: './admin.component.html', 9 styleUrls: ['./admin.component.scss'], 10 }) 11 export class AdminComponent implements OnInit { 12 constructor(private loader: MapsAPILoader, private pusher: PusherService) {} 13 theRanchPolygon; 14 username = 'J. Admin'; 15 message = ''; 16 showAlert = false; 17 showLocationUpdate = false; 18 zoom = 15; 19 // Center of the ranch, where the initial marker will be placed 20 center = { 21 lat: 6.435838, 22 lng: 3.451384, 23 }; 24 // This array of latLngs represents the polygon around our ranch 25 polygon = [ 26 { lat: 6.436914, lng: 3.451432 }, 27 { lat: 6.436019, lng: 3.450917 }, 28 { lat: 6.436584, lng: 3.450917 }, 29 { lat: 6.435006, lng: 3.450928 }, 30 { lat: 6.434953, lng: 3.451808 }, 31 { lat: 6.435251, lng: 3.451765 }, 32 { lat: 6.435262, lng: 3.451969 }, 33 { lat: 6.435518, lng: 3.451958 }, 34 ]; 35 36 ngOnInit() { 37 // Wait for the google maps script to be loaded before using the "google" keyword 38 this.loader.load().then(() => { 39 this.theRanchPolygon = new google.maps.Polygon({ paths: this.polygon }); 40 }); 41 const channel = this.pusher.init(); 42 channel.bind('ping', (position) => { 43 this.center = { 44 ...position, 45 }; 46 // Create a LatLng using the position returned from the pusher event 47 const latLng = new google.maps.LatLng(position); 48 this.showLocationUpdate = true; 49 this.message = "The user's location has changed"; 50 // Check if the location is outside the polygon 51 if (!google.maps.geometry.poly.containsLocation(latLng, this.theRanchPolygon)) { 52 // Show alert if user has left the polygon 53 this.showAlert = true; 54 }else{ 55 this.message = 'The user is currently in the ranch'; 56 } 57 }); 58 } 59 }
polygon: this is an array of latLngs that represent the polygon around our ranchMapsApiLoader: this is a service that provides a method to check if the Google maps script has been loaded.
In the OnInit lifecycle we do a few things:
- We wait for the Google maps script to load; in the promise returned, we create a polygon using the array of LatLng objects.
- We initialized Pusher and listened for the
pingevent. In the bind callback, we set thecenterproperty to the position sent through the event. - Create a LatLng using the position returned from the event.
- Finally, we checked if the position is outside the polygon and then we display an alert if it is.
Now that both pages have been created, let’s set up routes for each page. Open the app-routing.module.ts file and add routes to the routes array.
1// app-routing.module.ts 2 ... 3 import { HomeComponent } from './home/home.component'; 4 import { AdminComponent } from './admin/admin.component'; 5 6 const routes: Routes = [ 7 { 8 path: 'admin', 9 component: AdminComponent, 10 }, 11 { 12 path: '', 13 component: HomeComponent, 14 }, 15 ]; 16 17 ...
Now update the app.component.html file to contain just the route-outlet
1// app.component.html 2 3 <router-outlet></router-outlet>
At this point, your application should have realtime updates when there’s a location change. The admin user’s should we alerted if the user’s current location is outside “The Ranch” premises.
Navigate to http://localhost:4000 to view the home page and http://localhost:4000/admin to view the admin page.
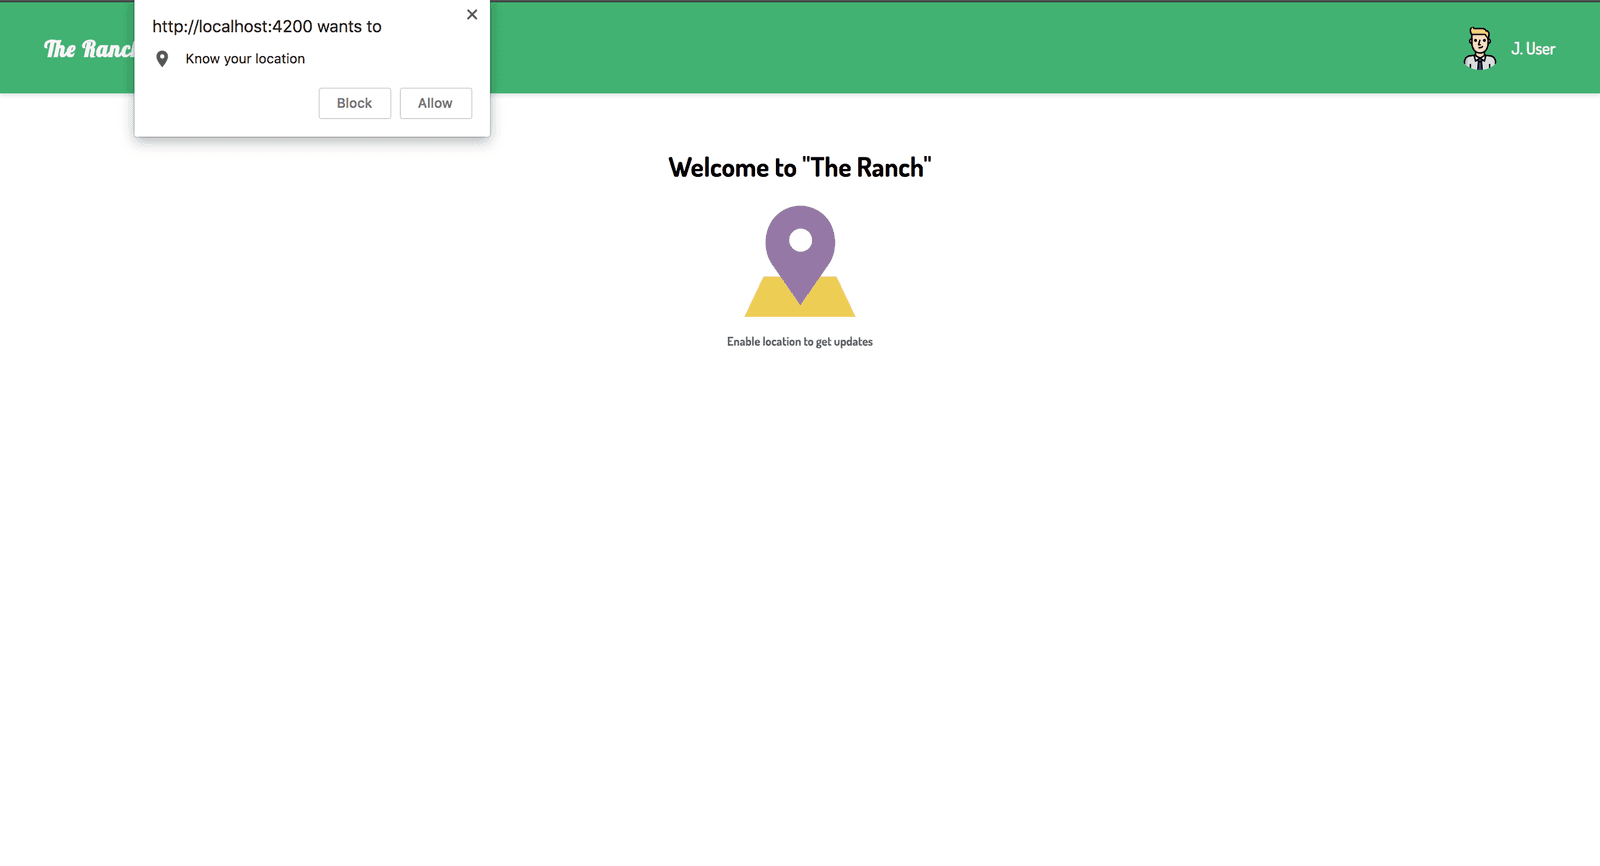
The home page:
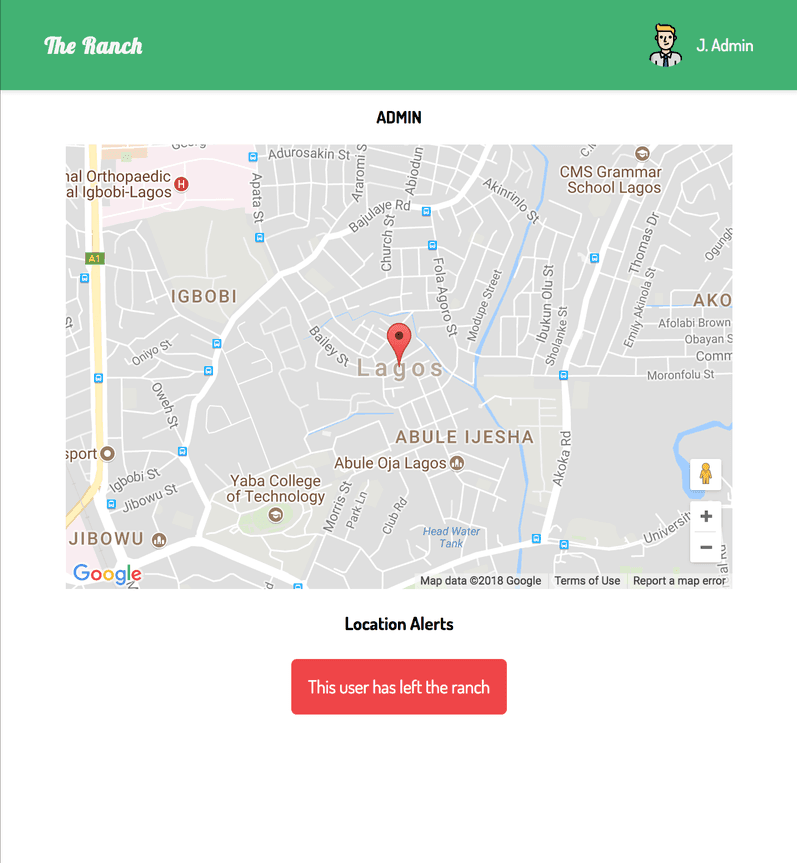
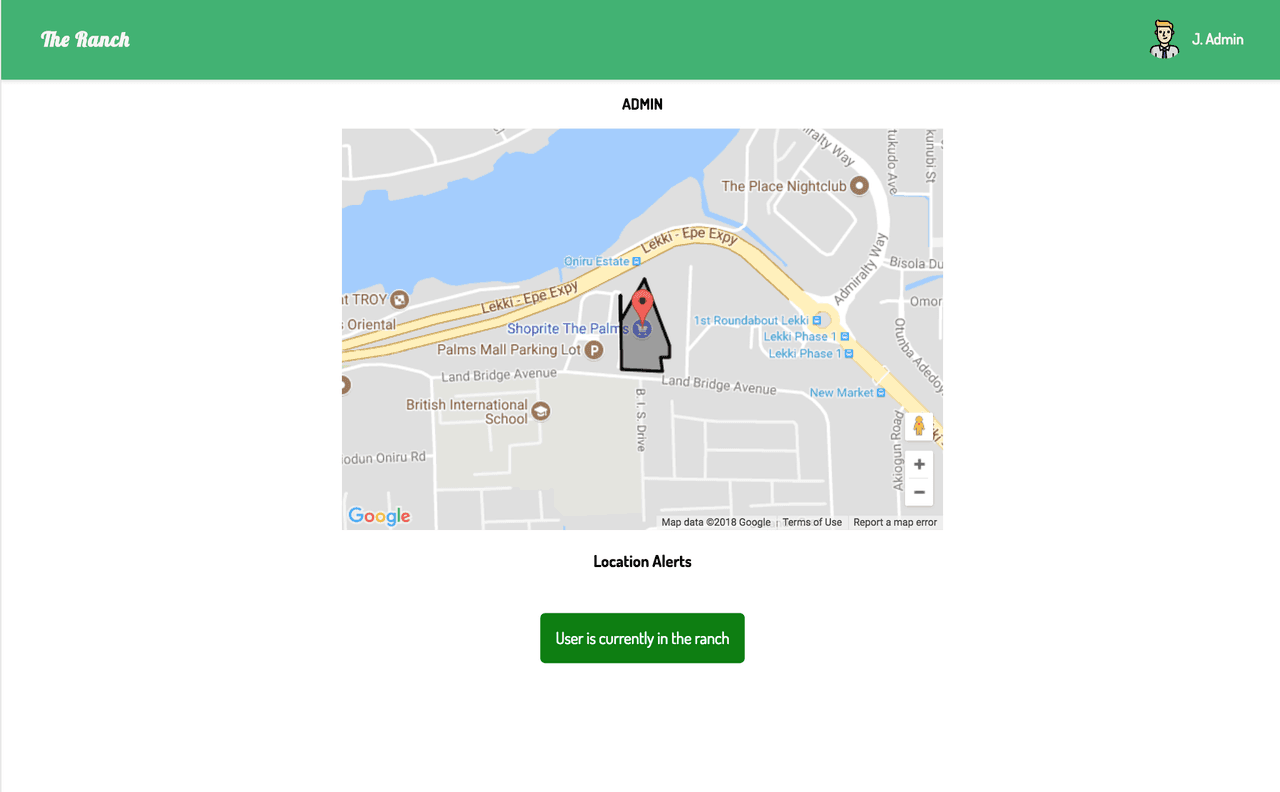
The different states of the admin page:
To test the realtime functionality of the application, open two browsers side-by-side and engage the application. Location updates should be in realtime.
Conclusion
Using Pusher, we’ve built out an application using the pub/sub pattern to receive realtime updates. Using geofences, we’ll be able to tell when an active guest is leaving “The Ranch”. You can check out the repo containing the demo on GitHub.


© 2024 Pusher Ltd. All rights reserved.
Pusher Limited is a company registered in England and Wales (No. 07489873) whose registered office is at MessageBird UK Limited, 3 More London Riverside, 4th Floor, London, United Kingdom, SE1 2AQ.