- Products

- Developers
- User stories
- Blog
- Pricing

Getting started with Vapor - Part 1: Installation and creating a basic API
Introduction
Introduction
In this part of the tutorial, we learn how to install Vapor and handle basic requests.
In the second part of this tutorial, we will also be looking at Vapor Cloud, as somewhere to easily deploy and manage your web applications.
Apple open sourced Swift in 2015, it didn’t take long for server based frameworks to appear. Since then Vapor has become one of the most popular frameworks with a strong community behind it.
Why is a server side Swift framework important though? It allows iOS developers to build both the application and backend server, without having to rely on a BAAS (backend as a service) such as Firebase without having to learn a new language.
Prerequisites
This tutorial uses the following:
- Xcode 9.4 or later - Download Here.
- Swift 4.1 - Including command line. This is bundled with Xcode 9.4+ or you can download it here.
- MacOS - Vapor can be run on Linux but this tutorial will use MacOS. You can attempt to follow this tutorial on Linux still and use a text editor where this tutorial uses Xcode.
- REST client such as Postman.
Some experience using Xcode and Swift is preferred.
Installation
First let’s check that your system is capable of using Vapor by running the following command.
1// MacOS 2 eval "$(curl -sL check.vapor.sh)" 3 // Linux 4 eval "$(curl -sL https://apt.vapor.sh)"

If you receive any errors make sure you have Xcode 9.4 installed on MacOS and Swift 4.1 on Linux.
To install Vapor run the following commands.
1// MacOS 2 brew install vapor/tap/vapor 3 // Linux 4 sudo apt-get install vapor -y
Create your first project
Let’s create, build and run your first project. Run the following command in terminal:
vapor new HelloWorld
This will create a new project by cloning the Vapor template.

Change directory to the project you just created.
cd HelloWorld
Let’s build and run your application. Run these two commands:
1vapor build 2 vapor run
The Vapor build command may take some time the first time you run this command. Once the run command is complete you can visit http://localhost:8080/hello. Once done close down the server using Control-C in the terminal.
Create your first route
Let’s open the Xcode project, note this is the preferred way of opening Xcode as there is no Xcode project inside the directory. Run the following command in terminal:
vapor xcode -y
This will open an Xcode project for us, before we continue change the scheme to be the Run Scheme.

Open routes.swift and delete the contents. Replace it with the following code.
1// Sources/App/routes.swift
2 import Vapor
3
4 public func routes(_ router: Router) throws {
5
6 router.get("api", "name") { req -> String in
7 let namesArray = ["Chris", "Sarah", "Bob", "Jess"]
8 let number = getRandomNumber(0, 3)
9 return "Hello, \(namesArray[number])"
10 }
11 }
12
13 func getRandomNumber(_ min: Int, _ max: Int) -> Int {
14 #if os(Linux)
15 return Int(random() % max) + min
16 #else
17 return Int(arc4random_uniform(UInt32(max)) + UInt32(min))
18 #endif
19 }
This creates our first GET route at the following path: http://localhost:8080/api/name. We define the route’s path and tell the request what we expect to return from it. Make sure you build and run your project again by running the build and run command or if you are using Xcode press the play button.
Notice how we have a function that we have a macro that determines if we are on Linux or not. This is because arc4random_uniform is not available on Linux. Swift 4.2 will add a random function directly on Int but that is not available in Xcode 9.4. This function will allow us to deploy to Vapor Cloud in part two as that is using Linux not MacOS.
Passing parameters to your route
In the previous example we randomly picked a name from an array, we may however want to pass some data to the server as a parameter. Below the route you created previously, add the following function:
1router.get("api", "first_name", String.parameter, "last_name", String.parameter) { req -> String in
2 let firstName = try req.parameters.next(String.self)
3 let lastName = try req.parameters.next(String.self)
4 return "Your name is \(firstName) \(lastName)"
5 }
This creates a new route that you can pass parameters into the path with. String.parameter specifies that the parameter can be any string that is passed into the request. You can then extract this from the request directly and assign them to variables.
Accepting data via POST
Vapor makes decoding JSON via post extremely easy thanks to Codable. We are going to use Postman to pass some data via a POST request. First add the following code below the two routes you have already created.
1router.post(Person.self, at: "api/name") { req, data -> String in
2 return "Hello \(data.firstName) \(data.lastName ?? "")"
3 }
This creates a route that accepts a post request at http://localhost:8080/api/name. It takes in a Person object that we will now define. Place the following code below the routes function.
1struct Person: Content { 2 let firstName: String 3 let lastName: String? 4 }
Notice how the struct conforms to Content, this is how Vapor decodes the data. It is a wrapper around Codable. See Swift 4 decoding JSON using Codable for more details on this. Build and run the server, and open Postman.
- Set the request to be POST.
- Set the URL http://localhost:8080/api/name.
- Select the Body tab.
- Select form-data as the type.
- Create two keys
firstNameandlastName. Supply some values to each key. - Press Send.
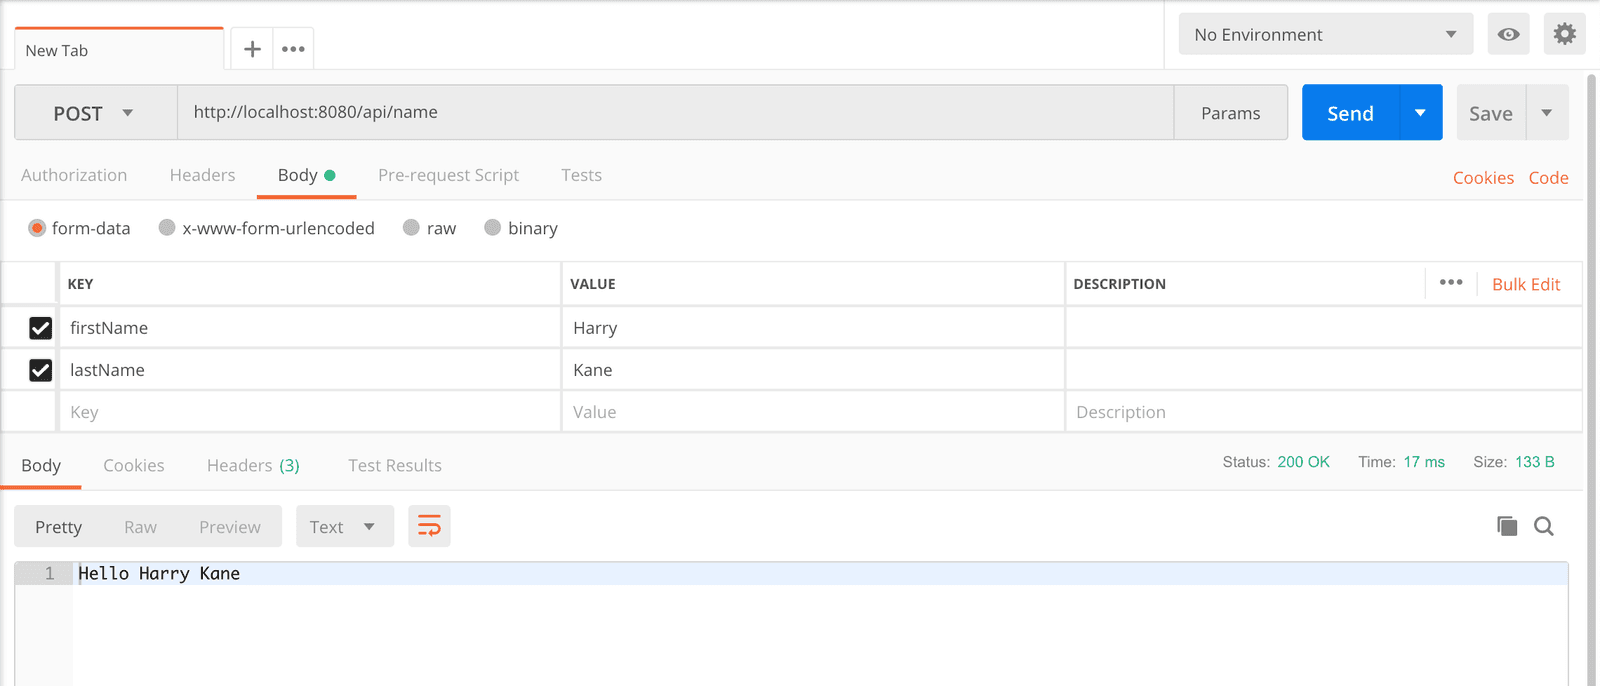
Notice the response, in the body. You can also remove the lastName parameter from the parameters. This is because we set it as optional within the the struct above. We can also return JSON from the API. Simply change the above function to return the struct data instead.
1router.post(Person.self, at: "api/name") { req, data -> Person in 2 return data 3 }
Conclusion
We’ve learnt why we might want to use Vapor for a backend service. We’ve also learnt how to install Vapor and create our first GET and POST routes.
In the second part of this tutorial, we’ll learn how to deploy our project to Vapor Cloud.
The source code for this project can be found here.


© 2024 Pusher Ltd. All rights reserved.
Pusher Limited is a company registered in England and Wales (No. 07489873) whose registered office is at MessageBird UK Limited, 3 More London Riverside, 4th Floor, London, United Kingdom, SE1 2AQ.