- Products

- Developers
- User stories
- Blog
- Pricing

Build a group chat app using .NET Core
- Introduction
- Prerequisites
- Setting up Pusher app
- Setting up our chat project
- Adding our models
- Group model
- UserGroup model
- Message model
- Creating the database context
- Setting up our database and running migrations
- Registering the database context
- Running migration
- Implementing our chat interface
- Creating the chat controller
- Adding the chat view file
- Display data to the chat view
- Adding groups
- Displaying messages for an active group
- Create an endpoint for displaying messages for a particular group
- Adding Ajax Request to Get the Messages and Display It
- Adding a view model
- Add method for adding message
- Add new message via Ajax
- Making our messaging realtime
- Add Pusher .NET package
- Adding authentication for private channel
- Triggering an Event When a Group Is Created
- Triggering an event when a new message is received
- Display the new group when a user creates a group
- Listen for new group
- Listen for new message
- Conclusion
Introduction
Our human need for realtime communication is always evolving. That’s why we’re seeing an increase in chat features in more than just chat-based apps. Group chat is a type of chat application where two or more users can exchange messages simultaneously.
In this article, we’ll build a group chat application in .NET Core MVC. Pusher sits between our server and client. It simplifies adding realtime functionality to our group chat app.
Here is a preview of what you’ll be building:
It will be helpful to have an understanding of the following, but extensive working knowledge isn't required:
Prerequisites
- Install Visual Studio Code, or Visual Studio (in this article I’ll use Visual Studio code, since it’s a cross platform editor.)
- Install the .NET Core SDK.
- Install the C# extension from the Visual Studio Code Marketplace.
Verify your setup by typing the following in your command line:
$ dotnet --version
This should print out the visual studio code version you have installed.
Setting up Pusher app
Next, let’s create an app in our Pusher account for the group chat application.
- Sign up or login to your Pusher account.
- Create a new pusher app.
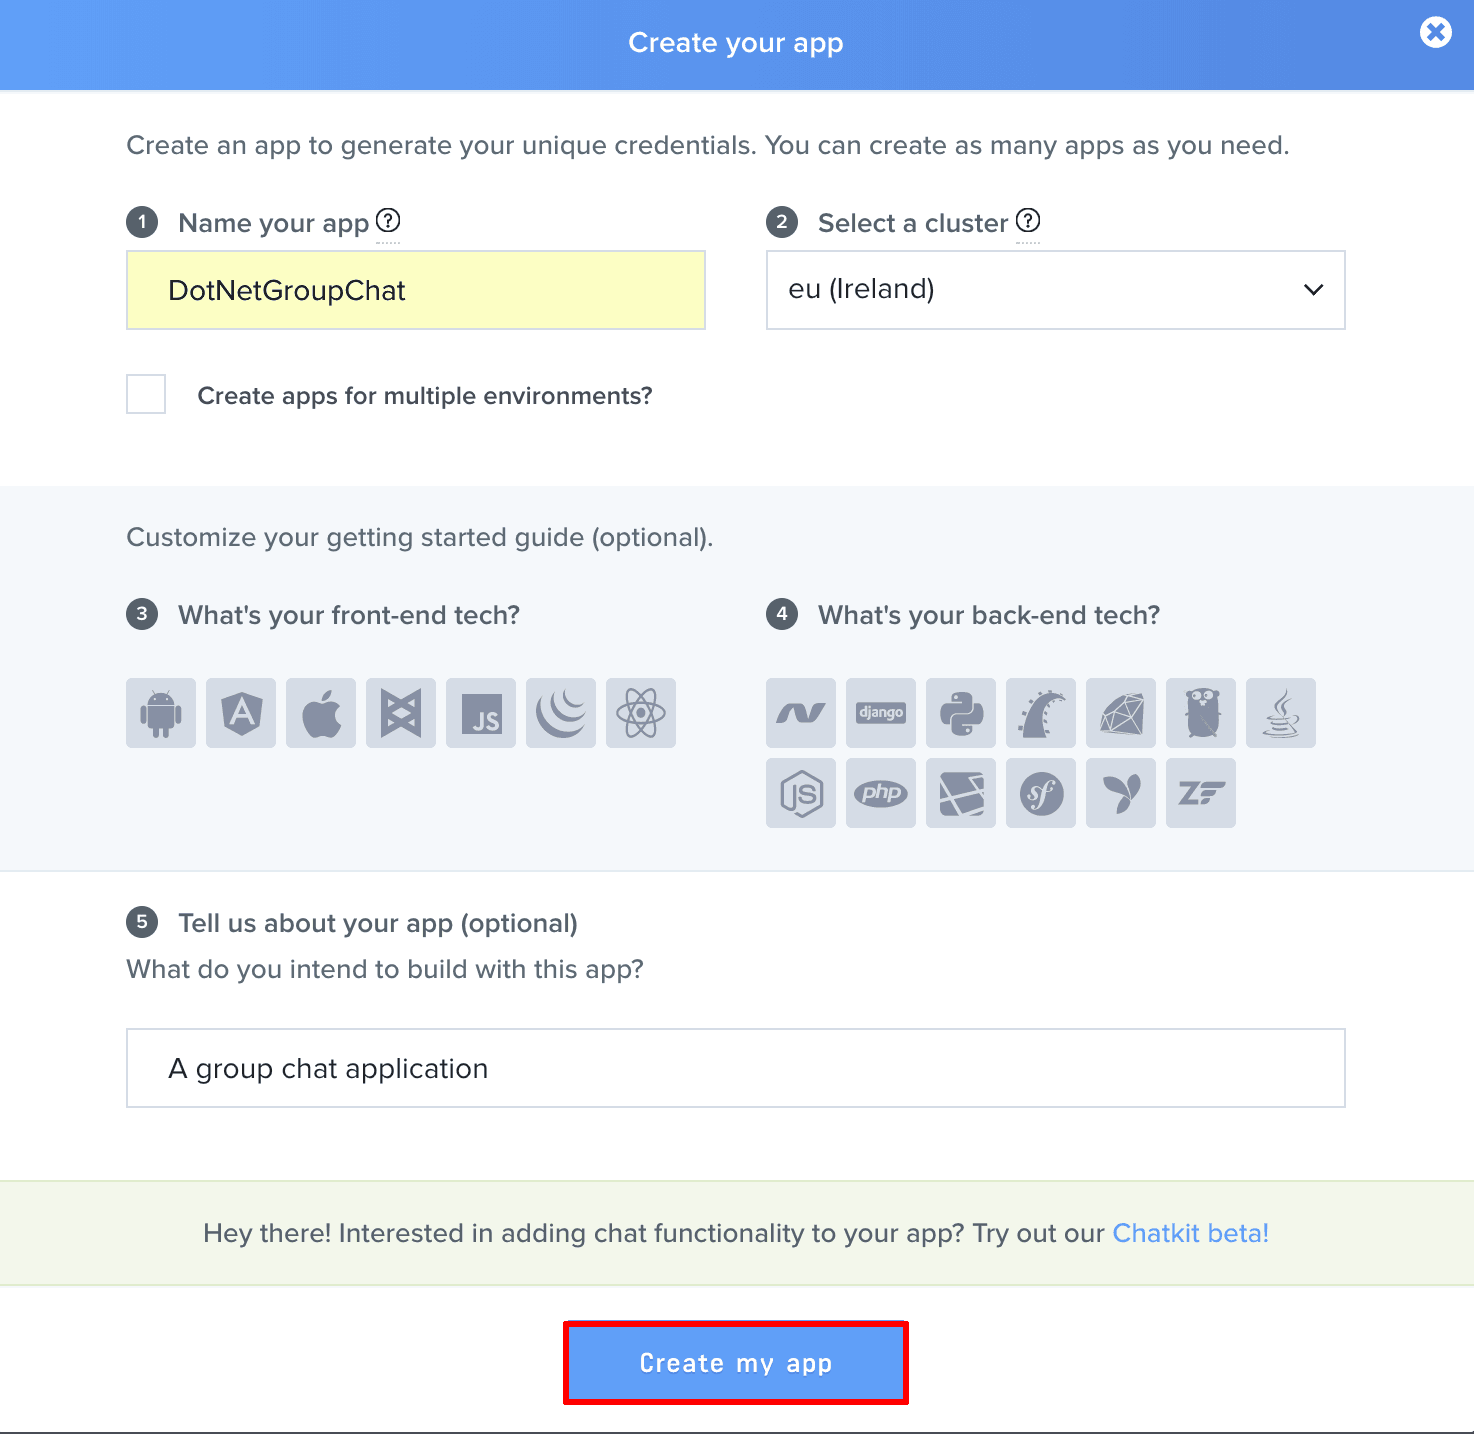
- After filling the form above, click on Create my app button to create the app.
- The next page is a getting started page with code samples. You should click on App Keys tab to get your Pusher app details.
We’ll need these keys later, so keep them handy! Make sure you add your correct Pusher app details below. PUSHER_APP_ID, PUSHER_APP_KEY, PUSHER_APP_SECRET, PUSHER_APP_CLUSTER are just a place holders, replace them with your actual Pusher app details and note it down:
1app_id = "PUSHER_APP_ID" 2key = "PUSHER_APP_KEY" 3secret = "PUSHER_APP_SECRET" 4cluster = "PUSHER_APP_CLUSTER"
Setting up our chat project
First, create a new directory on your system - GroupChat. Then from your command line, CD(change directory) into the folder your just created.
Then from your command line, run the following command:
$ dotnet new mvc --auth Individual
This command creates a new ASP.NET Core MVC project with authentication in your current folder.
We have included authentication (Identity) in this app because we want to uniquely identify each user so we can easily group them. ASP.NET Core Identity makes it easy to add login features to .NET Core apps.
💡 ASP.NET Core Identity is a membership system which allows you to add login functionality to your application. Users can create an account and login with a user name and password or they can use an external login provider such as Facebook, Google, Microsoft Account, Twitter or others.
Now, open the GroupChat folder in Visual Studio Code editor.
💡 If your Visual Studio Code have been set to your system path, you can open the project by typing “code .” (without quotes) in your command prompt.
- Select Yes to the Warn message "Required assets to build and debug are missing from 'GroupChat'. Add them?"
- Select Restore to the Info message "There are unresolved dependencies".
Next, Press Debug (F5) to build and run the program. In your browser navigate to http://localhost:5000/. You should see a default page.
Adding our models
A model is an object that represents the data in your application. We’ll need several models for our application. Start by creating the models for our table structure. For this project, we’ll need to create three tables - Group, UserGroup and Message.
Group model
In the Group table, we’ll need the following columns: ID (int) and GroupName (string) where the ID is the primary key. We’ll store all groups in this table.
Create a new file in the /Models folder called Group.cs and add the following code to it:
1using System; 2 namespace GroupChat.Models 3 { 4 public class Group 5 { 6 public int ID { get; set; } 7 public string GroupName { get; set; } 8 } 9 }
UserGroup model
In the UserGroup table, we’ll need the following columns: ID (int), UserName (string) and GroupId (int). We’ll store the User ID and Group ID in this table.
Create a new file in the /Models folder called UserGroup.cs and add the following code to it:
1using System; 2 3 namespace GroupChat.Models 4 { 5 public class UserGroup 6 { 7 public int ID { get; set; } 8 public string UserName { get; set; } 9 public int GroupId { get; set; } 10 } 11 }
Message model
In the message table, we’ll need the following columns: ID (int) , AddedBy (string), message (string) and GroupId (int). Here, we’ll store all messages entered by all user.
Create a new file in the /Models folder called Message.cs and add the following code to it:
1using System; 2 3 namespace GroupChat.Models 4 { 5 public class Message 6 { 7 public int ID { get; set; } 8 public string AddedBy { get; set; } 9 public string message { get; set; } 10 public int GroupId { get; set; } 11 } 12 }
Creating the database context
The database context is the main class that coordinates Entity Framework functionality for a given data model. We’ll derive from the Microsoft.EntityFrameworkCore.DbContext to create this class.
Create a new file called GroupChatContext.cs in the /Models folder:
1using Microsoft.EntityFrameworkCore; 2 namespace GroupChat.Models 3 { 4 public class GroupChatContext : DbContext 5 { 6 public GroupChatContext(DbContextOptions<GroupChatContext> options) 7 : base(options) 8 { 9 } 10 11 public DbSet<Group> Groups { get; set; } 12 public DbSet<Message> Message { get; set; } 13 public DbSet<UserGroup> UserGroup { get; set; } 14 } 15 }
Setting up our database and running migrations
Now that we have created our models, we can easily generate a migration file that will contain code to easily create and update our table schema.
Registering the database context
First, let’s register the database context we have created earlier. We’ll register the database context with the dependency injection container. Services (such as the DB context) that are registered with the dependency injection container are available to the controllers. Also, we’ll use Sqlite for our database.
Update the contents of the /Startup.cs file with the following code:
1[...] 2 public void ConfigureServices(IServiceCollection services) 3 { 4 [...] 5 services.AddDbContext<GroupChatContext>(options => 6 options.UseSqlite(Configuration.GetConnectionString("DefaultConnection"))); 7 [...] 8 } 9 [...]
You can see the database context as a database connection and a set of tables, and the Dbset as a representation of the tables themselves. The database context allows us to link our model properties to our database with a connection string (in our case, we are using SQLite)
Running migration
1$ dotnet ef migrations add GroupChat --context GroupChatContext 2 $ dotnet ef database update --context GroupChatContext
The first command will create a migration script that will be used for managing our database tables. We’ve also added --context to the commands so as to specify the context we want to run. This is because there is another context for Identity which has been created automatically by the template.
💡 If you got an error while running the command, stop the debugging or the server.
Implementing our chat interface
We’ll need an interface where a user can create a group, then add participating users to the group (only users added to a particular group can chat in that group).
We also need a route that will lead to the chat interface, like http://localhost:5000/chat. To do this we’ll need to create the chat controller and the chat view.
Creating the chat controller
Create a new file called ChatController.cs in the Controllers folder then add the following code:
1using System; 2 using System.Collections.Generic; 3 using System.Linq; 4 using System.Text; 5 using System.Text.Encodings.Web; 6 using System.Threading.Tasks; 7 using Microsoft.AspNetCore.Authentication; 8 using Microsoft.AspNetCore.Authorization; 9 using Microsoft.AspNetCore.Identity; 10 using Microsoft.AspNetCore.Mvc; 11 using GroupChat.Models; 12 namespace GroupChat.Controllers 13 { 14 [Authorize] 15 public class ChatController : Controller 16 { 17 private readonly UserManager<ApplicationUser> _userManager; 18 private readonly GroupChatContext _GroupContext; 19 public ChatController( 20 UserManager<ApplicationUser> userManager, 21 GroupChatContext context 22 ) 23 { 24 _userManager = userManager; 25 _GroupContext = context; 26 } 27 public IActionResult Index() 28 { 29 return View(); 30 } 31 } 32 }
In the preceding code:
- We have added
Authorizeto make sure that only logged in user can access our chat page. - We have also injected
ApplicationUserandGroupChatContextinto this class so we can have access to them in all our methods. TheApplicationUseris the context from Identity and we have created theGroupChatContextso we can have access to their respective tables in this class.
Adding the chat view file
- Create a new folder in the View folder called
chat - In the chat folder you just created, create a new file called
index.cshtml
Now, update the index.cshtml file with the code below:
1@{ 2 Layout = null; 3 } 4 <!doctype html> 5 <html lang="en"> 6 <head> 7 <!-- Required meta tags --> 8 <meta charset="utf-8"> 9 <meta name="viewport" content="width=device-width, initial-scale=1, shrink-to-fit=no"> 10 <!-- Bootstrap CSS --> 11 <link rel="stylesheet" href="https://maxcdn.bootstrapcdn.com/bootstrap/4.0.0-beta.3/css/bootstrap.min.css" integrity="sha384-Zug+QiDoJOrZ5t4lssLdxGhVrurbmBWopoEl+M6BdEfwnCJZtKxi1KgxUyJq13dy" crossorigin="anonymous"> 12 <title>DotNet Group Chat</title> 13 <style type="text/css"> 14 .group { 15 padding: 13px; 16 border-radius: 12px; 17 background: rgb(57, 125, 192); 18 margin: 5px 0px; 19 font-weight: bolder; 20 color: black; 21 cursor: pointer; 22 } 23 .chat_body { 24 height: 520px; 25 overflow: scroll; 26 } 27 28 .less_padding { 29 padding: 2px; 30 } 31 .chat_message { 32 padding: 13px; 33 border-radius: 12px; 34 width: 50%; 35 background: #85C1E9; 36 margin: 6px 4px; 37 } 38 .chat_main { 39 background-color: #957bbe; 40 height: 520; 41 padding: 0px; 42 } 43 .group_main { 44 background-color: #85C1E9; 45 } 46 </style> 47 </head> 48 <body> 49 <h3 class="text-center">Welcome</h3> 50 <div class="container" style="background-color: grey;"> 51 <div class="row"> 52 <div class="col-md-2 less_padding"> 53 <div class="col group_main"> 54 <div class="text-center"> Groups </div> 55 <div clsss="row" style="height: 500px;overflow: scroll;" id="groups"> 56 <input type="hidden" value="" id="currentGroup"> 57 <!-- List groups--> 58 </div> 59 <div class="text-center"> 60 <button type="submit" class="btn btn-primary" data-toggle="modal" data-target="#CreateNewGroup">Add Group</button> 61 </div> 62 </div> 63 </div> 64 <div class="col-md-10 less_padding"> 65 <div class="col-md-12 chat_main"> 66 <div class="chat_body"> 67 <!-- <div class="chat_message float-right">Hello, </div> --> 68 </div> 69 <div class="row container" style="margin-left: 3px;"> 70 <div class="col-md-9 col-sm-9 less_padding"> 71 <textarea class="form-control" rows="1" id="Message"></textarea> 72 </div> 73 <div class="col-md-3 col-sm-3 less_padding"> 74 <button type="submit" class="btn btn-primary" style=" position: absolute;" id="SendMessage">Send Message</button> 75 </div> 76 </div> 77 </div> 78 </div> 79 </div> 80 </div> 81 <!-- Modal --> 82 <div class="modal fade" id="CreateNewGroup" tabindex="-1" role="dialog" aria-labelledby="exampleModalCenterTitle" aria-hidden="true"> 83 <div class="modal-dialog" role="document"> 84 <div class="modal-content"> 85 <div class="modal-header"> 86 <h5 class="modal-title" id="exampleModalLongTitle">Add New Group</h5> 87 <button type="button" class="close" data-dismiss="modal" aria-label="Close"> 88 <span aria-hidden="true">×</span> 89 </button> 90 </div> 91 <div class="modal-body"> 92 <form id="CreateGroupForm"> 93 <div class="form-group"> 94 <label for="GroupName">Group Name</label> 95 <input type="text" class="form-control" name="GroupName" id="GroupName" aria-describedby="emailHelp" placeholder="Group Name"> 96 </div> 97 <label for="User">Add Users <br></label> <br> 98 <div class="row"> 99 <!-- List users here --> 100 </div> 101 </form> 102 </div> 103 <div class="modal-footer"> 104 <button type="button" class="btn btn-secondary" data-dismiss="modal">Close</button> 105 <button type="button" class="btn btn-primary" id="CreateNewGroupButton">Create Group</button> 106 </div> 107 </div> 108 </div> 109 </div> 110 <!-- Optional JavaScript --> 111 <!-- jQuery first, then Popper.js, then Bootstrap JS --> 112 <script src="https://code.jquery.com/jquery-3.2.1.min.js"></script> 113 <script src="https://cdnjs.cloudflare.com/ajax/libs/popper.js/1.12.9/umd/popper.min.js" integrity="sha384-ApNbgh9B+Y1QKtv3Rn7W3mgPxhU9K/ScQsAP7hUibX39j7fakFPskvXusvfa0b4Q" crossorigin="anonymous"></script> 114 <script src="https://maxcdn.bootstrapcdn.com/bootstrap/4.0.0-beta.3/js/bootstrap.min.js" integrity="sha384-a5N7Y/aK3qNeh15eJKGWxsqtnX/wWdSZSKp+81YjTmS15nvnvxKHuzaWwXHDli+4" crossorigin="anonymous"></script> 115 <script src="https://js.pusher.com/4.1/pusher.min.js"></script> 116 <script src="~/js/site.js" asp-append-version="true"></script> 117 </body> 118 </html>
Notice this at the top of the file:
1@{ 2 Layout = null; 3 }
This is to tell the rendering engine not to include layouts partials(like header, footer) in this page. Also, we included the Pusher JavaScript library in this page. This will be discussed later.
You should now have a new route available - http://localhost:5000/chat. /chat is the Controller’s name and since there is no other URL segment, this request will be mapped to the index method of the ChatController.cs method. Also in the index method, we have return View(). This will render the view corresponding to the ChatController. It will look for the index.cshtml file in the /view/chat folder.
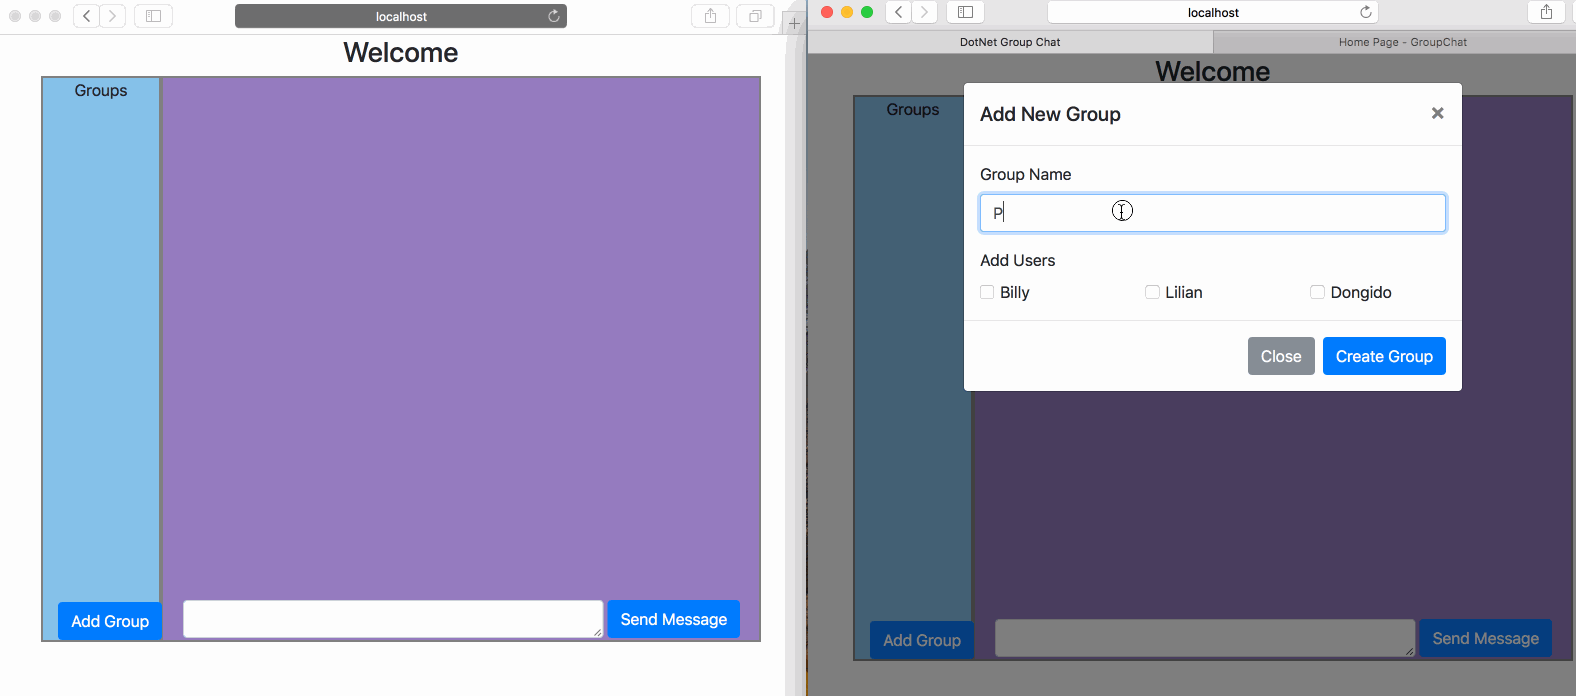
Heading to http://locahost:5000/chat will redirect you to a login page. Register an account and log in then visit the page again. You should have an interface like below:
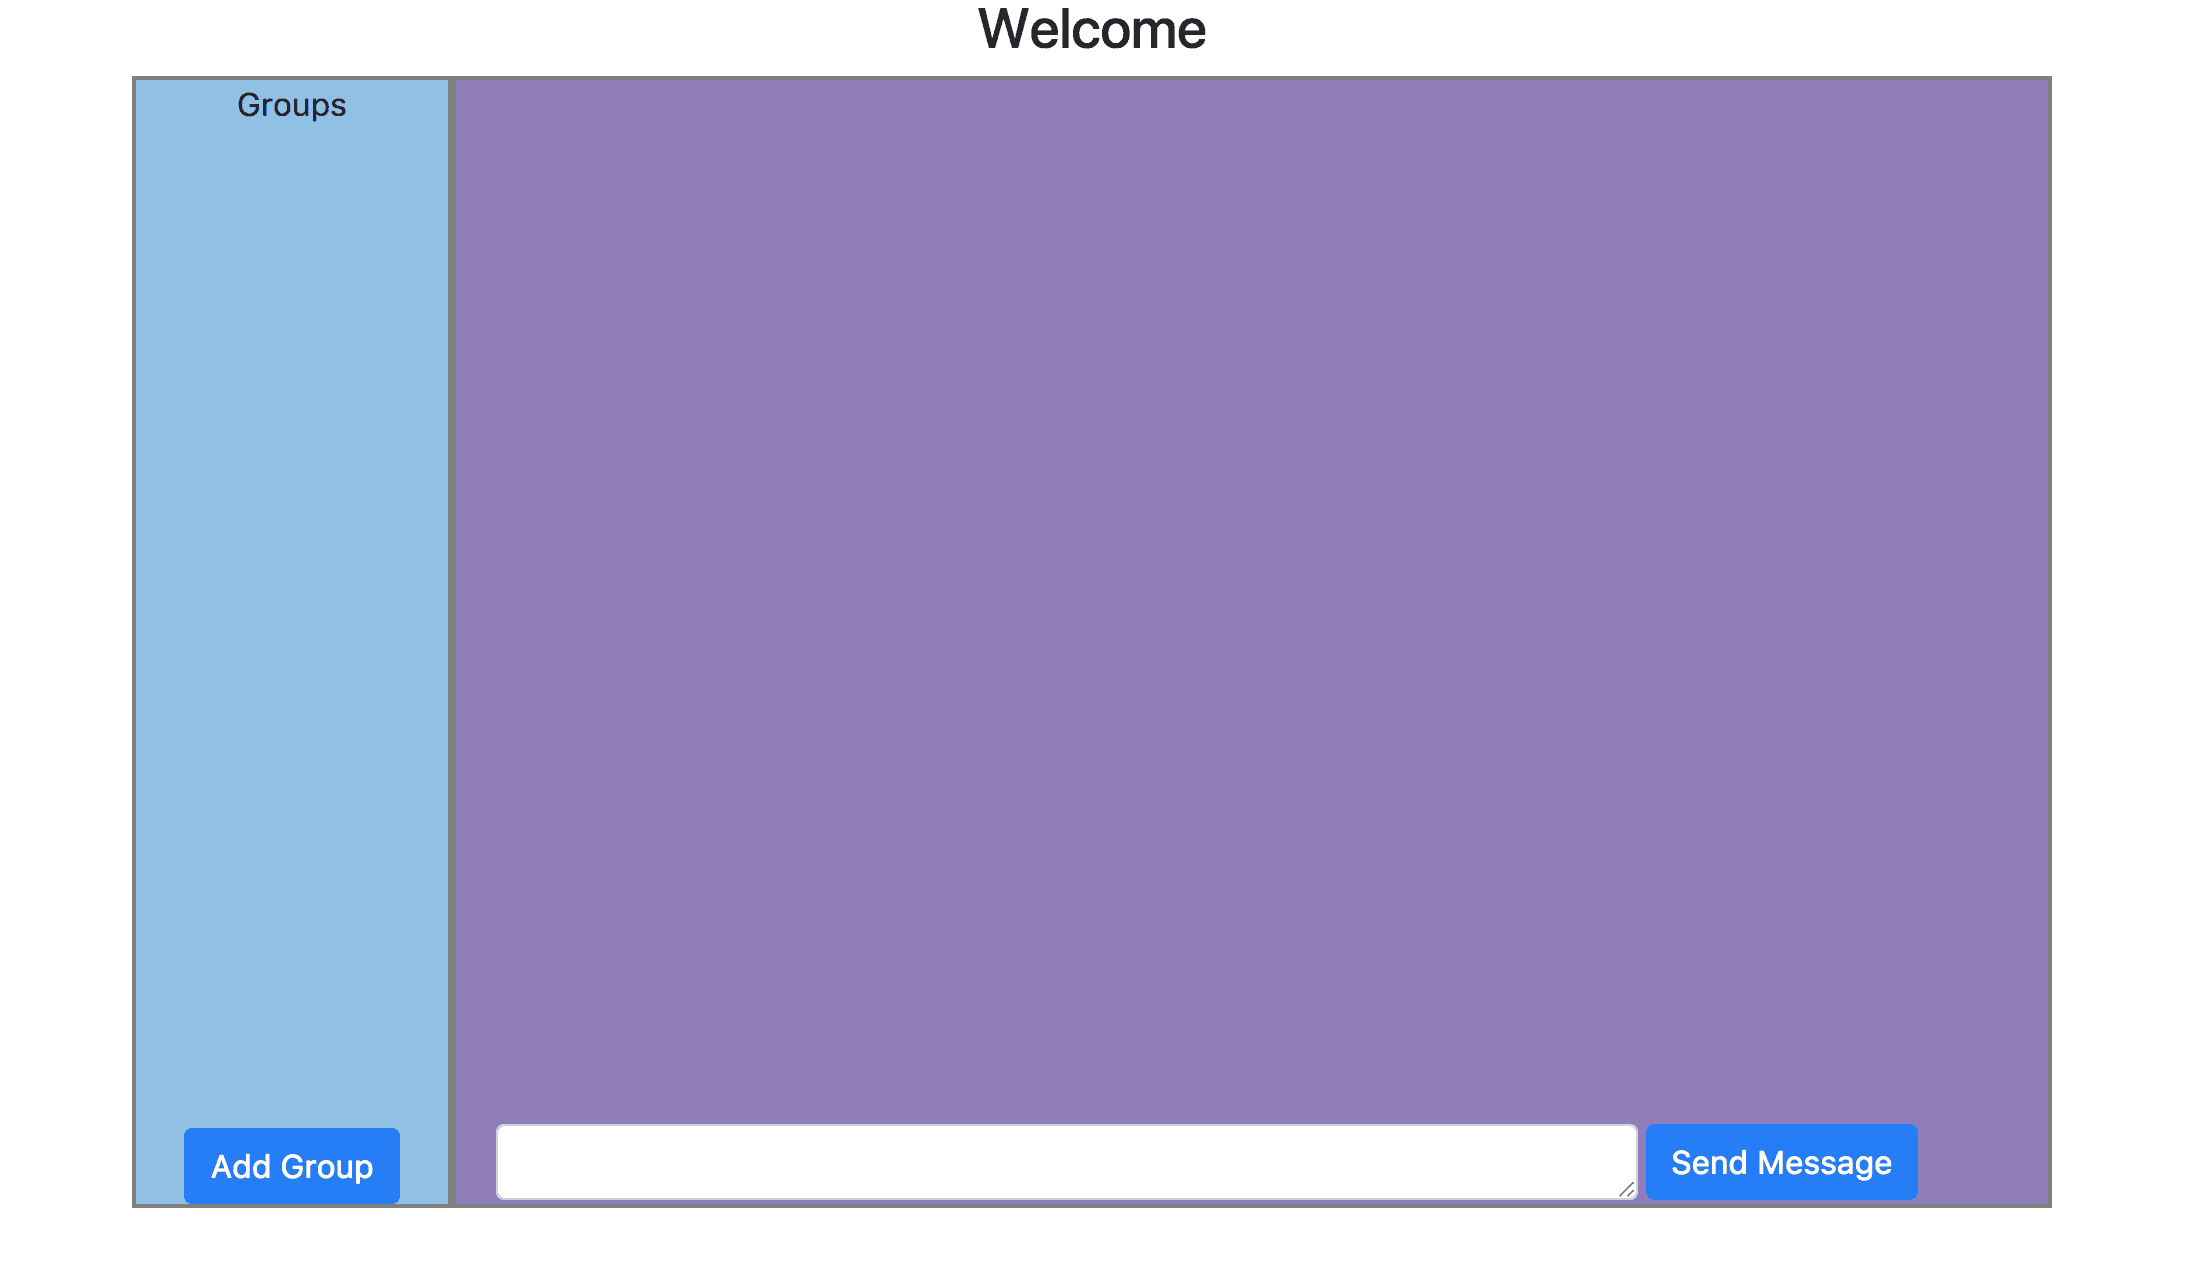
The left sidebar will be used to display all groups a user is subscribed to and the right side for all conversation messages in the groups. When a user clicks on a group, the corresponding message in that group will be displayed on the right. There is also a create group button. When a user clicks this button, a modal is displayed and the user can enter details of their new group. The modal will list all chat users. The group creator can select who they want to add to the group.
Now let’s get the group a user is subscribed to. After this, we’ll create a ViewModel to show the format of the output we want.
Add the following code to the Index method in the ChatController.cs class:
1[...] 2 var groups = _GroupContext.UserGroup 3 .Where( gp => gp.UserName == _userManager.GetUserName(User) ) 4 .Join( _GroupContext.Groups, ug => ug.GroupId, g =>g.ID, (ug,g) => 5 new UserGroupViewModel{ 6 UserName = ug.UserName, 7 GroupId = g.ID, 8 GroupName = g.GroupName}) 9 .ToList(); 10 11 ViewData["UserGroups"] = groups; 12 13 // get all users 14 ViewData["Users"] = _userManager.Users; 15 [...]
Here we made use of LINQ to make a query to get all groups in the UserGroup table that the current user is subscribed to. The raw SQL query is as follows:
1SELECT "gp"."UserName", "g"."ID" AS "GroupId", "g"."GroupName" 2 FROM "UserGroup" AS "gp" 3 INNER JOIN "Groups" AS "g" ON "gp"."GroupId" = "g"."ID" 4 WHERE "gp"."UserName" = @__GetUserName_0
In the code above we used UserGroupViewModel to describe how the content of the query result should look, but we have not created the file. Create a new file - UserGroupViewModel.cs in the Models folder and add a view model:
1using System; 2 using GroupChat.Models; 3 namespace GroupChat.Models 4 { 5 public class UserGroupViewModel 6 { 7 public string UserName { get; set; } 8 public int GroupId { get; set; } 9 public string GroupName { get; set; } 10 } 11 }
💡 A
view modelrepresents the data that you want to display on your view/page, or the input values you require for a request whether it be used for static text or for input values (like textboxes and dropdown lists) that can be added to the database. It is a model for the view.
Display data to the chat view
Now that we have the user’s groups and all the users, let’s display them on the view.
Add this to the header of Views/chat/index.cshtml:
1@using Microsoft.AspNetCore.Identity 2 @using GroupChat.Models 3 4 @inject UserManager<ApplicationUser> UserManager
Update the html div that has an id=”groups” in Views/chat/index.cshtml as below:
1[...] 2 <div clsss="row" style="height: 500px;overflow: scroll;" id="groups"> 3 <input type="hidden" value="" id="currentGroup"> 4 @foreach (var group in (dynamic)ViewData["UserGroups"]) { 5 <div class="group" data-group_id="@group.GroupId"> @group.GroupName </div> 6 } 7 </div> 8 [...]
Notice that we are storing data-group_id for every group rendered. This is the Group ID of the Group table which is unique so we can keep track of all groups easily.
Let us also display the users to the modal form. Add the following code below this comment <!-- List users here --> in Views/chat/index.cshtml:
1[...] 2 <!-- List users here --> 3 @foreach (var user in (dynamic)ViewData["Users"]) { 4 <div class="col-4"> 5 <div class="form-check"> 6 <input type="checkbox" value="@user.UserName" name="UserName[]"> 7 <label class="form-check-label" for="Users">@user.UserName</label> 8 </div> 9 </div> 10 } 11 [...]
Adding groups
Before a user can start chatting with their friends, they need to create a group and add users to it.
Now, let us add a view model that will define the structure of our form input when creating a new group. Create a new file called NewGroupViewModel.cs in the Models folder then add the following code to it:
1using System; 2 using System.Collections.Generic; 3 namespace GroupChat.Models 4 { 5 public class NewGroupViewModel 6 { 7 public string GroupName { get; set; } 8 public List<string> UserNames { get; set; } 9 } 10 }
Next, create a new file called GroupController.cs in the Controllers folder. Then add the following code to GroupController.cs:
1using System; 2 using System.Collections.Generic; 3 using System.Linq; 4 using System.Threading.Tasks; 5 using Microsoft.AspNetCore.Mvc; 6 using GroupChat.Models; 7 using System.Diagnostics; 8 using Microsoft.AspNetCore.Identity; 9 using Microsoft.AspNetCore.Authorization; 10 namespace GroupChat.Controllers 11 { 12 [Route("api/[controller]")] 13 [Authorize] 14 public class GroupController : Controller 15 { 16 private readonly GroupChatContext _context; 17 private readonly UserManager<ApplicationUser> _userManager; 18 19 public GroupController(GroupChatContext context, UserManager<ApplicationUser> userManager) 20 { 21 _context = context; 22 _userManager = userManager; 23 } 24 25 [HttpGet] 26 public IEnumerable<UserGroupViewModel> GetAll() 27 { 28 29 var groups = _context.UserGroup 30 .Where(gp => gp.UserName == _userManager.GetUserName(User)) 31 .Join(_context.Groups, ug => ug.GroupId, g =>g.ID, (ug,g) => 32 new UserGroupViewModel(){ 33 UserName = ug.UserName, 34 GroupId = g.ID, 35 GroupName = g.GroupName}) 36 .ToList(); 37 38 return groups; 39 } 40 41 [HttpPost] 42 public IActionResult Create([FromBody] NewGroupViewModel group) 43 { 44 if (group == null || group.GroupName == "") 45 { 46 return new ObjectResult( 47 new { status = "error", message = "incomplete request" } 48 ); 49 } 50 if( (_context.Groups.Any(gp => gp.GroupName == group.GroupName)) == true ){ 51 return new ObjectResult( 52 new { status = "error", message = "group name already exist" } 53 ); 54 } 55 56 Group newGroup = new Group{ GroupName = group.GroupName }; 57 // Insert this new group to the database... 58 _context.Groups.Add(newGroup); 59 _context.SaveChanges(); 60 //Insert into the user group table, group_id and user_id in the user_groups table... 61 foreach( string UserName in group.UserNames) 62 { 63 _context.UserGroup.Add( 64 new UserGroup{ UserName = UserName, GroupId = newGroup.ID } 65 ); 66 _context.SaveChanges(); 67 } 68 return new ObjectResult(new { status = "success", data = newGroup }); 69 } 70 } 71 }
In the preceding code:
- The constructor uses Dependency Injection to inject the database context (
GroupChatContextandApplicationUser) into the controller. We have injectedGroupChatContextandApplicationUsercontext into the class so we can have access to the contexts. - The
GetAllmethod is a Get method request that will be used to get all groups a particular user is subscribed to. - The
Createmethod is a POST method request that will be used to create a new group. - Using
_context.Groups.Add(newGroup);_context.SaveChanges();, we added a new group to the database. - Finally, with
returnnewObjectResult(new{ status = "success", data = newGroup });, we returned a JSON that indicates the request was successful.
Create a group by making an AJAX request to /api/group using a POST method. Add the following JavaScript code to /wwwroot/js/site.js:
1$("#CreateNewGroupButton").click(function(){ 2 let UserNames = $("input[name='UserName[]']:checked") 3 .map(function() { 4 return $(this).val(); 5 }).get(); 6 7 let data = { 8 GroupName: $("#GroupName").val(), 9 UserNames: UserNames 10 }; 11 12 $.ajax({ 13 type: "POST", 14 url: "/api/group", 15 data: JSON.stringify(data), 16 success: (data) => { 17 $('#CreateNewGroup').modal('hide'); 18 }, 19 dataType: 'json', 20 contentType:'application/json' 21 }); 22 23 });
Displaying messages for an active group
When a user clicks on a particular group, we’ll fetch all messages in that group and display them on the page. To achieve this we’ll make use of JQuery and Ajax to make a request to an endpoint which we’ll expose later, by passing the group_id along with the request and then display the resulting data on the page.
Create an endpoint for displaying messages for a particular group
Create a new file in the Controllers folder called MessageController.cs Then add the following code to MessageController.cs file:
1using System; 2 using System.Collections.Generic; 3 using System.Linq; 4 using System.Threading.Tasks; 5 using Microsoft.AspNetCore.Mvc; 6 using GroupChat.Models; 7 using Microsoft.AspNetCore.Identity; 8 9 namespace GroupChat.Controllers 10 { 11 [Route("api/[controller]")] 12 public class MessageController : Controller 13 { 14 private readonly GroupChatContext _context; 15 private readonly UserManager<ApplicationUser> _userManager; 16 public MessageController(GroupChatContext context, UserManager<ApplicationUser> userManager) 17 { 18 _context = context; 19 _userManager = userManager; 20 } 21 22 [HttpGet("{group_id}")] 23 public IEnumerable<Message> GetById(int group_id) 24 { 25 return _context.Message.Where(gb => gb.GroupId == group_id); 26 } 27 } 28 }
In the code above, [Route("api/[controller]")] added at the top of the file will create a base route - /api.
Also we added [HttpGet("{group_id}")] to GetById method so we have a route - /api/message/{group_id}. The route - /api/message/{group_id} will return all messages for a particular group.
Adding Ajax Request to Get the Messages and Display It
When a user clicks on a group, we’ll make a request to get all messages in that group.
Add the following code to wwwroot/js/site.js:
1// When a user clicks on a group, Load messages for that particular group. 2 $("#groups").on("click", ".group", function(){ 3 let group_id = $(this).attr("data-group_id"); 4 5 $('.group').css({"border-style": "none", cursor:"pointer"}); 6 $(this).css({"border-style": "inset", cursor:"default"}); 7 8 $("#currentGroup").val(group_id); // update the current group_id to html file... 9 currentGroupId = group_id; 10 11 // get all messages for the group and populate it... 12 $.get( "/api/message/"+group_id, function( data ) { 13 let message = ""; 14 15 data.forEach(function(data) { 16 let position = (data.addedBy == $("#UserName").val()) ? " float-right" : ""; 17 18 message += `<div class="row chat_message` +position+ `"> 19 <b>` +data.addedBy+ `: </b>` +data.message+ 20 `</div>`; 21 }); 22 23 $(".chat_body").html(message); 24 }); 25 26 });
Adding a view model
This view will help us define the nature of the form inputs we’ll use to make requests when we are adding a new message. Create a new file in the Models folder called MessageViewModel.cs:
1using System; 2 3 namespace GroupChat.Models 4 { 5 public class MessageViewModel 6 { 7 public int ID { get; set; } 8 public string AddedBy { get; set; } 9 public string message { get; set; } 10 public int GroupId { get; set; } 11 public string SocketId { get; set; } 12 } 13 }
We’ll discuss what we’ll use the SocketId for later in the article.
Add method for adding message
Here, we’ll add a new method for adding messages to the database.
Update MessageController.cs with the following code:
1[...] 2 [HttpPost] 3 public IActionResult Create([FromBody] MessageViewModel message) 4 { 5 Message new_message = new Message { AddedBy = _userManager.GetUserName(User), message = message.message, GroupId = message.GroupId }; 6 7 _context.Message.Add(new_message); 8 _context.SaveChanges(); 9 10 return new ObjectResult(new { status = "success", data = new_message }); 11 } 12 [...]
We can now send messages and store them in our database. However, other users do not get the messages in realtime. This is where Pusher comes in.
Add new message via Ajax
When a user clicks on the send message button, we’ll make an AJAX call to the method we added above with the message payload so it gets saved in the database.
Add the following code to wwwroot/js/site.js:
1$("#SendMessage").click(function() { 2 $.ajax({ 3 type: "POST", 4 url: "/api/message", 5 data: JSON.stringify({ 6 AddedBy: $("#UserName").val(), 7 GroupId: $("#currentGroup").val(), 8 message: $("#Message").val(), 9 socketId: pusher.connection.socket_id 10 }), 11 success: (data) => { 12 $(".chat_body").append(`<div class="row chat_message float-right"><b>` 13 +data.data.addedBy+ `: </b>` +$("#Message").val()+ `</div>` 14 ); 15 16 $("#Message").val(''); 17 }, 18 dataType: 'json', 19 contentType: 'application/json' 20 }); 21 });
Making our messaging realtime
Users can now send messages and create groups, and details are saved in the database. However, other users cannot see the messages or groups in realtime.
We will make use of Private channel in Pusher which will restrict unauthenticated users from subscribing to channels they don’t have access to.
Basically, we will subscribe to a channel - group_channel and trigger an event - new_group when a new group is created, so when an event - new_group is triggered, we update the group tab for all users (we can use Public channel for this).
We will also subscribe to other channels for messaging - private-1, private-2 etc but this will be a private channel because users who are not not subscribe to a particular group should not subscribe to it.
Add Pusher .NET package
From your command line, make sure you are in the root folder of your project then type:
$ dotnet add package PusherServer
Adding authentication for private channel
When a user wants to subscribe to a private channel, Pusher will authenticate the user to make sure they have the right to subscribe to it by making a request to our authentication logic.
We will create a route - pusher/auth which Pusher will use for authentication.
Lets create an endpoint that Pusher will make a request to when it wants to authenticate a user. Create the route by adding the following code to Startup.cs:
1app.UseMvc(routes => 2 { 3 [...] 4 routes.MapRoute( 5 name: "pusher_auth", 6 template: "pusher/auth", 7 defaults: new { controller = "Auth", action = "ChannelAuth" }); 8 [...] 9 });
Next, create a new file called AuthController.cs in the Controller folder and add the following code to it:
1using System; 2 using System.Collections.Generic; 3 using System.Linq; 4 using System.Threading.Tasks; 5 using Microsoft.AspNetCore.Mvc; 6 using GChat.Models; 7 using Microsoft.AspNetCore.Identity; 8 using PusherServer; 9 namespace GroupChat.Controllers 10 { 11 public class AuthController : Controller 12 { 13 private readonly GroupChatContext _context; 14 private readonly UserManager<ApplicationUser> _userManager; 15 16 public AuthController( GroupChatContext context, UserManager<ApplicationUser> userManager){ 17 _context = context; 18 _userManager = userManager; 19 } 20 21 [HttpPost] 22 public IActionResult ChannelAuth(string channel_name, string socket_id) 23 { 24 int group_id; 25 if(!User.Identity.IsAuthenticated) { 26 return new ContentResult { Content = "Access forbidden", ContentType = "application/json" }; 27 } 28 29 try 30 { 31 group_id = Int32.Parse(channel_name.Replace("private-", "")); 32 } 33 catch (FormatException e) 34 { 35 return Json( new { Content = e.Message } ); 36 } 37 38 var IsInChannel = _context.UserGroup 39 .Where(gb => gb.GroupId == group_id 40 && gb.UserName == _userManager.GetUserName(User)) 41 .Count(); 42 43 if( IsInChannel > 0){ 44 var options = new PusherOptions 45 { 46 Cluster = "PUSHER_APP_CLUSTER", 47 Encrypted = true 48 }; 49 var pusher = new Pusher( 50 "PUSHER_APP_ID", 51 "PUSHER_APP_KEY", 52 "PUSHER_APP_SECRT", 53 options 54 ); 55 56 var auth = pusher.Authenticate(channel_name, socket_id).ToJson(); 57 return new ContentResult { Content = auth, ContentType = "application/json" }; 58 } 59 return new ContentResult { Content = "Access forbidden", ContentType = "application/json" }; 60 } 61 } 62 }
Pusher will send along the Channel name and Socket Id of the user it wants to authenticate, here we extracted the group Id from the channel name. Then we query our database to check if that user is in that group. To make a private channel in Pusher, you just need to add Private- to the channel name you intend to use. In our case, we are using private-1, private-2 etc as the channel name.
Triggering an Event When a Group Is Created
We’ll trigger an event to Pusher when a new group is created so others will see the newly created group.
Add the following code to the Create method in GroupController.cs before return new ObjectResult(new { status = success, data = newGroup }); statement:
1var options = new PusherOptions 2 { 3 Cluster = "PUSHER_APP_CLUSTER", 4 Encrypted = true 5 }; 6 var pusher = new Pusher( 7 "PUSHER_APP_ID", 8 "PUSHER_APP_KEY", 9 "PUSHER_APP_SECRET", 10 options); 11 var result = await pusher.TriggerAsync( 12 "group_chat", //channel name 13 "new_group", // event name 14 new { newGroup } );
Make sure you use your own Pusher app details above.
Also, add this to the top of the file:
1using PusherServer;
Triggering an event when a new message is received
To trigger an event when a new message is added, add the following code to MessageController.cs:
1var options = new PusherOptions 2 { 3 Cluster = "PUSHER_APP_CLUSTER", 4 Encrypted = true 5 }; 6 var pusher = new Pusher( 7 "PUSHER_APP_ID", 8 "PUSHER_APP_KEY", 9 "PUSHER_APP_SECRET", 10 options 11 ); 12 var result = await pusher.TriggerAsync( 13 "private-" + message.GroupId, 14 "new_message", 15 new { new_message }, 16 new TriggerOptions() { SocketId = message.SocketId });
Make sure you use your own Pusher app details above.
We have added new TriggerOptions() { SocketId = message.SocketId }, so as not to broadcast to the user that triggered the event.
Also, add this to the top of GroupController.cs:
using PusherServer;
Display the new group when a user creates a group
When a new group is created, we will reload the groups for every user. Add the following function to wwwroot/js/site.js:
1function reloadGroup(){ 2 $.get("/api/group", function( data ) { 3 let groups = ""; 4 5 data.forEach(function(group){ 6 groups += `<div class="group" data-group_id="` 7 +group.groupId+ `">` +group.groupName+ 8 `</div>`; 9 }); 10 11 $("#groups").html(groups); 12 }); 13 }
Listen for new group
When a new group is created, we will call the reloadGroup() function. To listen for events, we need to initialize Pusher’s Javascript library. Add the following code to /wwwroot/js/site.js:
1let currentGroupId = null; 2 3 var pusher = new Pusher('PUSHER_APP_KEY', { 4 cluster: 'PUSHER_APP_CLUSTER', 5 encrypted: true 6 }); 7 8 var channel = pusher.subscribe('group_chat'); 9 channel.bind('new_group', function(data) { 10 reloadGroup(); 11 });
Make sure to add this to the top part of the code because some other code in the file will be using it.
In the preceding code:
- We initiated the Pusher JavaScript library using our Pusher key.
- Then we suscribed to a channel -
group_chat. - Then we bound that channel to an event -
new_group. So when a new group is created, we call the functionreloadGroup().
Listen for new message
When a user sends a message, we need to show it to other users in the group. To do this, we will subscribe to a channel and bind that channel to an event.
Add this to the $("#groups").on("click", ".group", function()… event in /wwwroot/js/site.js:
1if( !pusher.channel('private-'+group_id) ){ // check if the user have subscribed to the channel before. 2 let group_channel = pusher.subscribe('private-'+group_id); 3 4 group_channel.bind('new_message', function(data) { 5 6 if (currentGroupId == data.new_message.GroupId) { 7 $(".chat_body").append(`<div class="row chat_message"><b>` 8 +data.new_message.AddedBy+ `: </b>` +data.new_message.message+ ` </div>` 9 ); 10 ']} 11 12 }); 13 }
So it should now look like this:
1// When a user clicks on a group, Load messages for that particular group. 2 $("#groups").on("click", ".group", function(){ 3 let group_id = $(this).attr("data-group_id"); 4 5 $('.group').css({"border-style": "none", cursor:"pointer"}); 6 $(this).css({"border-style": "inset", cursor:"default"}); 7 8 $("#currentGroup").val(group_id); // update the current group_id to a html form... 9 currentGroupId = group_id; 10 11 // get all messages for the group and populate it... 12 $.get( "/api/message/"+group_id, function( data ) { 13 let message = ""; 14 15 data.forEach(function(data){ 16 let position = ( data.addedBy == $("#UserName").val() ) ? " float-right" : ""; 17 message += `<div class="row chat_message` + position +`"><b>`+ data.addedBy +`: </b>`+ data.message +` </div>`; 18 }); 19 20 $(".chat_body").html(message); 21 }); 22 if( !pusher.channel('private-'+group_id) ){ // check the user have subscribed to the channel before. 23 let group_channel = pusher.subscribe('private-'+group_id); 24 25 group_channel.bind('new_message', function(data) { 26 if( currentGroupId == data.new_message.GroupId){ 27 28 $(".chat_body").append(`<div class="row chat_message"><b>`+ data.new_message.AddedBy +`: </b>`+ data.new_message.message +` </div>`); 29 } 30 }); 31 } 32 });
Conclusion
So far, we have seen how to create a group chat application in ASP.NET Core MVC by leveraging Pusher as a technology for adding realtime functionality. You can find the complete code on Github.


© 2024 Pusher Ltd. All rights reserved.
Pusher Limited is a company registered in England and Wales (No. 07489873) whose registered office is at MessageBird UK Limited, 3 More London Riverside, 4th Floor, London, United Kingdom, SE1 2AQ.