- Products

- Developers
- User stories
- Blog
- Pricing

Understanding HTTP response status codes in frontend applications - Part 2: Implementations
- Introduction
- Prerequisites
- The Node.js backend
- Create the server
- The HTML and JavaScript frontend
- Testing the endpoints on the browser starting with the 2xx endpoints
- The homepage
- Submitting the registration form
- Making an update
- Now to 3xx endpoints
- Send a request to an old registration link
- Send a request to the old registration link bound to fail
- Get Jane’s profile
- Complete registration
- Now to 4xx endpoints
- Making a bad request
- Access all user details we should only see if we are logged in
- Access a super secret page
- Access the endpoint that accepts only PUT requests
- Try an arbitrary endpoint and see if our 404 works
- Finally to 5xx endpoints
- The 500 error
- Try patch method that we did not implement
- Make a request when the server is not available
- The unsupported HTTP version
- Conclusion
Introduction
In this tutorial, we will do three things to illustrate how these status codes work:
- Build a simple Node.js backend using Express to send data.
- Write simple HTML pages and make API calls using JavaScripts fetch API.
- Use Postman for some of our tests.
If you are not familiar with Node.js, do not worry. We are not building anything complex.
In the last tutorial of this series, we did an extensive deep dive into HTTP status codes and what they mean. If you are a backend developer, it is likely to alter how you build applications that other people will interact with. If you are a frontend developer, you will now understand how best to use the data sent to you from an API or even the backend of the application you are building (say you are not using APIs).
Prerequisites
- Read the first part of this tutorial.
- Have understanding of HTML and JavaScript.
The Node.js backend
We are going to specify simple one liners on our Node backend so we can keep this guide simple.
First, we are going to create a new folder for our project called http-response-codes and navigate into the created folder. We then proceed to create a new Node project:
$ npm init -y
This will create a new project with the default settings which is fine for this project
Install dependencies.
$ npm install --save express body-parser
Create the server
We have all we need to begin. Create a file index.js in the root directory of the project. This is where we will specify our Node server.
Open the file and add the following:
1// index.js 2 /* A simple API skeleton in Node.js using express */ 3 4 const express = require('express') 5 const bodyParser = require('body-parser') 6 const app = express(); 7 8 app.use(bodyParser.urlencoded({ extended: false }));
We have imported the dependencies we need for the project. Now, define some routes.
Add the routes for success status codes:
1// index.js 2 /** The success status codes */ 3 4 // 200 Ok 5 app.get('/', (req, res) => res.status(200).sendFile(`${__dirname}/html/register.html`)); 6 app.get('/update', (req, res) => res.status(200).sendFile(`${__dirname}/html/update.html`)); 7 app.get('/bad-request', (req, res) => res.status(200).sendFile(`${__dirname}/html/bad-request.html`)); 8 app.get('/complete', (req, res) => res.status(200).sendFile(`${__dirname}/html/complete.html`)); 9 app.get('/old-registration', (req, res) => res.status(200).sendFile(`${__dirname}/html/old-register.html`)); 10 app.get('/old-reg-fail', (req, res) => res.status(200).sendFile(`${__dirname}/html/old-reg-fail.html`)); 11 app.get('/user/john-new.html', (req, res) => res.status(200).send({message : "This is John's new page"})); 12 app.get('/user/jane-new', (req, res) => res.status(200).send({message : "This is Jane's new page"})); 13 app.get('/thank-you-page', (req, res) => res.status(200).send({message : "Thank you for registering!"})); 14 15 // 201 Created 16 app.post('/register', (req, res) => { 17 // logic to save to database 18 res.status(201).send({message : 'registrations compelete'}) 19 }); 20 app.post('/login', (req, res) => { 21 // logic to login 22 res.status(201).send('You have been logged in') 23 }); 24 // 204 No Content 25 app.put('/update', (req, res) => { 26 // logic to update database record 27 res.status(204).end() 28 });
We have defined a few routes to allow us test out our endpoints. We will test the success status codes with our browser so we can see the entire process the connection takes when we make it. We will worry about this later.
Add the routes for redirection status codes:
1// index.js 2 /** The redirection status codes */ 3 4 // 301 Moved Permanently 5 app.get('/user/john', (req, res) => { 6 res.set('location', '/user/john-new.html') 7 res.status(301).send() 8 }); 9 // This redirection may fail because the browser might change the request method to GET 10 app.post('/old-registration-fail', (req, res) => { 11 res.set('location', '/register') 12 res.status(301).send() 13 }); 14 15 // 302 Found 16 app.get('/user/jane', (req, res) => { 17 res.set('location', '/user/jane-new') 18 res.status(302).send() 19 }); 20 21 // 303 See Other 22 app.post('/complete-registration', (req, res) => { 23 res.set('location', '/thank-you-page') 24 res.status(303).send() 25 }); 26 27 // 307 Temporal Redirect 28 app.post('/old-registration', (req, res) => { 29 res.set('location', '/register') 30 res.status(307).send() 31 }); 32 33 // 308 Permanent Redirect 34 app.post('/old-login', (req, res) => { 35 res.set('location', '/login') 36 res.status(308).send() 37 });
Add the routes for client error status codes:
1// index.js 2 /** Client error status codes */ 3 4 // 400 Bad Request 5 app.post('/bad-request', (req, res) => { 6 res.status(400).send({message : "You are missing vital credentials"}) 7 }); 8 // 401 Unauthorized 9 app.get('/user', (req, res) => { 10 res.status(401).send({message : "You need to login to view this"}) 11 }); 12 // 403 Forbidden 13 app.get('/super-secret', (req, res) => { 14 res.status(403).send({message : "You are forbidden from seeing this"}) 15 }); 16 // 405 Method Not Allowed 17 app.all('/only-put', (req, res) => { 18 if(req.method == "PUT") res.status(204).end() 19 else res.status(405).send({message : "Please use put"}) 20 })
Add the routes for server error status codes:
1// index.js 2 /** Server error status codes */ 3 4 // 500 Internal Server Error 5 app.post('/500', (req, res) => { 6 res.status(500).send({message : "I failed. I'm sorry"}) 7 }); 8 // 501 Unauthorized 9 app.patch('*', (req, res) => { 10 res.status(501).send({message : "I will patch no such thing"}) 11 }); 12 // 503 Service Unavailable 13 app.get('/503', (req, res) => { 14 res.status(503).send({message : "I had to take a break. Getting too old for this"}) 15 }); 16 // 505 Method Not Allowed 17 app.all('/http2', (req, res) => { 18 if(req.httpVersion == "2.0") res.status(200).send({message : "You get a response. She gets a response. They get a response... Everybody gets a response"}) 19 else res.status(505).send({message : "Only http2 baby"}) 20 })
We put it last because we want to catch everything else not defined. We will also start the server.
1// index.js 2 3 // 404 Not Found 4 app.all('*', (req, res) => { 5 res.status(404).send({message : "This resource was not found"}) 6 }) 7 8 app.listen(3000, () => console.info('Application running on port 3000'));
Do not get overwhelmed by the many lines of code above. They are all routes that return a message when you hit them. We do not have any complex implementation so that we can keep this guide simple for everyone to follow.
The HTML and JavaScript frontend
For this section, we are going to create a directory — html in the root directory of our project. Inside that directory, we will make all the HTML files we referenced in our code above.
Create the directory:
$ mkdir html
Create the register file:
1<!-- html/register.html --> 2 <!DOCTYPE html> 3 <html lang="en"> 4 <head> 5 <meta charset="UTF-8"> 6 <title>Register Page</title> 7 </head> 8 <body> 9 <h2>Please ignore the lack of styling</h2> 10 <form id="form"> 11 <input type="text" name="name"> 12 <input type="email" name="email"> 13 <input type="password" name="password"> 14 <input type="submit" name="submit"> 15 </form> 16 <script type="text/javascript"> 17 // handle form submission 18 </script> 19 </body> 20 </html>
Add the script to handle form submission:
1// html/register.html 2 [...] 3 let form = document.getElementById('form') 4 let data = { 5 name : form.elements.name.value, 6 email : form.elements.email.value, 7 password : form.elements.password.value 8 } 9 form.addEventListener('submit', (e) => { 10 e.preventDefault() 11 fetch('http://localhost:3000/register', { 12 method: 'POST', 13 body: JSON.stringify(data), 14 headers:{ 15 'Content-Type': 'application/json' 16 } 17 }).then(res => { 18 console.log(res) // log response object 19 return res.json() // return json data from the server 20 }) 21 .then(response => alert(response.message)) 22 .catch(error => console.error('Error:', error)) 23 }) 24 [...]
We are using JavaScript’s Fetch API to submit the form to our server. Then we are logging the response object we got, before returning the data sent from the server in json format. The reason for logging the response is so we can look at the console to view what happened behind the scenes. You will notice that for any redirect response sent from the server, fetch will redirect automatically, and send us a result. If you do not look inside, you may never know.
We chain another then whenever we return json data as fetch will resolve the data into a promise, which is handled by the next then we chained. You will see it at work shortly.
For now, let’s make the remaining pages which follow a similar pattern.
Create the update file:
1<!-- html/update.html --> 2 <!DOCTYPE html> 3 <html lang="en"> 4 <head> 5 <meta charset="UTF-8"> 6 <title>Register Page</title> 7 </head> 8 <body> 9 <h2>Please ignore the lack of styling</h2> 10 <form id = "form"> 11 <input type="text" name="name" value="AceKyd"> 12 <input type="email" name="email" value="ace@kyd.com"> 13 <input type="password" name="password" value="acekyd"> 14 <input type="submit" name="submit"> 15 </form> 16 <script type="text/javascript"> 17 let form = document.getElementById('form') 18 let data = { 19 name : form.elements.name.value, 20 email : form.elements.email.value, 21 password : form.elements.password.value 22 } 23 form.addEventListener('submit', (e) => { 24 e.preventDefault() 25 fetch('http://localhost:3000/update', { 26 method: 'PUT', 27 body: JSON.stringify(data), 28 headers:{ 29 'Content-Type': 'application/json' 30 } 31 }).then(response => { 32 if(response.status == 204) alert("Data updated") 33 }) 34 .catch(error => console.error('Error:', error)) 35 }) 36 </script> 37 </body> 38 </html>
Create the old-register file:
1<!-- html/old-register.html --> 2 <!DOCTYPE html> 3 <html lang="en"> 4 <head> 5 <meta charset="UTF-8"> 6 <title>Register Page</title> 7 </head> 8 <body> 9 <h2>Please ignore the lack of styling</h2> 10 <form id="form"> 11 <input type="text" name="name"> 12 <input type="email" name="email"> 13 <input type="password" name="password"> 14 <input type="submit" name="submit"> 15 </form> 16 <script type="text/javascript"> 17 let form = document.getElementById('form') 18 let data = { 19 name : form.elements.name.value, 20 email : form.elements.email.value, 21 password : form.elements.password.value 22 } 23 form.addEventListener('submit', (e) => { 24 e.preventDefault() 25 fetch('http://localhost:3000/old-registration', { 26 method: 'POST', 27 body: JSON.stringify(data), 28 headers:{ 29 'Content-Type': 'application/json' 30 } 31 }).then(res => { 32 console.log(res) 33 return res.json() 34 }) 35 .then(response => alert(response.message)) 36 .catch(error => console.error('Error:', error)) 37 }) 38 </script> 39 </body> 40 </html>
Create the old-reg-fail file:
1<!-- html/old-reg-fail.html --> 2 <!DOCTYPE html> 3 <html lang="en"> 4 <head> 5 <meta charset="UTF-8"> 6 <title>Register Page</title> 7 </head> 8 <body> 9 <h2>Please ignore the lack of styling</h2> 10 <form id="form"> 11 <input type="text" name="name"> 12 <input type="email" name="email"> 13 <input type="password" name="password"> 14 <input type="submit" name="submit"> 15 </form> 16 <script type="text/javascript"> 17 let form = document.getElementById('form') 18 let data = { 19 name : form.elements.name.value, 20 email : form.elements.email.value, 21 password : form.elements.password.value 22 } 23 form.addEventListener('submit', (e) => { 24 e.preventDefault() 25 fetch('http://localhost:3000/old-registration-fail', { 26 method: 'POST', 27 body: JSON.stringify(data), 28 headers:{ 29 'Content-Type': 'application/json' 30 } 31 }).then(res => { 32 console.log(res) 33 return res.json() 34 }) 35 .then(response => alert(response.message)) 36 .catch(error => console.error('Error:', error)) 37 }) 38 </script> 39 </body> 40 </html>
Create the old-login file:
1<!-- html/old-login.html --> 2 <!DOCTYPE html> 3 <html lang="en"> 4 <head> 5 <meta charset="UTF-8"> 6 <title>Register Page</title> 7 </head> 8 <body> 9 <h2>Please ignore the lack of styling</h2> 10 <form id="form"> 11 <input type="email" name="email"> 12 <input type="password" name="password"> 13 <input type="submit" name="submit"> 14 </form> 15 <script type="text/javascript"> 16 let form = document.getElementById('form') 17 let data = { 18 name : form.elements.name.value, 19 password : form.elements.password.value 20 } 21 form.addEventListener('submit', (e) => { 22 e.preventDefault() 23 fetch('http://localhost:3000/old-login', { 24 method: 'POST', 25 body: JSON.stringify(data), 26 headers:{ 27 'Content-Type': 'application/json' 28 } 29 }).then(res => { 30 console.log(res) 31 return res.json() 32 }) 33 .then(response => alert(response.message)) 34 .catch(error => console.error('Error:', error)) 35 }) 36 </script> 37 </body> 38 </html>
Create the bad-request file:
1<!-- html/bad-request.html --> 2 <!DOCTYPE html> 3 <html lang="en"> 4 <head> 5 <meta charset="UTF-8"> 6 <title>Register Page</title> 7 </head> 8 <body> 9 <h2>Please ignore the lack of styling</h2> 10 <form id = "form"> 11 <input type="text" name="name" value="AceKyd"> 12 <input type="email" name="email" value="ace@kyd.com"> 13 <input type="password" name="password" value="acekyd"> 14 <input type="submit" name="submit"> 15 </form> 16 <script type="text/javascript"> 17 let form = document.getElementById('form') 18 let data = { 19 name : form.elements.name.value, 20 email : form.elements.email.value, 21 password : form.elements.password.value 22 } 23 form.addEventListener('submit', (e) => { 24 e.preventDefault() 25 fetch('http://localhost:3000/bad-request', { 26 method: 'POST', 27 body: JSON.stringify(data), 28 headers:{ 29 'Content-Type': 'application/json' 30 } 31 }).then(res => { 32 console.log(res) 33 return res.json() 34 }).then(res => alert(res.message)) 35 .catch(error => console.error('Error:', error)) 36 }) 37 </script> 38 </body> 39 </html>
Create the complete file:
1<!-- html/complete.html --> 2 <!DOCTYPE html> 3 <html lang="en"> 4 <head> 5 <meta charset="UTF-8"> 6 <title>Register Page</title> 7 </head> 8 <body> 9 <h2>Please ignore the lack of styling</h2> 10 <form id = "form"> 11 <input type="text" name="name" value="AceKyd"> 12 <input type="email" name="email" value="ace@kyd.com"> 13 <input type="password" name="password" value="acekyd"> 14 <input type="submit" name="submit"> 15 </form> 16 <script type="text/javascript"> 17 let form = document.getElementById('form') 18 let data = { 19 name : form.elements.name.value, 20 email : form.elements.email.value, 21 password : form.elements.password.value 22 } 23 form.addEventListener('submit', (e) => { 24 e.preventDefault() 25 fetch('http://localhost:3000/complete-registration', { 26 method: 'POST', 27 body: JSON.stringify(data), 28 headers:{ 29 'Content-Type': 'application/json' 30 } 31 }).then(res => { 32 console.log(res) 33 return res.json() 34 }).then(res => alert(res.message)) 35 .catch(error => console.error('Error:', error)) 36 }) 37 </script> 38 </body> 39 </html>
Now, we are ready to test 😁.
Run our application:
$ node index
Testing the endpoints on the browser starting with the 2xx endpoints
We are going to see a series of tests done on this endpoint and see how they all work together. The screenshots below would show two browser windows side by side to show the different stages of the request, responses and additional details as necessary. Shall we?
The homepage
Visit localhost:3000/ in the browser to access the homepage, which matches our app.get('/') route as declared.
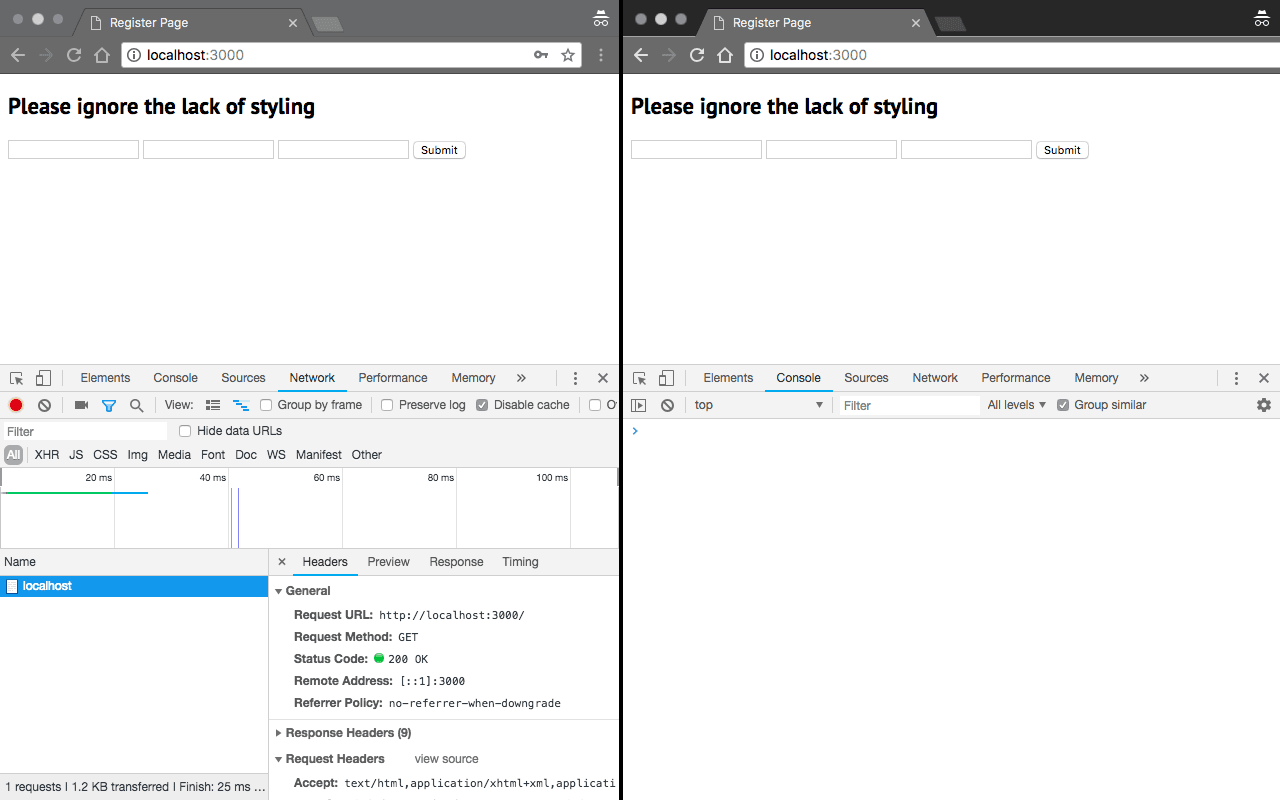
Notice the status code? That is the expected result when a get request is completed successfully. Be it an API call or direct browser request. When you check the result of every browser page we load, you will see that it the Status Code will be 200 OK.
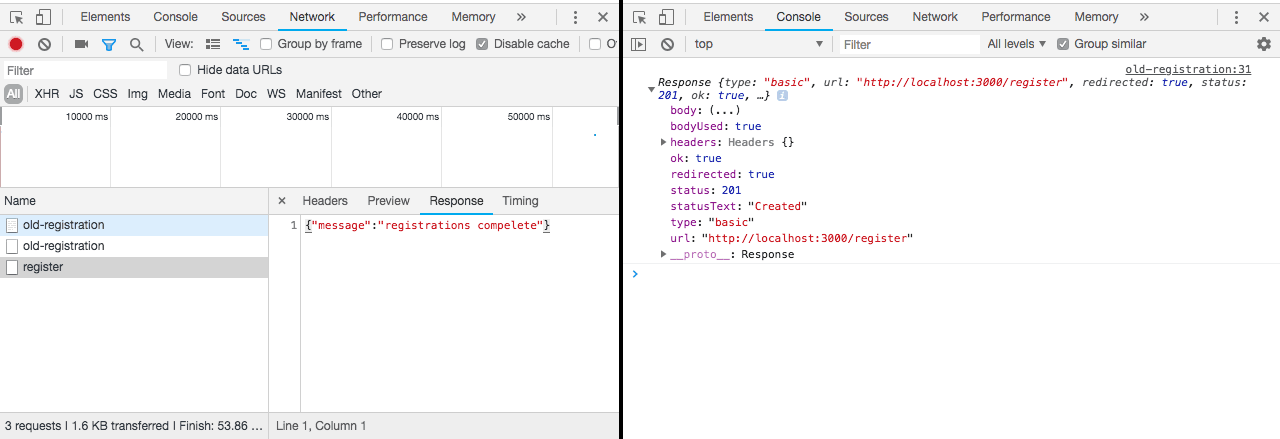
Submitting the registration form
Here we enter data into the form and click on the Submit button to make a POST request to our route as defined app.post('/register')
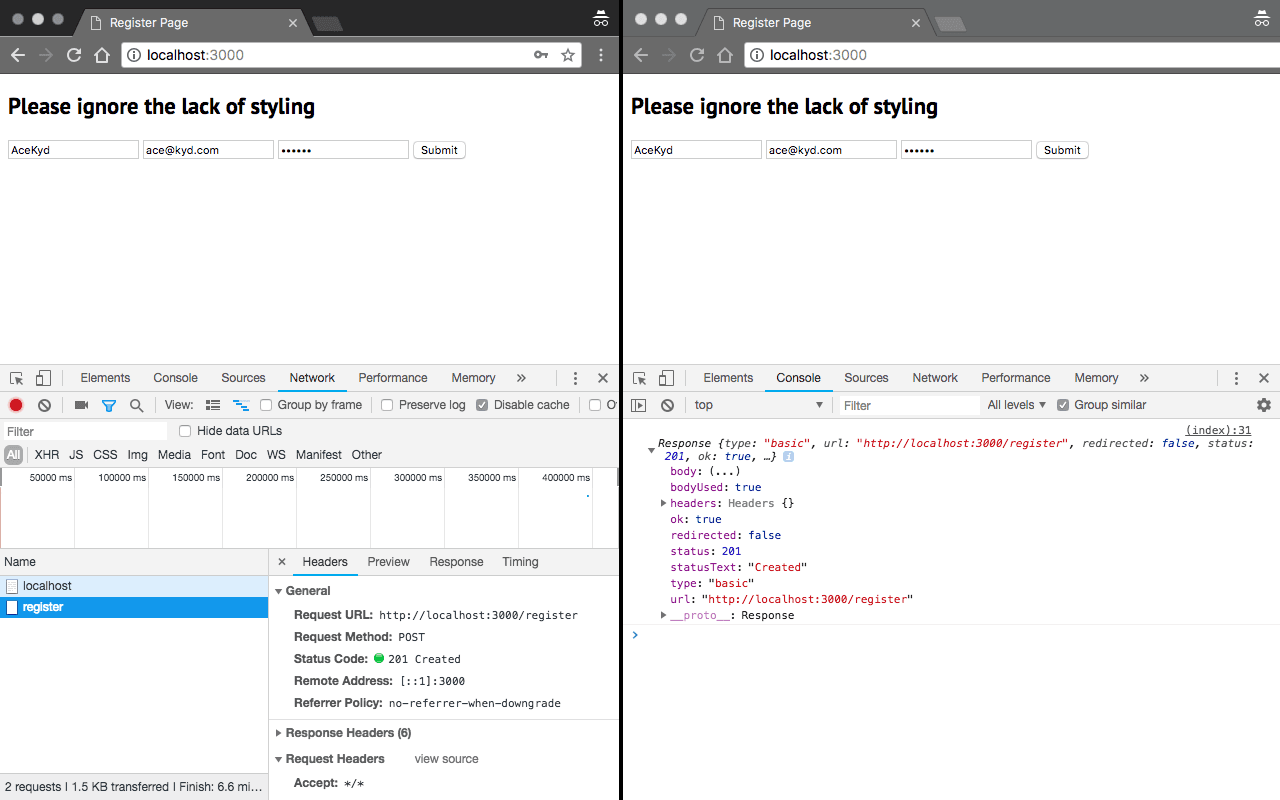
Look at the data returned from each request. Now, we can proceed to tell our users they have been successfully registered and their accounted created.
Making an update
Here we visit localhost:3000/update matching the app.put('/update') route, which loads up a pre-filled form to simulate editing an existing resource on the server.
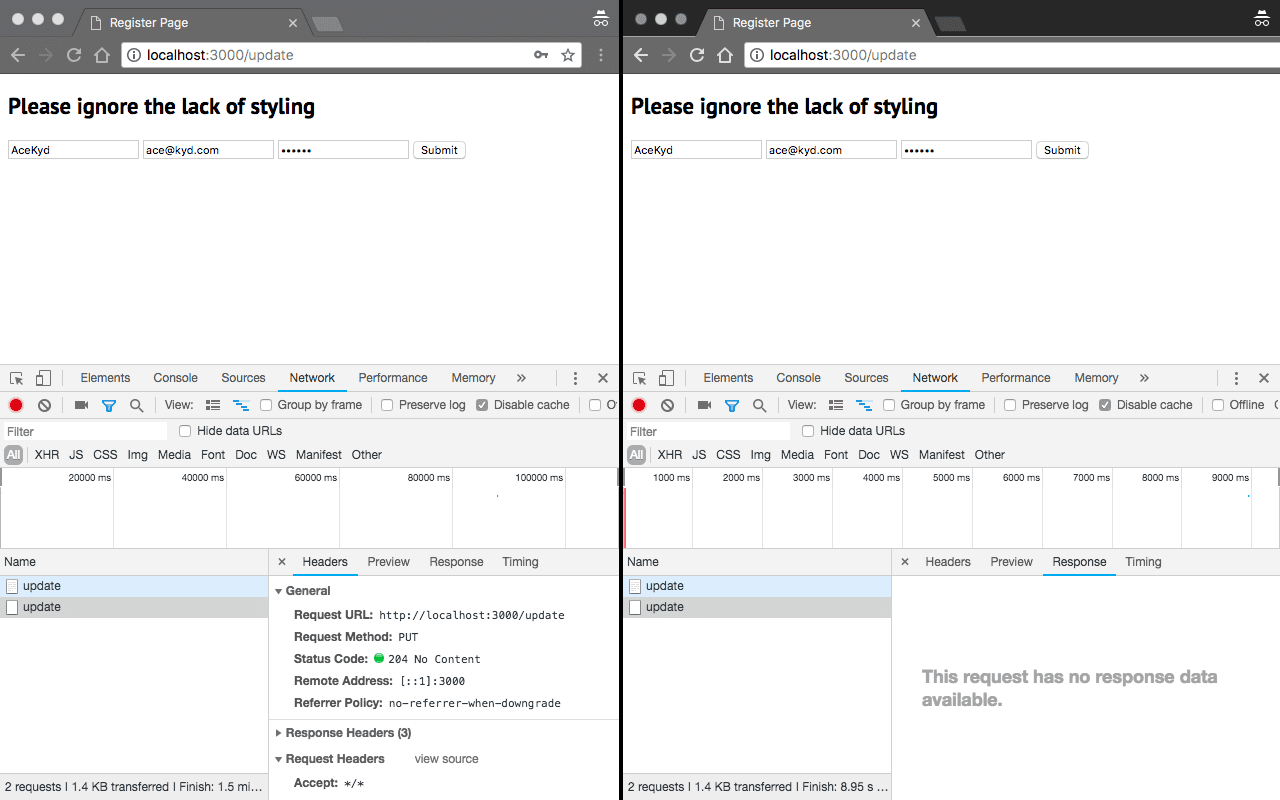
As is expected from a PUT request, there should be no response data once we send a 204. With such a request, do not expect anything new to be created on the server, as it will return the resource you gave to it.
A good question is “What if we are changing a profile image? Wouldn’t we need the server to send us the URL it saved the image with so we can load the image?” Since you are creating a resource, you should send such a request over POST, even though it will update a record already existing on your system.
Now to 3xx endpoints
Send a request to an old registration link
Visit localhost:3000/old-registration matching app.get('/old-registration') to send a request to app.post('/old-registration').
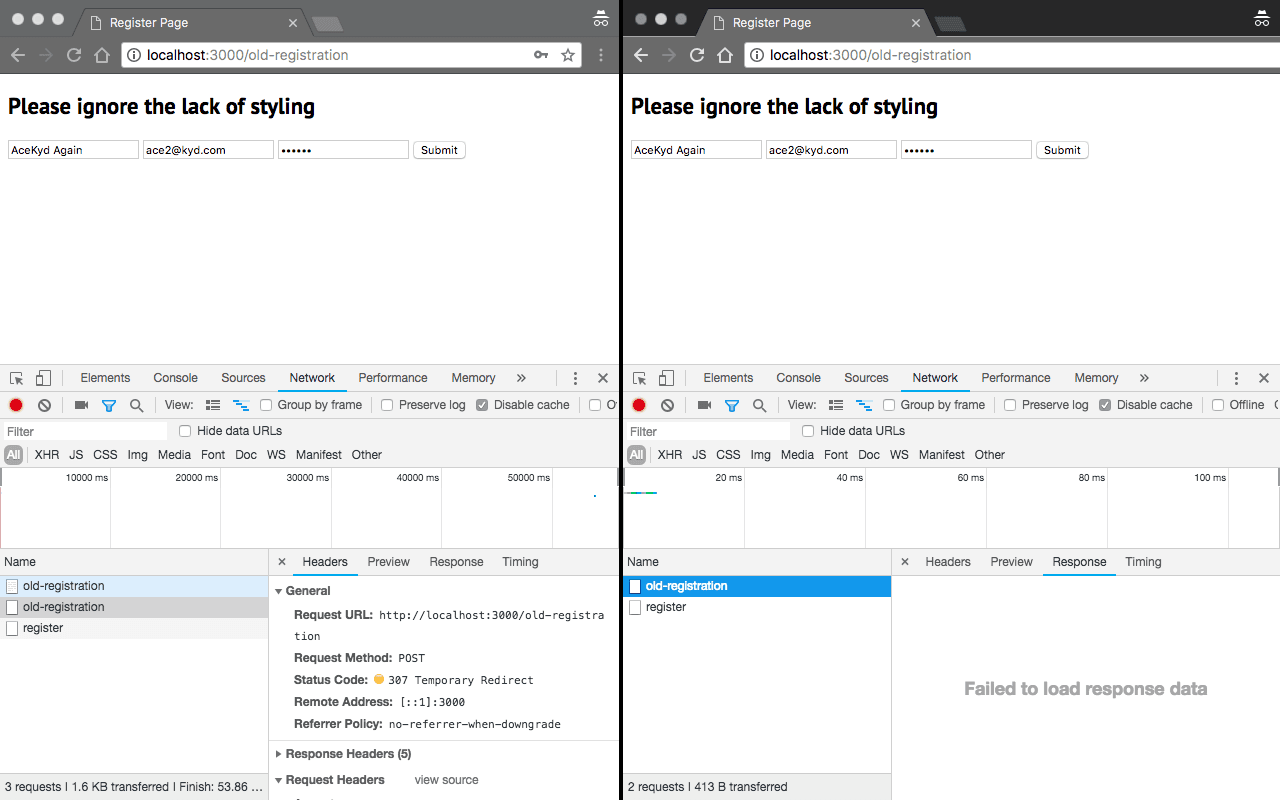
You can learn now that most of ajax clients like fetch will perform redirection automatically. Good thing our browser records activities, if not, we may not have seen how this worked. Notice also that they tell you if they were redirected or not.
Whatever it means for you at this point may not be clear to me. But if you keep records of changes for future requests (say your application learns and autoupdates it’s information), you can now note this change.
Send a request to the old registration link bound to fail
Visit localhost:3000/old-registration matching app.get('/old-reg-fail').

You see that we used 301 for this redirection and the browser changed the request method from POST to GET. Of course, our register endpoint does not have a GET method.
Get Jane’s profile
Visit localhost:3000/user/jane matching app.get('/user/jane').
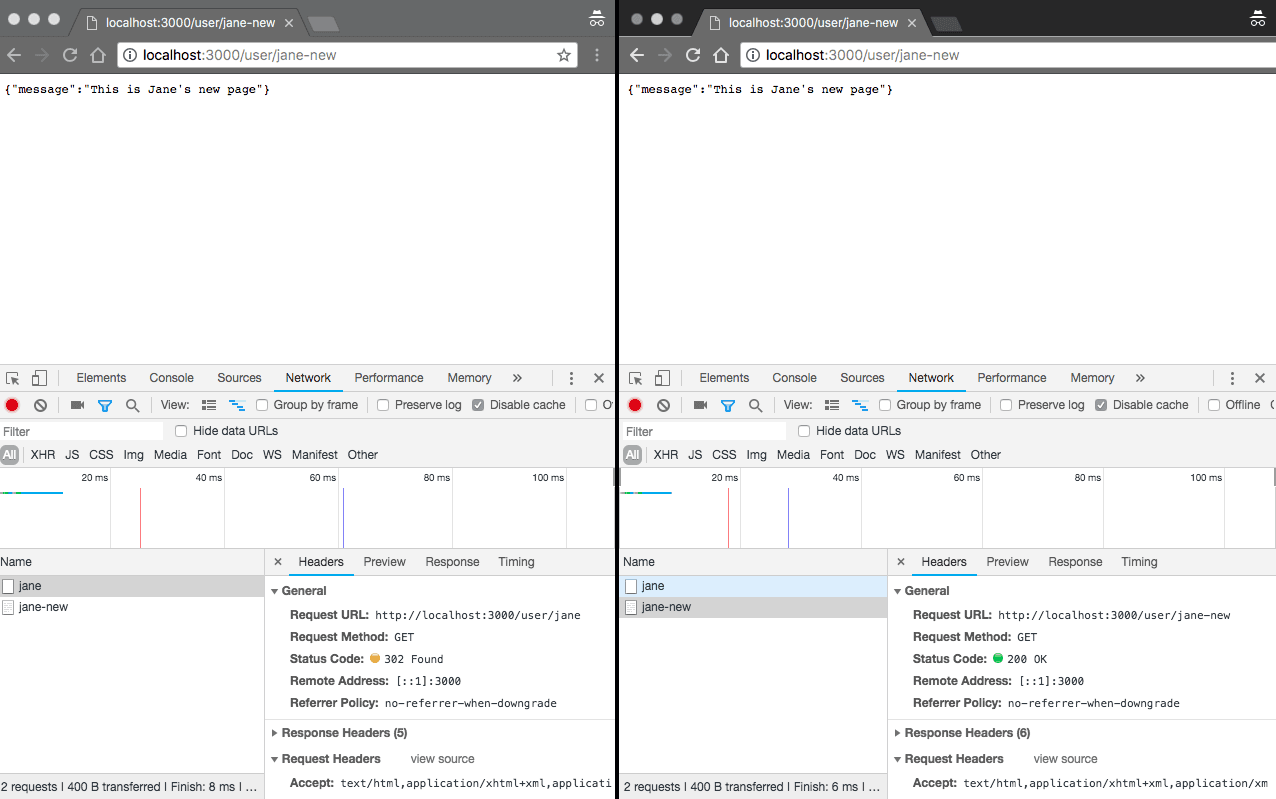
The server found the profile quite alright, but we have to go somewhere else to see it. There could be so many reasons for this. I can have a public link for viewing profiles for a class of users on my application. The endpoint might have very limited data based on the user level.
Be that as it may, you should know how many legs your application is taking. Also, notice the URL changed in the URL bar 😃.
Try and get John’s profile.
Complete registration
Visit localhost:3000/complete matching app.get('/complete')
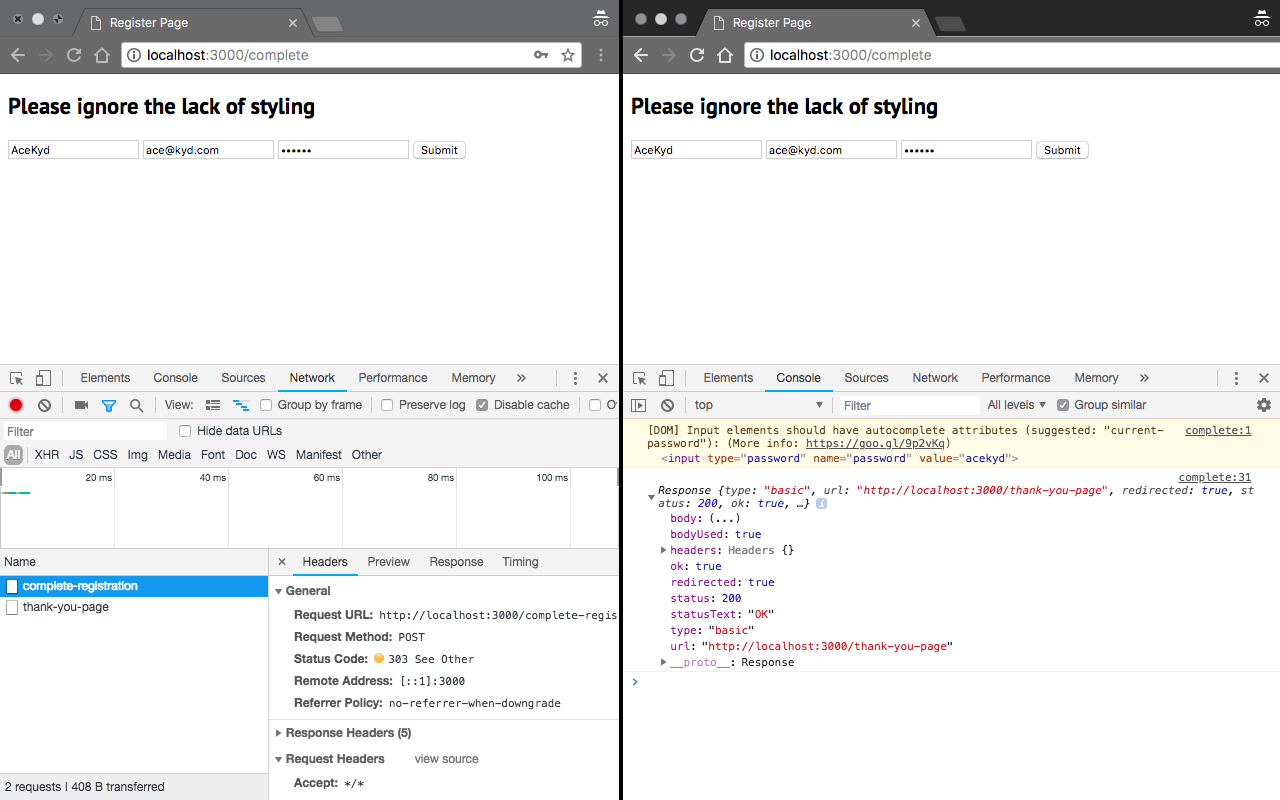
We were taken to a completely new page. Now, it is up to you to change the URL of your browser as you display the content. Can you see how this will help you create richer experience for your applications?
Now to 4xx endpoints
Making a bad request
Visit localhost:3000/bad-request matching app.get('/bad-request').
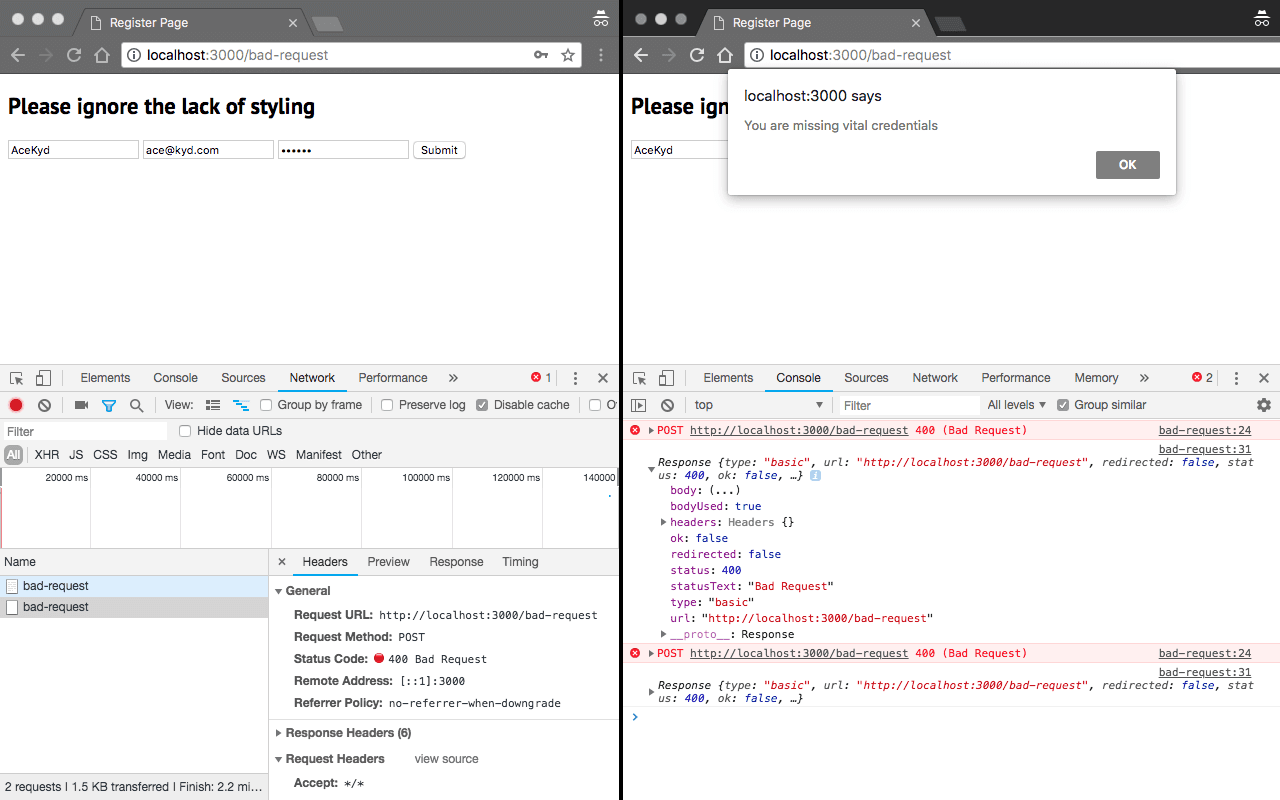
My favorite status code 😃. This tells you, me, the user that we supplied wrong credentials and the request will not go through. You can send a nicer message to your users to tell them they sent wrong credentials.
For the rest of the tests we will do, we will use Postman.
Access all user details we should only see if we are logged in
Here, we will be making a GET request to http://localhost:3000/user to match app.get('/user'). We will also need to add a Content-Type header set to application/json to specify what the content type of the returned content actually is. And in this case, JSON is returned.
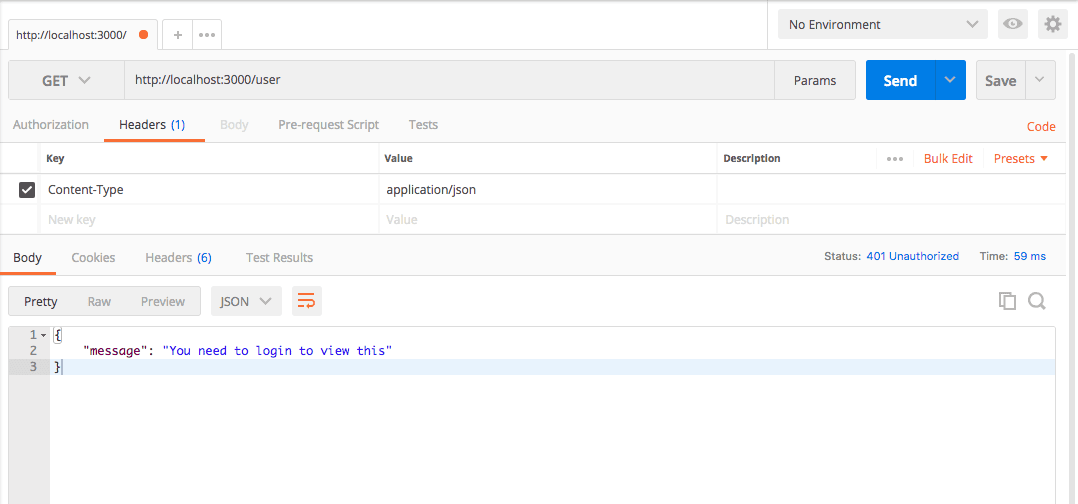
Look at the Status and then the Body of the response.
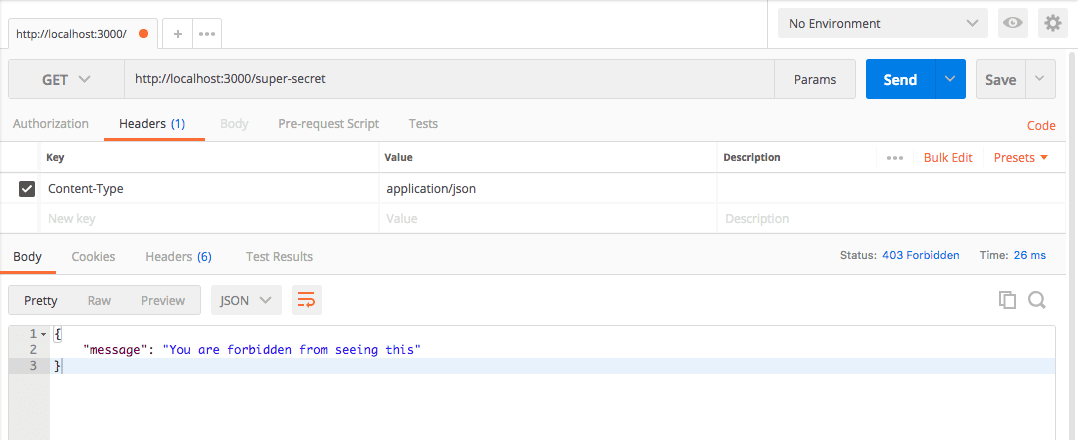
Access a super secret page
Here, we will be making a GET request to http://localhost:3000/super-secret to match app.get('/super-secret').
Access the endpoint that accepts only PUT requests
Here, we will be making requests to http://localhost:3000/only-put with multiple request methods.
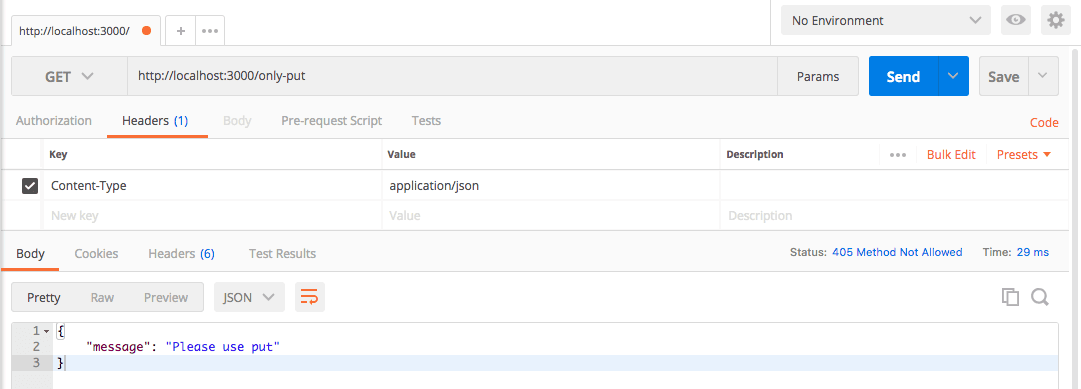

We already tried GET and POST and we still get 405 Method Not Allowed. Let’s try PUT
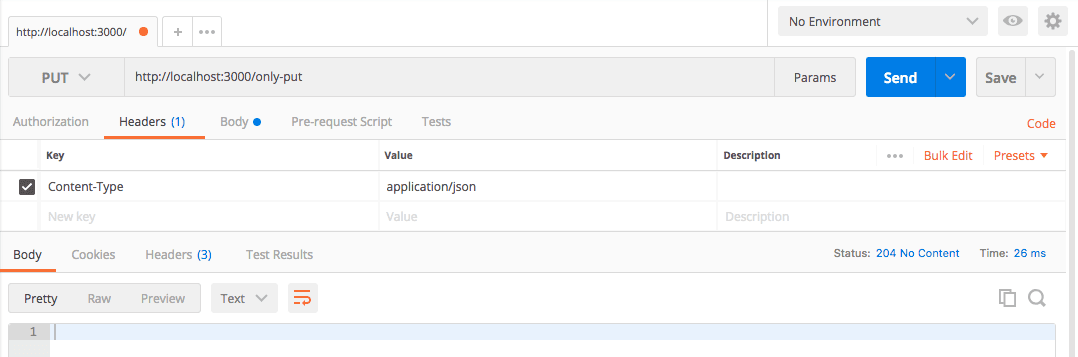
And we get 204 which means our request was successful.
Try an arbitrary endpoint and see if our 404 works
Here, we will be making a random GET request to http://localhost:3000/hello-mike that will be matched by our generic route – app.all('*').
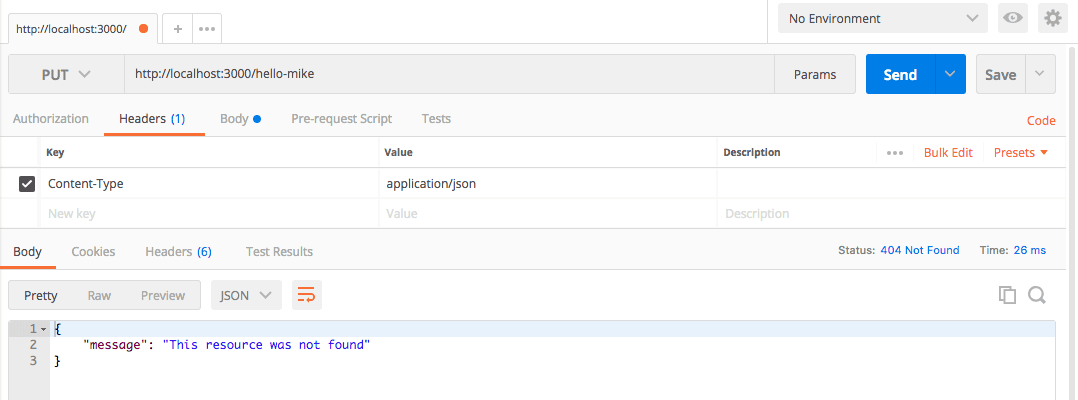
Yep. There you have it.
Finally to 5xx endpoints
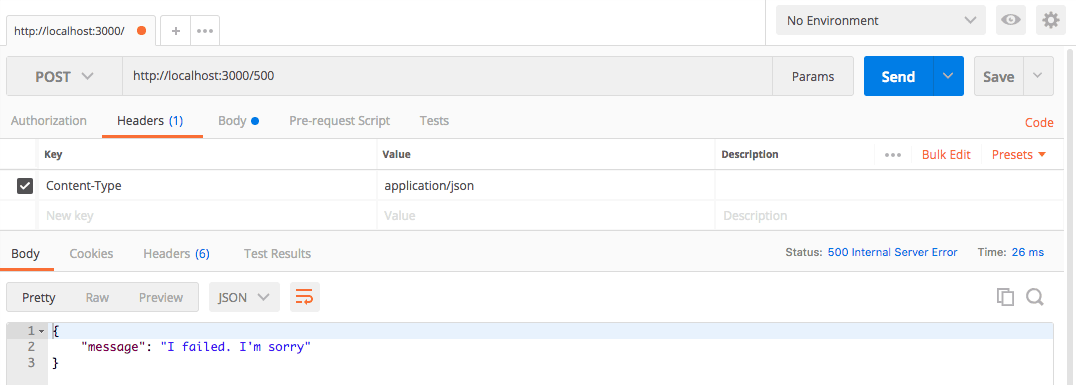
The 500 error
Here, we will be making a POST request to http://localhost:3000/500 to match app.post('/500').
Try patch method that we did not implement
Here, we will be making a random PATCH request to http://localhost:3000/501 that will be matched by our generic route – app.patch('*').
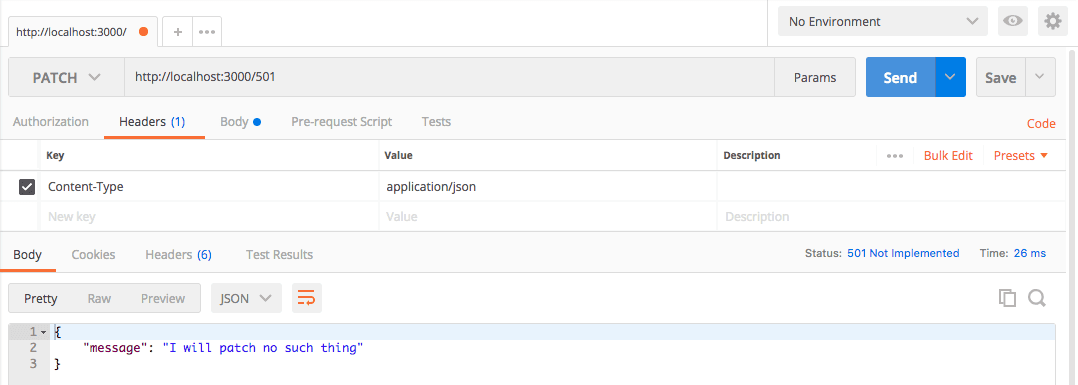
How you handle a 501 will depend on what the developer making the API
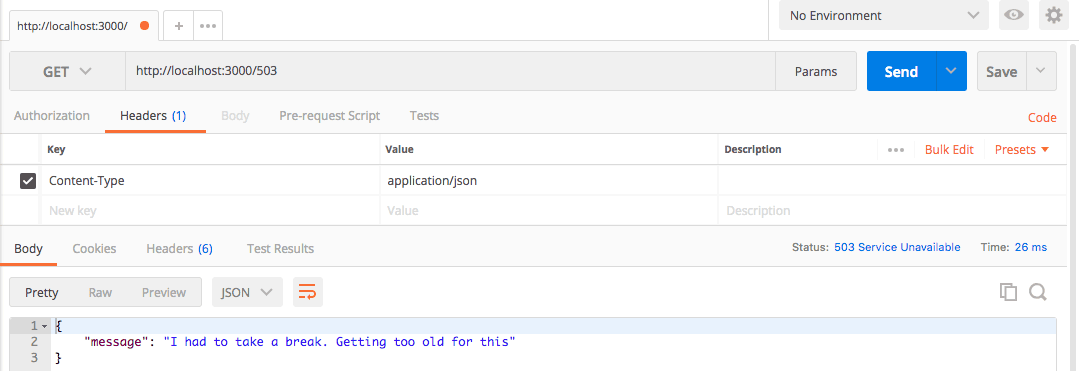
Make a request when the server is not available
Here, we will be making a GET request to http://localhost:3000/503 to match app.get('/503').
The unsupported HTTP version
Here, we will be making a GET request to http://localhost:3000/http2 that will be matched by our route – app.all('http2').

And finally, we have come to the end of tests… Phew!
Conclusion
This has been an interesting journey learning about status codes and what each mean. We tested very common endpoints to see what the response on them will look like.
Now, you can build better applications both on the backend and frontend and create more engaging experiences for your users.
Checkout the code to the project on GitHub.


© 2024 Pusher Ltd. All rights reserved.
Pusher Limited is a company registered in England and Wales (No. 07489873) whose registered office is at MessageBird UK Limited, 3 More London Riverside, 4th Floor, London, United Kingdom, SE1 2AQ.