- Products

- Developers
- User stories
- Blog
- Pricing

Build an iOS chat app using Swift and Chatkit - Part 3: Building the iOS app
- Introduction
- Creating our app’s storyboard in Xcode
- Creating the launch scene
- Creating the welcome scene
- Creating the signup and login scene
- Creating the ListContacts and Chatroom scenes
- Adding functionality to our scenes
- Launch scene
- Welcome scene
- Login scene
- Signup scene
- ListContacts scene
- Chatroom scene
- Implementing supporting classes for our application
- Implementing the models
- Implementing the services
- Implementing the global worker
- Conclusion
Introduction
IMPORTANT: ChatKit has been retired from the Pusher product stack as of April, 2020. This tutorial will no longer be functional in its current version. Explore our other Pusher tutorials to find out how Channels and Beams can help you build.
We previously created the API backend we need our iOS application to connect to. In this part, we will create the application itself using Xcode and Swift. We will be building out the application based on the prototypes we created in the first part of the series.
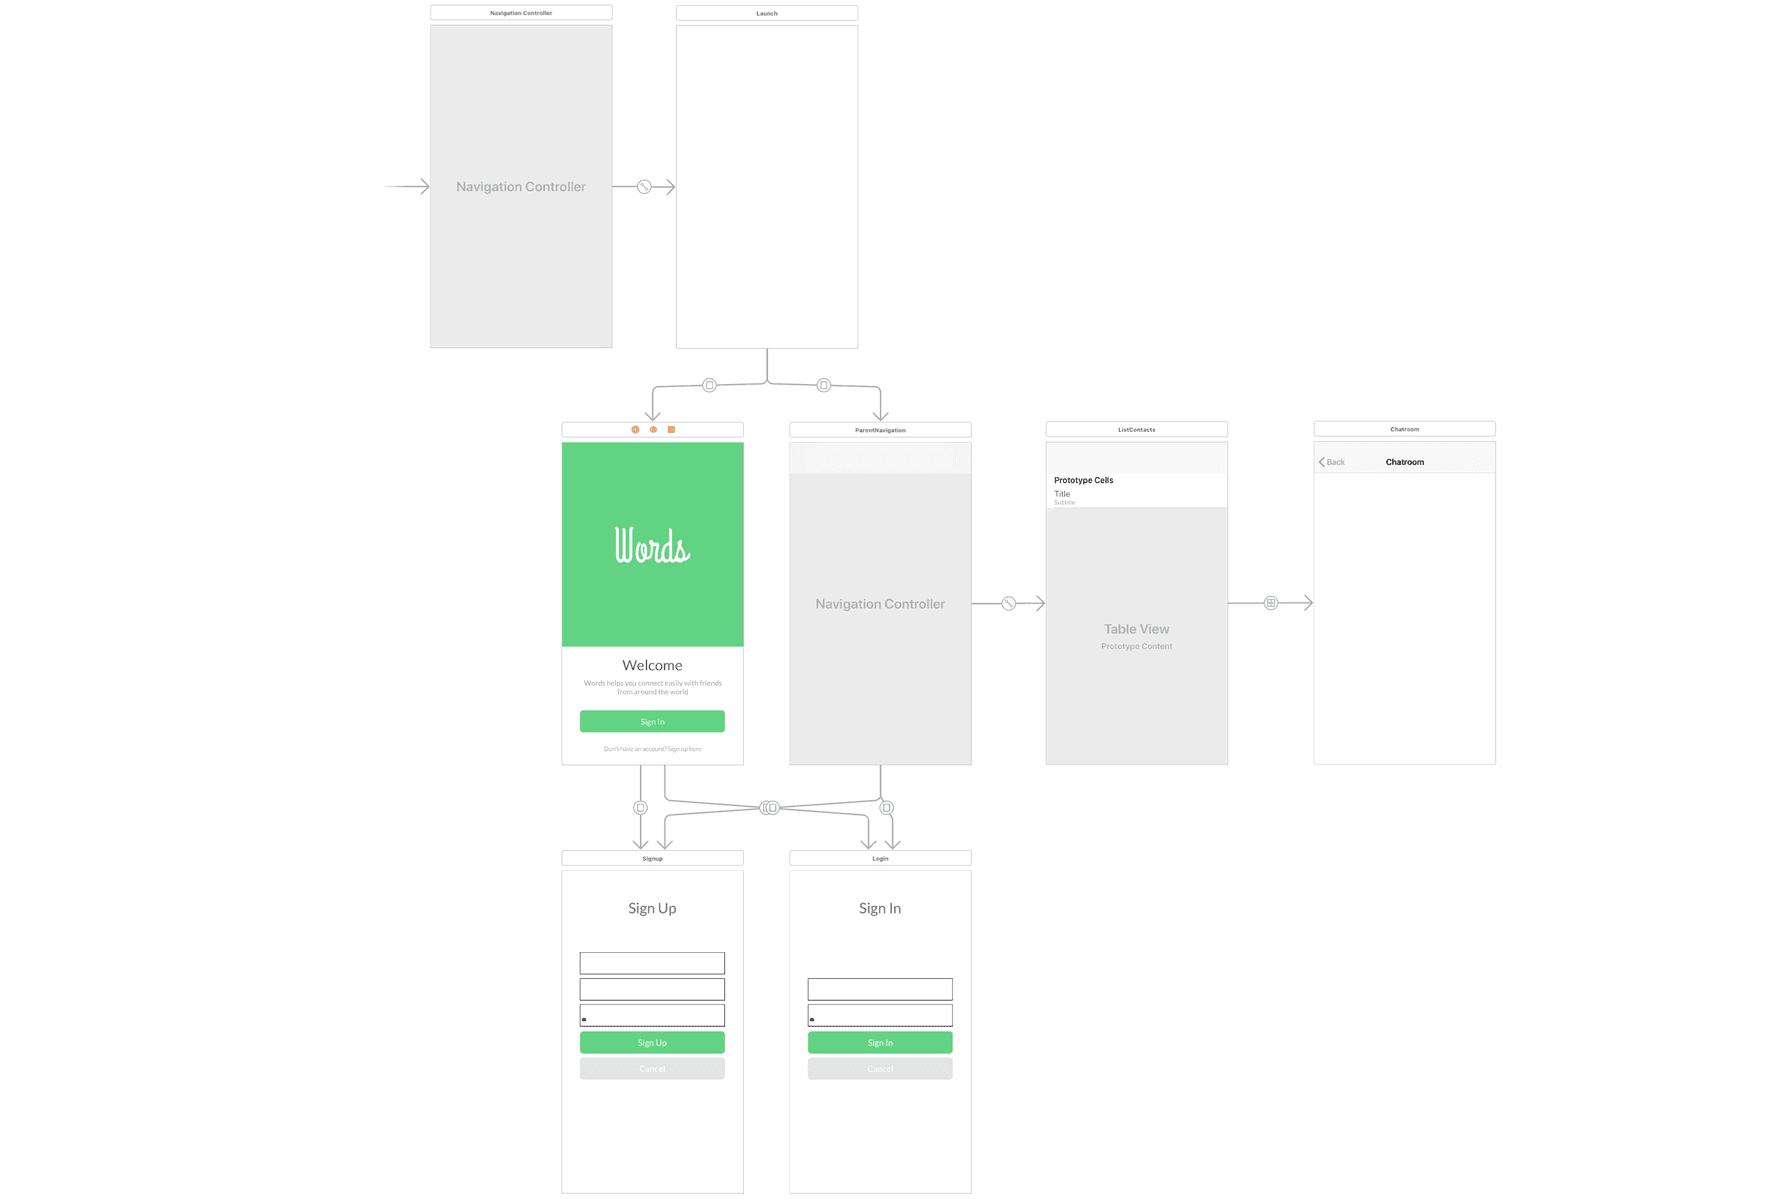
Here are the prototypes we made using our prototyping tool:
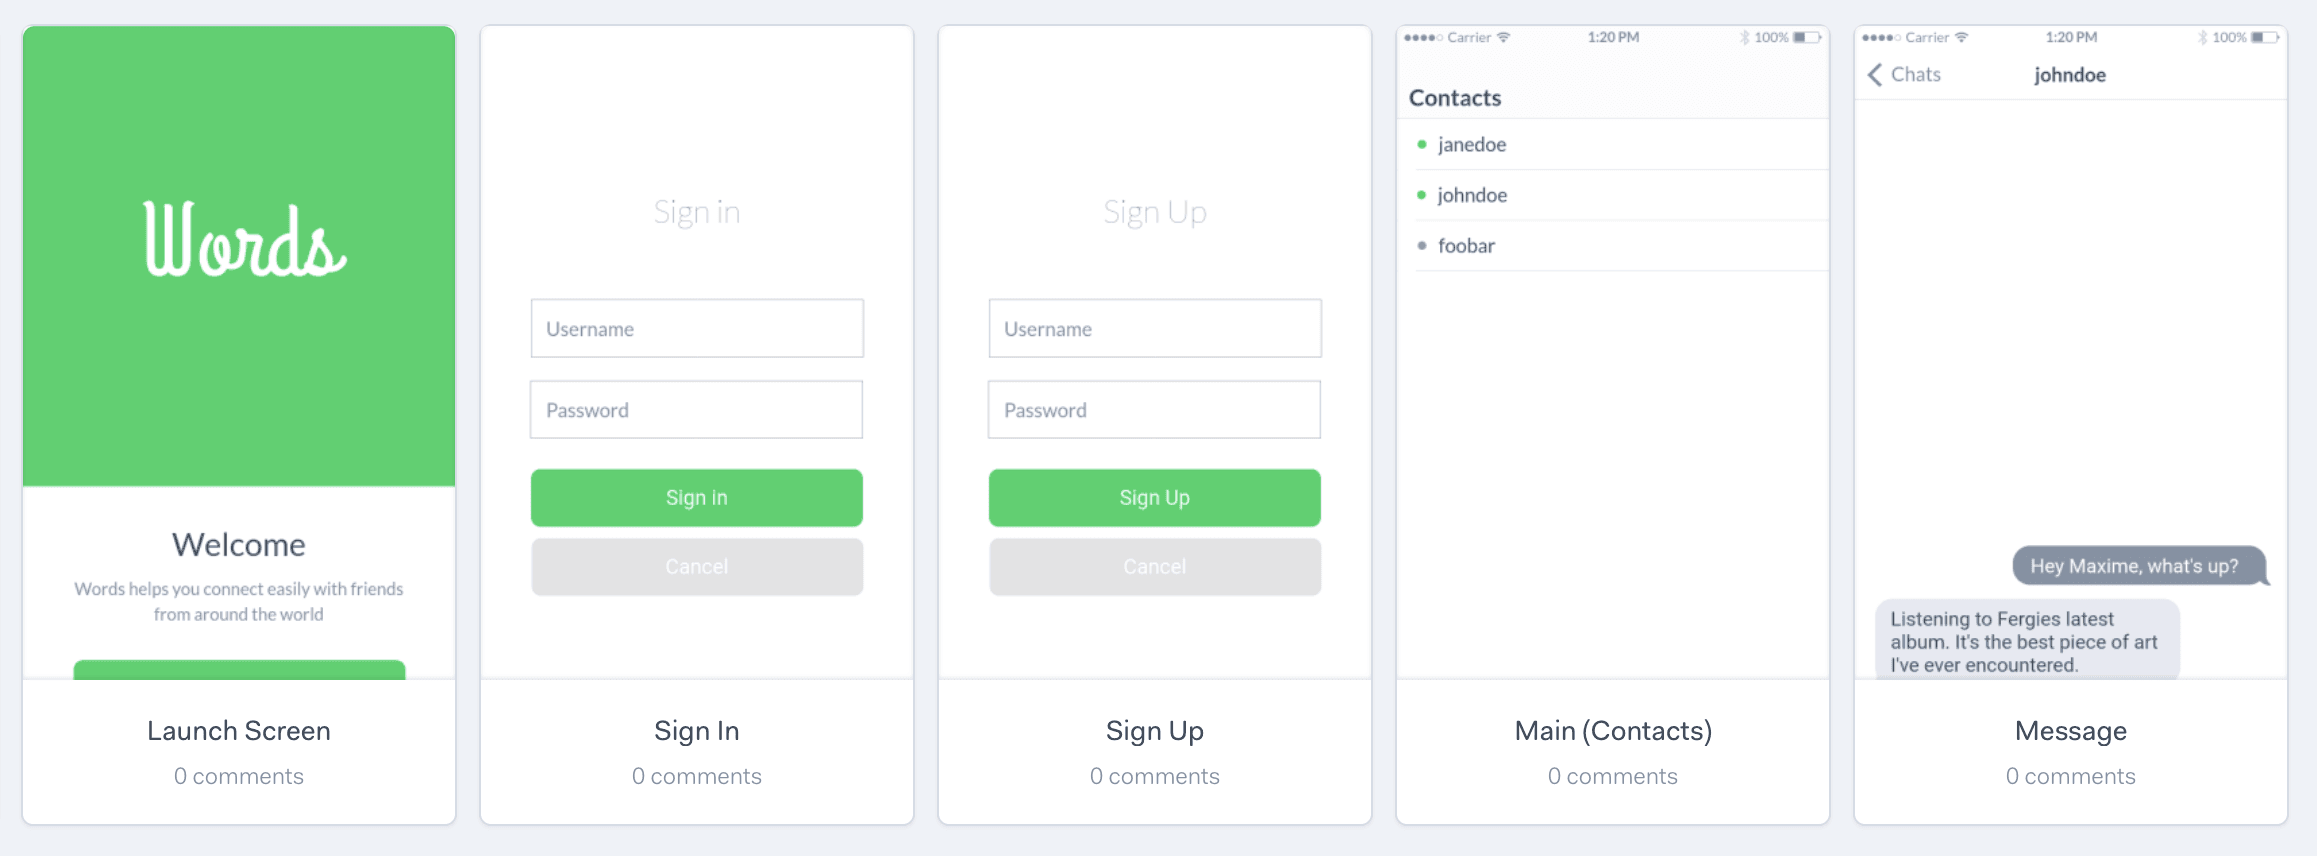
Let’s go through some requirements you need to have to follow this part of the article.
Creating our app’s storyboard in Xcode
We previously created the scenes of our application in Xcode using the Clean Swift templates. Now we are going to work on creating our storyboards and linking them to the view controllers we created.
Creating the launch scene
First add a Navigation View Controller and a View Controller to the storyboard as seen below. The Navigation Controller will be the entry point to our application. Set the custom class for the second View Controller as the LaunchViewController we created in the first part of the article.
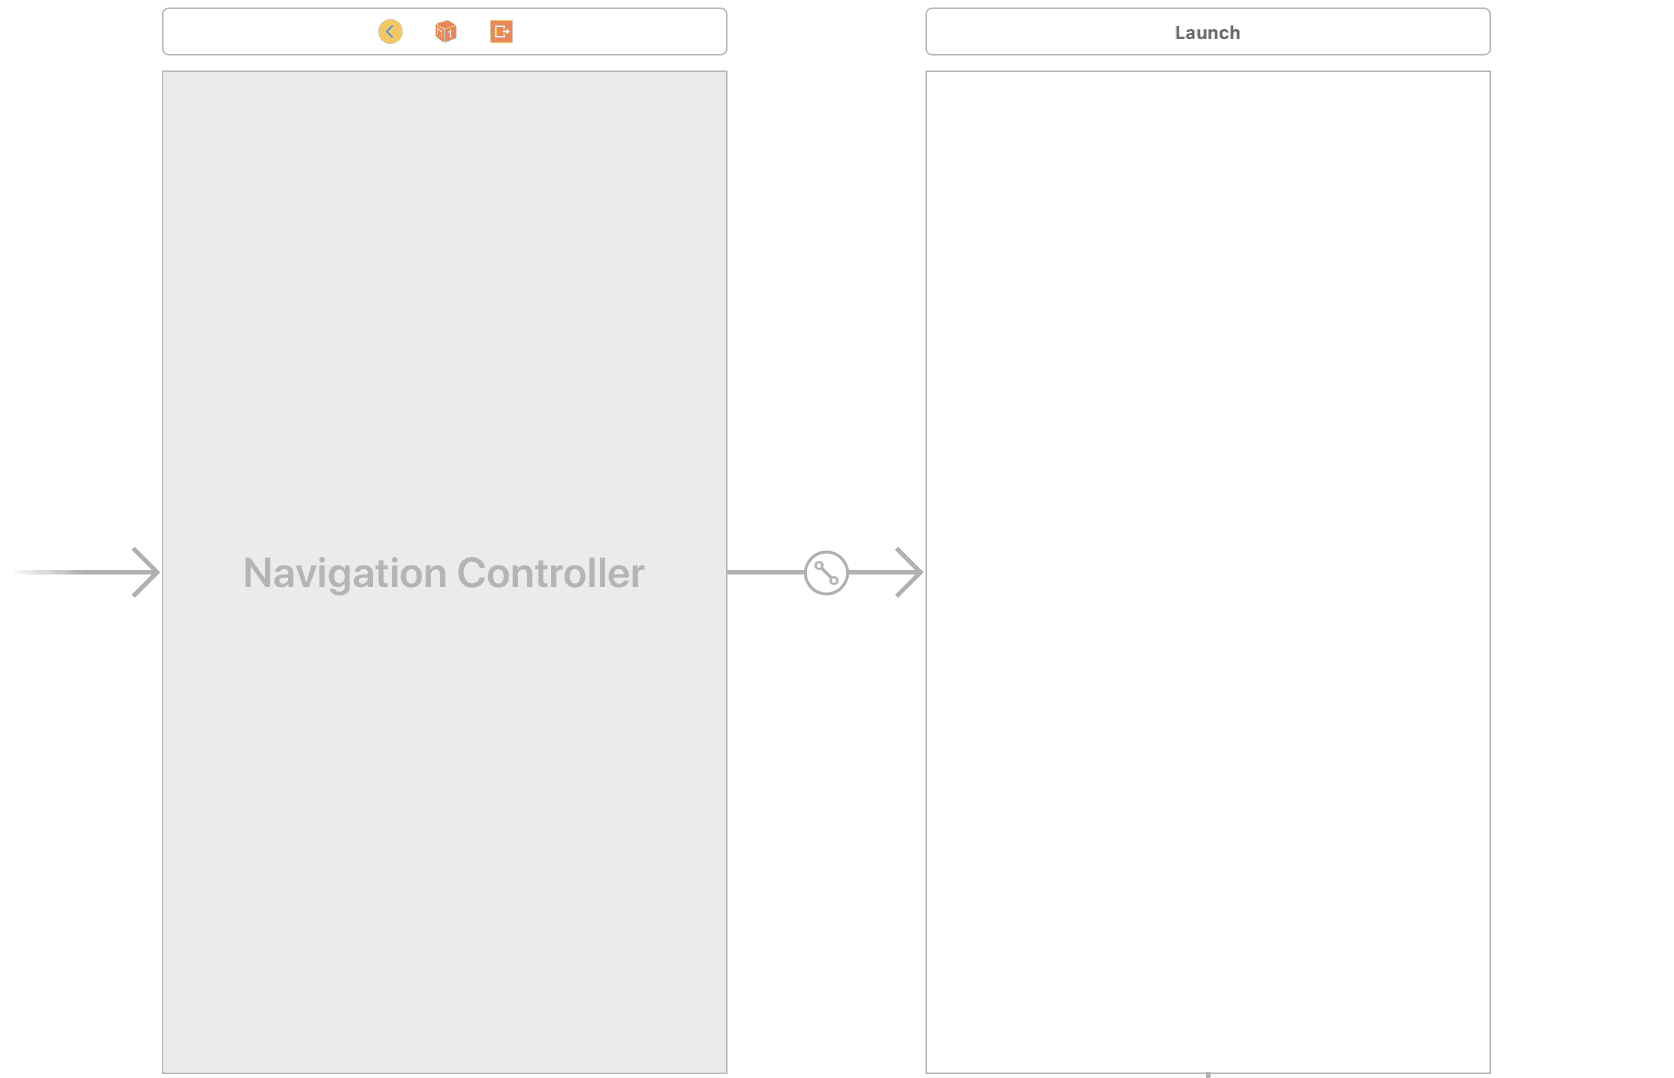
We will use the LaunchViewController to determine which initial screen to present to the user when the app is launched. If the user is logged in we’ll present the contacts list, if not, we’ll present the Welcome scene so the user can log in or sign up.
Creating the welcome scene
The next scene we will create is the welcome scene. When a user is not logged in, they will be redirected to this scene. From here they can sign up or log in to their account. In the Main.storyboard add the View Controller and create a “Present Modally” manual segue from the launch controller to the controller you just created.
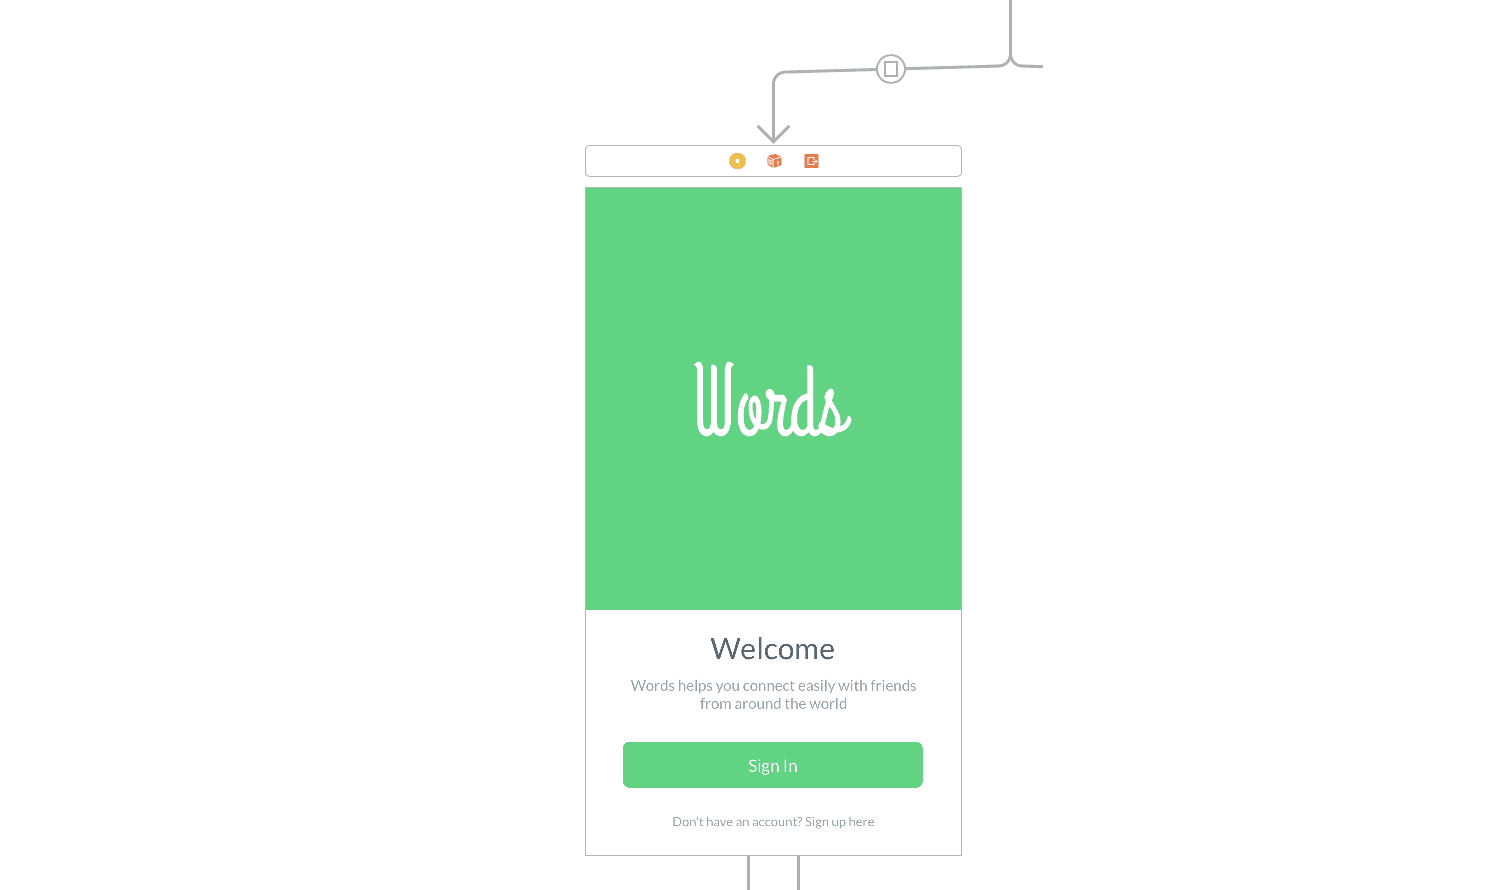
After creating the welcome view controller, you can start designing it to look like the prototype using a combination of UILabels, UIButtons, and UIViews. Then set the name of the manual segue to Welcome. Finally, set the custom class for the view controller to WelcomeViewController
Creating the signup and login scene
Next create two new View Controllers. The first will be for login and the second will be for sign up. Set theView Controller for the Signup controller to SignupViewController and the custom class for the login View Controller to LoginViewController.
Create a “Present Modally” segue from the Sign In button to the LoginViewController and from the Don’t have an account? Sign up here button to the SignupViewController. Name the segues Login and Signup.
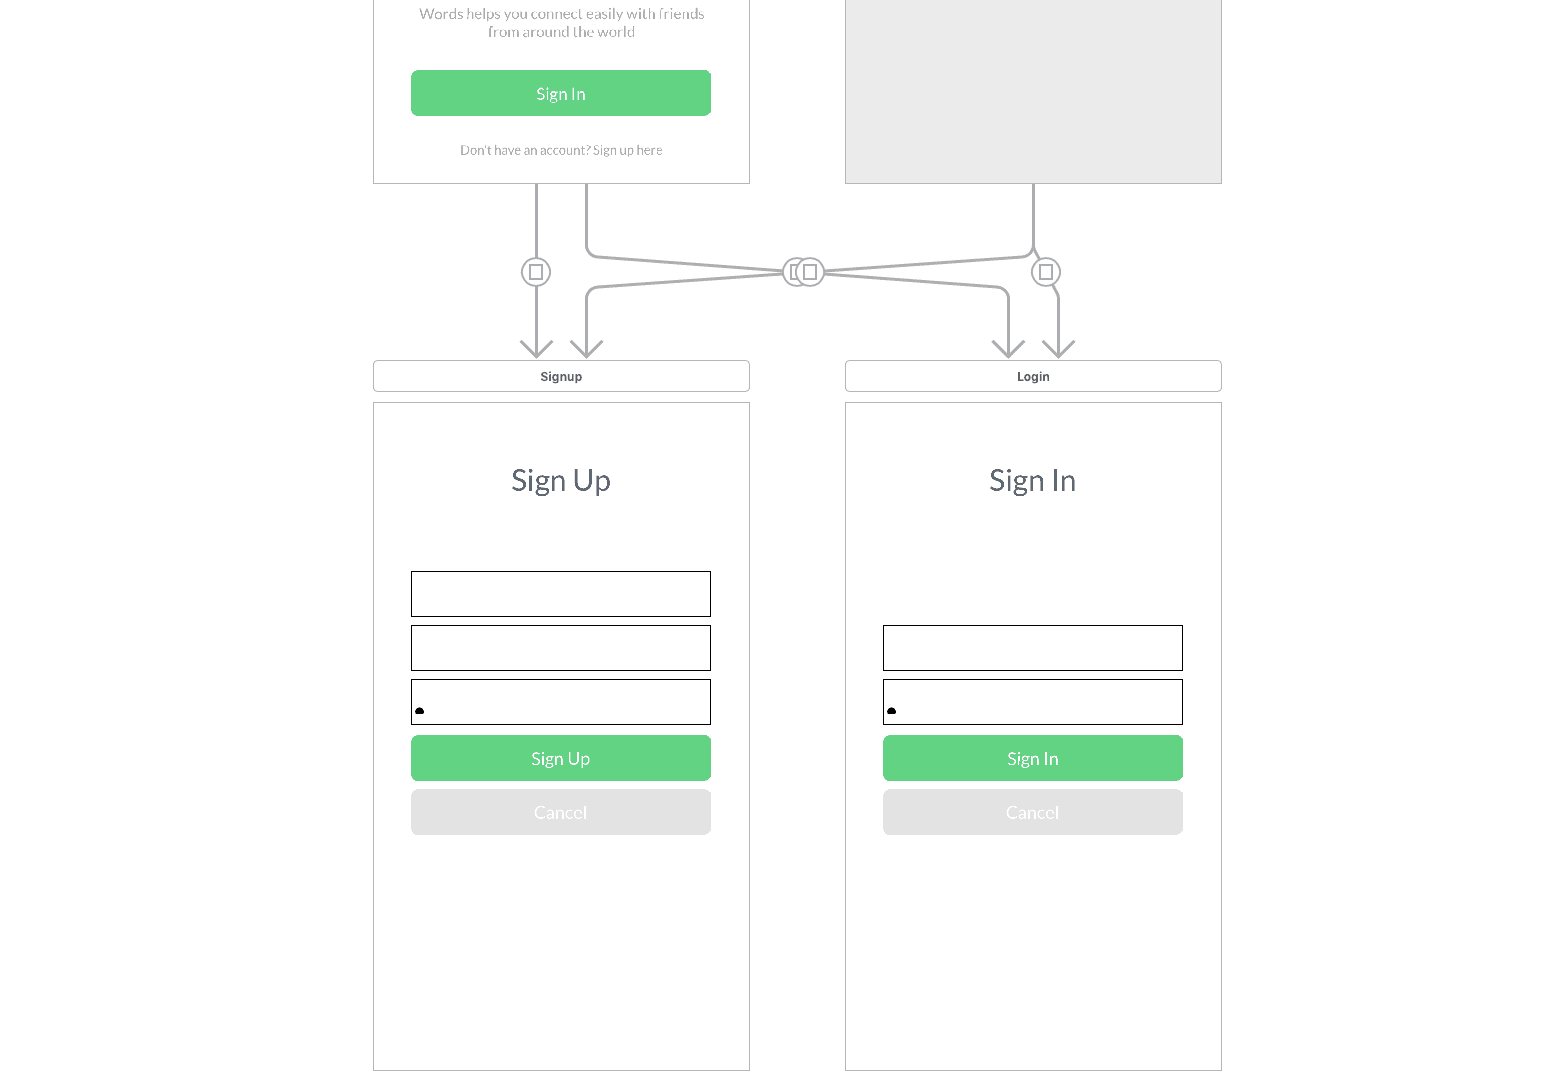
In the Signup view create three input fields and create an @IBOutlet for them in the SignupViewController, we named ours emailTextField, nameTextField and passwordTextField. Create an @IBAction called cancelButtonWasPressed for the cancel button and signupButtonWasPressed for the sign up button.
In the login view, we will follow almost the same steps as the sign up controller, but, this time the @IBAction will be named loginButtonWasPressed and there will be no nameTextField.
Creating the ListContacts and Chatroom scenes
Next, create a Navigation controller and make sure the root controller for it is a UITableViewController. Create a manual segue named ListMessages from the LaunchViewController to the navigation controller and set the custom class of the UITableViewController to ListContactsViewController.
Create a “Present Modally” manual segue named MainNavigator between the navigation controller and the Login and Signup scenes.
Lastly, create a new UIViewController and create a segue named Chatroom from the Prototype Cells to the new View Controller, then set the custom class of the View Controller to ChatroomViewController.
Here is a screenshot of our entire storyboard:
Adding functionality to our scenes
Now that we have our scenes in place and hooked up to our View Controllers, let’s start adding the functionality to them. We will start at the very first piece of code that gets called when the application is launched: AppDelegate.
In the AppDelegate file, right below the import statement add the code block below:
1struct AppConstants {
2 static let ENDPOINT: String = "http://127.0.0.1:8000"
3 static let CLIENT_ID: Int = API_CLIENT_ID
4 static let CLIENT_SECRET: String = "API_CLIENT_SECRET"
5 static let CHATKIT_INSTANCE_LOCATOR: String = "CHATKIT_INSTANCE_LOCATOR"
6 }
In the struct above, we define some constants for our application. We will use this as some configuration value handler for our application. Replace the values for the API_CLIENT_ID, API_CLIENT_SECRET and CHATKIT_INSTANCE_``LOCATOR with the actual values.
💡 You can get the
API_CLIENT_*key values from when you were setting up Passport in the previous part of the tutorial, and you can get theCHATKIT_INSTANCE_``LOCATORfrom the Chatkit dashboard.
Launch scene
Open the Scenes/Launch/LaunchSceneController file and let us start adding some functionality to the class.
In the file, replace the code with this
We have simplified most of the code that comes with the Clean Swift template. In the viewDidLoad method, we check to see if the user is logged in using an Authenticator class, which we will create later. If the user is logged in then we route the user to the list messages page else we go to the welcome page.
Next, open the LaunchRouter class and in the file paste this code
In the router we have defined the routeToWelcome and routeToListContacts methods. Both methods do what is necessary to route the user to either the Welcome or MainNavigator segue.
This is all we need to do for the Launch scene. You can delete the other template files in the Scenes/Launch directory as we will not be using them.
Welcome scene
For our Welcome scene we do not need to do anything actually as the scene has no logic. In the WelcomeViewController you can just paste the code below:
1import UIKit 2 3 class WelcomeViewController: UIViewController { 4 }
You can delete the other template files in the Welcome scene as we will not be needing them and they serve no purpose.
Login scene
For our Login scene we will start by adding the logic to our LoginModels class. The models will help us format the response from the API to what our application will be able to consume.
In the LoginModels file paste this code.
In the code above we have defined a series of structs and in them we have Request and Response. The Request standardises the parameters required for the request to the login endpoint while the Response takes the raw response from the API and saves them as either a ChatkitToken or UserToken object. We will define the ChatToken and the UserToken object later in the article
Next open the LoginInteractor and paste this code into the file.
In this class we have a login method that just calls a login method on the UsersWorker class. Depending on the response from that call, we either show a login error or we route to the contacts list.
Next, open the LoginRouter class and in the file paste the following code:
1import UIKit
2
3 @objc protocol LoginRoutingLogic {
4 func routeToListContacts()
5 }
6
7 class LoginRouter: NSObject, LoginRoutingLogic {
8 weak var viewController: LoginViewController?
9
10 func routeToListContacts() {
11 let storyboard = UIStoryboard(name: "Main", bundle: nil)
12 let destinationVC = storyboard.instantiateViewController(withIdentifier: "MainNavigator") as! UINavigationController
13
14 viewController!.show(destinationVC, sender: nil)
15 }
16 }
The router above has just one method. This method routes the app to the list contacts page when called.
The last class we want to edit for this scene is the LoginViewController. This is the class that pieces the other classes above. Open the file and paste this code into the file.
In the view controller we have the usual set up methods used by Clean Swift but we also have the @IBActions and @IBOutlets we created when we were creating our storyboards.
In the cancelButtonPressed method we just dismiss the login screen modal, in the loginButtonPressed method we call the login method on the interactor, and in the showValidationError method we show an alert with an error message.
Signup scene
For the Login scene functionality we will start with the models. Open the SignupModels file in the Scene/Signup directory and paste the code below into it:
1import Foundation
2
3 enum Signup {
4 struct Request {
5 var name: String
6 var email: String
7 var password: String
8 }
9
10 struct Response {
11 var user: User?
12
13 init(data: [String:Any]) {
14 self.user = User(
15 id: data["id"] as! Int,
16 name: data["name"] as! String,
17 email: data["email"] as! String,
18 chatkit_id: data["chatkit_id"] as! String
19 )
20 }
21 }
22 }
In the models we have Request and Response structs. Their functionality was described above.
Next, paste the code below into the SignupInteractor class in the same directory:
1import Foundation
2
3 protocol SignupBusinessLogic {
4 func createAccount(request: Signup.Request)
5 }
6
7 class SignupInteractor: SignupBusinessLogic {
8 var viewController: SignupFormErrorLogic?
9 var router: (NSObjectProtocol & SignupRoutingLogic)?
10 var worker = UsersWorker()
11
12 func createAccount(request: Signup.Request) -> Void {
13 self.worker.signup(request: request) { user, error in
14 guard error == nil else {
15 self.viewController?.showValidationError("Error creating account!")
16 return
17 }
18
19 self.router?.routeToListContacts()
20 }
21 }
22 }
In the createAccount method, we call the signup method on the UsersWorker and then depending on the response we either route to the contacts list or show an error.
Next, open the router class SignupRouter and paste the code below into it:
1import UIKit
2
3 @objc protocol SignupRoutingLogic {
4 func routeToListContacts()
5 }
6
7 class SignupRouter: NSObject, SignupRoutingLogic {
8 weak var viewController: SignupViewController?
9
10 func routeToListContacts() {
11 let storyboard = UIStoryboard(name: "Main", bundle: nil)
12 let destinationVC = storyboard.instantiateViewController(withIdentifier: "MainNavigator") as! UINavigationController
13
14 viewController!.show(destinationVC, sender: nil)
15 }
16 }
As in the login router, this method just routes the user to the contacts screen using the MainNavigator segue.
For the SignupViewController, use this code.
In this view controller, we set up the Clean Swift components then in the cancelButtonPressed method we dismiss the signup modal and in the signupButtonPressed method we create the account using the interactor. The showValidationError shows an alert when it is called, usually when there is an error signing up.
ListContacts scene
The ListContacts scene is supposed to show a list of the contacts available to chat with. Open the ListContactsModels file and paste this code into the file.
In the code above we have the usual Request and Response (explained above). We also have a ParseContact struct that takes the raw data and an array of rooms. It parses it into a Contact model object with User and PCRoom object. We reference this in the Responses above so as to avoid duplication.
We also have a ViewModel struct that we use to format the data in a way the presenter needs to display the data to the user.
Next open the ListContactsInteractor class and paste the code below into it: https://github.com/pusher/sample-chatroom-ios-chatkit/blob/master/words/Scenes/ListContacts/ListContactsInteractor.swift
In the method above, we have fetchContacts, which uses the UsersWorker class to fetch the contacts from the API and also the addContact class, which also uses the same worker to add contacts.
After a successful call, in both methods we call the presenter, which formats the data and makes a call to the View Controller and displays the content.
Let’s update the code for the ListContactsPresenter. Open the file and paste the code below into the file:
1import Foundation
2
3 protocol ListContactsPresentationLogic {
4 func presentContacts(_ contacts: [Contact])
5 func presentAddedContact(_ contact: Contact)
6 }
7
8 class ListContactsPresenter: ListContactsPresentationLogic {
9 weak var viewController: ListContactsDisplayLogic?
10 var displayedContacts: [ListContacts.Fetch.ViewModel.DisplayedContact] = []
11
12 func presentContacts(_ contacts: [Contact]) {
13 displayedContacts = []
14 for contact in contacts {
15 displayedContacts.append(ListContacts.Fetch.ViewModel.DisplayedContact(
16 id: contact.user.chatkit_id,
17 name: contact.user.name,
18 isOnline: false
19 ))
20 }
21 displayContacts()
22 }
23
24 func presentAddedContact(_ contact: Contact) {
25 displayedContacts.append(ListContacts.Fetch.ViewModel.DisplayedContact(
26 id: contact.user.chatkit_id,
27 name: contact.user.name,
28 isOnline: false
29 ))
30 displayContacts()
31 }
32
33 private func displayContacts() {
34 let vm = ListContacts.Fetch.ViewModel(displayedContacts: displayedContacts)
35 viewController?.displayFetchedContacts(viewModel: vm)
36 }
37 }
The code above has three methods. presentContacts and presentAddedContact do pretty much the same thing: format the contacts, append it to the displayedContacts array, and call the displayContacts method. The displayContacts method just calls displayFetchedContacts on the View Controller.
Let us update the code for the ListContactsViewController. Paste the following into the controller:
1import UIKit
2 import PusherChatkit
3
4 protocol ListContactsDisplayLogic: class {
5 func displayFetchedContacts(viewModel: ListContacts.Fetch.ViewModel)
6 }
7
8 class ListContactsViewController: UITableViewController, ListContactsDisplayLogic {
9 var interactor: ListContactsBusinessLogic?
10 var displayedContacts: [ListContacts.Fetch.ViewModel.DisplayedContact] = []
11 var router: (NSObjectProtocol & ListContactsRoutingLogic & ListContactsDataPassing)?
12
13 override init(nibName nibNameOrNil: String?, bundle nibBundleOrNil: Bundle?) {
14 super.init(nibName: nibNameOrNil, bundle: nibBundleOrNil)
15 setup()
16 }
17
18 required init?(coder aDecoder: NSCoder) {
19 super.init(coder: aDecoder)
20 setup()
21 }
22
23 private func setup() {
24 let viewController = self
25 let interactor = ListContactsInteractor()
26 let presenter = ListContactsPresenter()
27 let router = ListContactsRouter()
28 viewController.interactor = interactor
29 viewController.router = router
30 interactor.presenter = presenter
31 presenter.viewController = viewController
32 router.viewController = viewController
33 router.dataStore = interactor
34 }
35
36 override func prepare(for segue: UIStoryboardSegue, sender: Any?) {
37 if let scene = segue.identifier {
38 let selector = NSSelectorFromString("routeTo\(scene)WithSegue:")
39 if let router = router, router.responds(to: selector) {
40 router.perform(selector, with: segue)
41 }
42 }
43 }
44 }
This is the basic set up that comes with the Clean Swift templates. It just sets up the connections between all the ListContacts scene classes. Next, let’s add the methods below to the class. These are specific to our implementation:
1override func viewDidLoad() {
2 super.viewDidLoad()
3
4 navigationItem.title = "Contacts"
5 navigationController?.navigationBar.prefersLargeTitles = true
6 navigationItem.rightBarButtonItem = UIBarButtonItem(
7 title: "Add",
8 style: .plain,
9 target: self,
10 action: #selector(showAddContactPopup)
11 )
12
13 initialiseChatkit()
14 }
15
16 private func initialiseChatkit() {
17 let userId = CurrentUserIDDataStore().getID()
18
19 let chatManager = ChatManager(
20 instanceLocator: AppConstants.CHATKIT_INSTANCE_LOCATOR,
21 tokenProvider: ChatkitTokenDataStore(),
22 userID: userId.id!
23 )
24
25 chatManager.connect(delegate: self) { user, error in
26 guard error == nil else { return }
27 self.interactor?.currentUser = user
28 self.fetchContacts()
29 }
30 }
31
32 var emailTextField: UITextField?
33
34 @objc func showAddContactPopup(_ sender: Any) {
35 let alert = UIAlertController(
36 title: "Add",
37 message: "Enter the users email address",
38 preferredStyle: .alert
39 )
40
41 alert.addTextField { emailTextField in
42 emailTextField.placeholder = "Enter email address"
43 self.emailTextField = emailTextField
44 }
45
46 alert.addAction(UIAlertAction(title: "Cancel", style: .cancel, handler: nil))
47 alert.addAction(UIAlertAction(title: "Add Contact", style: .default) { action in
48 let request = ListContacts.Create.Request(user_id: self.emailTextField!.text!)
49 self.interactor?.addContact(request: request)
50 })
51
52 present(alert, animated: true, completion: nil)
53 }
54
55 private func fetchContacts() {
56 interactor?.fetchContacts(request: ListContacts.Fetch.Request())
57 }
58
59 func displayFetchedContacts(viewModel: ListContacts.Fetch.ViewModel) {
60 displayedContacts = viewModel.displayedContacts
61 tableView.reloadData()
62 }
In the viewDidLoad method, we configure the navigation bar and add an “Add” button to it. We also set the title to “Contacts”. The showAddContactPopup method shows an alert controller with a text field for the contact you want to add. When you click add, the contact will be added.
The initialiseChatkit method connects to Chatkit and stores the currentUser in the interactor while the fetchContacts method gets all the contacts from the API while the displayFetchedContacts method simply displays them.
Next we will add the class extension of ListContactsViewController that implements the UITableViewDelegate protocol. At the bottom of the ListContactsViewController paste the following:
1extension ListContactsViewController {
2 override func numberOfSections(in tableView: UITableView) -> Int {
3 return 1
4 }
5
6 override func tableView(_ tableView: UITableView, numberOfRowsInSection section: Int) -> Int {
7 return displayedContacts.count
8 }
9
10 override func tableView(_ tableView: UITableView, cellForRowAt indexPath: IndexPath) -> UITableViewCell {
11 var cell = tableView.dequeueReusableCell(withIdentifier: "ContactTableViewCell")
12 if cell == nil {
13 cell = UITableViewCell(style: .subtitle, reuseIdentifier: "ContactTableViewCell")
14 }
15
16 let contact = displayedContacts[indexPath.row]
17 cell?.textLabel?.text = contact.name
18 cell?.detailTextLabel?.text = contact.isOnline ? "online" : "Seen recently"
19
20 return cell!
21 }
22 }
The method should be familiar to you as it just helps us feed data to the UITableView so our contacts display properly on the table.
The last bit of code for the ListContacts scene is the ListContactsRouter. This will manage the routing to the Chatroom scene. Open the ListContactsRouter class and add the following code:
1import UIKit
2
3 @objc protocol ListContactsRoutingLogic {
4 func routeToChatroom(segue: UIStoryboardSegue)
5 }
6
7 protocol ListContactsDataPassing {
8 var dataStore: ListContactsDataStore? { get }
9 }
10
11 class ListContactsRouter: NSObject, ListContactsRoutingLogic, ListContactsDataPassing {
12 var dataStore: ListContactsDataStore?
13 weak var viewController: ListContactsViewController?
14
15 func routeToChatroom(segue: UIStoryboardSegue) {
16 let destinationVC = segue.destination as! ChatroomViewController
17 var destinationDS = destinationVC.router!.dataStore!
18 passDataToChatroom(source: dataStore!, destination: &destinationDS)
19 }
20
21 func passDataToChatroom(source: ListContactsDataStore, destination: inout ChatroomDataStore) {
22 let selectedRow = viewController?.tableView.indexPathForSelectedRow?.row
23 destination.contact = source.contacts?[selectedRow!]
24 destination.currentUser = source.currentUser
25 }
26 }
In the routeToChatroom method we call passDataToChatroom which passes data (the Contact object and the current user) to the ListContactsViewController for usage.
Chatroom scene
In the Chatroom scene we will start with the ChatroomModels. Open the file and paste the following code:
1import Foundation
2 import MessageKit
3 import PusherChatkit
4
5 enum Chatroom {
6 struct Messages {
7 struct Fetch {
8 struct Request {
9 var room: PCRoom
10 }
11
12 struct Response {
13 var messages: [Message] = []
14 init(messages: [PCMessage]) {
15 for message in messages {
16 let res = Chatroom.Messages.Create.Response(message: message)
17 self.messages.append(res.message)
18 }
19 }
20 }
21 }
22
23 struct Create {
24 struct Request {
25 var text: String
26 var sender: Sender
27 var room: PCRoom
28 }
29
30 struct Response {
31 var message: Message
32 init(message: PCMessage) {
33 self.message = Message(
34 text: message.text,
35 sender: Sender(id: message.sender.id, displayName: message.sender.displayName),
36 messageId: String(describing: message.id),
37 date: ISO8601DateFormatter().date(from: message.createdAt)!
38 )
39 }
40 }
41 }
42 }
43 }
Like the other methods, we have the usual Request and Response struct (explained above).
In the ChatroomInteractor.swift file paste this code.
In the subscribeToRoom method, we subscribe the currentUser to a room. We also set the PCRoomDelegate to the interactor which means we can implement methods that handle events on the interactor.
In the addChatMessage method we add a new message to the room as the currentUser. When the user is added we pass the messageId to the completion handler.
In the extension class, we implement the newMessage method of the PCRoomDelegate. The method is fired automatically anytime there is a new message in the room. So we handle the new message by presenting it to the controller using the ChatroomPresenters presentMessages method.
Next, open the ChatPresenter.swift file and paste the code below into it:
1import Foundation
2
3 protocol ChatroomPresentationLogic {
4 func presentMessages(response: Chatroom.Messages.Fetch.Response)
5 }
6
7 class ChatroomPresenter: ChatroomPresentationLogic {
8 weak var viewController: ChatroomDisplayLogic?
9
10 func presentMessages(response: Chatroom.Messages.Fetch.Response) {
11 viewController?.displayChatMessages(response: response)
12 }
13 }
The only method there is the presentMessages method. It just calls the displayChatMessages method on the view controller.
Next, in the ChatroomRouter just paste in the following code:
1import Foundation 2 3 protocol ChatroomDataPassing { 4 var dataStore: ChatroomDataStore? { get } 5 } 6 7 class ChatroomRouter: NSObject, ChatroomDataPassing { 8 weak var viewController: ChatroomViewController? 9 var dataStore: ChatroomDataStore? 10 }
Then in the ChatroomViewController we are going to split the controller into extensions as the code is lengthy. First paste the Clean Swift set up code into the file:
1import UIKit
2 import MessageKit
3 import PusherChatkit
4 import MessageInputBar
5
6 protocol ChatroomDisplayLogic: class {
7 func displayChatMessages(response: Chatroom.Messages.Fetch.Response)
8 }
9
10 class ChatroomViewController: MessagesViewController, ChatroomDisplayLogic {
11 var messages: [Message] = []
12 var interactor: ChatroomBusinessLogic?
13 var router: (NSObjectProtocol & ChatroomDataPassing)?
14
15 override init(nibName nibNameOrNil: String?, bundle nibBundleOrNil: Bundle?) {
16 super.init(nibName: nibNameOrNil, bundle: nibBundleOrNil)
17 setup()
18 }
19
20 required init?(coder aDecoder: NSCoder) {
21 super.init(coder: aDecoder)
22 setup()
23 }
24
25 private func setup() {
26 let viewController = self
27 let interactor = ChatroomInteractor()
28 let presenter = ChatroomPresenter()
29 let router = ChatroomRouter()
30
31 viewController.interactor = interactor
32 viewController.router = router
33 interactor.presenter = presenter
34 presenter.viewController = viewController
35 router.viewController = viewController
36 router.dataStore = interactor
37 }
38 }
Next, we will paste the class extension that handles the loading of the chat messages, and configures MessageKit and Chatkit as the view is loaded:
1extension ChatroomViewController {
2 override func viewDidLoad() {
3 super.viewDidLoad()
4 self.initialiseChatkit()
5 self.configureMessageKit()
6 self.navigationItem.title = router?.dataStore?.contact?.user.name
7 }
8
9 private func initialiseChatkit() {
10 guard let room = router?.dataStore?.contact?.room else { return }
11 guard let currentUser = router?.dataStore?.currentUser else { return }
12 self.interactor?.currentUser = currentUser
13 self.interactor?.subscribeToRoom(room: room)
14 }
15
16 private func configureMessageKit() {
17 messageInputBar.delegate = self
18 messagesCollectionView.messagesDataSource = self
19 messagesCollectionView.messagesLayoutDelegate = self
20 messagesCollectionView.messagesDisplayDelegate = self
21 scrollsToBottomOnKeyboardBeginsEditing = true
22 maintainPositionOnKeyboardFrameChanged = true
23 }
24
25 func displayChatMessages(response: Chatroom.Messages.Fetch.Response) {
26 self.messages = response.messages
27 self.messagesCollectionView.reloadData()
28 self.messagesCollectionView.scrollToBottom()
29 }
30 }
In the extension above we have the initialiseChatkit method. It takes the current user passed on from the ListContacts scene and saves it to the interactor. Then the next method is the configureMessageKit where we configure MessageKit. Lastly, we have the displayChatMessages method that displays the messages.
Next, paste the extension below the previous class:
1extension ChatroomViewController: MessagesDataSource {
2 func isFromCurrentSender(message: MessageType) -> Bool {
3 return message.sender == currentSender()
4 }
5
6 func currentSender() -> Sender {
7 return Sender(id: (interactor?.currentUser?.id)!, displayName: (interactor?.currentUser?.name)!)
8 }
9
10 func numberOfSections(in messagesCollectionView: MessagesCollectionView) -> Int {
11 return self.messages.count
12 }
13
14 func messageForItem(at indexPath: IndexPath, in messagesCollectionView: MessagesCollectionView) -> MessageType {
15 return self.messages[indexPath.section]
16 }
17
18 func configureAvatarView(_ avatarView: AvatarView, for message: MessageType, at indexPath: IndexPath, in messagesCollectionView: MessagesCollectionView) {
19 avatarView.initials = self.initials(fromName: message.sender.displayName)
20 }
21
22 func messageTopLabelAttributedText(for message: MessageType, at indexPath: IndexPath) -> NSAttributedString? {
23
24 return NSAttributedString(
25 string: message.sender.displayName,
26 attributes: [NSAttributedString.Key.font: UIFont.preferredFont(forTextStyle: .caption1)]
27 )
28 }
29
30 func messageBottomLabelAttributedText(for message: MessageType, at indexPath: IndexPath) -> NSAttributedString? {
31
32 struct ConversationDateFormatter {
33 static let formatter: DateFormatter = {
34 let formatter = DateFormatter()
35 formatter.dateStyle = .medium
36 return formatter
37 }()
38 }
39
40 return NSAttributedString(
41 string: ConversationDateFormatter.formatter.string(from: message.sentDate),
42 attributes: [NSAttributedStringKey.font: UIFont.preferredFont(forTextStyle: .caption2)]
43 )
44 }
45 }
46
47 extension ChatroomViewController: MessagesLayoutDelegate {
48 func messageBottomLabelHeight(for message: MessageType, at indexPath: IndexPath, in messagesCollectionView: MessagesCollectionView) -> CGFloat {
49 return 16
50 }
51
52 func messageTopLabelHeight(for message: MessageType, at indexPath: IndexPath, in messagesCollectionView: MessagesCollectionView) -> CGFloat {
53 return 16
54 }
55
56 func avatarPosition(for message: MessageType, at indexPath: IndexPath, in messagesCollectionView: MessagesCollectionView) -> AvatarPosition {
57 return AvatarPosition(horizontal: .natural, vertical: .messageBottom)
58 }
59
60 func messagePadding(for message: MessageType, at indexPath: IndexPath, in messagesCollectionView: MessagesCollectionView) -> UIEdgeInsets {
61 return isFromCurrentSender(message: message)
62 ? UIEdgeInsets(top: 0, left: 30, bottom: 0, right: 4)
63 : UIEdgeInsets(top: 0, left: 4, bottom: 0, right: 30)
64 }
65
66 func footerViewSize(for message: MessageType, at indexPath: IndexPath, in messagesCollectionView: MessagesCollectionView) -> CGSize {
67 return CGSize(width: messagesCollectionView.bounds.width, height: 10)
68 }
69
70 func heightForLocation(message: MessageType, at indexPath: IndexPath, with maxWidth: CGFloat, in messagesCollectionView: MessagesCollectionView) -> CGFloat {
71 return 200
72 }
73 }
74
75 extension ChatroomViewController: MessagesDisplayDelegate {
76 }
77
78 extension ChatroomViewController: MessageInputBarDelegate {
79 func messageInputBar(_ inputBar: MessageInputBar, didPressSendButtonWith text: String) {
80 guard interactor?.currentUser != nil else { return }
81 guard let room = router?.dataStore?.contact?.room else { return }
82
83 let request = Chatroom.Messages.Create.Request(text: text, sender: currentSender(), room: room)
84
85 self.interactor?.addChatMessage(request: request) { id, error in
86 guard error == nil else { return }
87 inputBar.inputTextView.text = String()
88 }
89 }
90 }
The first extension above extends the [MessagesDataSource](https://messagekit.github.io/Protocols/MessagesDataSource.html) protocol and has to conform to some of its methods. Here we implement currentSender, numberOfMessages and messageForItem, all self explanatory.
The next extension on the list is for the [MessagesLayoutDelegate](https://messagekit.github.io/Protocols/MessagesLayoutDelegate.html) protocol and it implements some of the methods but there are other methods you can implement to change the layouts display. There is also the implementation of [MessagesDisplayDelegate](https://messagekit.github.io/Protocols/MessagesDisplayDelegate.html), which is empty but you can look through the documentation to see methods you can implement.
Lastly, we implement [MessageInputBarDelegate](https://messagekit.github.io/Protocols/MessageInputBarDelegate.html) and in there we have the messageInputBar method, which is called after the send button is clicked on the chat screen. In this method we send the message using the interactor and then empty the input.
With this we are done with our scenes. Next, we will add the code for our supporting classes used in the scenes.
Implementing supporting classes for our application
The first set of supporting classes we will implement are the models. The models we want to implement are User, Message, Contact, Room, UserToken, and ChatToken. Here are the class contents:
Implementing the models
To implement the models, create a new folder/group in the root directory called Models and start creating the model files below in them. Get the code from the GitHub links.
The code for the Message.swift model
The code for the Contact.swift model
The code for the User.swift model
In the UserToken class above we implement the NSCoding protocol, we need this so we can save the UserToken object to UserDefaults.
The code to the ChatToken.swift model
Like the UserToken model, the ChatToken does the same thing with the NSCoding protocol.
When we have received a chatkit_id back from the server we want to store that in UserDefaults so that we can use it to connect to Chatkit.
The code to the CurrentUserID.swift model
Implementing the services
Create a new folder/group in the root directory for the project on Xcode and name it Services and in there add the following files:
Authenticator.swift class:
1import Foundation
2
3 class Authenticator {
4 func isLoggedIn() -> Bool {
5 return getAccessToken().count > 0
6 }
7
8 private func getAccessToken() -> String {
9 guard let token = ChatkitTokenDataStore().getToken().access_token, token.count > 0 else {
10 return ""
11 }
12
13 return token
14 }
15 }
This Authenticator class checks if the user is logged in. It does this by checking if the token from the API is saved in UserDefaults.
UserTokenDataStore.swift class:
1import Foundation
2
3 class UserTokenDataStore {
4 static var DATA_KEY = "WORDS_API_TOKEN"
5
6 func getToken() -> UserToken {
7 if let token = UserDefaults.standard.object(forKey: type(of: self).DATA_KEY) as! Data? {
8 return NSKeyedUnarchiver.unarchiveObject(with: token) as! UserToken
9 }
10
11 return UserToken(token_type: nil, access_token: nil, expires_in: nil)
12 }
13
14 func setToken(_ token: UserToken) {
15 let encodedData = NSKeyedArchiver.archivedData(withRootObject: token)
16 UserDefaults.standard.set(encodedData, forKey: type(of: self).DATA_KEY)
17 }
18 }
The UserDataTokenStore class saves and fetches the token required to make calls to our backend API.
Add the ChatTokenDataStore.swift class with this code
The class above does the same as the UserTokenDataStore, however it checks for the token required to make calls to the Chatkit API. It also extends the [PCTokenProvider](https://github.com/pusher/chatkit-swift/blob/master/Source/PCTokenProvider.swift) and thus we have the fetchToken method that fetches the token from the UserDefaults.
Add the CurrentUserIDDataStore.swift class with this code
The class above does the same as the two token data stores. It takes some information, in this case the user’s Chatkit ID, and fetches and stores it in UserDefaults.
Implementing the global worker
The last class we want to implement is the UsersWorker. Create a UsersWorker class and paste the following into the file:
1import UIKit 2 import Alamofire 3 4 class UsersWorker { 5 } 6 7 // MARK: Errors 8 9 enum ContactsError: Error { 10 case CannotAdd 11 case CannotFetch 12 } 13 14 enum UsersStoreError: Error { 15 case CannotLogin 16 case CannotSignup 17 case CannotFetchChatkitToken 18 }
Now we will start adding methods to the UsersWorker class. The first method is the fetchContacts method, which calls the API, using Alamofire, to get a list of contacts for display:
1func fetchContacts(currentUser: PCCurrentUser, completionHandler: @escaping ([Contact]?, ContactsError?) -> Void){
2 let enc = JSONEncoding.default
3 let url = AppConstants.ENDPOINT + "/api/contacts"
4 let headers = authorizationHeader(token: nil)
5
6 Alamofire
7 .request(url, method: .get, parameters: nil, encoding: enc, headers: headers)
8 .validate()
9 .responseJSON { response in
10 switch (response.result) {
11 case .success(let data):
12 DispatchQueue.main.async {
13 let data = data as! [[String:Any]?]
14 let res = ListContacts.Fetch.Response(for: currentUser, data:data)
15 completionHandler(res.contacts, nil)
16 }
17 case .failure(_):
18 completionHandler(nil, ContactsError.CannotFetch)
19 }
20 }
21 }
The next method to add to the class is the addContact method. The method makes the call to the API to add a contact:
1func addContact(currentUser: PCCurrentUser, request: ListContacts.Create.Request, completionHandler: @escaping (Contact?, ContactsError?) -> Void) {
2 let params = ["user_id": request.user_id]
3 let headers = authorizationHeader(token: nil)
4
5 postRequest("/api/contacts", params: params, headers: headers) { data in
6 guard data != nil else {
7 return completionHandler(nil, ContactsError.CannotAdd)
8 }
9
10 DispatchQueue.main.async {
11 let response = ListContacts.Create.Response(for: currentUser, data: data!)
12 completionHandler(response.contact, nil)
13 }
14 }
15 }
The next method to add to the class is the login method. The method makes a call to the API to login. The API returns the token for the API as the response. We make an additional call to the API to get the Chatkit token for the user so we can make calls to the Chatkit API on behalf of the user:
1func login(request: Login.Account.Request, completionHandler: @escaping (UserToken?, UsersStoreError?) -> Void) {
2 let params: Parameters = [
3 "grant_type": "password",
4 "username": request.email,
5 "password": request.password,
6 "client_id": AppConstants.CLIENT_ID,
7 "client_secret": AppConstants.CLIENT_SECRET,
8 ]
9
10 postRequest("/oauth/token", params: params, headers: nil) { data in
11 guard data != nil else {
12 return completionHandler(nil, UsersStoreError.CannotLogin)
13 }
14
15 let response = Login.Account.Response(data: data!)
16
17 let request = Login.Chatkit.Request(
18 username: request.email,
19 password: request.password,
20 token: response.userToken
21 )
22
23 self.fetchChatkitToken(request: request) { token, error in
24 guard error == nil else {
25 return completionHandler(nil, UsersStoreError.CannotFetchChatkitToken)
26 }
27
28 ChatkitTokenDataStore().setToken(token!)
29 UserTokenDataStore().setToken(response.userToken)
30
31 DispatchQueue.main.async {
32 completionHandler(response.userToken, nil)
33 }
34 }
35 }
36 }
Next we will add the signup method, this will call the API to create a user and then it will log the user in and fetch the Chatkit token for that user:
1func signup(request: Signup.Request, completionHandler: @escaping (User?, UsersStoreError?) -> Void) {
2 let params: Parameters = [
3 "name": request.name,
4 "email": request.email,
5 "password": request.password
6 ]
7
8 postRequest("/api/users/signup", params: params, headers: nil) { data in
9 guard data != nil else {
10 return completionHandler(nil, UsersStoreError.CannotSignup)
11 }
12
13 let response = Signup.Response(data: data!)
14 CurrentUserIDDataStore().setID(CurrentUserID(id: response.user?.chatkit_id))
15
16 let request = Login.Account.Request(
17 email: request.email,
18 password: request.password
19 )
20
21 self.login(request: request) { token, error in
22 guard error == nil else {
23 return completionHandler(nil, UsersStoreError.CannotLogin)
24 }
25
26 DispatchQueue.main.async {
27 completionHandler(response.user, nil)
28 }
29 }
30 }
31 }
The next method to add is the fetchChatkitToken. It fetches the Chatkit token from the API:
1func fetchChatkitToken(request: Login.Chatkit.Request, completionHandler: @escaping (ChatkitToken?, UsersStoreError?) -> Void) {
2 let headers = authorizationHeader(token: request.token.access_token!)
3
4 postRequest("/api/chatkit/token", params: nil, headers: headers) { data in
5 guard data != nil else {
6 return completionHandler(nil, UsersStoreError.CannotFetchChatkitToken)
7 }
8
9 DispatchQueue.main.async {
10 let response = Login.Chatkit.Response(data: data!)
11 completionHandler(response.token, nil)
12 }
13 }
14 }
The last two methods to add will be helpers, the postRequest and authorizationHeader methods:
1private func postRequest(_ url: String, params: Parameters?, headers: HTTPHeaders?, completion: @escaping([String:Any]?) -> Void) {
2 let enc = JSONEncoding.default
3 let url = AppConstants.ENDPOINT + url
4
5 Alamofire
6 .request(url, method: .post, parameters:params, encoding:enc, headers:headers)
7 .validate()
8 .responseJSON { response in
9 switch (response.result) {
10 case .success(let data): completion((data as! [String:Any]))
11 case .failure(_): completion(nil)
12 }
13 }
14 }
15
16 private func authorizationHeader(token: String?) -> HTTPHeaders {
17 let accessToken = (token == nil)
18 ? UserTokenDataStore().getToken().access_token
19 : token
20
21 return ["Authorization": "Bearer \(accessToken!)"]
22 }
The first method is a wrapper around Alamofire and the second method generates a HTTPHeaders array where we specify the token to send along with requests to the API.
Now you can run the application in the emulator and it should work.
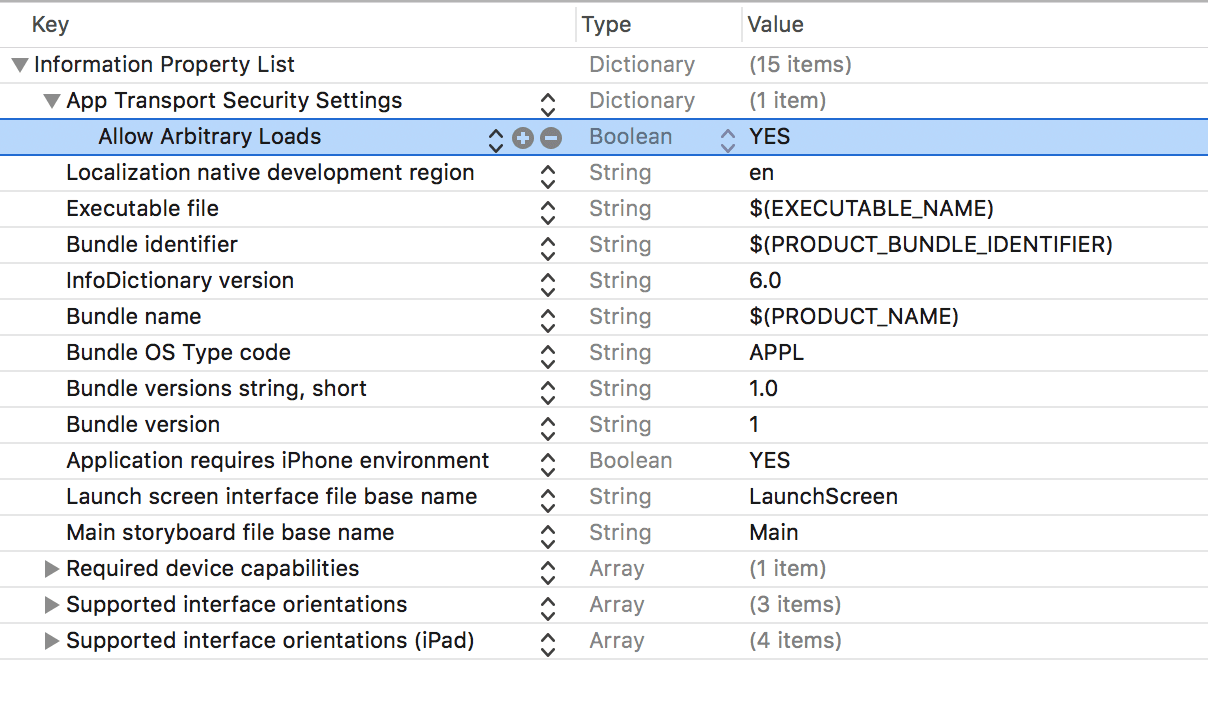
If you are running the API server locally XCode might not allow you to make requests to the local server. You can get around this by adding App Transport Security Settings to your Info.plist file and set Allow Artibrary Loads to YES.
Conclusion
In this part we were able to create the iOS application.
The source code to the application built in this series is available on GitHub.
IMPORTANT: ChatKit has been retired from the Pusher product stack as of April, 2020. This tutorial will no longer be functional in its current version. Explore our other Pusher tutorials to find out how Channels and Beams can help you build.


© 2024 Pusher Ltd. All rights reserved.
Pusher Limited is a company registered in England and Wales (No. 07489873) whose registered office is at MessageBird UK Limited, 3 More London Riverside, 4th Floor, London, United Kingdom, SE1 2AQ.