- Products

- Developers
- User stories
- Blog
- Pricing

Creating a Laravel logger - Part 1: Getting started
Introduction
In this tutorial series, we will see how we can create a simple realtime monitoring application. It will have mobile applications that will be able to see logs as they happen on your application and thus make it easier to find out what is wrong with an application and fix it.
When building applications, logging is an essential part of diagnosing the problems with the application. Many times, applications can fail when a client is viewing the website or application. These incidents can often go unnoticed especially if it is not reported by the client, which happens a lot.
Most languages and frameworks come with in-built logging systems that will help you diagnose problems with your application. However, these logs are stored on the filesystem and will require logging into your server and searching for the log messages, which is inconvenient. There are services like BugSnag and Sentry that offer log monitoring as a service which makes it easy to work with application logs.
The system will include a log dispatcher that will work hand in hand with a Laravel package to distribute logs to various clients (a web dashboard, an Android app, an iOS app) in realtime. For this first part, we will build the dispatcher. The app will contain a simple page with a modal that has a form.
Here’s a demo of how the page will look and the modal behavior:
Requirements
To follow along with this series you need the following things:
- Laravel installed on your local machine. Installation guide.
- Knowledge of PHP and the Laravel framework.
- Composer installed on your local machine. Installation guide.
- Android Studio >= 3.x installed on your machine (If you are building for Android).
- Knowledge of Kotlin and the Android Studio IDE.
- Xcode >= 10.x installed on your machine (If you are building for iOS).
- Knowledge of the Swift programming language and the Xcode IDE.
- Pusher account. Create a free sandbox Pusher account or sign in.
Setting up
Let’s start setting up our environment so we can build the logging dispatcher.
Installing PHP
NOTE: If you already have PHP 7.1.3 or above installed on your machine, you can skip this section.
The first step for our setup is to install PHP. This can be more complicated than usual depending on your machine. So, in order to not unnecessarily elongate this post, I will just provide explicit resources for that.
To install PHP:
- For Windows users, use this guide.
- For Ubuntu users, use this guide.
- For Mac, PHP usually comes pre-installed. You can verify using this command:
$ php -v
If you don’t have it installed or it’s a lower version that required, you can use this post as a guide to installing PHP on your Mac.
Installing Composer and the Laravel installer
NOTE: If you have already installed the Laravel CLI, you can skip this part entirely.
Next, let’s install Laravel. Laravel utilizes Composer to manage its dependencies so, before using Laravel, we have to make sure Composer is installed. If you don’t have it, you can follow the following steps to get it installed:
Run this command in your terminal to download the composer installer:
1// For Mac 2 $ php -r "copy('https://getcomposer.org/installer', 'composer-setup.php');" 3 4 // For Linux 5 $ curl -sS https://getcomposer.org/installer -o composer-setup.php
NOTE: If you are using a Windows machine, you can use the composer setup file here.
Next, run this command to verify your downloaded file:
$ php -r "if (hash_file('sha384', 'composer-setup.php') === '48e3236262b34d30969dca3c37281b3b4bbe3221bda826ac6a9a62d6444cdb0dcd0615698a5cbe587c3f0fe57a54d8f5') { echo 'Installer verified'; } else { echo 'Installer corrupt'; unlink('composer-setup.php'); } echo PHP_EOL;"
From the snippet above, you are verifying the hash of the downloaded installer. If the hash matches the expected hash from Composer. You can find the current Composer hash here.
Next, let’s install composer globally so we can run the command from anywhere. To do this, run the following command on your terminal:
$ php composer-setup.php --install-dir=/usr/local/bin --filename=composer
This command installs composer in the /usr/local/bin directory.
If you are using Linux, you might want to add
sudobefore thephpcommand so the command is run as therootuser.
Next, run the command below to install the Laravel installer:
$ composer global require laravel/installer
After the installation is complete, you should be able to run the laravel command on your terminal. Try this to verify:
$ laravel -V
If you have installed it successfully, you would see the version of the Laravel installer currently installed on your machine.
Building our app
Now that we have the Laravel installer, let’s create a new Laravel application. To create a new Laravel application, run the following command:
$ laravel new logger-app
This command will create a new Laravel application in a directory named logger-app.
Alternatively, you can create a Laravel app using the composer create-project command like this:
$ composer create-project --prefer-dist laravel/laravel logger-app
Now you can cd to your applications directory and run the following command:
$ php artisan serve
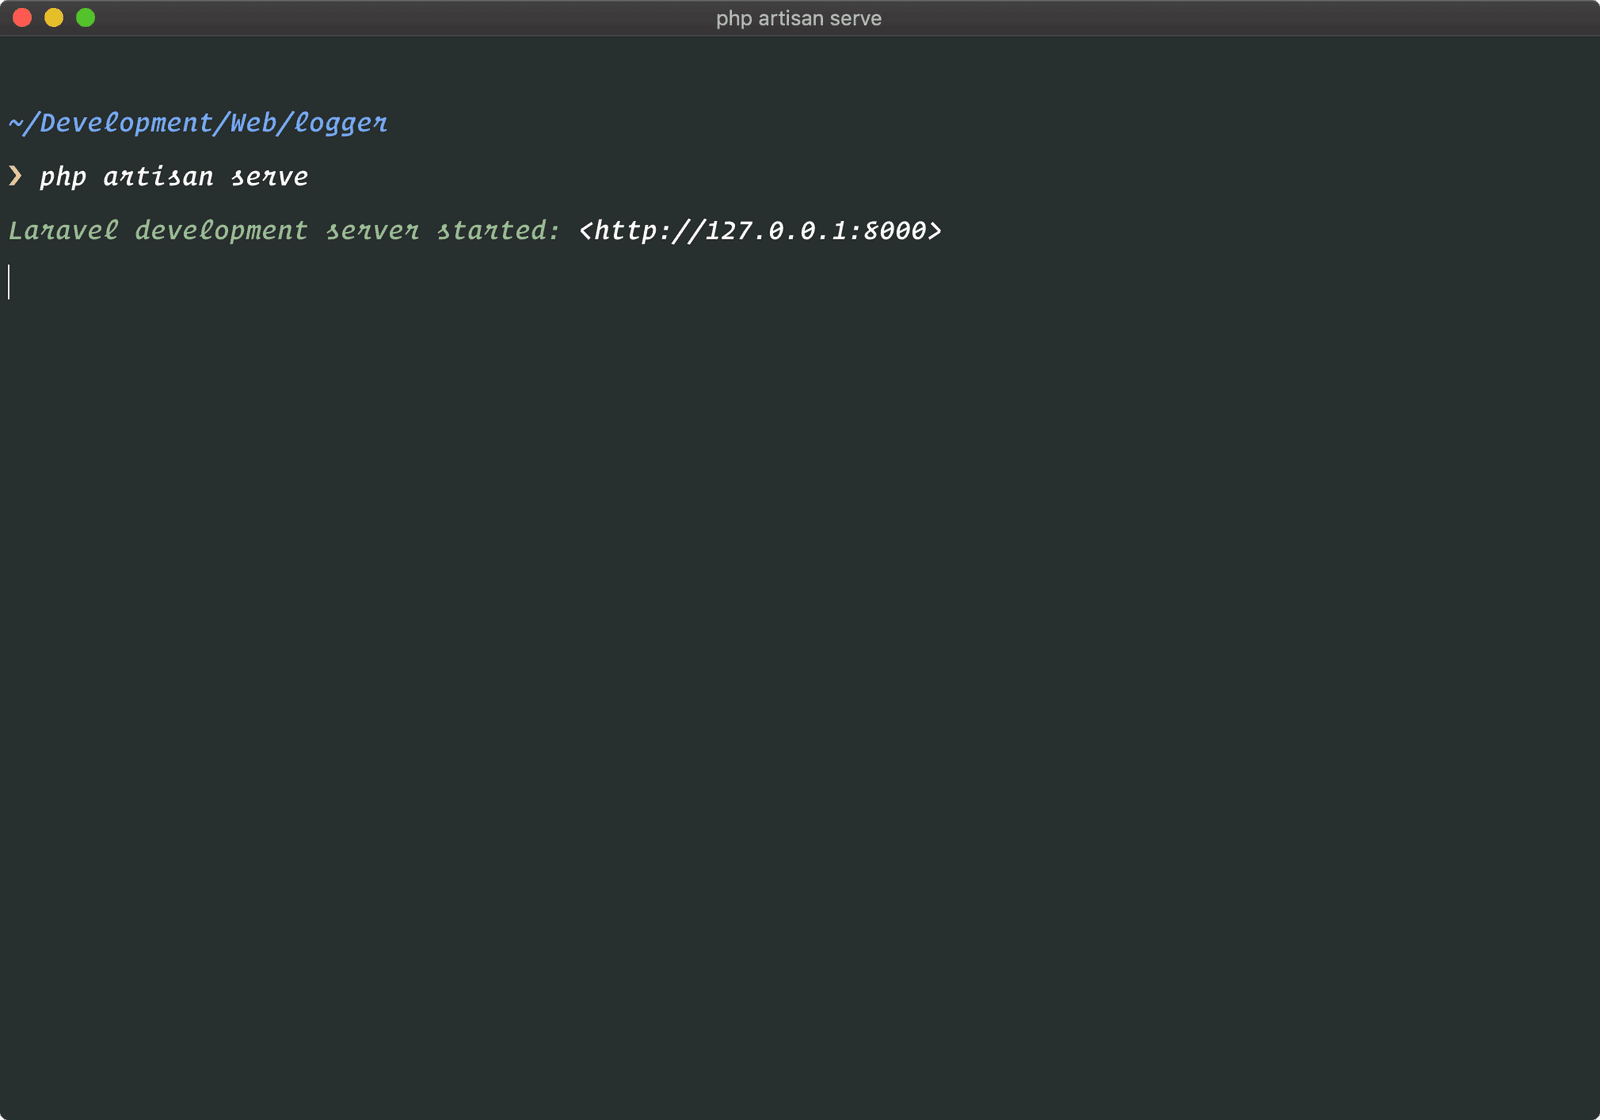
This will start a local PHP server on port 8000. Now, you can visit the URL http://localhost:8000 and you will see the Laravel welcome screen.
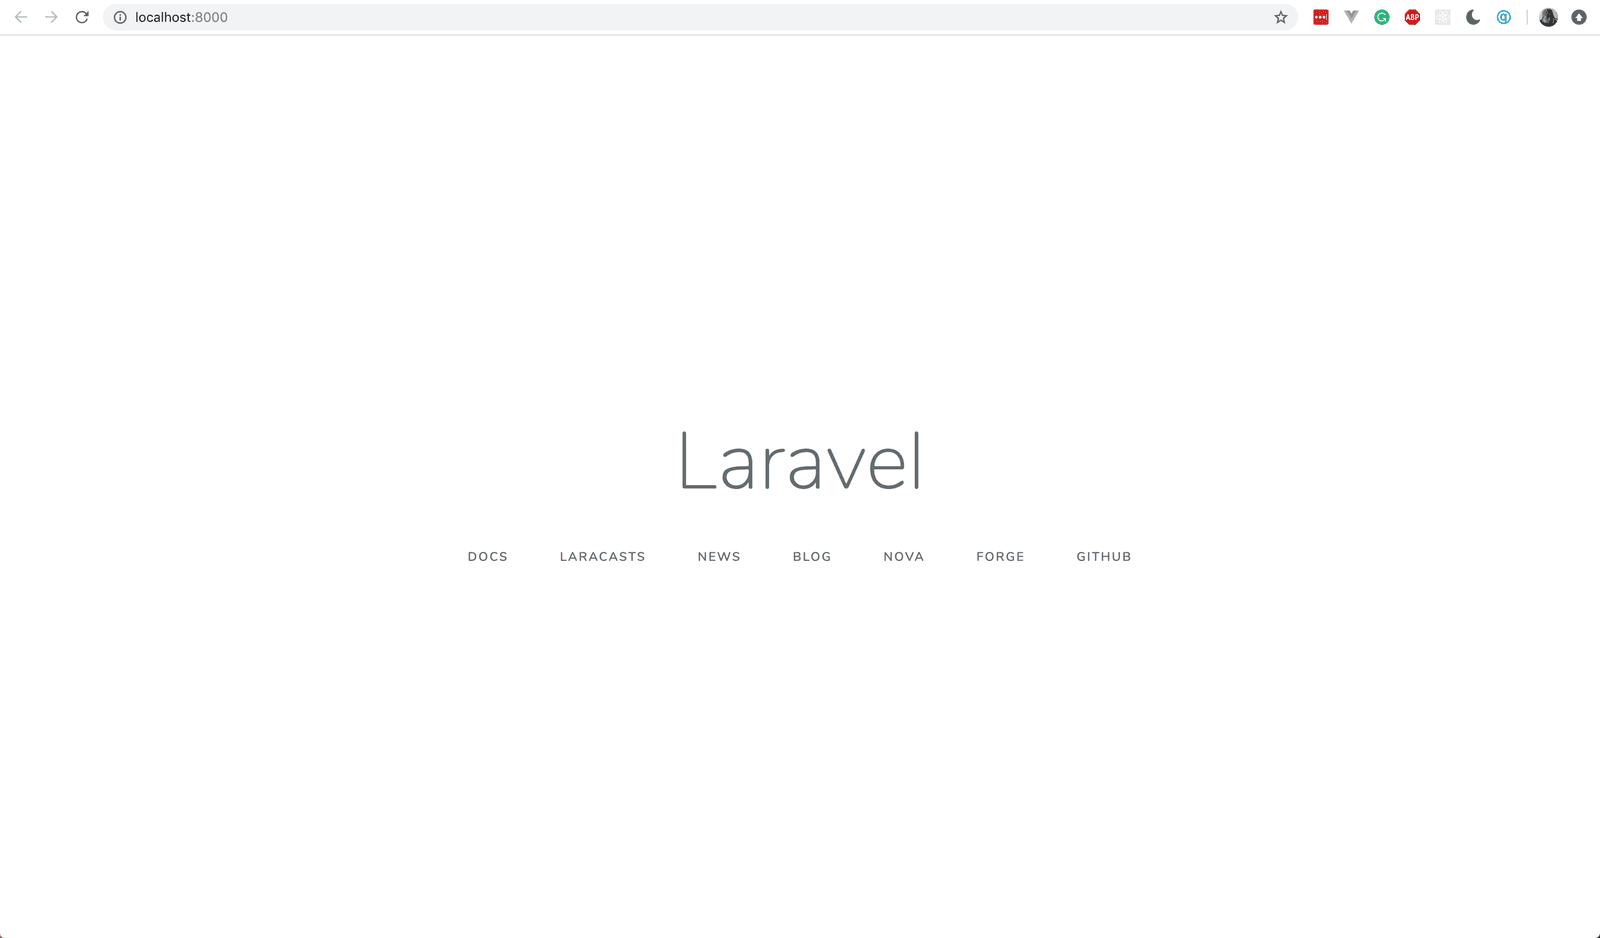
The page rendered here is the default view of newly created apps. This route is registered in the routes/web.php file. If you look at the single route there, you should see that it loads the welcome.blade.php view. All views are in the /resources/views/ directory. For the sake of brevity, let’s update this view instead of creating a new one.
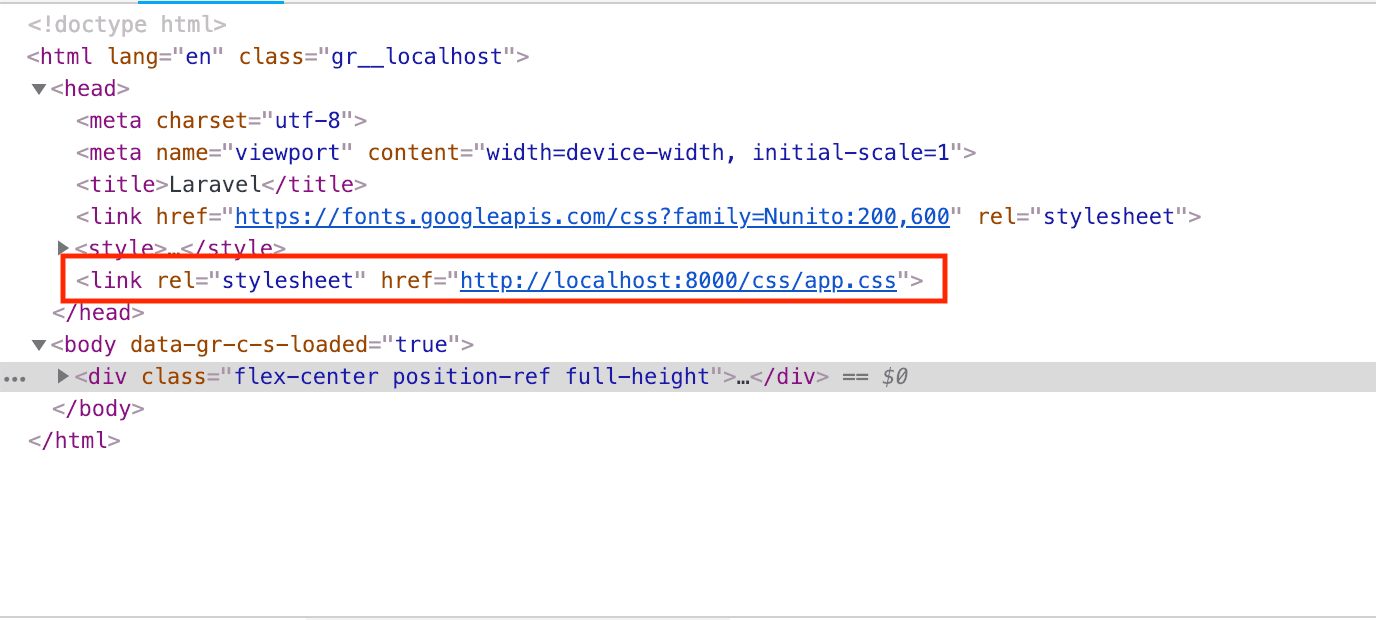
First, we need to import the app CSS file, add the link to the file in the <head> tag like so:
1<!-- File: ./resources/views/welcome.blade.php --> 2 <!-- [...] --> 3 <head> 4 <!-- Leave existing styles --> 5 <!-- [...] --> 6 <link rel="stylesheet" href="{{ asset('css/app.css') }}"> 7 <meta name="csrf-token" content="{{ csrf_token() }}" /> 8 </head>
Above, we are using the asset function to load the asset from the public/css directory. It is recommended that you use the asset function as it will add the full URL to the asset.
Next, let’s replace the design with ours. Still in the welcome.blade.php file, replace the code in the <body> tag with this:
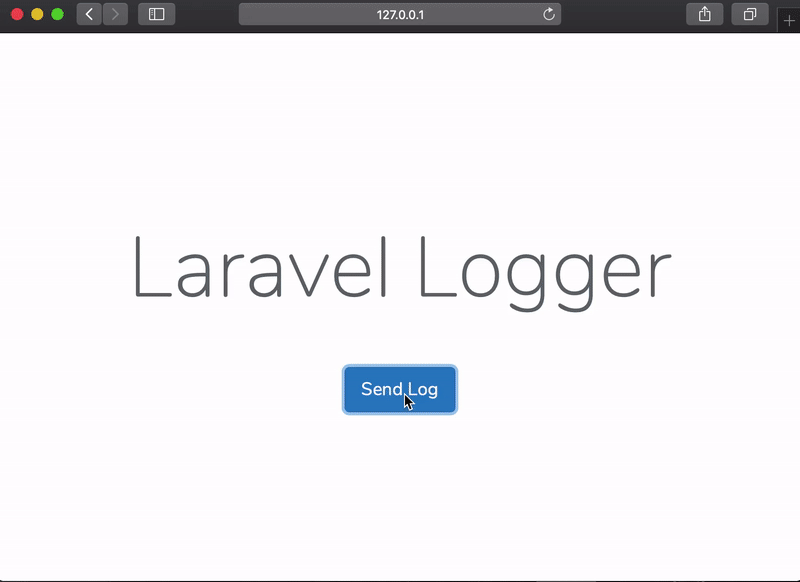
1<!-- File: ./resources/views/welcome.blade.php --> 2 <!-- [...] --> 3 <div class="flex-center position-ref full-height"> 4 <div class="content"> 5 <div class="title m-b-md"> 6 Laravel Logger 7 </div> 8 9 <div class="button"> 10 <button type="button" class="btn btn-lg btn-primary" data-toggle="modal" data-target="#exampleModal"> 11 Send Log 12 </button> 13 </div> 14 15 <!-- Modal will be inserted here --> 16 </div> 17 </div> 18 19 <script src="{{ asset('js/app.js') }}"></script> 20 <!-- [...] -->
Above, we replaced the HTML on the previous page with ours. We also added a button that when clicked a modal, which we will create soon, will open. In the snippet, we added comments for where other parts of the code will be added, you should watch out for that too.
Now for the modal, in the same file where it specifies the “Modal will be inserted here” add the following code:
@includeIf('partials.modal')
This will include the view resources/views/partials/modal.blade.php if it exists. Right now it does not so create it and paste the following code into the file:
1<!-- File: ./resources/views/partials/modal.blade.php --> 2 <div class="modal fade" id="exampleModal" tabindex="-1" role="dialog" aria-labelledby="exampleModalLabel" aria-hidden="true"> 3 <div class="modal-dialog" role="document"> 4 <div class="modal-content"> 5 <div class="modal-header"> 6 <h5 class="modal-title" id="exampleModalLabel"> 7 Send Log 8 </h5> 9 <button type="button" class="close" data-dismiss="modal" aria-label="Close"> 10 <span aria-hidden="true">×</span> 11 </button> 12 </div> 13 <div class="modal-body"> 14 <div class="form-group"> 15 <label for="exampleFormControlSelect1">Log Level</label> 16 <select name="level" class="form-control" id="level"> 17 <option value="info">Info</option> 18 <option value="warning">Warning</option> 19 <option value="error">Error</option> 20 </select> 21 </div> 22 <div class="form-group"> 23 <label for="exampleFormControlTextarea1">Log Message</label> 24 <textarea name="message" class="form-control" id="message" rows="2"></textarea> 25 </div> 26 </div> 27 <div class="modal-footer"> 28 <button type="button" class="btn btn-secondary" data-dismiss="modal">Close</button> 29 <button type="button" class="btn btn-danger">Dispatch</button> 30 </div> 31 </div> 32 </div> 33 </div>
The modal content is made of three sections, the header, body and, footer. The header shows a description of the modal. Next, is the body which contains the form. This contains an input for the log message and the log level (warning, error, or info). Lastly, the footer has two buttons: a button to dispatch (send) the form details and another to close the modal.
With this, we have finished building the frontend of the app. Now, we can run our app, and it should look like this:
Conclusion
In this first tutorial of the series, we have built a logger app that will trigger logs using Laravel. The app dispatches logs of different levels. For now, this app does not actually send the log anywhere or even generate it.
In the next part, we will build a package that will send the log messages to Pusher. We will then link the package to this app to make it work then the Dispatch button on the modal is pressed.
The source code is available on GitHub.


© 2024 Pusher Ltd. All rights reserved.
Pusher Limited is a company registered in England and Wales (No. 07489873) whose registered office is at MessageBird UK Limited, 3 More London Riverside, 4th Floor, London, United Kingdom, SE1 2AQ.