- Products

- Developers
- User stories
- Blog
- Pricing

Create a live blog app using Swift and Go
Introduction
Live blogs allow users to follow events live without audio or video. It's particularly useful when you are in situations where you cannot consume audio/video media. Live blogs have been used to cover things like football commentary, political commentary, and more.
In this article, we are going to consider how to build a live blogging application. We will be building it using Swift for iOS and we will use Go as the backend language for the application. When we are done with the application, this is what it will look like:
Prerequisites
To get started you need the following:
- Xcode (v9.x) running on your machine. Download Xcode.
- Go (v0.10 or later) installed on your machine. Installation guide.
- SQLite installed on your machine.
- Knowledge of the Swift programming language.
- Basic knowledge of the Go programming language.
- Knowledge of using the Xcode IDE.
- CocoaPods installed on your machine. Installation guide.
- Pusher Channels. Create a free sandbox Pusher account or sign in.
Let's get started.
Creating the Swift application
Launch Xcode and create a new 'Single View App' project. We will creatively name ours ... drum rolls ... LiveBlog. Next, close Xcode and cd to the root directory of your Xcode project and run the following command:
$ pod init
This command will create a new Podfile in the root of your project. Open the Podfile in your code editor and paste the following code:
1platform :ios, '11.0' 2 3 target 'LiveBlog' do 4 use_frameworks! 5 6 pod 'Alamofire', '~> 4.7.2' 7 pod 'PusherSwift', '~> 6.1.0' 8 pod 'PushNotifications', '~> 0.10.8' 9 pod 'NotificationBannerSwift', '~> 1.6.3' 10 end
Next, run the following command to install the packages listed above using Cocoapods:
$ pod install
When the installation is complete, you will see a LiveBlog.xcworkspace file in the project directory. Open this file in Xcode.
Let's create our application's storyboard. Open the Main.storyboard file and what we want to do is create something similar to the board below:
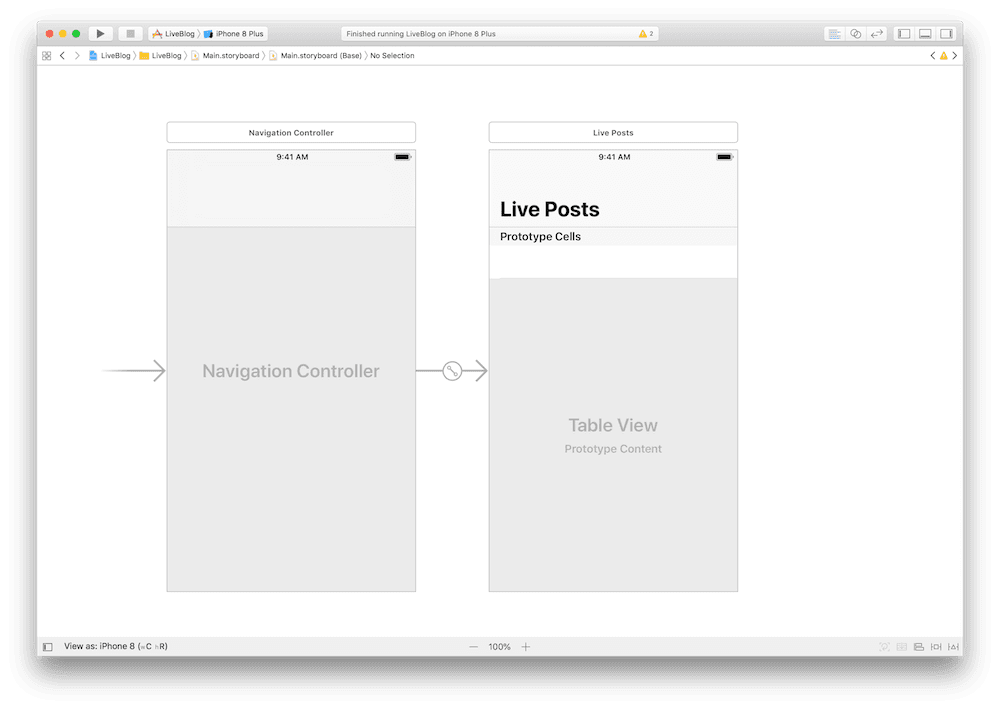
To create this, we added a new navigation controller and made it the entry point of the storyboard. We then assigned a reuse identifier to the cell on the table view controller called post. We also set the title of the view controller using the interface builder.
Next, create a table view controller called PostsTableViewController and set this as the custom class for the table view controller in the main storyboard.
In the PostsTableViewController paste in the following code:
1import UIKit
2 import Alamofire
3 import NotificationBannerSwift
4
5 struct Post: Codable {
6 let id: Int64
7 let content: String
8 }
9
10 struct Posts: Codable {
11 var items: [Post]
12 }
13
14 class PostsTableViewController: UITableViewController {
15
16 var posts = Posts(items: [])
17
18 override func viewDidLoad() {
19 super.viewDidLoad()
20
21 Alamofire.request("http://127.0.0.1:9000/posts").validate().responseJSON { resp in
22 guard resp.result.isSuccess, let data = resp.data else {
23 return StatusBarNotificationBanner(title: "Unable to fetch posts", style: .danger).show()
24 }
25
26 if let posts = try? JSONDecoder().decode(Posts.self, from: data) {
27 self.posts = posts
28 self.tableView.reloadData()
29 }
30 }
31 }
32
33 override func numberOfSections(in tableView: UITableView) -> Int {
34 return 1
35 }
36
37 override func tableView(_ tableView: UITableView, numberOfRowsInSection section: Int) -> Int {
38 return posts.items.count
39 }
40
41 override func tableView(_ tableView: UITableView, cellForRowAt indexPath: IndexPath) -> UITableViewCell {
42 let cell = tableView.dequeueReusableCell(withIdentifier: "post", for: indexPath)
43 let post = posts.items[indexPath.row]
44
45 cell.textLabel?.text = post.content
46
47 return cell
48 }
49
50 }
Above we have a two Codable structs for the Post and Posts objects. We will decode the response from the API to these objects and make working with JSON responses easier.
Recommended: Decoding JSON using Codable in Swift 4
In our viewDidLoad method, we make a request to the API to fetch the posts and then we save them to the posts property of the controller then we reload the tableView.
The rest of the methods in the controller should be familiar to you. They are used to override the table view's rendering.
Adding realtime functionality
Because we are creating a live blog, we want to add the realtime functionality to the application so that when a new post is made, we get an instant update.
In the PostsTableViewController, import the Pusher Swift SDK:
import PusherSwift
Now in the viewDidLoad method, we can add our Pusher functionality. At the top of the method after super.viewDidLoad(), add the following code:
1let pusher = Pusher(
2 key: "PUSHER_APP_KEY",
3 options: PusherClientOptions(
4 host: .cluster("PUSHER_APP_CLUSTER")
5 )
6 )
7
8 let channel = pusher.subscribe("live-blog-stream")
9
10 let _ = channel.bind(eventName: "new-post") { data in
11 if let data = data as? [String: AnyObject] {
12 if let id = data["id"] as? Int64, let content = data["content"] as? String {
13 self.posts.items.insert(Post(id: id, content: content), at: 0)
14 self.tableView.reloadData()
15 }
16 }
17 }
NOTE: Replace the
PUSHER_APP_*keys with the value from your Pusher dashboard.
In the code above, we create an instance of the Pusher SDK and then we subscribe to the live-blog-stream channel. We then bind a callback to the new-post event on the channel.
Whenever this event is triggered, the callback is fired. In the callback, we update the posts with the new post that was passed with the event then we reload the tableView so the changes are reflected immediately.
With those few lines, we have implemented realtime functionality to the application. Easy right?
Creating the Go backend for our realtime application
The next thing we want to do is create the backend for our application. We will make it as simple as possible so we can easily demonstrate how to trigger events on a channel in Pusher using Go.
Create a new project directory for the Go application. Let's call it liveblog-backend and in that directory create a public directory:
1$ mkdir liveblog-backend 2 $ cd liveblog-backend 3 $ mkdir public
In the root directory, create a new file called main.go and in here is where all our Go code will reside.
Open the main.go file in your favorite editor and paste the following code into the file:
1package main 2 3 import ( 4 "database/sql" 5 "net/http" 6 7 "github.com/labstack/echo" 8 "github.com/labstack/echo/middleware" 9 _ "github.com/mattn/go-sqlite3" 10 pusher "github.com/pusher/pusher-http-go" 11 ) 12 13 func main() { 14 e := echo.New() 15 16 e.Use(middleware.Logger()) 17 e.Use(middleware.Recover()) 18 19 db := initialiseDatabase("./storage.db") 20 migrateDatabase(db) 21 22 e.File("/admin", "public/admin.html") 23 e.GET("/posts", getPosts(db)) 24 e.POST("/posts", savePost(db)) 25 26 e.Logger.Fatal(e.Start(":9000")) 27 }
Above, we import the packages we will need for the Go application to function properly. We also defined a main function which will be the sole entry point of the application.
In the main function, we instantiated the Echo framework and we added some middlewares to the instance of echo.
Next, we initialized the database and ran a migration on the database. This will create a storage.db file in the root directory. This is the file SQLite will use to operate. Finally, we defined some routes for our application and specified the port we want our application to start on, 9000.
In the main function, we referenced some functions we had not created so let's add these functions.
In the main.go file, add the following above the main function:
1func initialiseDatabase(filepath string) *sql.DB { 2 db, err := sql.Open("sqlite3", filepath) 3 4 if err != nil { 5 panic(err) 6 } 7 8 if db == nil { 9 panic("db nil") 10 } 11 12 return db 13 } 14 15 func migrateDatabase(db *sql.DB) { 16 sql := ` 17 CREATE TABLE IF NOT EXISTS posts( 18 id INTEGER NOT NULL PRIMARY KEY AUTOINCREMENT, 19 content TEXT 20 ); 21 ` 22 _, err := db.Exec(sql) 23 if err != nil { 24 panic(err) 25 } 26 } 27 28 func getPosts(db *sql.DB) echo.HandlerFunc { 29 return func(c echo.Context) error { 30 rows, err := db.Query("SELECT * FROM posts ORDER BY id DESC") 31 if err != nil { 32 panic(err) 33 } 34 35 defer rows.Close() 36 37 result := PostCollection{} 38 39 for rows.Next() { 40 post := Post{} 41 err2 := rows.Scan(&post.ID, &post.Content) 42 if err2 != nil { 43 panic(err2) 44 } 45 46 result.Posts = append(result.Posts, post) 47 } 48 49 return c.JSON(http.StatusOK, result) 50 } 51 } 52 53 func savePost(db *sql.DB) echo.HandlerFunc { 54 return func(c echo.Context) error { 55 postContent := c.FormValue("content") 56 stmt, err := db.Prepare("INSERT INTO posts (content) VALUES(?)") 57 if err != nil { 58 panic(err) 59 } 60 61 defer stmt.Close() 62 63 result, err := stmt.Exec(postContent) 64 if err != nil { 65 panic(err) 66 } 67 68 insertedID, err := result.LastInsertId() 69 if err != nil { 70 panic(err) 71 } 72 73 post := Post{ 74 ID: insertedID, 75 Content: postContent, 76 } 77 78 client.Trigger("live-blog-stream", "new-post", post) 79 80 return c.JSON(http.StatusOK, post) 81 } 82 }
Above, we have four functions. The first is the initialiseDatabase function. We use this to create the database file if it does not exist and then create a connection to the database once it exists. The migrateDatabase function does just what the name suggests. It executes migrations for the database if it was not previously run.
The getPosts function gets the list of posts from the database and returns it as a JSON response. The savePost function saves a new post to the database and triggers an update to Pusher on the live-blog-stream channel.
The savePost function is referencing a Pusher client instance that does not exist so let's create that. In the main.go file right after the import statements, add the following:
1var client = pusher.Client{ 2 AppId: "PUSHER_APP_ID", 3 Key: "PUSHER_APP_KEY", 4 Secret: "PUSHER_APP_SECRET", 5 Cluster: "PUSHER_APP_CLUSTER", 6 Secure: true, 7 }
NOTE: Replace the
PUSHER_APP_*keys with the keys from your Pusher application dashboard.
In the above, we instantiate the Pusher Go client with the credentials from the dashboard. This will make it possible to trigger events using the Pusher instance.
The final thing we want to do is add the object structures for our Post and PostCollection. In the same main.go file, add the following code below the Pusher instance above:
1// Post type 2 type Post struct { 3 ID int64 `json:"id"` 4 Content string `json:"content"` 5 } 6 7 // PostCollection type 8 type PostCollection struct { 9 Posts []Post `json:"items"` 10 }
Now save and close the file.
Create a new admin.html file in the public directory and paste the following into it:
1<!DOCTYPE html> 2 <html lang="en"> 3 <head> 4 <meta charset="UTF-8"> 5 <title>Admin Panel</title> 6 <link rel="stylesheet" href="https://stackpath.bootstrapcdn.com/bootstrap/4.1.1/css/bootstrap.min.css"> 7 <style> 8 .container { 9 max-width: 500px; 10 } 11 .logo-space { 12 text-align: center; 13 padding: 50px 0; 14 background-color: #bada55; 15 margin: 10px 0; 16 } 17 </style> 18 </head> 19 <body> 20 <div id="app"> 21 <div class="container"> 22 <div class="logo-space"> 23 <h1>Live Blog</h1> 24 </div> 25 <div class="alert alert-success" role="alert" v-show="successfulPost"> 26 Post added successfully! 27 </div> 28 <form action="/posts" method="POST" id="post-stuff" v-on:submit.prevent="submitForm"> 29 <div class="form-group"> 30 <textarea class="form-control" v-model="content" placeholder="Enter Post"></textarea> 31 </div> 32 <input type="submit" class="form-control btn btn-primary" name="submit" value="Update Stream"> 33 </form> 34 </div> 35 </div> 36 <script src="https://cdn.jsdelivr.net/npm/vue@2.5.16/dist/vue.js"></script> 37 <script src="https://cdnjs.cloudflare.com/ajax/libs/axios/0.18.0/axios.min.js"></script> 38 <script> 39 new Vue({ 40 el: "#app", 41 data: { 42 content: "", 43 successfulPost: false 44 }, 45 methods: { 46 submitForm() { 47 if (this.content.length > 0 && this.content !== "") { 48 let data = new FormData() 49 data.append("content", this.content) 50 51 axios.post("/posts", data).then(res => { 52 this.content = "" 53 this.successfulPost = true 54 setTimeout(() => this.successfulPost = false, 3000) 55 }) 56 } 57 } 58 } 59 }) 60 </script> 61 </body> 62 </html>
The code above is for the admin page where we can add our new posts. This will then make a POST request to the API to add a new post to the database. When the post is added to the database, an event will be triggered by the Pusher Go client. This event will then be picked up by the Swift application and the iOS app will be updated in realtime.
Save the file and execute the following command to run our Go application:
$ go run main.go
This will start a server on port 9000.
Testing our live blogging application
The next thing we need to do is test our application. Open your project in Xcode using the .xcworkspace file. Before building the application though, we need to do one last thing. Open the info.plist file and apply the following changes:
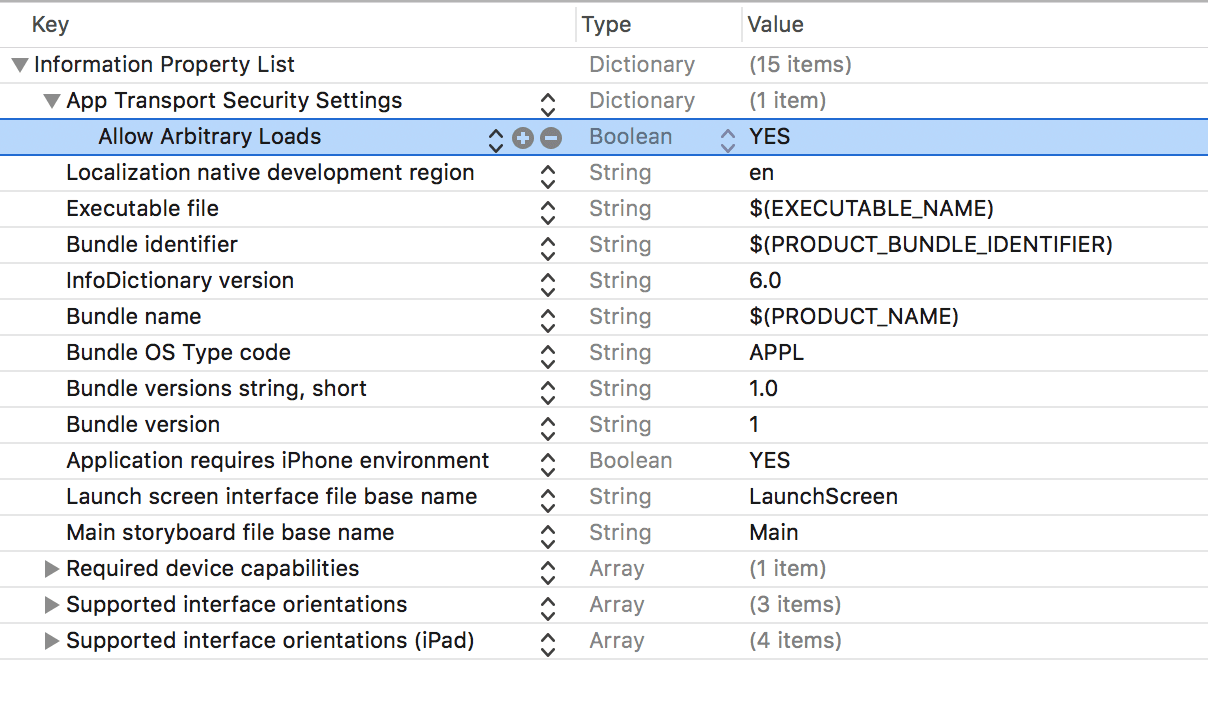
With this change, you can build and run your application and it will talk directly with your local web application.
Conclusion
In this article, we have seen how we can easily create a live blog using Swift, Go and Pusher Channels.
Pusher Channels makes it very easy to implement realtime features into almost any application in all languages. You should check out the documentation here to get started. The source code for this article is available on GitHub.


© 2024 Pusher Ltd. All rights reserved.
Pusher Limited is a company registered in England and Wales (No. 07489873) whose registered office is at MessageBird UK Limited, 3 More London Riverside, 4th Floor, London, United Kingdom, SE1 2AQ.