- Products

- Developers
- User stories
- Blog
- Pricing

Writing an MVP for your backend with Kotlin
Introduction
Motivation
Kotlin is a popular language, but it is mostly associated with Android. This is not an accident—Google appointed it as a first-class language for Android. Since its conception, Kotlin was intimately related to the Android platform. But JetBrains has always emphasized its multiplatform nature. Nowadays Kotlin is used as a primary language for a variety of scenarios:
- iOS or Raspberry Pi (hence the development of Kotlin/Native)
- As a frontend language
- One of my favorites: serving as a backend language.
Recently I had to confront the dilemma of developing a small microservice (are all microservices small?) that would include some shared components with other J2EE applications. I would have total ownership over this microservice, as long as:
A) Other services and entities at my client could be able to operate with this microservice, and
B) Some shared components (i.e., models, DTOs, etc.) could be shared among the platforms.
I decided to go fully Kotlin for it. Since I observed that for some folks Kotlin was still new in the backend, I thought it could be a good idea to provide a sort of Minimum Viable Product (MVP). The idea sounded attractive at first, and as I implemented it turned out to be faster and more efficient than I thought.
So, an MVP must include minimal functionality desired in a product. It should not get very complex, or the purpose gets killed. I came up with the following points that would be desired to have in an MVP for a backend service:
- A REST API providing CRUD operations for an entity.
- Documentation
- Testing
- Dependency Injection
- Environment separation
Choosing a small example as an entity that could serve, something as simple as a message entity could serve. Let's consider a message being composed of an ID, a title, and some content.
As mentioned before, it can get much more complex the more features we add, but I considered this to be a good start for the MVP. Kotlin already makes a few things easy. I had to choose a few libraries to develop it as standard as I can.
After some research, I came up with the following thoughts:
- I have used Spring previously in Java. It does its job, it is pretty standard and I am happy overall with it. Since Spring Version 5.0 support for Kotlin was introduced. So this was going to be an obvious choice.
- Jackson is my choice for JSON conversation.
Many backend services based on Java use Maven out of habit, which is not a bad thing. However, I consider Gradle to be more deeply linked to Kotlin since its inception. So we will use Gradle for this tutorial.
However, this could be easily ported to other platforms. Remember as well to have Gradle 4+ installed in your environment. The entire code has been uploaded to GitHub. You can direct yourself there anytime if you want to check the project entirely. However, if you want to start doing it from scratch (something we recommend in order to acquire knowledge solidly) follow the tutorial.
Let's start getting our hands dirty.
Prerequisites
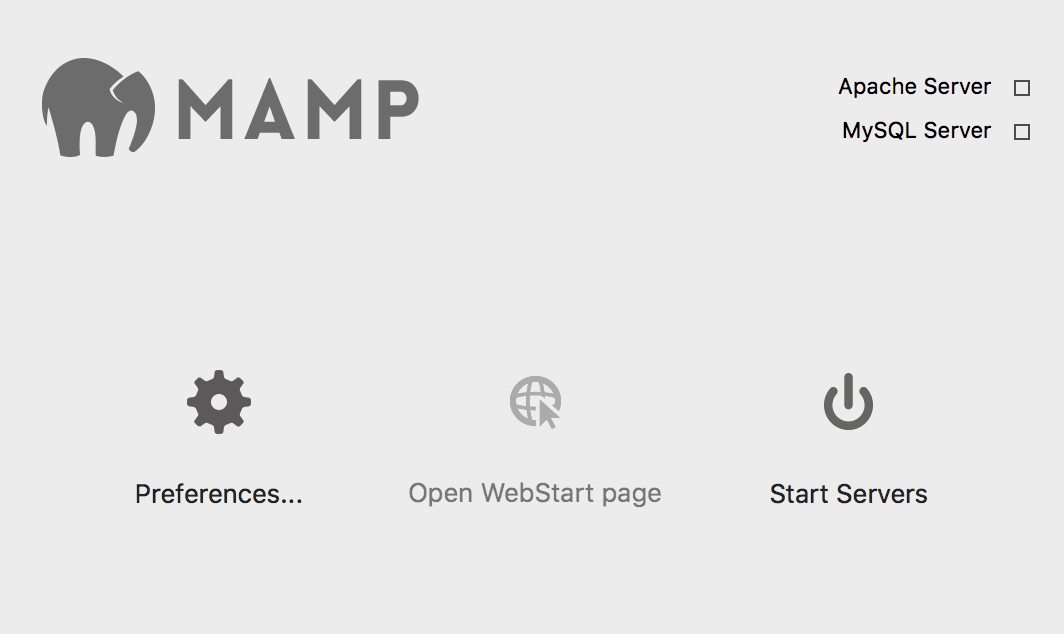
- If you do not have an existing infrastructure on your computer, we can recommend you to one of the *AMP (WAMP, LAMP, MAMP) alternatives. The installation is straightforward, and it will provide you a functioning MySQL database. Note you do not need the Apache and PHP parts of the package for this tutorial.
- We will also be using IntelliJ, since it provides a great integration with Kotlin and Spring.
- Postman to execute the requests.
- The user must feel comfortable developing basic Java web apps and understanding the layers beneath it (endpoints, database, etc).
- An SQL database reader. I use SequelPro for Macintosh and I can endorse it. Other OS will offer different alternatives. I have heard good things of SQLYog for Windows.
Create a brand new project
In your IntelliJ environment, click on File > New Project > Gradle > Next. The following screens refer to GroupID and Project name. Choose the naming at your convenience.
Now that the project is created, we need to add the Gradle dependencies. We will be using Spring, Jackson and the MySQL connector. There are a few sub packages from Spring that will need to be added as well. Please, check that your main Gradle file contains the following lines within the block dependencies.
1// build.gradle 2 3 dependencies { 4 implementation "org.jetbrains.kotlin:kotlin-stdlib:$kotlin_version" 5 implementation('org.springframework.boot:spring-boot-starter-web') 6 implementation('org.springframework.boot:spring-boot-starter-data-jpa') 7 testCompile('org.springframework.boot:spring-boot-starter-test') 8 runtime('mysql:mysql-connector-java') 9 implementation "com.fasterxml.jackson.module:jackson-module-kotlin" 10 }
To resolve the dependencies, make sure your block buildscript/dependencies looks like this:
1// build.gradle 2 3 buildscript { 4 ext.kotlin_version = '1.2.41' 5 ext.spring_boot_version = '2.0.0.RELEASE' 6 ext.koin_version = '0.9.3' 7 8 repositories { 9 mavenCentral() 10 jcenter() 11 } 12 dependencies { 13 classpath "org.jetbrains.kotlin:kotlin-gradle-plugin:$kotlin_version" 14 classpath "org.jetbrains.kotlin:kotlin-allopen:$kotlin_version" 15 classpath "org.springframework.boot:spring-boot-gradle-plugin:$spring_boot_version" 16 } 17 }
Apply the following plugins to your Gradle file.
1// build.gradle 2 3 apply plugin: 'kotlin' 4 apply plugin: "kotlin-spring" 5 apply plugin: 'org.springframework.boot' 6 apply plugin: 'io.spring.dependency-management'
Implement basic functionality
Let's start with the proper code. A Spring application will always need to have an Application class. This is the main entry point to our MVP. Create a class called Application.kt in your root folder, and include the following code:
1// src/main/kotlin/com/kotlinmvpweb/demo/Application.kt 2 3 import org.springframework.boot.SpringApplication 4 import org.springframework.boot.autoconfigure.SpringBootApplication 5 6 @SpringBootApplication 7 class Application 8 9 fun main(args: Array<String>) { 10 SpringApplication.run(Application::class.java, *args) 11 }
Now that our Spring application has been specified, we are going to define our entity. We agreed on using an entity called Message, but essentially every other class will serve for that purpose. We want to showcase how straightforward this implementation results with Kotlin.
As a reminder, we agreed on our Message being composed of ID, title, and content. Define your following class (Message.kt) in a new package (model) within your root folder:
1// src/main/kotlin/com/kotlinmvpweb/demo/model/Message.kt 2 3 import javax.persistence.Entity 4 import javax.persistence.GeneratedValue 5 import javax.persistence.GenerationType 6 import javax.persistence.Id 7 import javax.validation.constraints.NotBlank 8 9 @Entity 10 data class Message ( 11 @Id @GeneratedValue(strategy = GenerationType.IDENTITY) 12 val id: Long = 0, 13 14 @get: NotBlank 15 val title: String = "", 16 17 @get: NotBlank 18 val content: String = "" 19 )
Java would have traditionally needed a group of setters/getters to provide access to the fields. Kotlin simplifies this by using data classes.
Create the Spring repository. Create the following class MessageRepository in a package called repository in your root folder:
1// src/main/kotlin/com/kotlinmvpweb/demo/repository/MessageRepository.kt 2 3 import com.kotlinmvpweb.demo.model.Message 4 import org.springframework.stereotype.Repository 5 import org.springframework.data.jpa.repository.JpaRepository 6 7 @Repository 8 interface MessageRepository : JpaRepository<Message, Long>
By creating this interface we are actually fulfilling two purposes:
- When we extend from JpaRepository, we essentially get all the required CRUD methods we will later need for our class message.
- This will allow the Spring repository infrastructure to scan the classpath for this interface and create a Spring bean for it.
Now let's create our last class to complete the basic setup. Create a folder controller in your root folder, a new class called MessageController.kt ` with the following content:
1// src/main/kotlin/com/kotlinmvpweb/demo/controller/MessageController.kt 2 3 import com.kotlinmvpweb.demo.model.Message 4 import com.kotlinmvpweb.demo.repository.MessageRepository 5 import org.springframework.http.HttpStatus 6 import org.springframework.http.ResponseEntity 7 import org.springframework.web.bind.annotation.* 8 import javax.validation.Valid 9 10 11 12 @RestController 13 @RequestMapping("/api") 14 class MessageController(private val messageRepository: MessageRepository) { 15 16 @GetMapping("/messages") 17 fun getAllmessages(): List<Message> = 18 messageRepository.findAll() 19 20 21 @PostMapping("/messages") 22 fun createNewMessage(@Valid @RequestBody message: Message): Message = 23 messageRepository.save(message) 24 25 26 @GetMapping("/messages/{id}") 27 fun getMessageById(@PathVariable(value = "id") messageId: Long): ResponseEntity<Message> { 28 return messageRepository.findById(messageId).map { message -> 29 ResponseEntity.ok(message) 30 }.orElse(ResponseEntity.notFound().build()) 31 } 32 33 @PutMapping("/messages/{id}") 34 fun updateMessageById(@PathVariable(value = "id") messageId: Long, 35 @Valid @RequestBody newMessage: Message): ResponseEntity<Message> { 36 37 return messageRepository.findById(messageId).map { existingMessage -> 38 val updatedMessage: Message = existingMessage 39 .copy(title = newMessage.title, content = newMessage.content) 40 ResponseEntity.ok().body(messageRepository.save(updatedMessage)) 41 }.orElse(ResponseEntity.notFound().build()) 42 43 } 44 45 @DeleteMapping("/messages/{id}") 46 fun deleteMessageById(@PathVariable(value = "id") messageId: Long): ResponseEntity<Void> { 47 48 return messageRepository.findById(messageId).map { message -> 49 messageRepository.delete(message) 50 ResponseEntity<Void>(HttpStatus.OK) 51 }.orElse(ResponseEntity.notFound().build()) 52 } 53 }
Each method provides a different HTTP Endpoint (using the HTTP Operations GET, POST, PUT or DELETE based on the annotation). Inside the function, the logic for the operation is included: in our case, there is no complex logic, just a simple database operation using Spring. Check also the placeholder {id} in some of the methods - this must be specified in the query URL.
Lastly, we need to create a configuration file for Spring. In this file, we will write our information for accessing the database and some extra fields. Create a file called application.properties within your folder resources including this:
1// src/main/resources/application.properties 2 3 ## Spring DATASOURCE (DataSourceAutoConfiguration & DataSourceProperties) 4 spring.datasource.url = jdbc:mysql://localhost:3306/your-db?autoReconnect=true&useUnicode=true&characterEncoding=UTF-8&allowMultiQueries=true&useSSL=false 5 spring.datasource.username = root 6 spring.datasource.password = root 7 8 # The SQL dialect makes Hibernate generate better SQL for the chosen database 9 spring.jpa.properties.hibernate.dialect = org.hibernate.dialect.MySQL5InnoDBDialect 10 11 # Hibernate ddl auto (create, create-drop, validate, update) 12 spring.jpa.hibernate.ddl-auto = update
If you have installed one of the *AMP platforms, you generally have to start the database through their interface. In my case, I have installed MAMP. WAMP and LAMP have similar interfaces. Open the starting screen, and click on the button Start Servers.
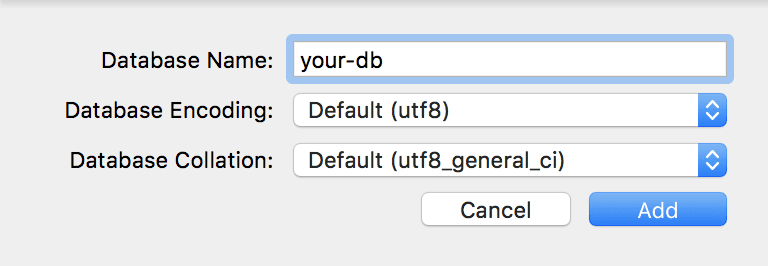
This will initialise the database. Make sure that the database name you have referred to in your application.properties file exists beforehand (in our example, the name is your-db). If you open SequelPro, you can create a new database by clicking on Database → Add Database. The default encoding and collation will suffice for our example.
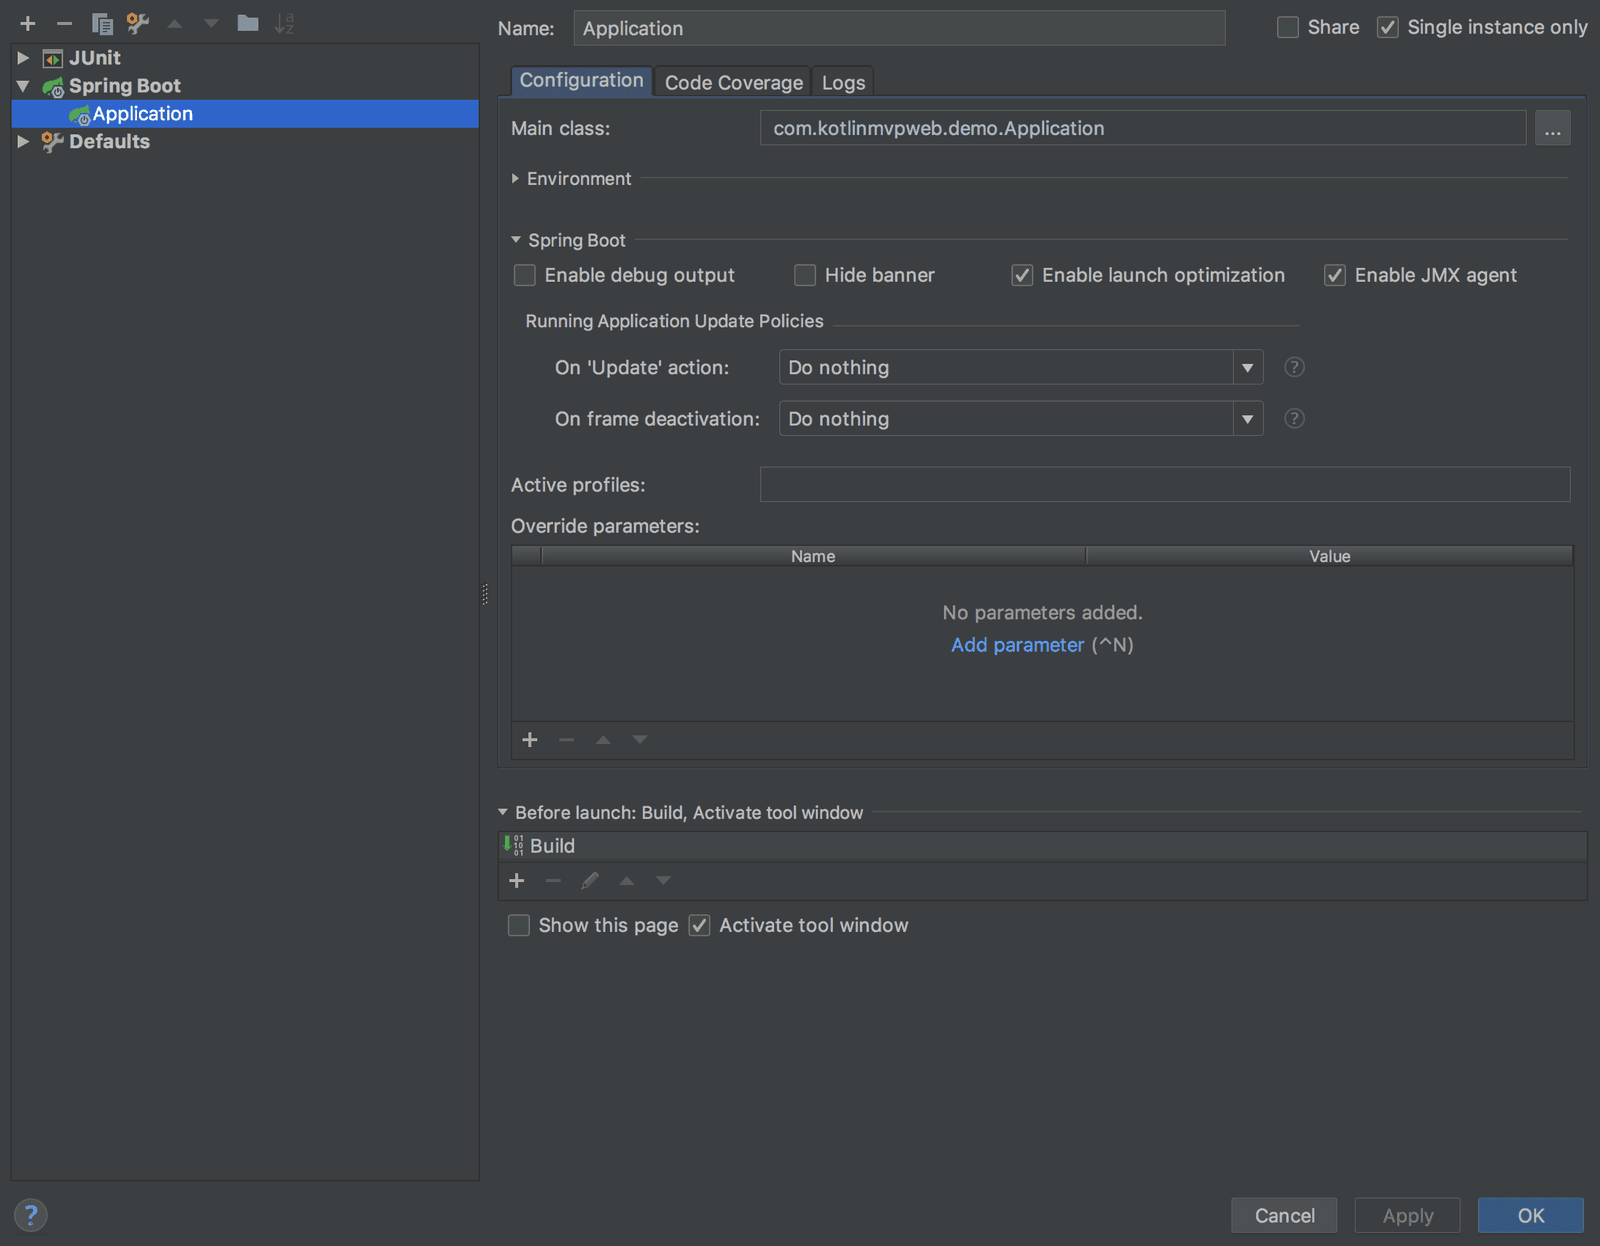
Now, it is time to run your example. IntelliJ generally creates a run configuration with default values that works out for most of the environments. If you click on Run → Run Application, there should be a default option. If there isn’t, click on Run → Edit Configurations. In the screen that pops up, click on + Spring Boot. This will create a default Spring Boot run configuration. You need to provide some values in this screen (mainly the name of your Application class). See in the following screen an example of configuration (the other options are advanced and not needed for this tutorial):
You are ready to go. When your configuration is set up, click on Run → Run Your-Configuration-Name and the application will start!
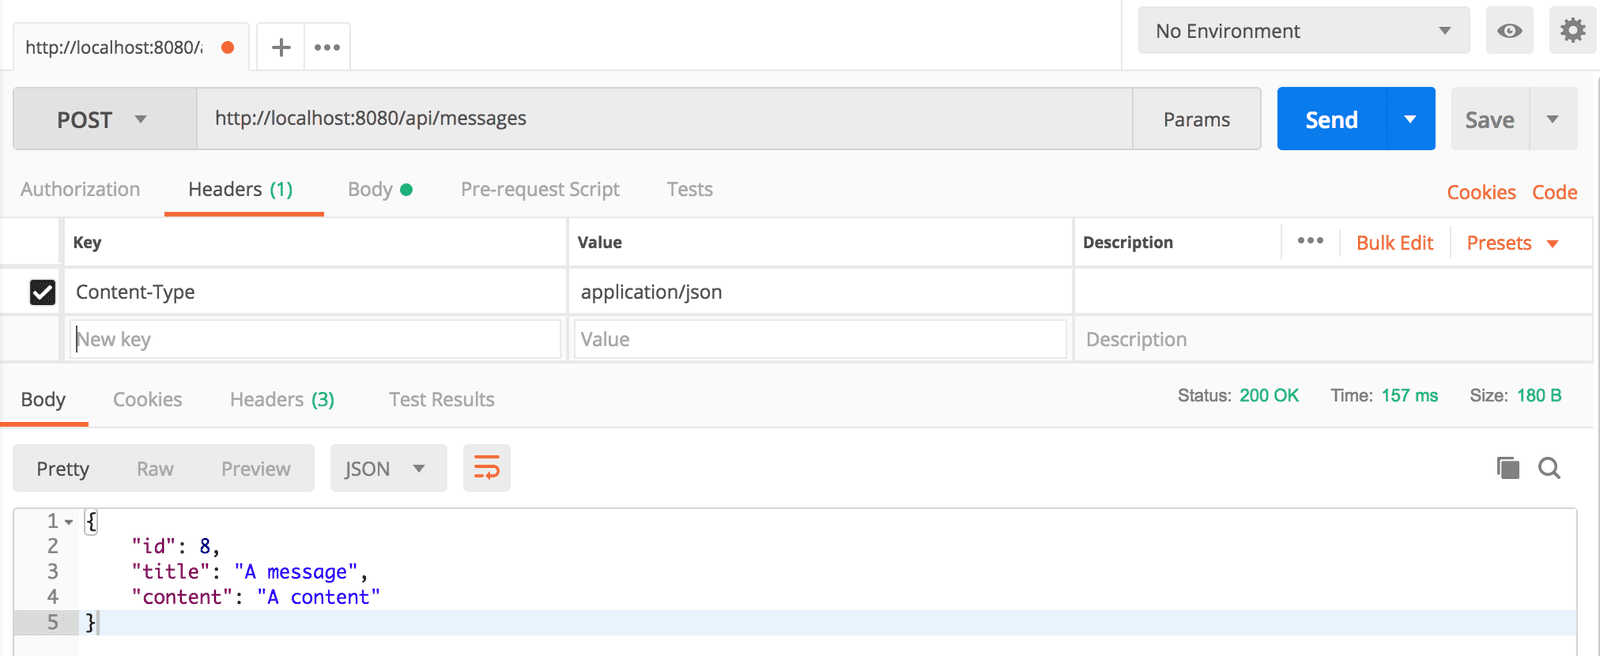
Let's see how this works. Open Postman, and execute a POST request against http://localhost:8080/api/messages sending the following JSON object in the body:
1{ 2 "id": 8, 3 "title": "A message", 4 "content": "A content" 5 }
If everything has worked out, the backend will return you the object that has been created.
As mentioned, you can perform all the HTTP Operations (PUT, DELETE, POST, GET)
Documentation
The language that is being used in Kotlin to document code is called KDoc. If you are familiar with JavaDoc, they both work pretty similarly. KDoc has been extended to support Kotlin particularities. There is an open source alternative I would like to mention here, and it is called Dokka. Dokka has some more functionality than KDoc itself, and you might want to check their GitHub repository. Coming back to Dokka, let's see how the syntax would work. Let's first write a documentation block for our class MessageController:
1/** 2 * This class is a controller that handles messages 3 * 4 * @property messageRepository the repository of messages 5 * @constructor Creates an empty controller. 6 */
So far, simple and it might remind the potential reader of JavaDoc. The properties are specified through a @property annotation. The behavior of the constructor through the annotation @constructor. Let's observe how this would work in the case of a function createNewMessage:
1/** 2 * Stores a message in our backend 3 * @return the inserted message in case it was successful 4 */
Again, and similarly to JavaDoc, we do include a short description of the function behavior and functionality. We use the annotation @return to describe what the function will return.
Logging your code
Logging is an overdiscussed topic in terms of usefulness and practicality. There are fierce discussions whether one library is better than another one, or whether a pattern is more suitable than a previously used. Same discussions happen all the time with code styling. I like to present here a TL;DR: do not lose too much time on those arguments, and use the library or mechanism that best suits your needs. Most of the logging frameworks have a very similar functionality. For our purpose, we will use kotlin-logging, but any other framework can serve you if you feel like it.
In order to add kotlin.logging to your project, make sure you add the following lines to your build.gradle file:
compile 'io.github.microutils:kotlin-logging:1.5.4'
Now you are ready to go.
Testing your code
Testing is a crucial part of any software system. It allows us to create iterative improvements and add new features while keeping safe the already constructed code. JetBrains provides the library kotlin.test, which provides annotations and a set of utility functions for your tests. This library includes a set of modules. One of the most interesting is kotlin-test-junit5. This module provides an implementation of Asserter on top of JUnit 5.
In order to start developing your own tests, you need to import the library kotlin.test in your project. Make sure the following lines have been included in your Gradle file.
testCompile "org.jetbrains.kotlin:kotlin-test-junit"
After synchronizing your Gradle file, you should be able to access the classes included within this library. Now, next to your main folder, create the following path: test/kotlin/com/kotlinmvpweb/demo. This folder will be the responsible to host your tests. Now create inside a Kotlin file that can be named HelloWorldTest.kt. Within the folder, write the following content:
1// src/test/kotlin/com/kotlinmvpweb/demo/ExampleTests.kt 2 3 import mu.KotlinLogging 4 import org.junit.After 5 import org.junit.Assert 6 import org.junit.Before 7 import org.junit.Test 8 import kotlin.test.assertTrue 9 10 class ExampleTests { 11 12 private val logger = KotlinLogging.logger {} 13 14 @Before 15 fun prepareYourTest() { 16 logger.debug { "We are preparing our test" } 17 } 18 19 @Test 20 fun exampleTestInline() { 21 logger.debug { "We are executing our test" } 22 assertTrue { 23 logger.debug { "Here an assertion will take place" } 24 true 25 } 26 } 27 28 @Test 29 fun testOk() { 30 Assert.assertEquals("A string", "A different string" ) 31 } 32 33 @After 34 fun after() { 35 logger.debug { "We finished executing our test" } 36 } 37 }
The code is easy to read. You see that we have two functions annotated with @Before and @After. Those functions will be executed before and after the actual tests are executed, in case you need to set up or tear down any of your variables. This was actually the syntax in Junit 3.x, fortunately, the world always gravitates towards a better place. The functions executing a test are annotated with @Test. One of them includes an inline assertion, whereas the other one includes an assert function from the JUnit suite. Tests can get more complex as your software grows but is not the nature of this tutorial to provide a deep inside. We can refer you to a nice article written by Philipp Hauer where he explores it more intensively.
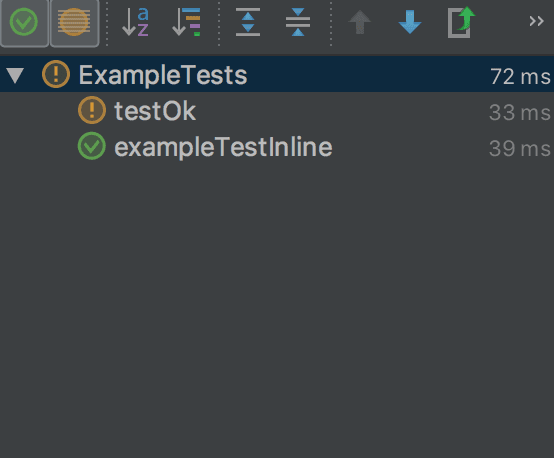
If you want to run the tests, you just need to right click on the test file, and select Run filename.kt The tests will execute, and a panel will be displayed at the bottom showing the result. You can change the test output, to see how some of them might fail and how some of them might pass.
Conclusion
After reading this article, a reader should have ended up with a functioning MVP. This MVP provides a backend, CRUD operations to the database and its correspondent endpoints. This is just the beginning of the journey. Software gets unapologetically complex over time. But it is paramount to start with a stable and fresh basis in order to provide sustainable growth. The repository can be accessed here.
After this introduction, a reader might want to take a look at the following topics:
- Dependency injection
- Further architecturing the app
- Advanced testing
- Database migrations
I would like to thank my colleagues and friend Inaki Villar and Marius Budin for their friendly and helpful review.


© 2024 Pusher Ltd. All rights reserved.
Pusher Limited is a company registered in England and Wales (No. 07489873) whose registered office is at MessageBird UK Limited, 3 More London Riverside, 4th Floor, London, United Kingdom, SE1 2AQ.