- Products

- Developers
- User stories
- Blog
- Pricing

Publish notifications from a news CMS to an iOS app with Pusher Beams
- Introduction
- Prerequisites
- Creating our Pusher application
- Configure APNs
- Creating your Pusher application
- Building our backend using Laravel
- Building our iOS application using Swift
- Adding push notifications to our iOS new application
- Deeplinking our iOS push notifications
- Allowing our application to connect locally
- Conclusion
Introduction
A recent piece about the New York Times tech team How to Push a Story chronicled the lengths they go to make sure that the push notifications they send are relevant, timely, and interesting.
The publishing platform at the NYT lets editors put notifications through an approval process, measures the tolerance for the frequency of notifications, and tracks whether users unsubscribe from them.
In this article, we will build a simple news publishing CMS and iOS mobile application that has the ability to send the latest news as a push notification. We will also show how you can use interests to segment users who receive push notifications based on specific news categories like “Business” or “Sports”.
When we are done, we will have our application function like this:
Prerequisites
- A Mac with Xcode installed. Download Xcode here.
- Knowledge of using Xcode.
- Knowledge of Swift.
- Create a free sandbox Pusher account or sign in.
- Knowledge of Laravel/PHP.
- Laravel CLI installed on your machine.
- SQLite installed on your machine. Here’s an installation guide.
- CocoaPods installed on your machine.
Once you have the requirements, let’s start.
Creating our Pusher application
IMPORTANT: You need to be enrolled to the Apple Developer program to be able to use the push notifications feature. Also push notifications do not work on simulators so you will need an actual iOS device to test.
Pusher Beams has first-class support for native iOS applications. Your iOS app instances subscribe to Interests; then your servers send push notifications to those interests. Every app instance subscribed to that interest will receive the notification, even if the app is not open on the device at the time.
This section describes how you can set up an iOS app to receive transactional push notifications about news updates through Pusher.
Configure APNs
Pusher relies on the Apple Push Notification service (APNs) to deliver push notifications to iOS application users on your behalf. When we deliver push notifications, we use your key that has APNs service enabled. This page guides you through the process of getting the key and how to provide it to Pusher.
Head over to the Apple Developer dashboard and then create a new key as seen below:
When you have created the key, download it. Keep it safe as we will need it in the next section.
IMPORTANT: You have to keep the generated key safe as you cannot get it back if you lose it.
Creating your Pusher application
Create a new Pusher Beams application from the Pusher dashboard.
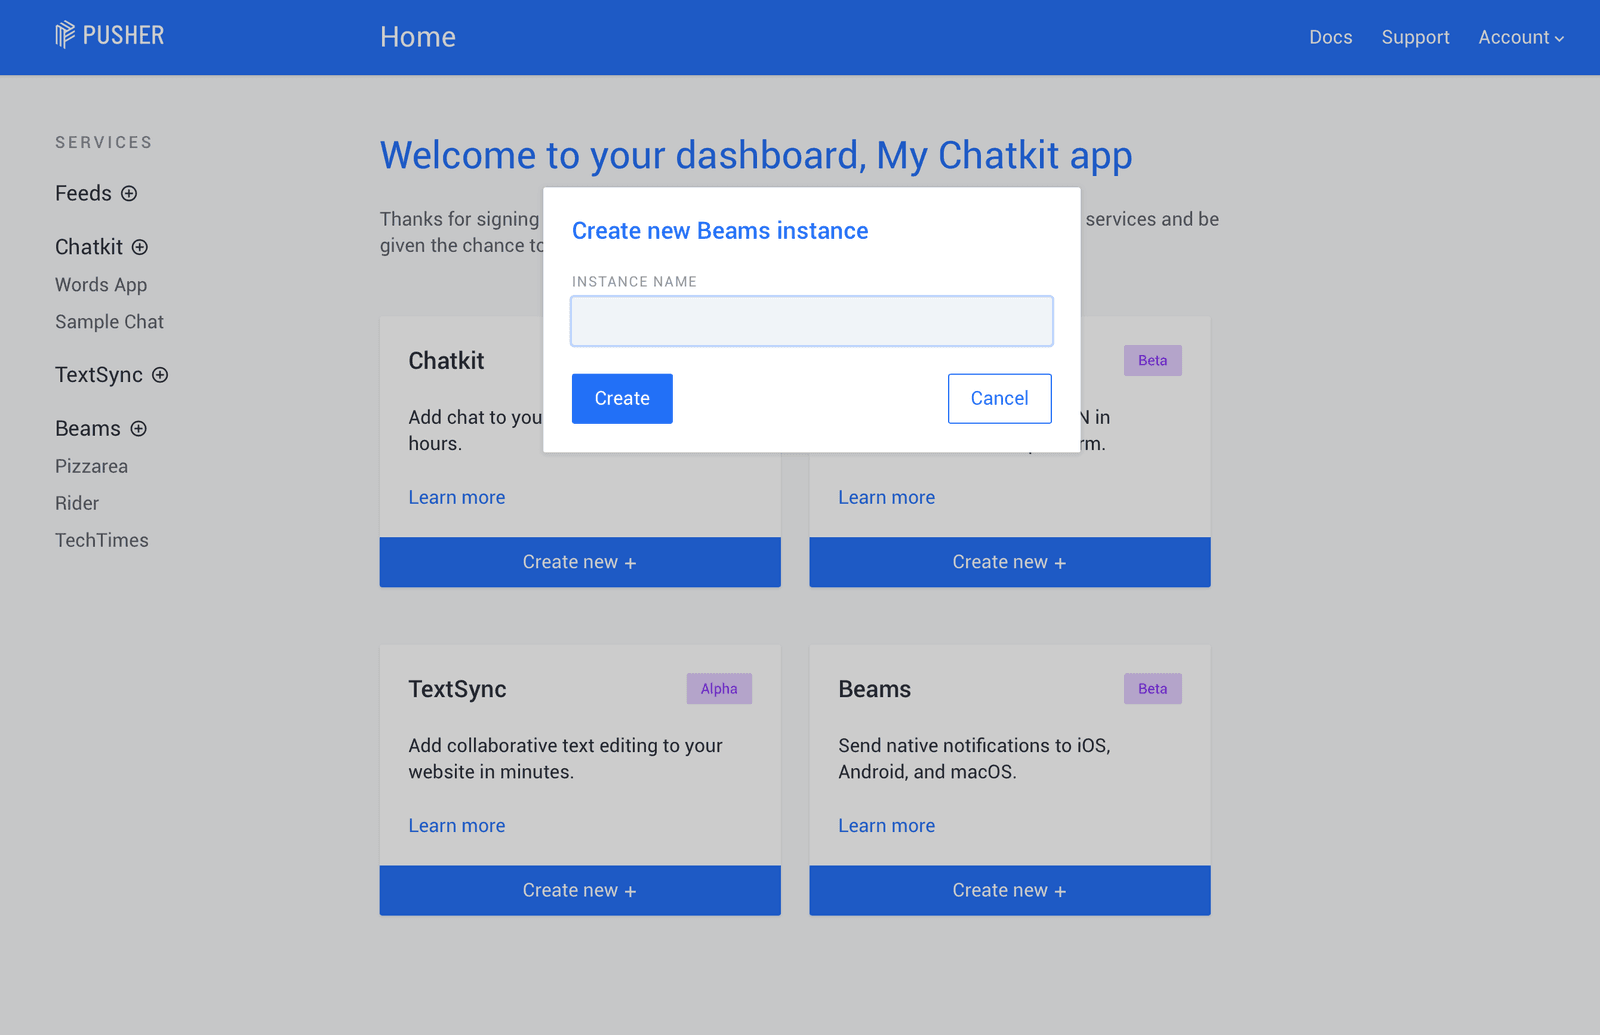
When you have created the application, you should be presented with a quickstart that will help you set up the application.
To configure your Beams instance you will need to get the key with APNs service enabled from Apple. This is the same key as the one we downloaded in the previous section. Once you’ve got the key, upload it.
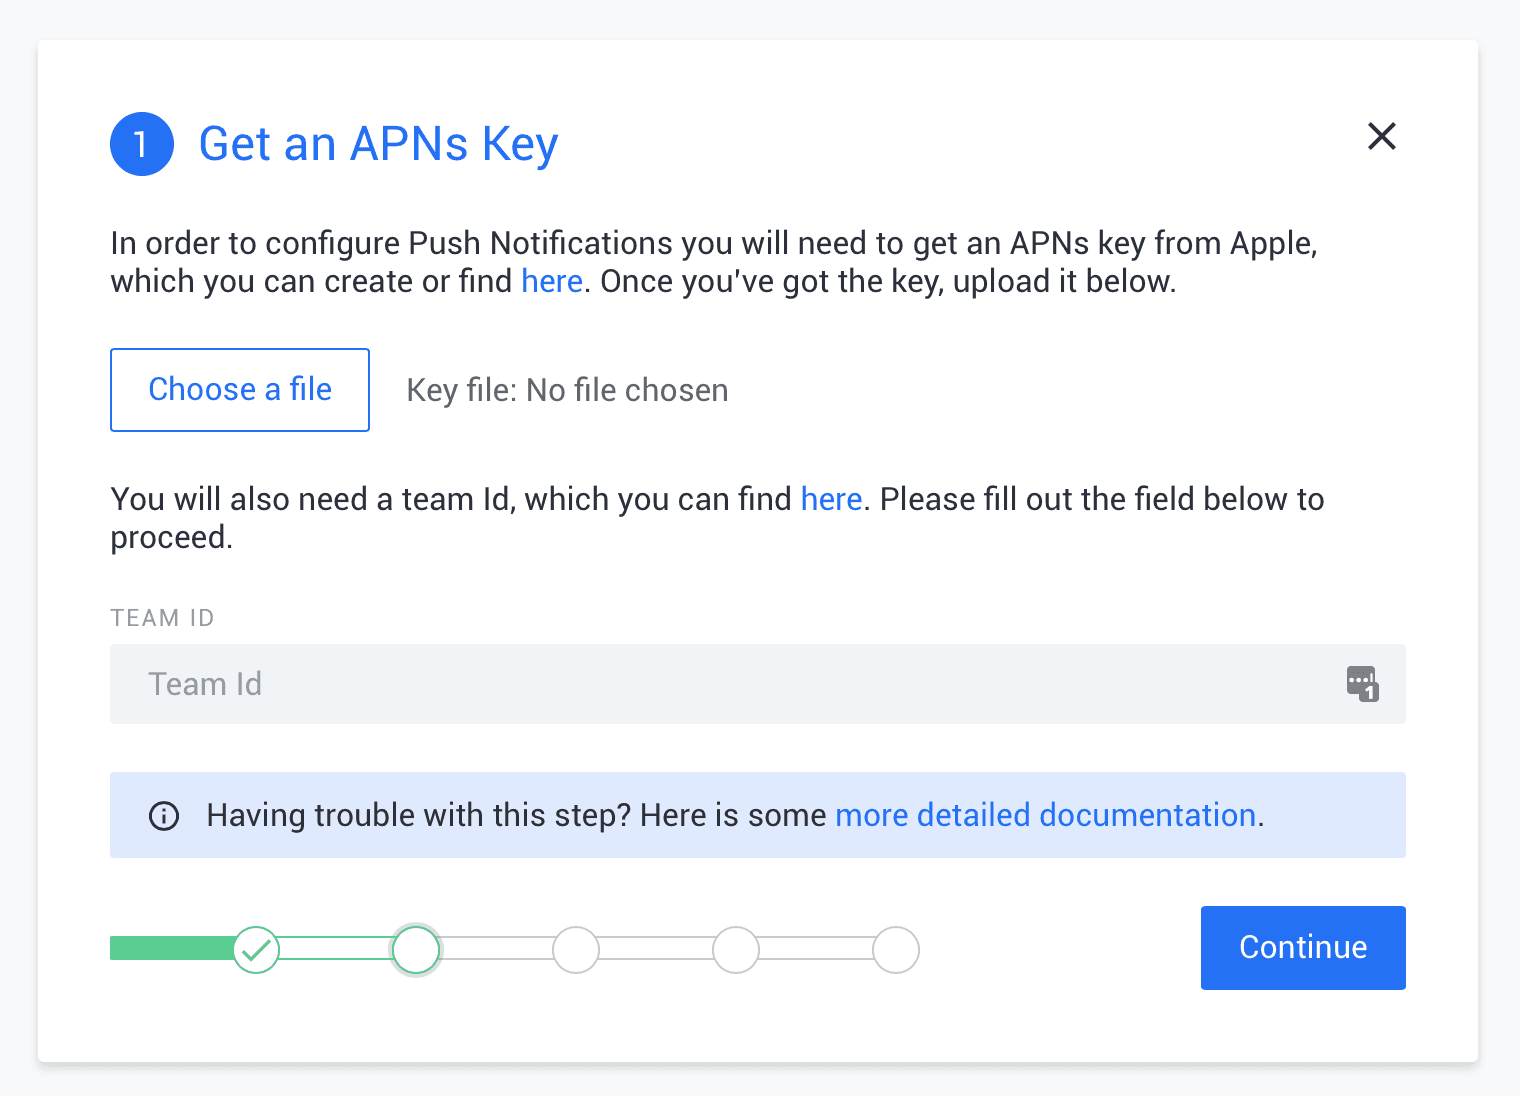
Enter your Apple Team ID. You can get the Team ID from here. You can then continue with the setup wizard and copy the instance ID and secret key for your Pusher application.
Building our backend using Laravel
The first thing we need to do, is build the backend application. Start a new Laravel project by running the command below in your terminal:
$ laravel new project-name
When the process is complete, open your project in a code editor of your choice. Next, let’s start building out our project.
Open the .env file and in the file add the following to the bottom:
1PUSHER_PN_INSTANCE_ID=ENTER_INSTANCE_ID 2 PUSHER_PN_SECRET_KEY=ENTER_SECRET_KEY
in the same file, replace the following lines:
1DB_CONNECTION=mysql 2 DB_DATABASE=homestead 3 DB_USERNAME=username 4 DB_PASSWORD=password
With
1DB_CONNECTION=sqlite 2 DB_DATABASE=/full/path/to/database.sqlite
Then create a new empty file database.sqlite in the database directory.
Next, let’s install the Pusher Beams SDK for PHP to our application. Run the command below to install using composer:
$ composer install pusher/pusher-push-notifications
When installation is completed, let’s create our model and migration files. Run the command below to generate our model and migrations for our stories and story_categories table:
1$ php artisan make:model StoryCategory -m 2 $ php artisan make:model Story -m
💡 Adding the
-mflag will make artisan generate a corresponding migration file for the Model. Also, the order the command is run is important because thestoriestable will have a foreign key relationship with thestory_categoriestable so the latter needs to exist first.
Open the app/StoryCategory.php model and add the property below to the class:
protected $fillable = ['title', 'interest']
Next, open the corresponding migration file in database/migrations directory and replace the up method with the following:
1public function up() 2 { 3 Schema::create('story_categories', function (Blueprint $table) { 4 $table->increments('id'); 5 $table->string('title'); 6 $table->string('interest'); 7 $table->timestamps(); 8 }); 9 }
Open the app/Story.php model and replace the contents with the following:
1<?php 2 namespace App; 3 4 use Illuminate\Database\Eloquent\Model; 5 use Pusher\PushNotifications\PushNotifications; 6 7 class Story extends Model 8 { 9 protected $with = ['category']; 10 11 protected $fillable = [ 12 'category_id', 'title', 'notification', 'content', 'featured_image' 13 ]; 14 15 public function push(): array 16 { 17 if (!$this->exists or $this->notification == null) { 18 return []; 19 } 20 21 $pushNotifications = new PushNotifications([ 22 'instanceId' => env('PUSHER_PN_INSTANCE_ID'), 23 'secretKey' => env('PUSHER_PN_SECRET_KEY'), 24 ]); 25 26 $publishResponse = (array) $pushNotifications->publish( 27 [$this->category->interest], 28 [ 29 'apns' => [ 30 'aps' => [ 31 'alert' => [ 32 'title' => "📖 {$this->title}", 33 'body' => (string) $this->notification, 34 ], 35 'mutable-content' => 0, 36 'category' => 'pusher', 37 'sound' => 'default' 38 ], 39 'data' => array_only($this->toArray(), [ 40 'title', 'content' 41 ]), 42 ], 43 ] 44 ); 45 return $publishResponse; 46 } 47 48 public function category() 49 { 50 return $this->belongsTo(StoryCategory::class); 51 } 52 }
In the model above, we have a push method. This method is a shortcut that helps us send push notifications on the loaded story model. This way we can do something similar to:
App\Story::find(1)->push()
Open the corresponding migration file for the Story model in database/migrations and add replace the up method with the following code:
1public function up() 2 { 3 Schema::create('stories', function (Blueprint $table) { 4 $table->increments('id'); 5 $table->unsignedInteger('category_id'); 6 $table->foreign('category_id')->references('id')->on('story_categories'); 7 $table->string('title'); 8 $table->string('notification')->nullable(); 9 $table->text('content'); 10 $table->timestamps(); 11 }); 12 }
Now run the command below to process the migrations:
$ php artisan migrate
If you have setup the database properly, you should see a ‘migration successful’ response from the terminal.
Next, let’s create the routes our application will need. Open the routes/web.php file and replace the contents with the following code:
1<?php 2 use App\Story; 3 use Illuminate\Http\Request; 4 5 Route::view('/stories/create', 'story'); 6 7 Route::post('/stories/create', function (Request $request) { 8 $data = $request->validate([ 9 'title' => 'required|string', 10 'content' => 'required|string', 11 'notification' => 'nullable|string', 12 'category_id' => 'required|exists:story_categories,id', 13 ]); 14 15 $story = Story::create($data); 16 $story->push(); 17 18 return back()->withMessage('Post Added Successfully.'); 19 }); 20 21 Route::get('/stories/{id}', function (int $id) { 22 return Story::findOrFail($id); 23 }); 24 25 Route::get('/stories', function () { 26 return Story::orderBy('id', 'desc')->take(20)->get(); 27 });
Above, we have four routes:
GET /stories/createwhich just loads a viewstory.blade.php. This view will be used to display a form where we can enter new content.POST /stories/createwhich processes the form data from above, adds the content and sends a push notification if appropriate.GET /stories/{id}which loads a single story.GET /storieswhich loads the 20 of the most recent stories.
Next, let’s create the view file for the first route as that is the only missing piece. Create a story.blade.php file in the resources/views directory and paste the following HTML code:
1<!DOCTYPE html> 2 <html lang="en"> 3 <head> 4 <title>Create new post</title> 5 <meta charset="utf-8"> 6 <link rel="stylesheet" href="https://maxcdn.bootstrapcdn.com/bootstrap/4.0.0-alpha.6/css/bootstrap.min.css"> 7 <meta name="viewport" content="width=device-width, initial-scale=1"> 8 <style type="text/css"> 9 .invalid-feedback { width: 100%; margin-top: .25rem; font-size: 80%; color: #dc3545; } 10 </style> 11 </head> 12 <body style="margin-top: 120px;"> 13 <nav class="navbar navbar-inverse bg-inverse fixed-top"> 14 <a class="navbar-brand" href="#" style="font-weight: bold">TECHTIMES</a> 15 </nav> 16 <div class="container"> 17 @if (Session::has('message')) 18 <div class="alert alert-success" role="alert">{{ session('message') }}</div> 19 @endif 20 <div class="starter-template"> 21 <form action="/stories/create" method="POST"> 22 {{ csrf_field() }} 23 <div class="form-group"> 24 <label for="post-title">Post Title</label> 25 <input name="title" type="text" class="form-control" id="post-title" placeholder="Enter Post Title"> 26 @if ($errors->has('title')) 27 <div class="invalid-feedback">{{ $errors->first('title') }}</div> 28 @endif 29 </div> 30 <div class="form-group"> 31 <label for="post-category">Category</label> 32 <select name="category_id" id="post-category" class="form-control"> 33 <option value="">Select A Category</option> 34 @foreach (App\StoryCategory::all() as $category) 35 <option value="{{ $category->id}}">{{ $category->title }}</option> 36 @endforeach 37 </select> 38 @if ($errors->has('category_id')) 39 <div class="invalid-feedback">{{ $errors->first('category_id') }}</div> 40 @endif 41 </div> 42 <div class="form-group"> 43 <label for="post-content">Post Content</label> 44 <textarea name="content" id="post-content" cols="30" rows="10" placeholder="Enter your post content" class="form-control"></textarea> 45 @if ($errors->has('content')) 46 <div class="invalid-feedback">{{ $errors->first('content') }}</div> 47 @endif 48 </div> 49 <div class="form-group"> 50 <label for="post-notification">Push Notification</label> 51 <input name="notification" type="text" class="form-control" id="post-notification" placeholder="Enter Push Notification Message"> 52 @if ($errors->has('notiifcation')) 53 <div class="invalid-feedback">{{ $errors->first('notiifcation') }}</div> 54 @else 55 <small class="form-text text-muted">Leave this blank if you do not want to publish a push notification for this post.</small> 56 @endif 57 </div> 58 <button type="submit" class="btn btn-primary">Save Post</button> 59 </form> 60 </div> 61 </div> 62 </body> 63 </html>
The above is just a basic bootstrap powered view that allows the user to create content as seen in the screen recording at the beginning of the article.
That’s it. The backend application is complete. To start serving the application, run the following command:
$ php artisan serve
This will start a PHP server running on port 8000. You can access it by going to http://127.0.0.1:8000/stories.
Building our iOS application using Swift
Now that we have a backend server that can serve us all the information we want and also send push notifications, let us create our iOS application, which will be the client application.
Launch Xcode and create a new ‘Single Page Application’ project. We will be calling ours TechTimes. When the project is created, exit Xcode and cd to the root of the project using a terminal. In the root of the project create a Podfile and paste the following into the file:
1platform :ios, '11.0' 2 target 'techtimes' do 3 use_frameworks! 4 pod 'Alamofire', '~> 4.6.0' 5 pod 'PushNotifications', '~> 0.10.7' 6 end
Then run the command below to start installing the dependencies we defined above:
$ pod install
When the installation is complete, we will have a new .xcworkspace file in the root of the project. Double-click the workspace file to relaunch Xcode.
Next let’s create our storyboard. Open your Main.storyboard file. We want to design it to look similar to this:
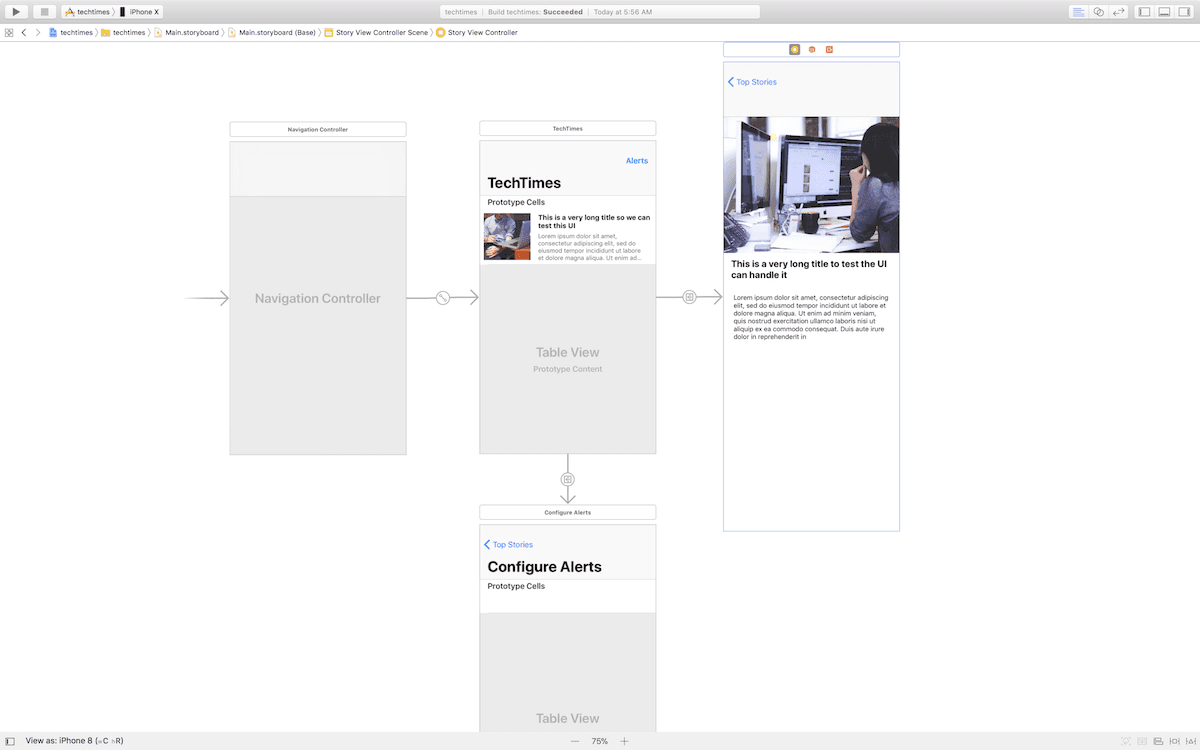
The initial view controller is a UINavigationController, which is connected to a UITableViewController. The Table View Controller has custom cells that have the class StoryTableViewCell, which we will use to display the data in our cell. The cells have a reuse identifier: Story.
The second scene has a custom class of StoriesTableViewController. We have designed the scene to have a button on the top right which is connected to the Controller via an @IBAction. When the button is clicked we want to display the bottom View Controller.
The third scene has a custom class of StoryViewController and it has a UIScrollView where we have an image, post title and post content. We have created an @IBOutlet for both the title and the content text to the custom class Controller so we can override the contents.
We give each controller a unique storyboard identifier which is the custom class name so we can navigate to them using their storyboard ID.
When you are done creating the storyboard, let’s create the custom classes for each story board scene.
Create a new class StoriesTableViewController.swift and paste the following code into it:
1import UIKit
2 import Alamofire
3
4 class StoriesTableViewController: UITableViewController {
5 var stories: [Stories.Story] = []
6
7 override func viewDidLoad() {
8 super.viewDidLoad()
9
10 self.tableView.rowHeight = UITableViewAutomaticDimension
11 self.tableView.estimatedRowHeight = 140
12
13 self.fetchStories { response in
14 guard let response = response else { return }
15 self.stories = response.stories
16 self.tableView.reloadData()
17 }
18 }
19
20 private func fetchStories(completion: @escaping(Stories.Response?) -> Void) {
21 let request = Stories.Request()
22 Alamofire.request(request.URL).validate().responseJSON { response in
23 guard response.result.isSuccess,
24 let stories = response.result.value as? [[String:AnyObject]] else {
25 self.noStoriesAlert()
26 return completion(nil)
27 }
28
29 completion(Stories.Response(stories: stories))
30 }
31 }
32
33 private func noStoriesAlert() {
34 let alert = UIAlertController(
35 title: "Error Fetching News",
36 message: "An error occurred while fetching the latest news.",
37 preferredStyle: .alert
38 )
39
40 alert.addAction(UIAlertAction(title: "Okay", style: .default, handler: nil))
41 self.present(alert, animated: true, completion: nil)
42 }
43 }
In viewDidLoad above, we call the fetchStories method, which fetches the stories from the remote application. When the fetch is complete, we then set the stories property and reload the table view.
In the same file let’s create an extension to the controller. In this extension, we will override our Table View Controller delegate methods:
1extension StoriesTableViewController {
2 override func numberOfSections(in tableView: UITableView) -> Int {
3 return 1
4 }
5
6 override func tableView(_ tableView: UITableView, numberOfRowsInSection section: Int) -> Int {
7 return stories.count
8 }
9
10 override func tableView(_ tableView: UITableView, cellForRowAt indexPath: IndexPath) -> UITableViewCell {
11 let cell = tableView.dequeueReusableCell(withIdentifier: "Story", for: indexPath) as! StoryTableViewCell
12 let story = stories[indexPath.row]
13 let randomNum = arc4random_uniform(6) + 1
14
15 cell.imageView?.image = UIImage(named: "image-\(randomNum)")
16 cell.storyTitle?.text = story.title
17 cell.storyContent?.text = story.content
18
19 return cell
20 }
21
22 override func tableView(_ tableView: UITableView, didSelectRowAt indexPath: IndexPath) {
23 let storyboard = UIStoryboard(name: "Main", bundle: nil)
24 let vc = storyboard.instantiateViewController(withIdentifier: "StoryViewController") as! StoryViewController
25 vc.story = stories[indexPath.row]
26 self.navigationController?.pushViewController(vc, animated: true)
27 }
28 }
In the tableView(_:cellForRowAt:) method, we define the title and content for our cell. For our image, we are using random images we stored manually in our Asset.xcassets collection. In a real application you would probably want to load the UIImage from the URL returned by the API.
In the tableView(_:didSelectRowAt:) method, we instantiate the *StoryViewController*, set the story property of the controller and then navigate to the controller.
Let’s define the code to the StoryTableViewCell. Create a new file called StoryTableViewCell.swift and paste in the following:
1import UIKit 2 3 class StoryTableViewCell: UITableViewCell { 4 @IBOutlet weak var storyTitle: UILabel! 5 @IBOutlet weak var storyContent: UILabel! 6 @IBOutlet weak var featuredImageView: UIImageView! 7 8 override func awakeFromNib() { 9 super.awakeFromNib() 10 } 11 }
PRO TIP: Make sure this is set as the custom class for our
StoryTableViewController's cells.
Next, let’s create the Stories struct we references in the stories property of out StoryTableViewController class. Create a Stories.swift file and paste in the following:
1import UIKit
2
3 struct Stories {
4 struct Request {
5 let URL = "http://127.0.0.1:8000/stories"
6 }
7
8 struct Response {
9 var stories: [Story]
10
11 init(stories: [[String:AnyObject]]) {
12 self.stories = []
13
14 for story in stories {
15 self.stories.append(Story(story: story))
16 }
17 }
18 }
19
20 struct Story {
21 let title: String
22 let content: String
23 let featuredImage: UIImage?
24
25 init(story: [String:AnyObject]) {
26 self.title = story["title"] as! String
27 self.content = story["content"] as! String
28 self.featuredImage = nil
29 }
30 }
31 }
In the Stories struct we have the Request struct which contains the URL of the API. We also have the Response struct and in there, in the init method we pass the data from the API which will then create a Stories.Story instance.
The Stories.Story struct has an init function that takes a dictionary and assigns it to the properties on the struct. With this we can easily map all the results from the API to the Stories.Story struct. This helps keep things structured and clean.
Next, let’s create the StoryViewController class that will be the custom class for our third scene in the storyboard. Create a new StoryViewController.swift file and paste in the following:
1import UIKit
2
3 class StoryViewController: UIViewController {
4
5 var story: Stories.Story?
6
7 @IBOutlet weak var storyTitle: UILabel!
8 @IBOutlet weak var storyContent: UITextView!
9
10 override func viewDidLoad() {
11 super.viewDidLoad()
12 storyTitle.text = story?.title
13 storyContent.text = story?.content
14 }
15 }
In the viewDidLoad method, we are simply setting the values for our @IBOutlets using the story property. This property is set in the tableView(_:didSelectRowAt:) method in the StoriesTableViewController class.
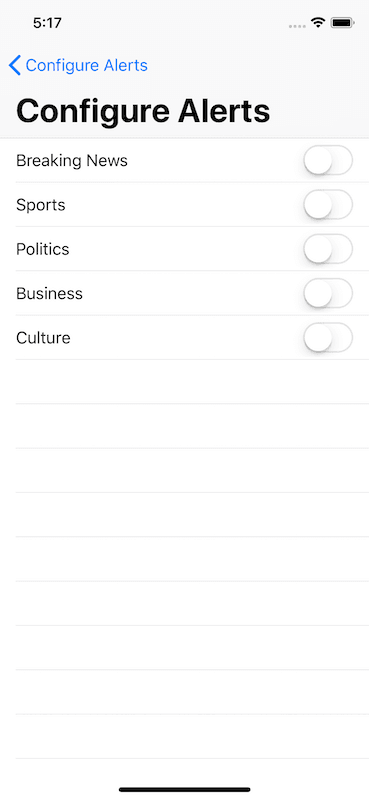
The next class we have to create is the AlertViewController. This will be the custom class to our last scene. This is where the user can subscribe (or unsubscribe) to an interest. When users subscribe to an interest, they start receiving push notifications when new stories are added to that category.
Create a new class AlertViewController and paste in the following code:
1import UIKit
2
3 class AlertsTableViewController: UITableViewController {
4
5 var categories: [[String: Any]] = []
6
7 override func viewDidLoad() {
8 super.viewDidLoad()
9 self.getCategories()
10 self.tableView.reloadData()
11
12 navigationItem.title = "Configure Alerts"
13 }
14
15 private func getCategories() {
16 guard let categories = UserDefaults.standard.array(forKey: "categories") as? [[String: Any]] else {
17 self.categories = [
18 ["name": "Breaking News", "interest": "breaking_news", "subscribed": false],
19 ["name": "Sports", "interest": "sports", "subscribed": false],
20 ["name": "Politics", "interest": "politics", "subscribed": false],
21 ["name": "Business", "interest": "business", "subscribed": false],
22 ["name": "Culture", "interest": "culture", "subscribed": false],
23 ]
24
25 return self.saveCategories()
26 }
27
28 self.categories = categories
29 }
30
31 private func saveCategories() {
32 UserDefaults.standard.set(self.categories, forKey: "categories")
33 }
34
35 @objc func switchChanged(_ sender: UISwitch) {
36 categories[sender.tag]["subscribed"] = sender.isOn
37 self.saveCategories()
38 }
39 }
In the viewDidLoad we call the *getCategories* method. In the *getCategories* method, we load the categories from UserDefaults. If it does not exist, we create the default categories and save them to UserDefaults. We need to maintain state on the user defaults so we know when the user subscribes and unsubscribes. When the application is restarted, the settings will still be saved.
In the saveCategories method, we just use UserDefaults to save the changes to the categories property. The switchChanged is a listener for when the switch on one of the categories is changed.
Next, in the same file, add the following extension which will conform to the UITableViewController:
1extension AlertTableViewController {
2 override func numberOfSections(in tableView: UITableView) -> Int {
3 return 1
4 }
5
6 override func tableView(_ tableView: UITableView, numberOfRowsInSection section: Int) -> Int {
7 return categories.count
8 }
9
10 override func tableView(_ tableView: UITableView, cellForRowAt indexPath: IndexPath) -> UITableViewCell {
11 let cell = tableView.dequeueReusableCell(withIdentifier: "Alert", for: indexPath)
12
13 let category = categories[indexPath.row]
14
15 let switchView = UISwitch(frame: .zero)
16 switchView.tag = indexPath.row
17 switchView.setOn(category["subscribed"] as! Bool, animated: true)
18 switchView.addTarget(self, action: #selector(switchChanged(_:)), for: .valueChanged)
19
20 cell.accessoryView = switchView
21 cell.textLabel?.text = category["name"] as? String
22
23 return cell
24 }
25 }
In the tableView(_:cellForRowAt:) method, we configure our cell and then create a UISwitch view and set that as the accessory view. We also use the tag property of the switchView to save the indexPath.row. This is so we can then tell which category’s notification switch was toggled. We then set the switchChanged method as the listener for when the switch is toggled.
The next thing we need to do is set up our application to receive and act on push notifications.
Adding push notifications to our iOS new application
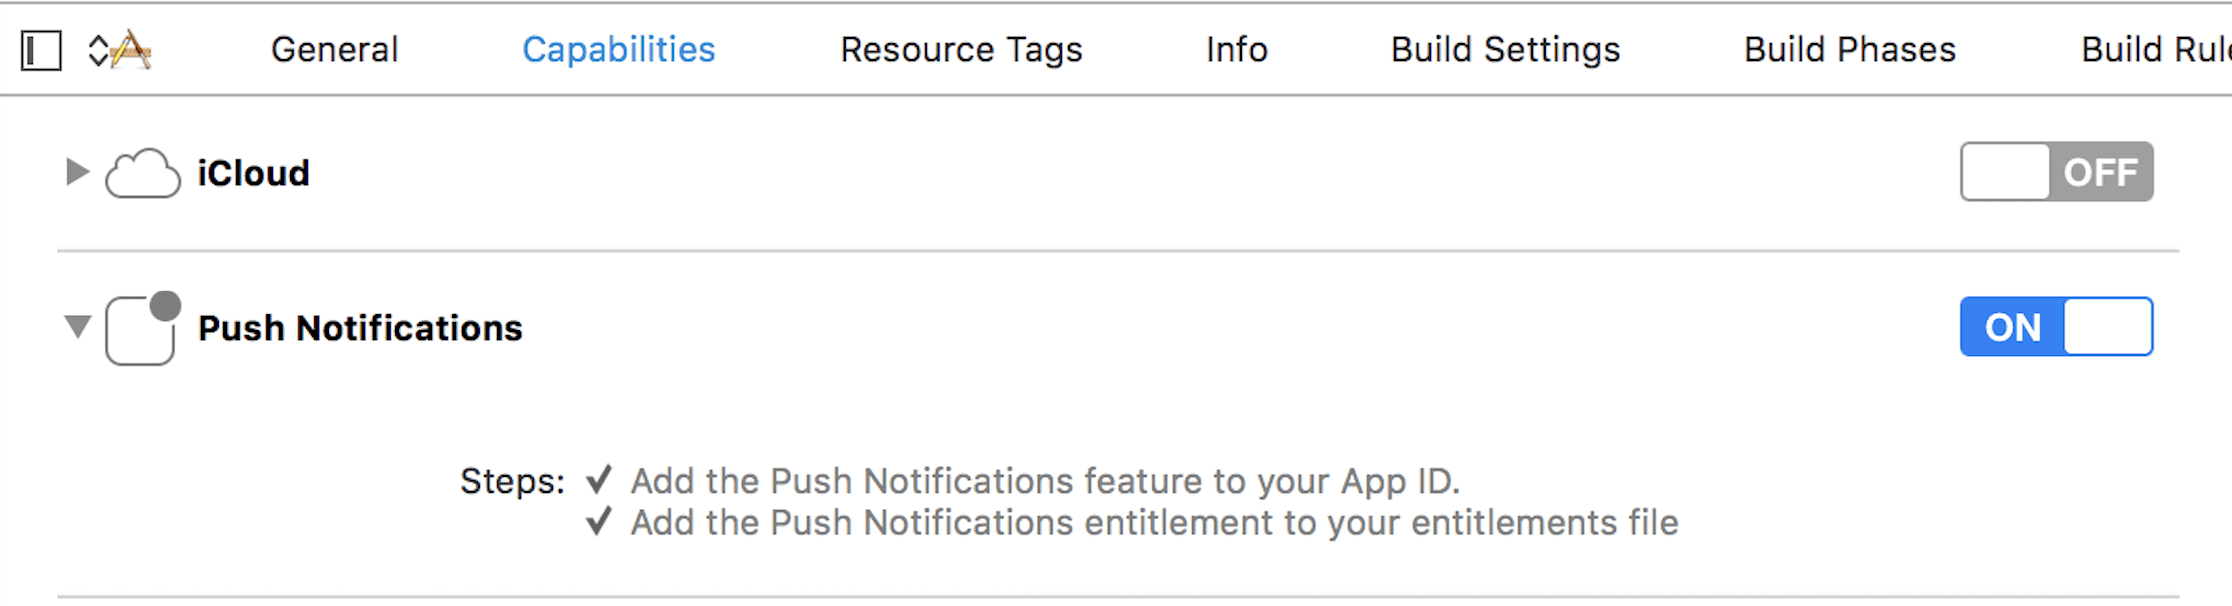
Now that we have the application working, let’s integrate push notifications to the application. The first thing we need to do is turn on push notifications from the capabilities list on Xcode.
In the project navigator, select your project, and click on the Capabilities tab. Enable Push Notifications by turning the switch ON.
Next open your AlertsTableViewController class and in there import the PushNotifications library:
import PushNotifications
In the same file, replace the switchChanged(_:) method with the following code:
1@objc func switchChanged(_ sender: UISwitch) {
2 categories[sender.tag]["subscribed"] = sender.isOn
3
4 let pushNotifications = PushNotifications.shared
5 let interest = categories[sender.tag]["interest"] as! String
6
7 if sender.isOn {
8 try? pushNotifications.subscribe(interest: interest) {
9 self.saveCategories()
10 }
11 } else {
12 try? pushNotifications.unsubscribe(interest: interest) {
13 self.saveCategories()
14 }
15 }
16 }
In the code above, when the switch is turned on or off, the user subscription to the interest gets turned on or off also.
Next open the AppDelegate class and import the packages below:
1import PushNotifications 2 import UserNotifications
Then in the same file add the following lines of code:
1let pushNotifications = PushNotifications.shared
2
3 func application(_ application: UIApplication, didFinishLaunchingWithOptions launchOptions: [UIApplicationLaunchOptionsKey: Any]?) -> Bool {
4 self.pushNotifications.start(instanceId: "PUSHER_NOTIFICATION_INSTANCE_ID")
5 self.pushNotifications.registerForRemoteNotifications()
6
7 let center = UNUserNotificationCenter.current()
8 center.delegate = self
9
10 return true
11 }
12
13 func application(_ application: UIApplication, didRegisterForRemoteNotificationsWithDeviceToken deviceToken: Data) {
14 self.pushNotifications.registerDeviceToken(deviceToken)
15 }
IMPORTANT Replace
PUSHER_NOTIFICATION_INSTANCE_IDwith the keys from your Pusher dashboard.
If you have done everything correctly, your applications should now be able to receive push notifications any time the client is subscribed to the news category and there is a new post.
However, right now, when the push notification is clicked, the application will be launched and it’ll just list the articles and not link to the specific articles. Let’s fix that by deeplinking to the specific article when the push notification is opened.
Deeplinking our iOS push notifications
When users click on our push notification, we want to direct the user to the story in the application and not just launch the app. Let’s add this feature. For this we will be implementing tips from the excellent article on how to open deep links, notifications, and shortcuts.
Create a new file in Xcode called Deeplink.swift and paste the following code into the file:
1import UIKit
2
3 enum DeeplinkType {
4 case story(story: Stories.Story)
5 }
6
7 let Deeplinker = DeepLinkManager()
8 class DeepLinkManager {
9 fileprivate init() {}
10
11 private var deeplinkType: DeeplinkType?
12
13 func checkDeepLink() {
14 guard let deeplinkType = self.deeplinkType else {
15 return
16 }
17
18 DeeplinkNavigator.shared.proceedToDeeplink(deeplinkType)
19
20 self.deeplinkType = nil
21 }
22
23 func handleRemoteNotification(_ notification: [AnyHashable: Any]) {
24 if let data = notification["data"] as? [String: AnyObject] {
25 let story = Stories.Story(story: data)
26 self.deeplinkType = DeeplinkType.story(story: story)
27 } else {
28 self.deeplinkType = nil
29 }
30 }
31 }
In our DeeplinkManager we have two methods. The first, checkDeeplink checks the deep link and gets the deeplinkType and then it calls DeeplinkNavigator.shared.proceedToDeeplink which then navigates the user to the deep link. We will create this method later.
The next method is the handleRemoteNotification method. This simply sets the deeplinkType on the DeeplinkManager class based on the notification received.
In the same file, add the following code to the bottom:
1class DeeplinkNavigator {
2 static let shared = DeeplinkNavigator()
3
4 private init() {}
5
6 func proceedToDeeplink(_ type: DeeplinkType) {
7 switch type {
8 case .story(story: let story):
9 if let rootVc = UIApplication.shared.keyWindow?.rootViewController as? UINavigationController {
10 let storyboard = UIStoryboard(name: "Main", bundle: nil)
11 if let vc = storyboard.instantiateViewController(withIdentifier: "StoryViewController") as? StoryViewController {
12 vc.story = story
13 rootVc.show(vc, sender: rootVc)
14 }
15 }
16 }
17 }
18 }
This is the code to the DeeplinkNavigator we referenced in the checkDeeplink method earlier. In this class we have one method proceedToDeeplink and this method navigates the user to a controller depending on the deeplinkType. In our case, it will navigate to the story.
Next, open the AppDelegate and add the following methods to the class:
1func applicationDidBecomeActive(_ application: UIApplication) {
2 Deeplinker.checkDeepLink()
3 }
4
5 func userNotificationCenter(_ center: UNUserNotificationCenter, willPresent notification: UNNotification, withCompletionHandler completionHandler: @escaping (_ options: UNNotificationPresentationOptions) -> Void) {
6 Deeplinker.handleRemoteNotification(notification.request.content.userInfo)
7 completionHandler([.alert, .sound])
8 }
9
10 func userNotificationCenter(_ center: UNUserNotificationCenter, didReceive response: UNNotificationResponse, withCompletionHandler completionHandler: @escaping () -> Void) {
11 let notification = response.notification.request.content.userInfo
12 Deeplinker.handleRemoteNotification(notification)
13 completionHandler()
14 }
In the applicationDidBecomeActive(:) method we call our Deeplinker.checkDeepLink() method. This checks for a deeplink when the application becomes active.
The other two methods are basically listeners that get fired when there is a new push notification. In these methods, we call the handleRemoteNotification method so the push notification can be handled.
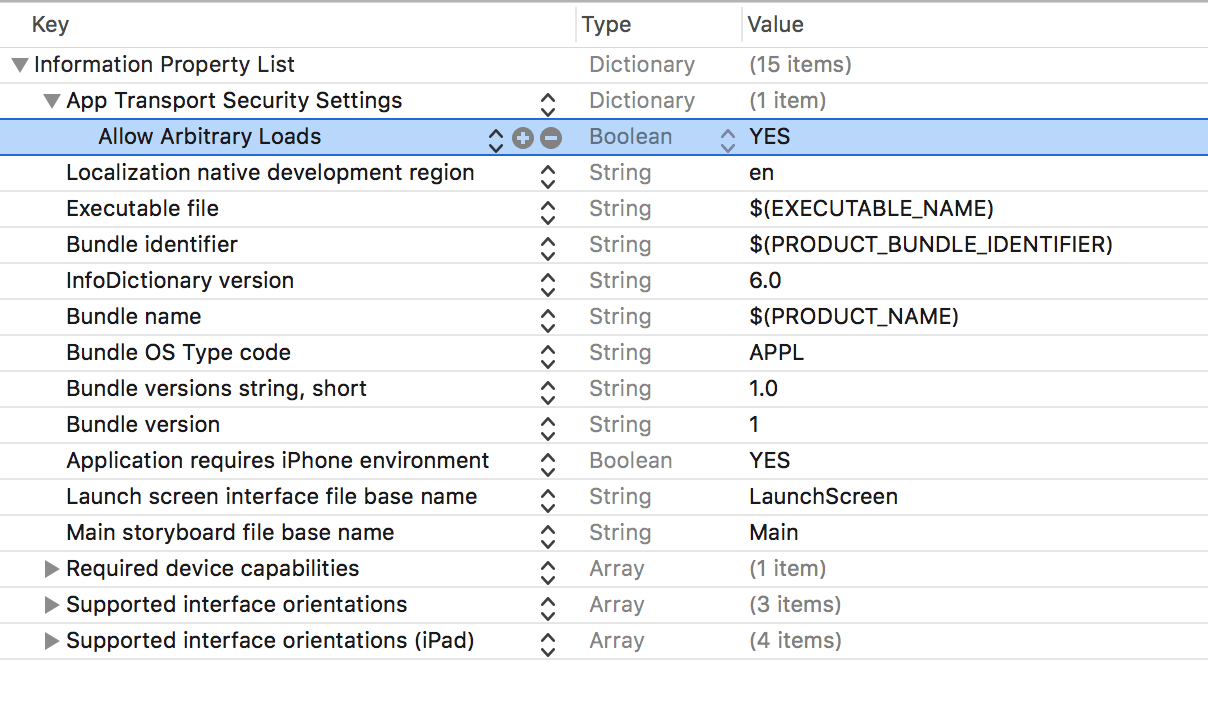
Allowing our application to connect locally
If you are going to be testing the app’s backend using a local server, then there is one last thing we need to do. Open the info.plist file and add an entry to the plist file to allow connection to our local server:
That’s it now. We can run our application. However, remember that to demo the push notifications, you will need an actual iOS device.
Here is the application one more time:
Conclusion
In this article, we have shown how you can use the power of interests to segment the push notifications that gets sent to your users. Hopefully, you have learnt a thing or two and you can come up with interesting ways to segment your users based on their interests.
The source code to the application is on GitHub. If you have any questions, do not hesitate to ask using the comment box below.


© 2024 Pusher Ltd. All rights reserved.
Pusher Limited is a company registered in England and Wales (No. 07489873) whose registered office is at MessageBird UK Limited, 3 More London Riverside, 4th Floor, London, United Kingdom, SE1 2AQ.