- Products

- Developers
- User stories
- Blog
- Pricing

Build a photo feed using Laravel
Introduction
A photo feed is a web feed that features image enclosures. It provides an easy, standard way to reference a list of images. Instagram and Flickr are examples of such a feed.
Today, we will create a realtime photo feed using Laravel and Pusher. With the release of Echo, Laravel has provided an out of the box solution for implementing realtime features using event broadcasting without the need of polling applications. It is simple to get started in a few minutes.
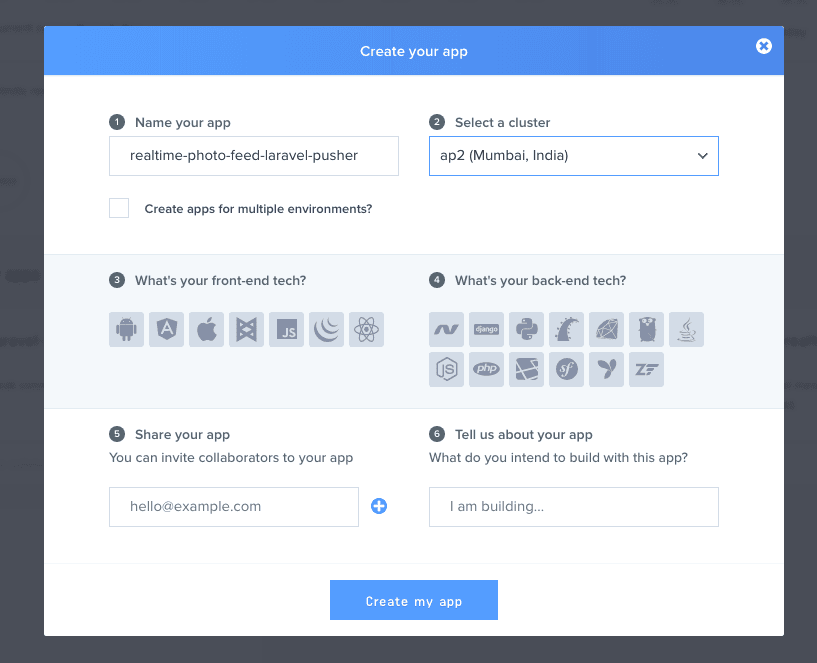
Setup an app on Pusher
First, you need to sign up on Pusher and create a new app.
Install Laravel, Pusher SDK and Echo
Then, we will grab a fresh copy of Laravel:
laravel new realtime-photo-feed-laravel-pusher
This will install the latest version of the Laravel framework and download the necessary dependencies. Next, we will install the Pusher PHP SDK using Composer:
composer require pusher/pusher-php-server
After this, we will install the JavaScript dependencies:
npm install
Now, we need to install two Javascript libraries necessary for realtime event broadcasting: Laravel Echo and Pusher JS
npm install --save laravel-echo pusher-js
We require some form of user authentication mechanism to demonstrate the functionality. Let us use the default authentication scaffolding provided by Laravel:
php artisan make:auth
Configuration
First, we need to set the APP_ID, APP_KEY, APP_SECRET and APP_CLUSTER in the environment file. We can get these details in our Pusher app dashboard:
1# .env 2 3APP_URL=your-application-url 4 5BROADCAST_DRIVER=pusher 6 7PUSHER_APP_ID=your-pusher-app-id 8PUSHER_APP_KEY=your-pusher-app-key 9PUSHER_APP_SECRET=your-pusher-app-secret 10PUSHER_APP_CLUSTER=your-pusher-app-cluster
Next, we need to create a fresh Echo instance in our applications's JavaScript. We can do so at the bottom of our resources/assets/js/bootstrap.js file:
1import Echo from "laravel-echo" 2 3window.Echo = new Echo({ 4 broadcaster: 'pusher', 5 key: 'your-pusher-app-key', 6 cluster: 'ap2', 7 encrypted: true 8});
Our application
We will create a realtime photo feed similar to what Instagram does. The core feature is to display the new photos in realtime, without the need of polling the application continuously or refreshing the page. We will not cover anything relating to writing CRUD functionality using Laravel. We will concentrate on the code necessary for implementing the realtime photo feed feature.
Migrations
Next, we need a photos table, where we can record all the photos uploaded by a user. Let us create a model and migration:
php artisan make:model Photo -m
The photos table would require the following fields:
- URL of each uploaded photo
- A field to link the photo to the user who uploaded it
Below is our migration file for the photos table:
1use Illuminate\Support\Facades\Schema; 2use Illuminate\Database\Schema\Blueprint; 3use Illuminate\Database\Migrations\Migration; 4 5class CreatePhotosTable extends Migration 6{ 7 8 public function up() 9 { 10 Schema::create('photos', function (Blueprint $table) { 11 $table->increments('id'); 12 $table->string('photo_url'); 13 $table->integer('user_id')->unsigned(); 14 $table->timestamps(); 15 }); 16 } 17 18 public function down() 19 { 20 Schema::dropIfExists('photos'); 21 } 22}
Uploading Photos
We need to handle the request for uploading photos, move the uploaded photo to a specified directory and store the photo_url in database table. First, we will create a UploadPhotoController which will handle this request:
php artisan make:controller UploadPhotoController
When using the public disk, the files are stored in the storage/app/public directory. To make them accessible for the web users, we need to create a symbolic link with the following command:
php artisan storage:link
- Please make a note that, the GD extension needs to be installed on the the server to successfully upload the file
We will store the photos on the public disk, which is a convention for where to place assets we want to be publicly accessible. Then, we can grab the URL for the image to store for this photo in the database row.
1# routes/api.php 2 3Route::middleware('auth:api')->post('/upload/photo', 'UploadPhotoController'); 4 5 6# UploadPhotoController.php 7 8public function __invoke() 9{ 10 $file = request('photo'); 11 $path = $file->hashName('profiles'); 12 13 $disk = Storage::disk('public'); 14 15 $disk->put( 16 $path, $this->formatImage($file) 17 ); 18 19 $photo = request()->user()->photos()->create([ 20 'photo_url' => $disk->url($path), 21 ]); 22 23 return $photo->load('user'); 24}
Broadcasting Feed
Whenever a new photo is uploaded, we need to fire an event which will be broadcasted over Pusher to a private channel. Let us first create the NewPhoto event:
php artisan make:event NewPhoto
broadcastOn method
The event should implement a broadcastOn method. This method must return the channels to which the event should be broadcasted on.
broadcastWith method
By default, Laravel will broadcast all the public properties in JSON format as the event payload. We can define our logic to broadcast only the necessary data in the broadcastWith method.
Below is our NewPhoto event:
1namespace App\Events; 2 3use App\Photo; 4use Illuminate\Broadcasting\InteractsWithSockets; 5use Illuminate\Broadcasting\PrivateChannel; 6use Illuminate\Contracts\Broadcasting\ShouldBroadcast; 7use Illuminate\Foundation\Events\Dispatchable; 8use Illuminate\Queue\SerializesModels; 9 10class NewPhoto implements ShouldBroadcast 11{ 12 use Dispatchable, InteractsWithSockets, SerializesModels; 13 14 public $photo; 15 16 /** 17 * Create a new event instance. 18 * 19 * @return void 20 */ 21 public function __construct(Photo $photo) 22 { 23 $this->photo = $photo; 24 } 25 26 /** 27 * Get the channels the event should broadcast on. 28 * 29 * @return PrivateChannel|array 30 */ 31 public function broadcastOn() 32 { 33 return new PrivateChannel('photos'); 34 } 35}
Now, we need to start our queue to actually listen for jobs and broadcast any events that are recorded. We can use the database queue listener on our local environment:
php artisan queue:listen
Next, we need to broadcast this event to other users on the same channel. Let us use the broadcast helper provided by Laravel to fire the event whenever a new photo is uploaded:
1# UploadPhotoController.php 2 3public function __invoke() 4{ 5 $file = request('photo'); 6 $path = $file->hashName('profiles'); 7 8 $disk = Storage::disk('public'); 9 10 $disk->put( 11 $path, $this->formatImage($file) 12 ); 13 14 $photo = request()->user()->photos()->create([ 15 'photo_url' => $disk->url($path), 16 ]); 17 18 broadcast(new NewPhoto($photo))->toOthers(); 19 20 return $photo->load('user'); 21}
Listening to the feed
Installation and configuration of Laravel Echo is a must before we can start listening to photo feeds. We have covered the installation process in detail in the section above. Please go through it if you might have skipped it.
We can listen to a private channel using Echo.private(channel). As we have broadcasted the NewPhoto event on a private channel, we will use Echo.private():
1listen() { 2 Echo.private('photos') 3 .listen('NewPhoto', (e) => this.photos.unshift(e.photo)); 4}
Authorization
As we are listening on a private channel, we need to authenticate that the current logged in user should be able to listen on this private channel. Laravel Echo will automatically call the necessary authorization routes if we are listening to a private channel. But, we need to write the authentication logic which will actually authorize the user.
Authorization logic is written in the routes/channels.php. For the sake of example, we will simply return true without performing any authorization logic:
1Broadcast::channel('photos', function ($user) { 2 return true; 3});
Now, whenever a new photo is uploaded, the event would broadcast over Pusher. Next, we listen to photos channel and push the new photo to our photos array in our Vue component.
Below is the JavaScript part of our example component written using Vue.js
1<span>Select New Photo</span> 2<input ref="photo" type="file" class="form-control" name="photo" @change="update">
1<script> 2 export default { 3 props: ['user'], 4 data() { 5 return { 6 photos: [] 7 } 8 }, 9 mounted() { 10 this.getPhotos(); 11 this.listen(); 12 }, 13 methods: { 14 update(e) { 15 e.preventDefault(); 16 17 axios.post('/api/upload/photo?api_token=' + this.user.api_token, this.gatherFormData()) 18 .then(response => this.photos.unshift(response.data)); 19 }, 20 /** 21 * Gather the form data for the photo upload. 22 */ 23 gatherFormData() { 24 const data = new FormData(); 25 26 data.append('photo', this.$refs.photo.files[0]); 27 28 return data; 29 }, 30 getPhotos() { 31 axios.get('/api/photos').then(response => this.photos = response.data); 32 }, 33 listen() { 34 Echo.private('photos') 35 .listen('NewPhoto', (e) => this.photos.unshift(e.photo)); 36 } 37 }, 38 } 39</script>
And here the demonstration of our functionality:
Conclusion
In this article, we have shown you how to build a realtime photo feed. We have covered the configuration options you need to get started. The example above should help you fill in the gaps and give an overview of some of the other configuration options available to you.


© 2024 Pusher Ltd. All rights reserved.
Pusher Limited is a company registered in England and Wales (No. 07489873) whose registered office is at MessageBird UK Limited, 3 More London Riverside, 4th Floor, London, United Kingdom, SE1 2AQ.