- Products

- Developers
- User stories
- Blog
- Pricing

Create a Pokemon battle game with React Native - Part 2: Two-player mode
- Introduction
- Prerequisites
- Overview of features to add
- Enable client events
- Add the two-player mode
- Update the action types
- Update the battle reducer
- Update the team selection screen
- Update the battle screen
- Update the PokemonList component
- Update the PokemonOption component
- Update the MovesList component
- Add the server code
- Running the app
- Conclusion
Introduction
In this tutorial, we’ll be implementing the game’s two-player mode.
If you need an overview of what the final output for this series will look like, or if you need more details on what we’ll be doing in each part, check out part one.
This is the second tutorial of a three-part series on creating Pokemon battle game with React Native. These are the topics covered in this series:
- Part one: Practice mode
- Part two: Two-player mode
- Part three: Animations and sounds
Prerequisites
This tutorial has the same prerequisites as part one of the series.
We’ll be using Pusher Channels to communicate data between players in realtime. To get started, sign up for a free Pusher account or sign in. Then go to the Pusher dashboard to create a Channels app.
Overview of features to add
We’ve added a lot of code in part one. This time, we’re mostly going to update the existing code in order for us to connect to Pusher Channels and be able to emit moves made by each player, so their opponent’s screen also gets updated with the same changes. In this case, we need to implement the following:
- When a user switches Pokemon, emit an event via Pusher Channels so their opponent also sees the new Pokemon they switched to.
- When user attacks with their Pokemon, the opponent’s Pokemon should also receive the damage on their side.
Here’s what the final output for this part is going to look like:
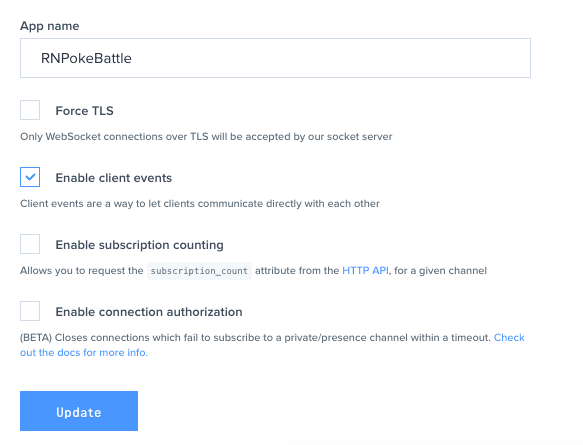
Enable client events
On your Pusher app instance, enable client events in the settings page. This allows us to trigger client events right from the app itself. A server will still be required for authentication though:
Add the two-player mode
At this point, we’re ready to start adding the code for the two-player mode. Start by installing the Pusher JavaScript library. This allows us to use Channels:
yarn add pusher-js
Update the action types
Update the action types file to include the new actions that we will be working with:
1// src/actions/types.js 2 export const SET_POKEMON_HEALTH = "set_pokemon_health"; 3 export const SET_MESSAGE = "set_message"; 4 export const REMOVE_POKEMON_FROM_TEAM = "remove_pokemon_from_team";
Since the two-player mode is already going to involve two players, we need a way to also update the health of the current player’s Pokemon (SET_POKEMON_HEALTH), as well as remove them from the team when they faint (REMOVE_POKEMON_FROM_TEAM). The SET_MESSAGE action is for informing both players on what each other’s actions are. For example: “opposing player switched to Pikachu”.
Next, add the action creators for the action types we just added:
1// src/actions/index.js 2 import { 3 // existing code here.. 4 5 // add these: 6 SET_POKEMON_HEALTH, 7 SET_MESSAGE, 8 REMOVE_POKEMON_FROM_TEAM 9 } from "./types"; 10 11 // add these after the last function 12 export const setPokemonHealth = (team_member_id, health) => { 13 return { 14 type: SET_POKEMON_HEALTH, 15 team_member_id, // the unique ID assigned to a specific Pokemon on a team 16 health 17 }; 18 }; 19 20 export const setMessage = message => { 21 return { 22 type: SET_MESSAGE, 23 message // the message to display on the player's screen 24 }; 25 }; 26 27 export const removePokemonFromTeam = team_member_id => { 28 return { 29 type: REMOVE_POKEMON_FROM_TEAM, 30 team_member_id 31 }; 32 };
Update the battle reducer
Update the battle reducer so it can process the actions we created. Start by including the action types:
1// src/reducers/BattleReducer.js 2 3 import { 4 // existing code here.. 5 6 // add these: 7 SET_POKEMON_HEALTH, 8 SET_MESSAGE, 9 REMOVE_POKEMON_FROM_TEAM 10 } from "../actions/types";
Next, we add wait-for-turn as a move display text. In part one, we already added three of the move display text. These are the text displayed on top of the actual controls (fight or switch, Pokemon move selection, and Pokemon selection). It basically guides the user on what to do with the controls. wait-for-turn is empty because we don’t want to display a move display text while the user is waiting for their turn:
1const move_display_text = { 2 "wait-for-turn": "", // add this 3 4 // existing code here.. 5 };
Next, add the default message to display. This message is different from the move display text. Its primary function is to inform the user what move their opponent did, and it also shows them what move they did and how effective it is:
1const INITIAL_STATE = { 2 // existing code here.. 3 4 message: "" // add this 5 };
Next, add the conditions that will process the actions:
1case SET_POKEMON_HEALTH: // updates the current_hp of the Pokemon with the team_member_id specified in the action 2 let team_data = [...state.team]; 3 team_data = team_data.map(item => { 4 if (item.team_member_id == action.team_member_id) { 5 item.current_hp = action.health; 6 } 7 return item; 8 }); 9 10 return { ...state, team: team_data }; 11 12 case SET_MESSAGE: // sets the message to display in place of the controls 13 return { ...state, move: "wait-for-turn", message: action.message }; 14 15 case REMOVE_POKEMON_FROM_TEAM: // removes the Pokemon with the specified team_member_id from the team 16 const diminished_team = [...state.team].filter(item => { 17 return item.team_member_id != action.team_member_id; 18 }); 19 20 return { ...state, team: diminished_team };
Update the team selection screen
At this point, we’re now ready to update the team selection screen so it actually looks for an opponent instead of emulating that it’s looking for an opponent. Start by including the components and libraries we need:
1import { View, TouchableOpacity, ActivityIndicator, Alert } from "react-native"; // add Alert 2 import Pusher from "pusher-js/react-native";
Next, update the constructor so it declares an initial value for the Pusher client reference and the current user’s channel. This channel is where the opponent triggers events for updating their opponent Pokemon’s health and informing their opponent that they switched Pokemon:
1constructor(props) { 2 // existing code here.. 3 4 // add these: 5 this.pusher = null; 6 this.my_channel = null; 7 }
Next, update the function that gets executed when the user confirms their team selection to store the pokemon_ids and team_member_ids in a separate array. We will use those later as additional information when we authenticate the user with the server component of the app:
1confirmTeam = () => { 2 const { selected_pokemon, setTeam, setPokemon, navigation } = this.props; 3 4 let team = [...selected_pokemon]; 5 let pokemon_ids = []; // add this 6 let team_member_ids = []; // add this 7 team = team.map(item => { 8 let hp = 500; 9 10 let shuffled_moves = shuffleArray(item.moves); 11 let selected_moves = shuffled_moves.slice(0, 4); 12 13 let moves = moves_data.filter(item => { 14 return selected_moves.indexOf(item.id) !== -1; 15 }); 16 17 let member_id = uniqid(); 18 19 pokemon_ids.push(item.id); // add this 20 team_member_ids.push(member_id); // add this 21 22 return { 23 ...item, 24 team_member_id: member_id, 25 current_hp: hp, 26 total_hp: hp, 27 moves: moves, 28 is_selected: false 29 }; 30 }); 31 32 setTeam(team); 33 setPokemon(team[0]); 34 35 this.setState({ 36 is_loading: true 37 }); 38 39 // next: add code for authenticating with the server 40 };
Next, add the code for authenticating the user to the server. Here, we’re passing the username, pokemon_ids and team_member_ids as additional params. These are used later on so that both users have a copy of their opponents team. The users won’t really know all the Pokemon that are in their opponent’s team, only the app needs to know about that information so it can update the health and remove the Pokemon from the opponent’s team when they faint:
1const username = navigation.getParam("username"); // get the username passed from the login screen 2 3 this.pusher = new Pusher("YOUR_PUSHER_APP_KEY", { 4 authEndpoint: "YOUR_NGROK_URL/pusher/auth", 5 cluster: "YOUR_PUSHER_APP_CLUSTER", 6 encrypted: true, 7 auth: { 8 params: { 9 username: username, 10 pokemon_ids: pokemon_ids, 11 team_member_ids: team_member_ids 12 } 13 } 14 }); 15 16 // next: subscribe to current user's Pusher channel
In the above code, replace the placeholder values with your Pusher credentials. We’ll replace the ngrok URL later once we get to the server part.
Next, subscribe to the current user’s Pusher channel. If the subscription succeeds, we listen for the opponent-found event to be triggered. This event is triggered by the server once it finds an opponent for the user. As you’ll see later, the server will send the usernames of the two users that were matched. That’s what we’re picking up when the opponent-found event is triggered.
We determine the opponent by comparing the username of the user to the usernames sent from the server. The first turn goes to the user who first confirmed their team selection. Lastly, we send all the relevant information to the next screen by means of navigation props:
1this.my_channel = this.pusher.subscribe(`private-user-${username}`); 2 this.my_channel.bind("pusher:subscription_error", status => { 3 Alert.alert( 4 "Error", 5 "Subscription error occurred. Please restart the app" 6 ); 7 }); 8 9 this.my_channel.bind("pusher:subscription_succeeded", data => { 10 this.my_channel.bind("opponent-found", data => { 11 let opponent = 12 username == data.player_one.username 13 ? data.player_two // object containing player two's data 14 : data.player_one; // object containing player one's data 15 16 let first_turn = 17 username == data.player_one.username 18 ? "you" 19 : data.player_two.username; 20 21 Alert.alert( 22 "Opponent found!", 23 `${ 24 opponent.username 25 } will take you on! First turn goes to ${first_turn}` 26 ); 27 28 this.setState({ 29 is_loading: false, 30 username: "" 31 }); 32 33 // send all relevant information to the next screen 34 navigation.navigate("Battle", { 35 pusher: this.pusher, 36 username: username, 37 opponent: opponent, 38 my_channel: this.my_channel, 39 first_turn: first_turn 40 }); 41 }); 42 });
Update the battle screen
We’re now ready to update the battle screen so it can handle the two-player mode. Start by importing the new action creators we added earlier:
1// src/screens/BattleScreen.js 2 3 import { 4 // existing code here.. 5 6 // add these: 7 setPokemonHealth, 8 removePokemonFromTeam, 9 setMessage, 10 removePokemonFromOpponentTeam 11 } from "../actions";
Next, update mapStateToProps to include the message from the store. This way, the battle screen’s UI will always stay up to date with the current value of message in the store:
1const mapStateToProps = ({ team_selection, battle }) => { 2 const { 3 // existing code here.. 4 5 message // add this 6 } = battle; 7 return { 8 // existing code here.. 9 message // add this 10 }; 11 };
Next, add the functions for dispatching the new actions in mapDispatchToProps:
1const mapDispatchToProps = dispatch => { 2 return { 3 // existing code here.. 4 5 // add these: 6 setMessage: message => { 7 dispatch(setMessage(message)); 8 }, 9 setPokemonHealth: (team_member_id, health) => { 10 dispatch(setPokemonHealth(team_member_id, health)); 11 }, 12 setMove: move => { 13 dispatch(setMove(move)); 14 }, 15 removePokemonFromTeam: team_member_id => { 16 dispatch(removePokemonFromTeam(team_member_id)); 17 }, 18 removePokemonFromOpposingTeam: team_member_id => { 19 dispatch(removePokemonFromOpponentTeam(team_member_id)); 20 } 21 }; 22 };
From the code above, you can see that it’s not just the new actions we’re adding. We also have previously added actions that we didn’t have previously. This includes setMove and removePokemonFromOpponentTeam. Previously, we didn’t need to add those because we’re only dispatching them from the MovesList component. This time, we need to add them to the screen itself because it is where we will be putting all of the event listeners for Pusher Channels.
Next, update the constructor to add an initial value for the opponents_channel. We will be using this channel to inform the user’s opponent when their current Pokemon receives damage. We also use it for sending messages to display on the opponent’s control section:
1constructor(props) { 2 super(props); 3 this.opponents_channel = null; 4 }
Next, extract all of the store values and functions we returned earlier from mapDispatchToProps:
1async componentDidMount() { 2 const { 3 // existing code here.. 4 5 // add these: 6 navigation, 7 team, 8 setMove, 9 removePokemonFromOpposingTeam, 10 setMessage, 11 setPokemonHealth, 12 removePokemonFromTeam 13 } = this.props; 14 15 // next: construct opponent team data 16 }
Next, construct the opponent team data based on the pokemon_ids and team_member_ids that were passed from the team selection screen earlier:
1let pusher = navigation.getParam("pusher"); 2 3 const { username, pokemon_ids, team_member_ids } = navigation.getParam( 4 "opponent" 5 ); 6 7 let opponent_pokemon_ids = pokemon_ids.split(","); 8 let opponent_team_member_ids = team_member_ids.split(","); 9 10 // only return the data of the Pokemon's that are on the opponent's team 11 let opponent_team_data = pokemon_data.filter(item => { 12 return opponent_pokemon_ids.indexOf(item.id.toString()) !== -1; 13 }); 14 15 opponent_team_data = opponent_team_data.map((item, index) => { 16 let hp = 500; 17 18 let shuffled_moves = shuffleArray(item.moves); 19 let selected_moves = shuffled_moves.slice(0, 4); 20 21 let moves = moves_data.filter(item => { 22 return selected_moves.indexOf(item.id) !== -1; 23 }); 24 25 return { 26 ...item, 27 current_hp: hp, 28 total_hp: hp, 29 moves: moves, 30 is_selected: false 31 }; 32 });
Once we have the opponent team data, we need to sort it based on the ordering of Pokemon the opponent has used when they were selecting their team. This ordering is represented by how the items in the opponent_pokemon_ids array are arranged so we loop through that array, and add the team member ID to each Pokemon. We then save the sorted opponent Pokemon team in the store:
1let sorted_opponent_team = []; 2 opponent_pokemon_ids.forEach((id, index) => { 3 let team_member = opponent_team_data.find( 4 item => id == item.id.toString() 5 ); 6 team_member.team_member_id = opponent_team_member_ids[index]; 7 sorted_opponent_team.push(team_member); 8 }); 9 10 // save the opponent Pokemon team in the store 11 setOpponentTeam(sorted_opponent_team); 12 setOpponentPokemon(sorted_opponent_team[0]); 13 14 // next: subscribe to opponent's channel
Next, subscribe to the opponent’s channel. Once subscribed, get the username of the user who will make the first move, and if it’s not the current user, call setMove with wait-for-turn as the argument. This effectively locks the user’s controls so they can no longer perform any actions while their opponent hasn’t made their move yet:
1this.opponents_channel = pusher.subscribe(`private-user-${username}`); 2 this.opponents_channel.bind("pusher:subscription_error", status => { 3 Alert.alert( 4 "Error", 5 "Subscription error occurred. Please restart the app" 6 ); 7 }); 8 9 this.opponents_channel.bind("pusher:subscription_succeeded", data => { 10 const first_turn = navigation.getParam("first_turn"); 11 12 if (first_turn != "you") { 13 setMessage("Please wait for you turn..."); // set message to display in place of the controls UI 14 setMove("wait-for-turn"); 15 } 16 }); 17 18 // next: listen for the event when the opponent informs the user that they switched Pokemon
Next, listen for the event when the opponent informs the user that they switched Pokemon. This event includes the team_member_id of the opponent Pokemon as its data. We use that ID to get the Pokemon data object from the sorted_opponent_team from earlier. From there, we just set the message to inform the user which Pokemon their opponent used, and then change the current opponent Pokemon by calling the setOpponentPokemon function. As setting a message automatically locks the UI, we need to call the setMove function after 1.5 seconds so the user can also make their move:
1let my_channel = navigation.getParam("my_channel"); 2 3 my_channel.bind("client-switched-pokemon", ({ team_member_id }) => { 4 let pokemon = sorted_opponent_team.find(item => { 5 return item.team_member_id == team_member_id; 6 }); 7 8 setMessage(`Opponent changed Pokemon to ${pokemon.label}`); 9 setOpponentPokemon(pokemon); 10 11 setTimeout(() => { 12 setMove("select-move"); 13 }, 1500); 14 }); 15 16 // next: listen for event when the user's Pokemon is attacked
Next, listen for the event when the user's Pokemon is attacked. This event includes the updated health, team_member_id of the Pokemon, and the message to display. We use those data to update the UI. If the Pokemon’s health goes below 1, we get the data of that Pokemon and set its health to zero and remove it from the team. This is because, most likely, the health will become a negative value, which will make the health bar all red. Setting it to zero will make it white instead:
1my_channel.bind("client-pokemon-attacked", data => { 2 setMessage(data.message); 3 4 // update the UI with the new health and allow user to make a move after 1.5 seconds 5 setTimeout(() => { 6 setPokemonHealth(data.team_member_id, data.health); 7 setMove("select-move"); 8 }, 1500); 9 10 if (data.health < 1) { // if the Pokemon faints 11 let fainted_pokemon = team.find(item => { 12 return item.team_member_id == data.team_member_id; 13 }); 14 15 setTimeout(() => { 16 setPokemonHealth(data.team_member_id, 0); 17 18 setMessage(`${fainted_pokemon.label} fainted`); 19 removePokemonFromTeam(data.team_member_id); 20 21 }, 1000); 22 23 // let the user select the Pokemon to switch to 24 setTimeout(() => { 25 setMove("select-pokemon"); 26 }, 2000); 27 } 28 });
Next, update the render method so it displays the current message value. Also, add the conditions to selectively display the move_display_text, we don’t really need to display it if message is not empty. The PokemonList and MovesList also shouldn’t be displayed until the opponents_channel is initialized because we’re passing it to those components. Note that the … indicates that the same props are used, so you simply have to copy the new props. In this case, the only new props are the opponents_channel for the PokemonList and MovesList components:
1render() { 2 const { 3 team, 4 move, 5 move_display_text, 6 pokemon, 7 opponent_pokemon, 8 backToMove, 9 message // add this 10 } = this.props; 11 12 return ( 13 <View style={styles.container}> 14 <CustomText styles={[styles.headerText]}>Fight!</CustomText> 15 16 <View style={styles.battleGround}> 17 {opponent_pokemon && ( 18 <View style={styles.opponent}> 19 <HealthBar ... /> 20 <PokemonFullSprite ... /> 21 </View> 22 )} 23 24 {pokemon && ( 25 <View style={styles.currentPlayer}> 26 <HealthBar ... /> 27 <PokemonFullSprite ... /> 28 </View> 29 )} 30 </View> 31 32 <View style={styles.controls}> 33 <View style={styles.controlsHeader}> 34 {(move == "select-pokemon" || move == "select-pokemon-move") && ( 35 <TouchableOpacity 36 style={styles.backButton} 37 onPress={() => { 38 backToMove(); 39 }} 40 > 41 <Ionicons name="md-arrow-round-back" size={20} color="#333" /> 42 </TouchableOpacity> 43 )} 44 45 {move != "wait-for-turn" && ( 46 <CustomText styles={styles.controlsHeaderText}> 47 {move_display_text} 48 </CustomText> 49 )} 50 51 {move == "wait-for-turn" && ( 52 <CustomText styles={styles.message}>{message}</CustomText> 53 )} 54 </View> 55 56 {move == "select-move" && <ActionList />} 57 58 {move == "select-pokemon" && 59 this.opponents_channel && ( 60 <PokemonList 61 ... 62 opponents_channel={this.opponents_channel} 63 /> 64 )} 65 66 {pokemon && 67 this.opponents_channel && 68 move == "select-pokemon-move" && ( 69 <MovesList 70 ... 71 opponents_channel={this.opponents_channel} 72 /> 73 )} 74 </View> 75 </View> 76 ); 77 }
Update the PokemonList component
Next, we need to make the opponents_channel props available to the PokemonOption component. Note that we could have used the React Context API or Redux for this. But to simplify things, we’re just going to “drill it down” to the component which actually needs it:
1// src/components/PokemonList/PokemonList.js 2 3 const PokemonList = ({ 4 // existing code here.. 5 6 opponents_channel // add this 7 }) => { 8 // existing code here.. 9 });
Look for the return statement, and pass the value of opponents_channel to PokemonOption:
1<PokemonOption 2 // existing code here.. 3 opponents_channel={opponents_channel} // add this 4 />
Update the PokemonOption component
If you still remember, the PokemonOption component is used for two things: for selecting Pokemon to be included in the team, and for selecting a Pokemon to switch to. The updates that we’re going to do is only for the latter, so the code in the condition for selecting a Pokemon for a team should stay intact.
Start by importing the actions that we need:
1// src/components/PokemonOption/PokemonOption.js 2 import { selectPokemon, setPokemon, setMove, setMessage } from "../../actions";
Next, update the mapDispatchToProps function to expose the functions for dispatching the setMessage and setMove actions to the component:
1const mapDispatchToProps = dispatch => { 2 return { 3 // existing code here.. 4 5 // add these: 6 setMessage: message => { 7 dispatch(setMessage(message)); 8 }, 9 setMove: move => { 10 dispatch(setMove(move)); 11 } 12 }; 13 };
Scroll to the top, and extract the functions you just exposed. Don’t forget to include the opponents_channel as well:
1const PokemonOption = ({ 2 // existing code here.. 3 4 // add these: 5 setMessage, 6 setMove, 7 opponents_channel 8 }) => { 9 // existing code here.. 10 });
Next, update the switch-pokemon condition so it updates the message displayed in the controls section, and sets the user’s current Pokemon to the selected one. After that, inform the opponent by triggering the client-switched-pokemon event on their channel. As you’ve seen earlier, this would allow the opponent to make a move. Thus, we need to set the user to wait for their turn:
1if (action_type == "select-pokemon") { 2 // existing code here.. 3 } else if (action_type == "switch-pokemon") { 4 // replace existing code with these: 5 6 setMessage(`You used ${pokemon_data.label}`); 7 setPokemon(pokemon_data); 8 9 opponents_channel.trigger("client-switched-pokemon", { 10 team_member_id: pokemon_data.team_member_id // the ID of the Pokemon the user switched to 11 }); 12 13 setTimeout(() => { 14 setMessage("Please wait for your turn..."); 15 setMove("wait-for-turn"); 16 }, 2000); 17 }
Update the MovesList component
The final thing we need to implement before we move on to the server component is the updating of the opponent Pokemon’s health.
Start by importing the setMessage action:
1// src/components/MovesList/MovesList.js 2 3 import { 4 // existing code here.. 5 6 setMessage // add this 7 } from "../../actions";
Next, update the mapStateToProps function to include the data on the user’s current Pokemon. This allows us to inform the opponent on which of their opponent’s Pokemon has made the move:
1const mapStateToProps = ({ battle }) => { 2 const { opponent_pokemon, pokemon } = battle; 3 4 return { 5 opponent_pokemon, 6 pokemon // add this 7 }; 8 };
Next, update mapDispatchToProps to expose functions for dispatching the setMove and setMessage actions:
1const mapDispatchToProps = dispatch => { 2 // existing code here.. 3 4 // add these: 5 backToMove: () => { 6 dispatch(setMove("select-move")); 7 }, 8 setMessage: message => { 9 dispatch(setMessage(message)); 10 } 11 }
Next, extract the new data and functions we’ve mapped to this component’s props:
1const MovesList = ({ 2 // existing code here.. 3 4 // add these: 5 pokemon, 6 opponents_channel, 7 backToMove, 8 setMessage 9 }) => { 10 // existing code here.. 11 })
Lastly, update the onPress function to construct the message to be displayed on the user’s controls UI. This includes the name of the Pokemon, the name of the move, and its effectiveness. After that, inform the opponent that their Pokemon was attacked:
1let { effectiveness, damage } = getMoveEffectivenessAndDamage( 2 item, 3 opponent_pokemon 4 ); // extract effectiveness 5 6 let health = opponent_pokemon.current_hp - damage; 7 8 // add these: 9 let message = `${pokemon.label} used ${ 10 item.title 11 }! ${effectiveness}`; 12 13 setMessage(message); 14 15 // inform the opponent that their Pokemon was attacked 16 opponents_channel.trigger("client-pokemon-attacked", { 17 team_member_id: opponent_pokemon.team_member_id, 18 message: message, // so the opponent sees the same message displayed on this user's screen 19 health: health 20 }); 21 22 setOpponentPokemonHealth(opponent_pokemon.team_member_id, health); 23 24 if (health < 1) { 25 setOpponentPokemonHealth(opponent_pokemon.team_member_id, 0); // set health to zero so health bar is not all red 26 removePokemonFromOpponentTeam(opponent_pokemon.team_member_id); 27 } 28 29 setTimeout(() => { 30 setMessage("Please wait for your turn..."); 31 setMove("wait-for-turn"); 32 }, 1500);
Add the server code
At this point, we’re ready to add the server code. Create a server folder inside the root of your project directory, navigate inside it, and execute npm init. Just answer the questions by entering a blank value.
Next, open the generated package.json file and change the value of name to RNPokeBattle-server.
After that, install all the packages we need:
npm install body-parser dotenv express pusher
Next, create a server.js file and add the following. This includes the packages we just installed and initializes them:
1var express = require("express"); // for setting up a server 2 var bodyParser = require("body-parser"); 3 var Pusher = require("pusher"); // for connecting to Pusher 4 5 var app = express(); 6 app.use(bodyParser.json()); // parse request body to JSON format 7 app.use(bodyParser.urlencoded({ extended: false })); // allow parsing of URL encoded request body 8 9 require("dotenv").config(); // load environment variables from .env file
Next, initialize the variable where we’ll store the users’ data, and initialize Pusher:
1var users = []; 2 3 var pusher = new Pusher({ 4 appId: process.env.APP_ID, 5 key: process.env.APP_KEY, 6 secret: process.env.APP_SECRET, 7 cluster: process.env.APP_CLUSTER 8 });
Add a route for testing if the server is working. Don’t forget to access this route later on your browser once we run the server:
1app.get("/", function(req, res) { 2 // for testing if the server is running 3 res.send("all green..."); 4 });
Next, add the route for handling authentication requests (this is the endpoint that we’re accessing in the src/screens/TeamSelectionScreen.js earlier). Here, we get the user’s index based on the username in the request body. Only if the username doesn’t already exist do we process the request further. Once there are two users in the users array, we trigger the opponent-found event on both users. The event contains the pokemon_ids and team_member_ids for both users. That’s what we were making use of in the code for the battle screen earlier:
1app.post("/pusher/auth", function(req, res) { 2 var username = req.body.username; 3 var pokemon_ids = req.body.pokemon_ids; 4 var team_member_ids = req.body.team_member_ids; 5 6 let user_index = users.findIndex(item => { 7 return item.username == username; 8 }); 9 10 if (user_index === -1) { 11 users.push({ 12 username: username, 13 pokemon_ids: pokemon_ids, 14 team_member_ids: team_member_ids 15 }); 16 17 if (users.length == 2) { 18 var player_one_index = 0; 19 var player_one = users.splice(player_one_index, 1)[0]; 20 21 var player_two_index = 0; // because there will only be one item left in the users array after the splice 22 var player_two = users.splice(player_two_index, 1)[0]; 23 24 // trigger a message to each players. the message contains the IDs of the Pokemon of their opponent 25 pusher.trigger("private-user-" + player_one.username, "opponent-found", { 26 player_one: player_one, 27 player_two: player_two 28 }); 29 30 setTimeout(() => { 31 pusher.trigger( 32 "private-user-" + player_two.username, 33 "opponent-found", 34 { 35 player_one: player_one, 36 player_two: player_two 37 } 38 ); 39 }, 3000); 40 } 41 42 // authenticate the user 43 var socketId = req.body.socket_id; 44 var channel = req.body.channel_name; 45 var auth = pusher.authenticate(socketId, channel); 46 47 res.send(auth); // send a response back 48 } else { 49 res.status(400); 50 } 51 });
You might be wondering why there’s a three-second delay for triggering the opponent-found event for the second user. This is because they joined last. This delay ensures that they’re already subscribed to all the relevant channels before the event is fired.
Next, make the server listen to the port included in the .env file:
1var port = process.env.PORT || 5000; 2 app.listen(port);
Don’t forget to create the .env file and put your Pusher credentials:
1APP_ID=YOUR_PUSHER_APP_ID 2 APP_KEY=YOUR_PUSHER_APP_KEY 3 APP_SECRET=YOUR_PUSHER_APP_SECRET 4 APP_CLUSTER=YOUR_PUSHER_APP_CLUSTER 5 PORT=3000
Running the app
Once that’s done, we’re now ready to run the server and the app. Go back to the root directory of the app, start it, and run the server:
1cd .. 2 expo start 3 node server/server.js
Next, navigate to the folder where you downloaded the ngrok executable file and run it:
./ngrok http 3000
Copy the resulting https URL to your src/screens/TeamSelectionScreen.js file by replacing the placeholder value for the ngrok URL.
Conclusion
In this tutorial, we learned how to use Pusher Channels to implement the two-player Pokemon battle in React Native. We’ve specifically used it to pair players, and sync the attacks made by their Pokemon to their opponents Pokemon.
Stay tuned for the last part where we turn this app into a proper game by adding animations and sounds.
You can find the code for this app on its GitHub repo. The code added to this specific part of the series is on the two-player branch.


© 2024 Pusher Ltd. All rights reserved.
Pusher Limited is a company registered in England and Wales (No. 07489873) whose registered office is at MessageBird UK Limited, 3 More London Riverside, 4th Floor, London, United Kingdom, SE1 2AQ.