- Products

- Developers
- User stories
- Blog
- Pricing

Implement push notifications in Kotlin to create a food delivery app
- Introduction
- Introduction
- Prerequisites
- Overall design
- Setting up your Pusher accounts
- Registering for Pusher Channels
- Registering for Pusher Beams
- Backend application
- Required endpoints
- Listing menu items
- Managing orders
- Sending update notifications
- Takeaway web application
- Building the customers application
- Displaying the menu items
- Placing an order
- Receiving order update notifications
- Conclusion
Introduction
Introduction
Many business need to be very responsive to customer requests in order to be competitive. This works both ways - the business being informed immediately when a new order comes in, and the customer being informed as to the progress of their order.
In this article we are going to build a simple takeaway application, featuring a web app for the takeaway itself to use, and an Android app for customers. The web app will be updated automatically using Pusher Channels, and the Android app will receive notifications using Pusher Beams so that the customer and staff are always aware of everything going on.
Prerequisites
In order to follow along, you will need some experience with the Kotlin programming language, which we are going to use for both the backend and frontend of our application, as well as with Android development.
We are going to be building the web UI that the takeaway uses with Create React App, so ensure that this is installed, along with a recent version of Node.js.
You will also need appropriate IDEs. We suggest IntelliJ IDEA and Android Studio. Finally, you will need a free Pusher Account. Sign up now if you haven’t already done so.
Overall design
Our overall application will have a backend application, a web UI that is to be used by the takeaway company, and an Android application that is targeted to the customers. Customers will order food using the Android application, and the orders will appear in the web UI in real time using Pusher Channels. The takeaway company can then use the web UI to update progress on the orders, which will be sent directly to the customer’s device using Pusher Beams, keeping them updated on the progress of their order. The backend application then acts as orchestration between the two UIs.
Setting up your Pusher accounts
We are going to use two different Pusher accounts for this application - a Pusher Channels account for real time updates of the web UI, and a Pusher Beams account for notifying the customers of the status of their orders.
Registering for Pusher Channels
In order to follow along, you will need to create a free sandbox Pusher account or sign in. Next click Channels apps on the sidebar, followed by Create Channels app.
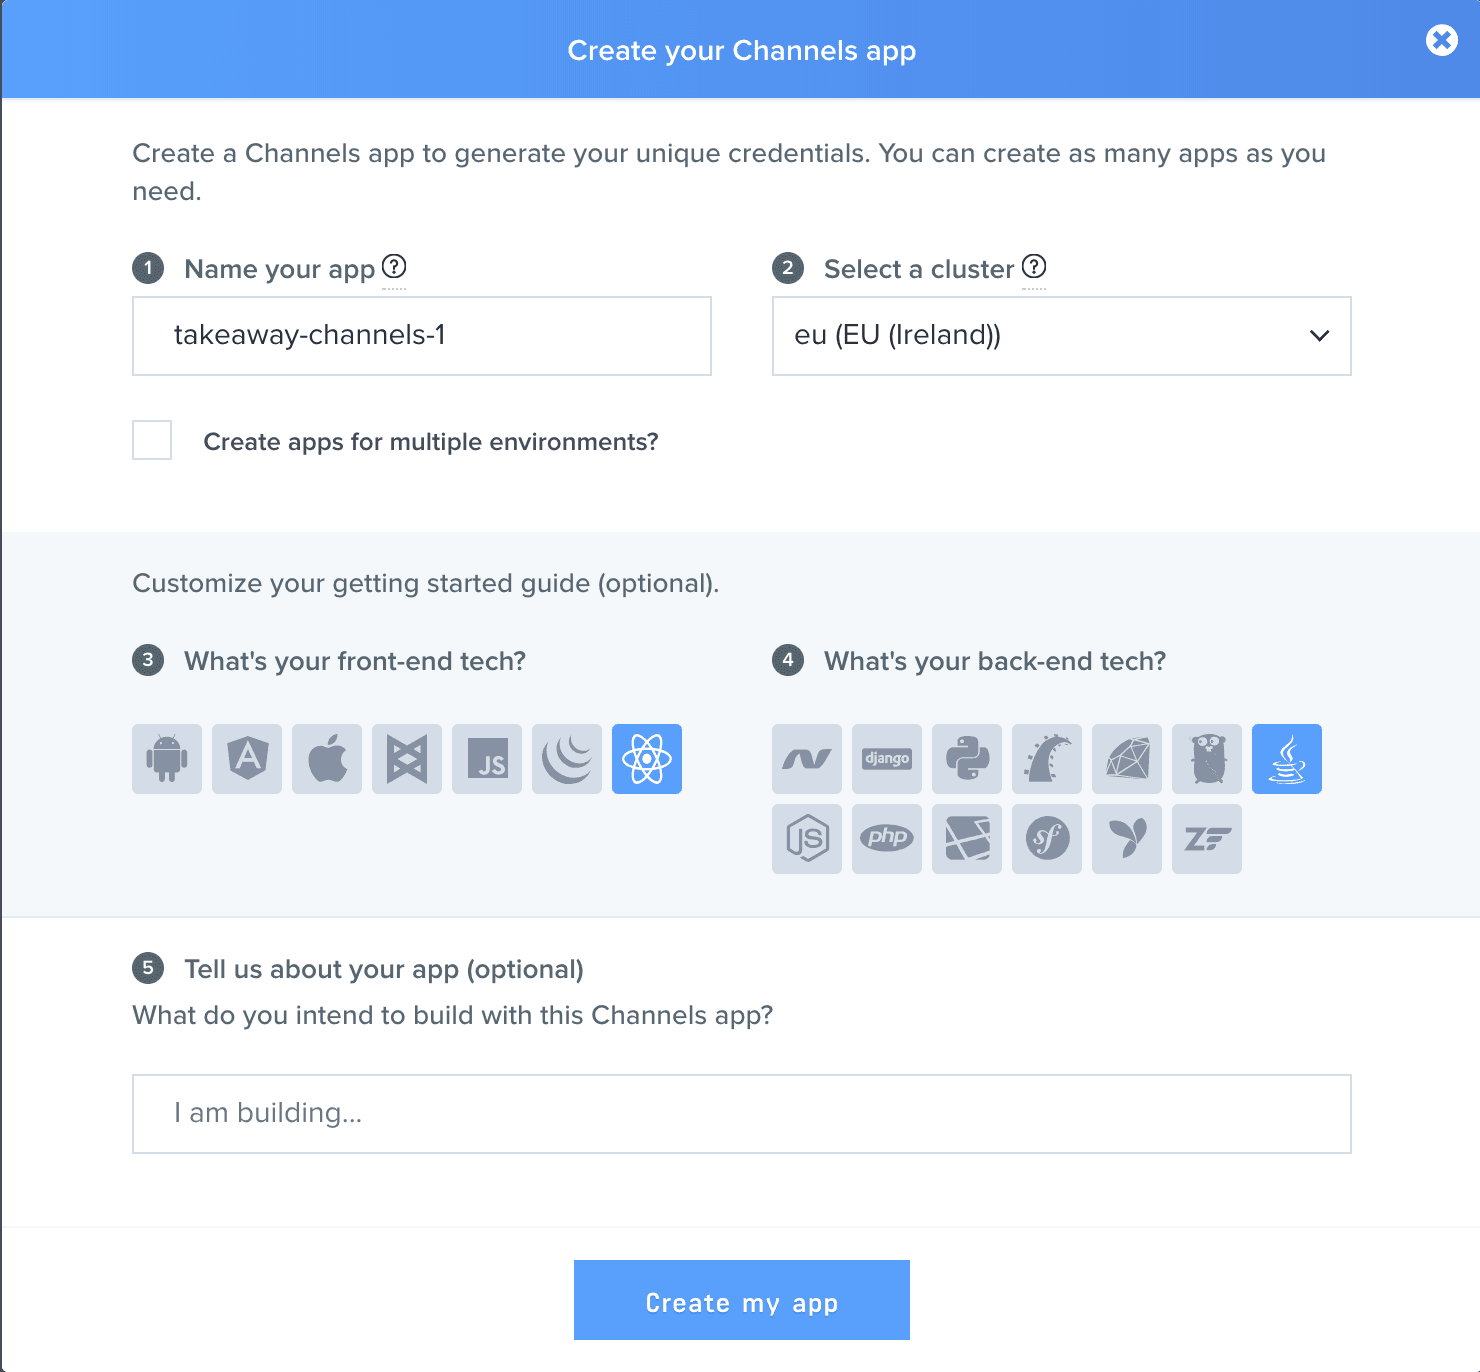
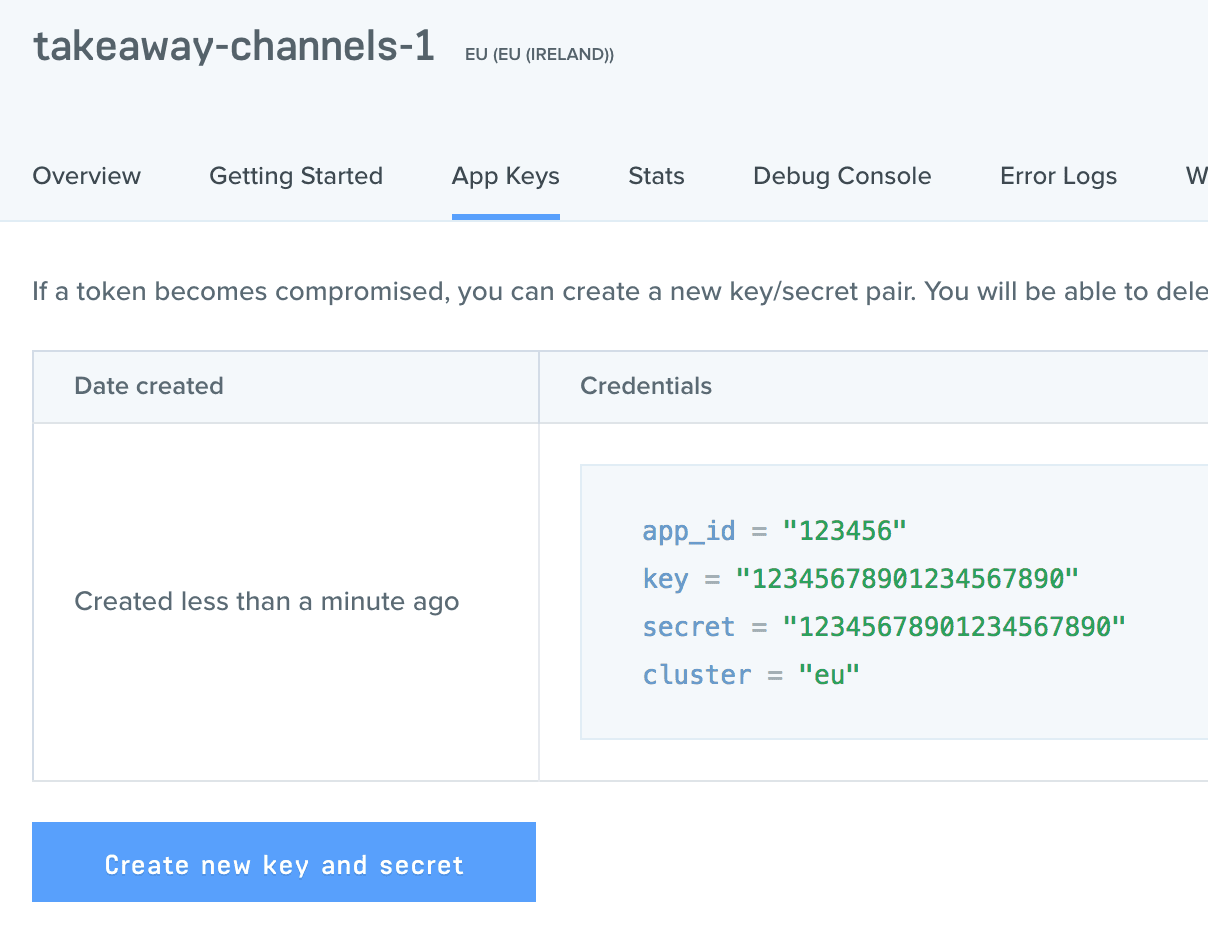
Fill out this dialog as needed and then click the Create my app button. Then click on App Keys and note down the credentials for later.
Registering for Pusher Beams
In order to use the Beams API and SDKs from Pusher, you also need to create a new Beams instance in the Pusher dashboard
Next, on your Overview for your Beams instance, click Open Quickstart to add your Firebase Cloud Messaging (FCM) Server Key to the Beams Instance.
After saving your FCM key, you can finish the Quickstart wizard by yourself to send your first push notification, or just continue as we’ll cover this below.
It’s important to make sure that you download and keep the google-services.json file from the Firebase Console as we are going to need this later on.
Once you have created your Beams instance, you will also need to note down your Instance Id and Secret Key from the Pusher Dashboard, found under the CREDENTIALS section of your Instance settings.
Backend application
We are going to build our backend application using Spring Boot and the Kotlin programming language, since this gives us a very simple way to get going whilst still working in the same language as the Android app.
Head over to https://start.spring.io/ to create our project structure. We need to specify that we are building a Gradle project with Kotlin and Spring Boot 2.0.2 (or newer if available at the time of reading), and we need to include the “Web” component:
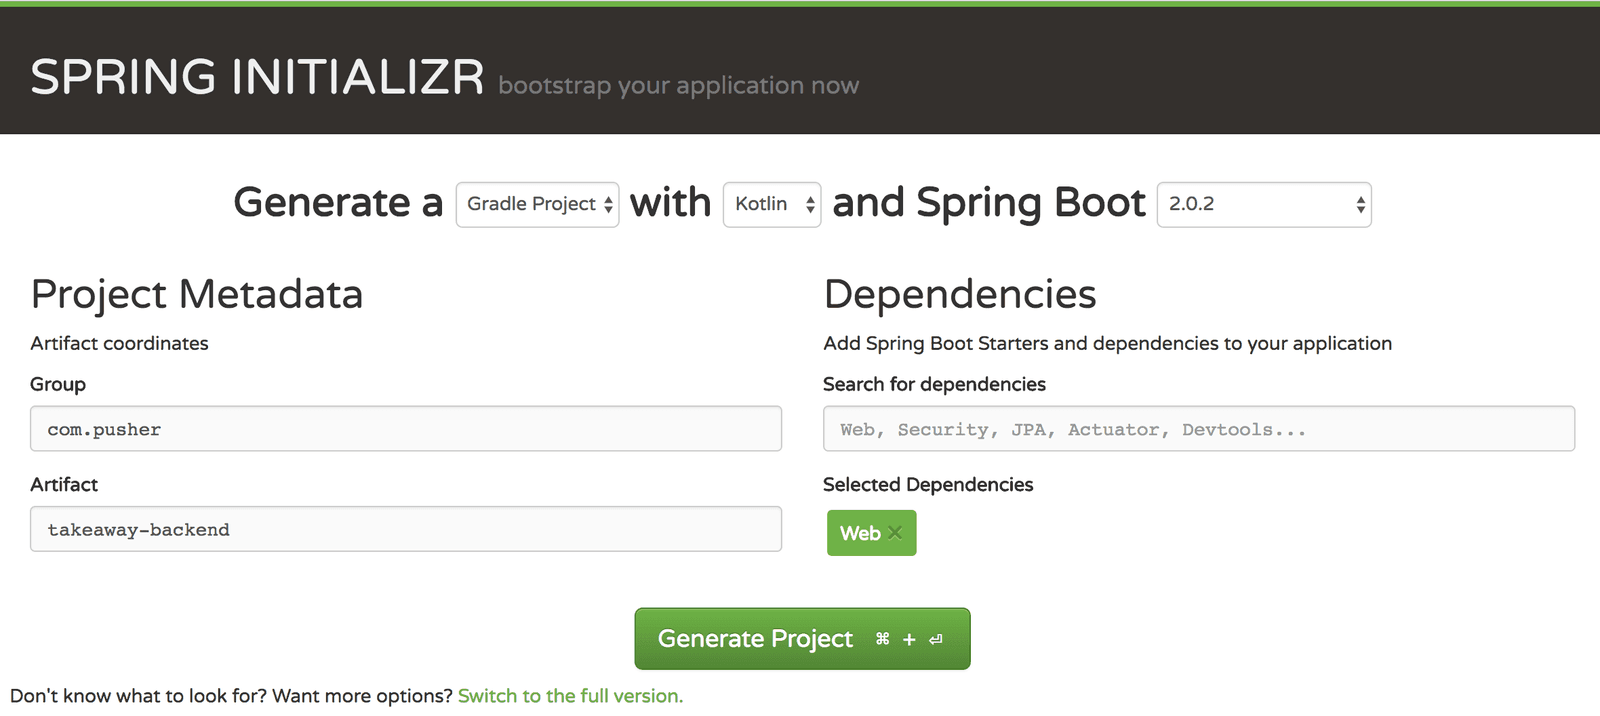
The Generate Project button will give you a zip file containing our application structure. Unpack this somewhere. At any time, you can execute ./gradlew bootRun to build and start your backend server running.
Firstly though, we need to add some dependencies. Open up the build.gradle file and add the following to the dependencies section:
1compile 'com.pusher:pusher-http-java:1.0.0' 2 compile 'com.pusher:push-notifications-server-java:0.9.0' 3 runtime 'com.fasterxml.jackson.module:jackson-module-kotlin:2.9.2'
The first of these is the Pusher library needed for triggering push notifications. The second is the Jackson module needed for serializing and deserializing Kotlin classes into JSON.
Now, build the project. This will ensure that all of the dependencies are downloaded and made available and that everything compiles and builds correctly:
1$ ./gradlew build 2 Starting a Gradle Daemon (subsequent builds will be faster) 3 4 > Task :test 5 2018-04-27 07:34:27.548 INFO 43169 --- [ Thread-5] o.s.w.c.s.GenericWebApplicationContext : Closing org.springframework.web.context.support.GenericWebApplicationContext@c1cf60f: startup date [Fri Apr 27 07:34:25 BST 2018]; root of context hierarchy 6 7 8 BUILD SUCCESSFUL in 17s 9 5 actionable tasks: 5 executed
Required endpoints
Our backend application will have endpoints for the customer and staff UI to work with. The customer endpoints are:
- GET /menu-items
- POST /orders
Whilst the staff endpoints are:
- GET /orders
- PUT /orders/{id}/status
- PUT /orders/{id}/items/{id}/status
An orders resource will contain a number of menu-items entries, with the status of them. The customer application will create a new order containing a simple list of these entries, and then the staff application will update the status of each item as is completed. Once they are all completed it will then update the order status to indicate that the food is out for delivery, and that it has been delivered.
The creation of an order will cause a Pusher Channels message to be sent out, containing the new order. Every time an order is updated will cause a Pusher Beams message to be sent out, containing the status of that order.
Listing menu items
The first thing we’ll do is to support listing of menu items.
Firstly we want to actually represent our menu items. In this case we’ll go for something very simple - just an name and an ID - but in reality you could include whatever details are needed. Create a new class called MenuItem as follows:
1data class MenuItem( 2 val id: String, 3 val name: String 4 )
Then we’ll create a class to represent our DAO layer for loading menu items. This will be entirely hard-coded in this application, but in reality would work in terms of a database. Create a new class called MenuItemDao as follows:
1@Component 2 class MenuItemDao { 3 private val menuItems = listOf( 4 MenuItem(id = "cheese_tomato_pizza", name = "Cheese & Tomato Pizza"), 5 MenuItem(id = "hot_spicy_pizza", name = "Hot & Spicy Pizza"), 6 MenuItem(id = "vegetarian_pizza", name = "Vegetarian Supreme Pizza"), 7 MenuItem(id = "garlic_bread", name = "Garlic Pizza Bread"), 8 MenuItem(id = "donner_kebab", name = "Donner Kebab"), 9 MenuItem(id = "chicken_tikka_kebab", name = "Chicken Tikka Kebab"), 10 MenuItem(id = "chicken_strips", name = "Chicken Strips (7)"), 11 MenuItem(id = "beef_burger", name = "Beef Burger"), 12 MenuItem(id = "cheeseburger", name = "Cheeseburger") 13 ) 14 15 fun listMenuItems() = menuItems 16 }
Note: the
@Componentannotation means that Spring will automatically find this class and make it available for other classes to use.
Now we’ll create a controller to list these menu items. Create a new class called MenuItemController as follows:
1@RestController 2 @CrossOrigin 3 class MenuItemController(private val dao: MenuItemDao) { 4 @RequestMapping("/menu-items") 5 fun getMenuItems() = dao.listMenuItems() 6 }
Note: the @CrossOrigin annotation makes this controller accessible from web applications running on a different host and/or port.
Managing orders
The next part is to manage the orders themselves. For this we want to be able to create, update and list the orders that are being processed.
Firstly we will create a representation of the order itself. For this, create a class called Order as follows:
1enum class OrderItemStatus { 2 PENDING, 3 STARTED, 4 FINISHED 5 } 6 7 enum class OrderStatus { 8 PENDING, 9 STARTED, 10 COOKED, 11 OUT_FOR_DELIVERY, 12 DELIVERED 13 } 14 15 data class OrderItem( 16 val id: String, 17 val menuItem: String, 18 var status: OrderItemStatus 19 ) 20 21 data class Order( 22 val id: String, 23 var status: OrderStatus, 24 val items: List<OrderItem> 25 )
You’ll note that there are actually 4 classes here. These represent, between them, the entire order. A single order contains a status and a list of order items, where a single order item contains a menu item and the status of that order item. This allows us to update each order item independently of any others, including if one order contains multiples of the same menu item.
Next, create a new class called OrderDao. This is going to represent our data storage for orders and order items.
1@Component 2 class OrderDao { 3 private val orders = mutableListOf<Order>() 4 5 fun createNewOrder(items: List<String>) : Order { 6 val orderId = UUID.randomUUID().toString() 7 val orderItems = items.map { menuItem -> 8 val orderItemId = UUID.randomUUID().toString() 9 OrderItem(id = orderItemId, menuItem = menuItem, status = OrderItemStatus.PENDING) 10 } 11 12 val order = Order(id = orderId, items = orderItems, status = OrderStatus.PENDING) 13 orders.add(order) 14 15 return order 16 } 17 18 fun removeOrder(orderId: String) { 19 orders.removeIf { order -> order.id == orderId } 20 } 21 22 fun listOrders(): List<Order> = orders 23 24 fun getOrderById(id: String) = orders.first { order -> order.id == id } 25 }
Finally, we want a controller that can be used to interact with orders. For this, create a new class called OrderController as follows:
1@RestController 2 @RequestMapping("/orders") 3 @CrossOrigin 4 class OrderController(private val orderDao: OrderDao) { 5 @RequestMapping(method = [RequestMethod.GET]) 6 fun listOrders() = orderDao.listOrders() 7 8 @RequestMapping(method = [RequestMethod.POST]) 9 fun createOrder(@RequestBody items: List<String>): Order { 10 val order = orderDao.createNewOrder(items) 11 12 // notifier call to go here 13 return order 14 } 15 16 @RequestMapping(value = ["/{order}/status"], method = [RequestMethod.PUT]) 17 fun updateOrderStatus(@PathVariable("order") orderId: String, 18 @RequestBody newStatus: OrderStatus): Order { 19 val order = orderDao.getOrderById(orderId) 20 order.status = newStatus 21 22 if (order.status == OrderStatus.DELIVERED) { 23 orderDao.removeOrder(orderId) 24 } 25 26 // notifier call to go here 27 return order 28 } 29 30 @RequestMapping(value = ["/{order}/items/{item}/status"], method = [RequestMethod.PUT]) 31 fun updateOrderItemStatus(@PathVariable("order") orderId: String, 32 @PathVariable("item") itemId: String, 33 @RequestBody newStatus: OrderItemStatus): Order { 34 val order = orderDao.getOrderById(orderId) 35 order.items.first { item -> item.id == itemId } 36 .status = newStatus 37 38 if (order.items.all { item -> item.status == OrderItemStatus.FINISHED }) { 39 order.status = OrderStatus.COOKED 40 } else if (order.items.any { item -> item.status != OrderItemStatus.PENDING }) { 41 order.status = OrderStatus.STARTED 42 } 43 44 // notifier call to go here 45 return order 46 } 47 }
This has some business logic around when the status of an order or an order item is updated, in order to correctly transition the order through it’s lifecycle.
Note: there is no error handling here. Actions such as providing an invalid ID or status will cause a bad error to be returned. In a real application this would need to be handled properly, but for this article we don’t need to worry about it.
Sending update notifications
Once we have our backend server able to manage our orders and order items, we need to keep all of our clients updated. This includes both the web UI for the restaurant and the Android UI for the customers. For this, we are going to be sending events using both Pusher Beams and Pusher Channels.
For this, we will first create a new class called OrderNotifier as follows:
1@Component 2 class OrderNotifier( 3 @Value("\${pusher.beams.instance_id}") beamsInstanceId: String, 4 @Value("\${pusher.beams.secret}") beamsSecretKey: String, 5 @Value("\${pusher.channels.app_id}") channelsAppId: String, 6 @Value("\${pusher.channels.key}") channelsKey: String, 7 @Value("\${pusher.channels.secret}") channelsSecret: String, 8 @Value("\${pusher.channels.cluster}") channelsCluster: String 9 ) { 10 11 private val beams: PushNotifications = PushNotifications(beamsInstanceId, beamsSecretKey) 12 private val channels: Pusher = Pusher(channelsAppId, channelsKey, channelsSecret) 13 14 init { 15 channels.setCluster(channelsCluster) 16 channels.setEncrypted(true) 17 } 18 19 fun notify(order: Order) { 20 sendBeamsNotification(order) 21 sendChannelsNotification(order) 22 } 23 24 private fun sendBeamsNotification(order: Order) { 25 val itemStatusCounts = order.items.groupBy { it.status } 26 .mapValues { it.value.size } 27 28 beams.publish(listOf(order.id), 29 mapOf( 30 "fcm" to mapOf( 31 "data" to mapOf( 32 "order" to order.id, 33 "status" to order.status.name, 34 "itemsPending" to (itemStatusCounts[OrderItemStatus.PENDING] ?: 0).toString(), 35 "itemsStarted" to (itemStatusCounts[OrderItemStatus.STARTED] ?: 0).toString(), 36 "itemsFinished" to (itemStatusCounts[OrderItemStatus.FINISHED] ?: 0).toString() 37 ) 38 ) 39 )) 40 } 41 42 private fun sendChannelsNotification(order: Order) { 43 channels.trigger("orders", "order-update", mapOf( 44 "order" to order.id, 45 "status" to order.status.name 46 )) 47 } 48 }
Then we will wire this up in our controller. Update the constructor definition of OrderController as follows:
class OrderController(private val orderDao: OrderDao, private val orderNotifier: OrderNotifier) {
Then add the following to each of the createOrder, updateOrderStatus and updateOrderItemStatus methods, immediately before the return:
orderNotifier.notify(order)
Finally, we need to actually configure our system. This is done in application.properties, as follows:
1pusher.channels.app_id=CHANNELS_APP_ID 2 pusher.channels.key=CHANNELS_KEY 3 pusher.channels.secret=CHANNELS_SECRET 4 pusher.channels.cluster=CHANNELS_CLUSTER 5 6 pusher.beams.instance_id=BEAMS_INSTANCE_ID 7 pusher.beams.secret=BEAMS_SECRET
Note: remember to replace CHANNELS_APP_ID, CHANNELS_KEY, CHANNELS_SECRET, CHANNELS_CLUSTER, BEAMS_INSTANCE_ID and BEAMS_SECRET with the appropriate values obtained when you registered your Pusher application details.
At this point, our backend does everything necessary to support this application.
Takeaway web application
The next part is to build the web application that the takeaway will use to fulfil orders. We’re going to use Create React App for that. Firstly, we’ll create the webapp structure itself:
1$ create-react-app takeaway-webapp 2 $ cd takeaway-webapp 3 $ npm install --save axios pusher-js semantic-ui-react semantic-ui-css
This also installs the modules for communicating with our backend - axios for making HTTP calls and pusher-js for receiving the Pusher Channels messages - as well as Semantic UI for our styling.
Note: at the time of writing, this also installs babel/runtime version 7.0.0-beta.48, which has a serious bug in it. If this is still the case then you can fix this by running
npm install--``save @babel/runtime@7.0.0-beta.47.
Firstly we’ll create a component for rendering a single order. This is fully self-contained in this example, but in reality you might choose to separate out into smaller components. Create a new file called src/Order.js as follows:
1import React from 'react'; 2 import { Segment, Table, Button } from 'semantic-ui-react' 3 import axios from 'axios'; 4 function updateOrderItem(order, item, newStatus) { 5 axios.put(`http://localhost:8080/orders/${order.id}/items/${item.id}/status`, 6 newStatus, 7 { 8 transformRequest: (data) => `"${data}"`, 9 headers: { 10 'Content-Type': 'application/json' 11 } 12 }); 13 } 14 function updateOrder(order, newStatus) { 15 axios.put(`http://localhost:8080/orders/${order.id}/status`, 16 newStatus, 17 { 18 transformRequest: (data) => `"${data}"`, 19 headers: { 20 'Content-Type': 'application/json' 21 } 22 }); 23 } 24 function OrderItemButton({ order, item }) { 25 if (item.status === 'PENDING') { 26 return <Button onClick={() => updateOrderItem(order, item, 'STARTED')}>Start Work</Button>; 27 } else if (item.status === 'STARTED') { 28 return <Button onClick={() => updateOrderItem(order, item, 'FINISHED')}>Finish Work</Button>; 29 } else { 30 return <div>Finished</div>; 31 } 32 } 33 function OrderButton({ order }) { 34 if (order.status === 'COOKED') { 35 return <Button onClick={() => updateOrder(order, 'OUT_FOR_DELIVERY')}>Out for Delivery</Button>; 36 } else if (order.status === 'OUT_FOR_DELIVERY') { 37 return <Button onClick={() => updateOrder(order, 'DELIVERED')}>Delivered</Button>; 38 } else { 39 return null; 40 } 41 } 42 export default function Order({ order }) { 43 const items = order.items.map((item) => ( 44 <Table.Row key={item.id}> 45 <Table.Cell> 46 {item.name} 47 </Table.Cell> 48 <Table.Cell> 49 <OrderItemButton order={order} item={item} /> 50 </Table.Cell> 51 </Table.Row> 52 )); 53 return ( 54 <Segment vertical> 55 <Table striped> 56 <Table.Body> 57 {items} 58 </Table.Body> 59 </Table> 60 <OrderButton order={order} /> 61 </Segment> 62 ); 63 }
Note: this makes calls to
http://localhost:8080. In reality you will need to replace this with the real URL to your backend service.
This will render a table containing all of the order items, each of which has a button next to it to update the status of that item. There will also be a button, if applicable, below the table to update the delivery status of the entire order.
Next we’ll create a simple component to render the complete list of orders. Create src/OrdersList.js as follows:
1import React from 'react'; 2 import Order from './Order'; 3 export default ({ orders }) => { 4 const orderElements = orders.map((order) => <Order order={order} key={order.id} />); 5 return ( 6 <div> 7 {orderElements} 8 </div> 9 ); 10 };
Now we need to actually connect this to our APIs. For this we will create a file called src/ConnectedOrdersList.js - so called because it’s not a UI component but a connecting component that makes API calls instead - as follows:
1import React from 'react'; 2 import axios from 'axios'; 3 import Pusher from 'pusher-js'; 4 import OrdersList from './OrdersList'; 5 const socket = new Pusher('<CHANNELS__KEY>', { 6 cluster: '<CHANNELS_CLUSTER>', 7 }); 8 export default class ConnectedOrdersList extends React.Component { 9 state = { 10 orders: [] 11 }; 12 render() { 13 return ( 14 <div className="ui container"> 15 <OrdersList orders={this.state.orders} /> 16 </div> 17 ); 18 } 19 componentDidMount() { 20 this._fetchOrders(); 21 socket.subscribe('orders') 22 .bind('order-update', () => this._fetchOrders()); 23 } 24 _fetchOrders() { 25 const ordersPromise = axios.get('http://localhost:8080/orders') 26 const menuItemsPromise = axios.get('http://localhost:8080/menu-items'); 27 Promise.all([ordersPromise, menuItemsPromise]) 28 .then((values) => { 29 const menuItems = {}; 30 values[1].data.forEach((entry) => { 31 menuItems[entry.id] = entry.name; 32 }); 33 const orders = values[0].data.map((order) => { 34 return { 35 id: order.id, 36 status: order.status, 37 items: order.items.map((item) => { 38 return { 39 id: item.id, 40 menuItem: item.menuItem, 41 status: item.status, 42 name: menuItems[item.menuItem] 43 }; 44 }) 45 }; 46 }); 47 this.setState({ 48 orders: orders 49 }); 50 }); 51 } 52 }
Note: ensure you replace <CHANNELS_KEY> and <CHANNELS_CLUSTER> with the same values as used in the backend application.
This contains a method that will make two API calls - one each to our /menu-items and /orders endpoints - and combine the results together. Then it will update the component state with this result, which will cause it to render our Orders component with the resultant list. We also register to listen to the Pusher events that we broadcast earlier so that every time we get an indication that the orders have changed we can go and refresh our list.
Finally, replace the contents of src/App.js with the following:
1import React, { Component } from 'react'; 2 import 'semantic-ui-css/semantic.min.css'; 3 import OrdersList from './ConnectedOrdersList'; 4 class App extends Component { 5 render() { 6 return ( 7 <div className="App"> 8 <OrdersList /> 9 </div> 10 ); 11 } 12 } 13 export default App;
This renders our ConnectedOrdersList component that we’ve just defined as the main body of our application.
At this point, we have a fully functional web UI that the takeaway can use to manage the orders:

Building the customers application
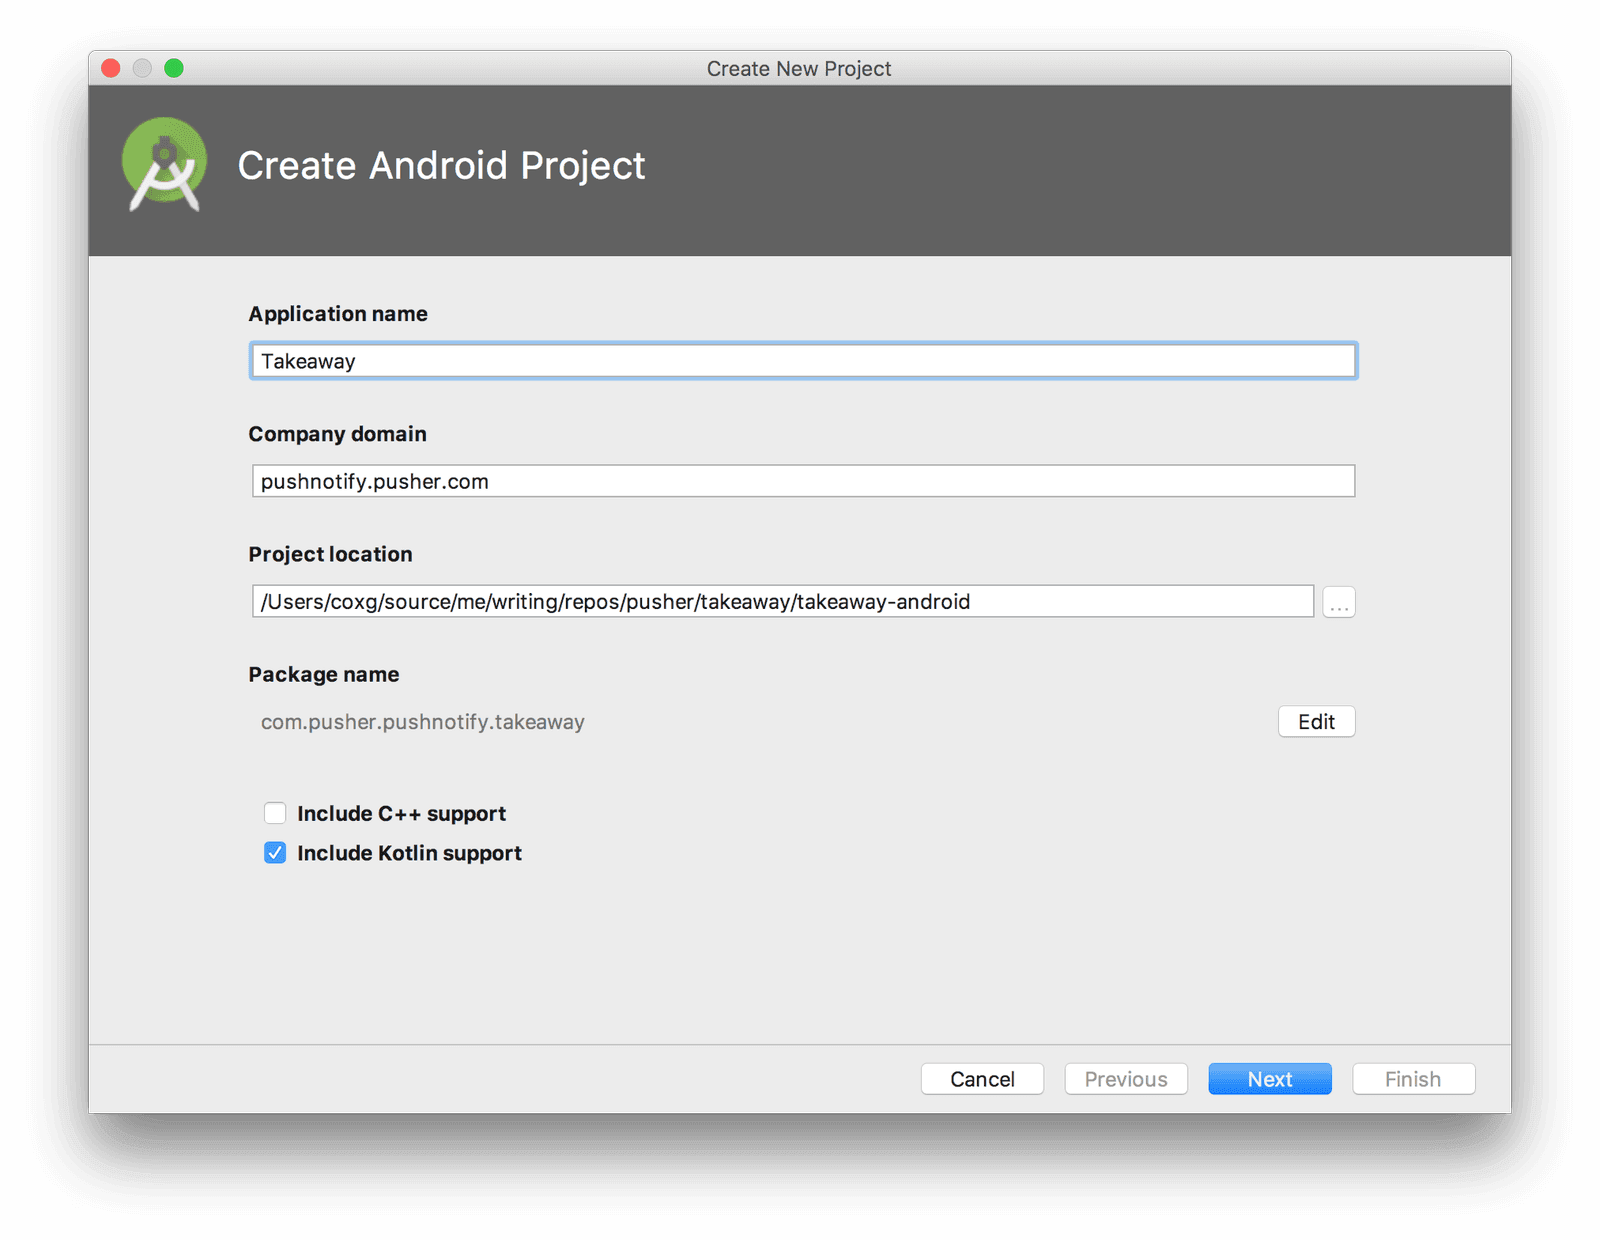
The customers Android application will also be built in Kotlin, using Android Studio. To start, open up Android Studio and create a new project, entering some appropriate details and ensuring that you select the Include Kotlin support option. Note that the Package name must match that specified when you set up the FCM Server Key earlier.
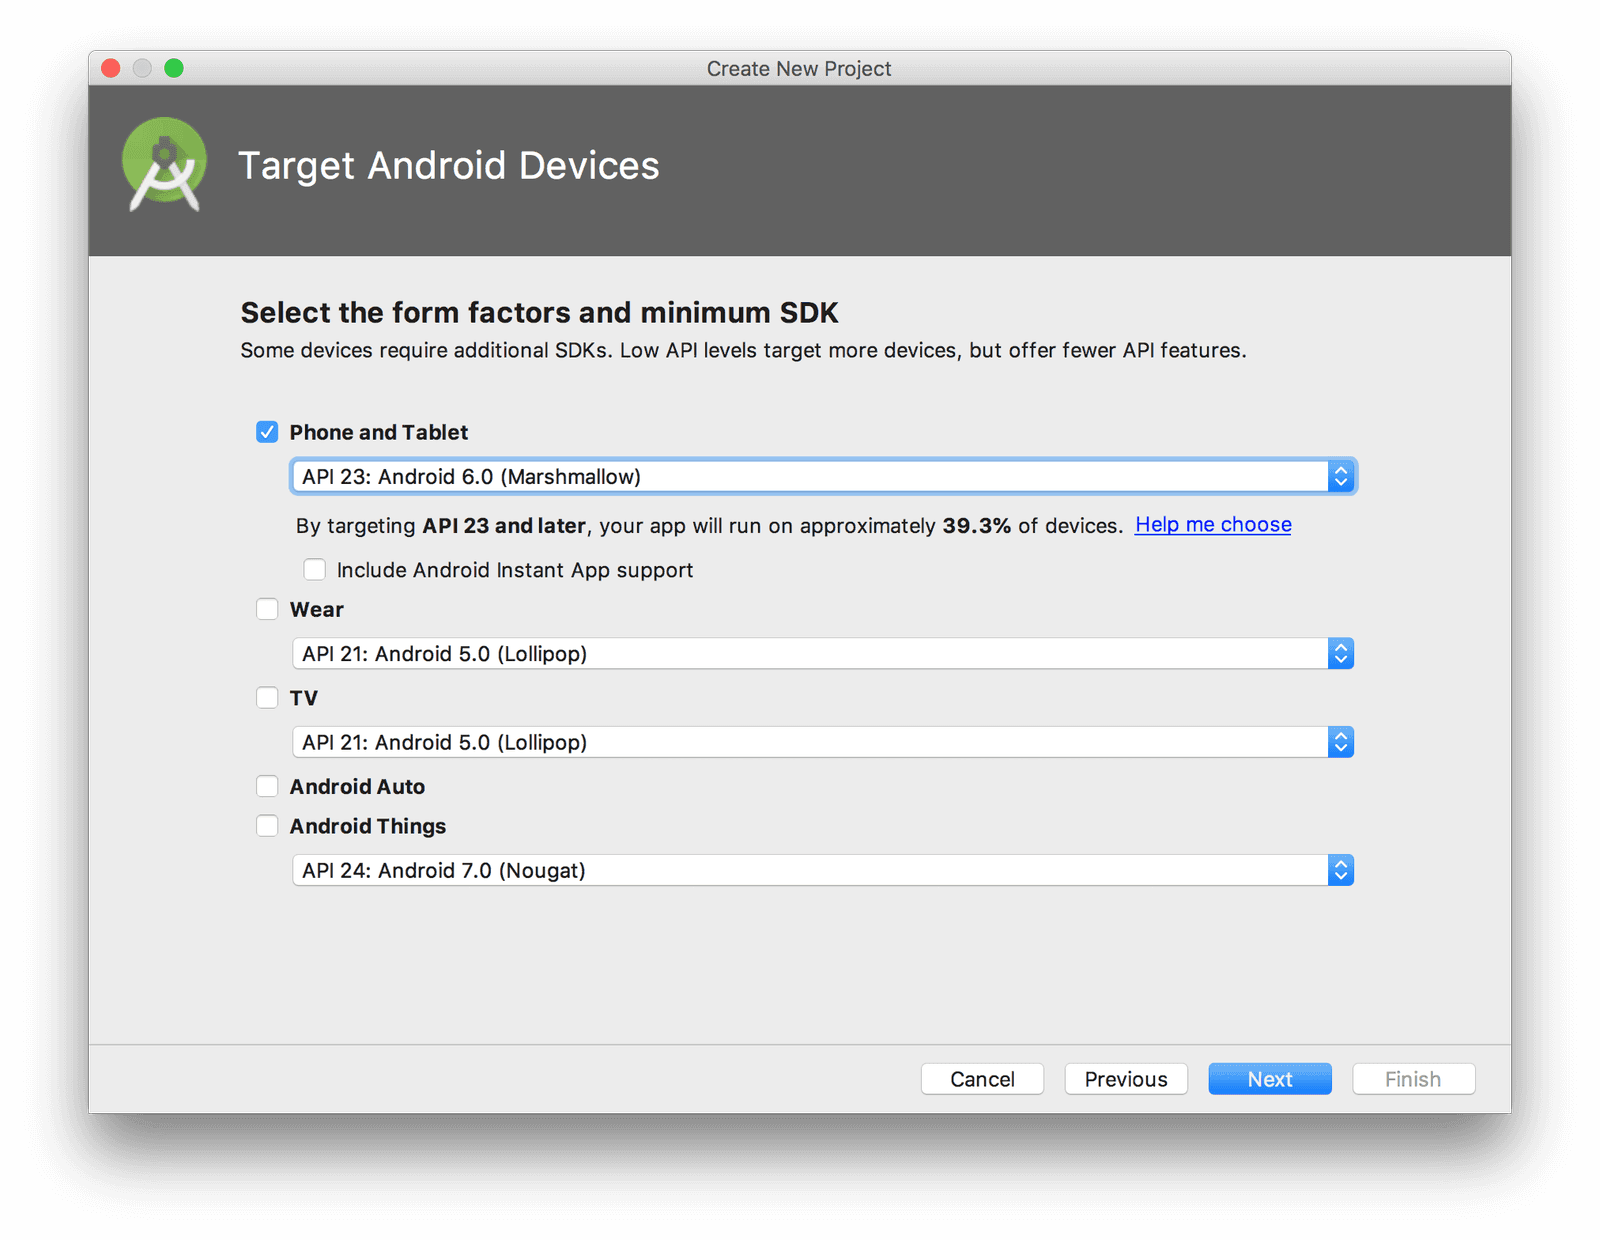
Then on the next screen, ensure that you select support for Phone and Tablet using at least API 23:
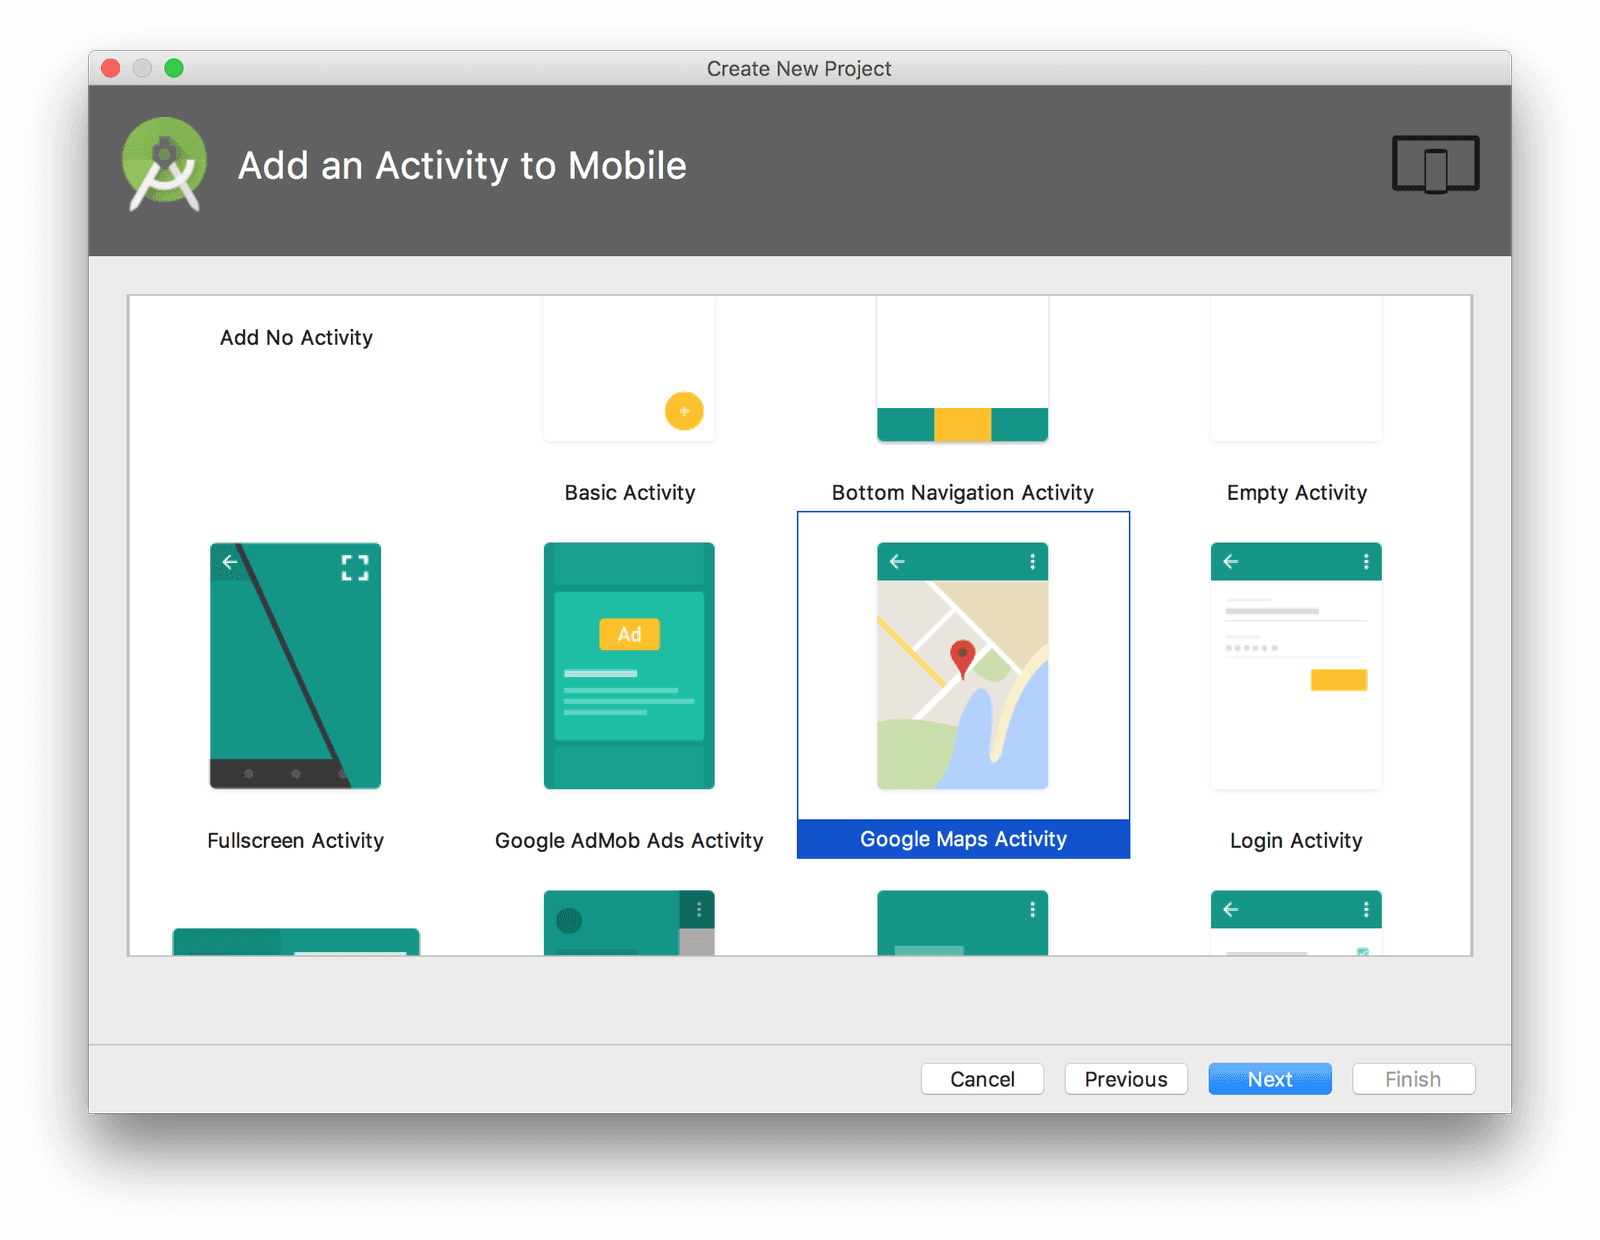
Ensure that an Google Maps Activity is selected:
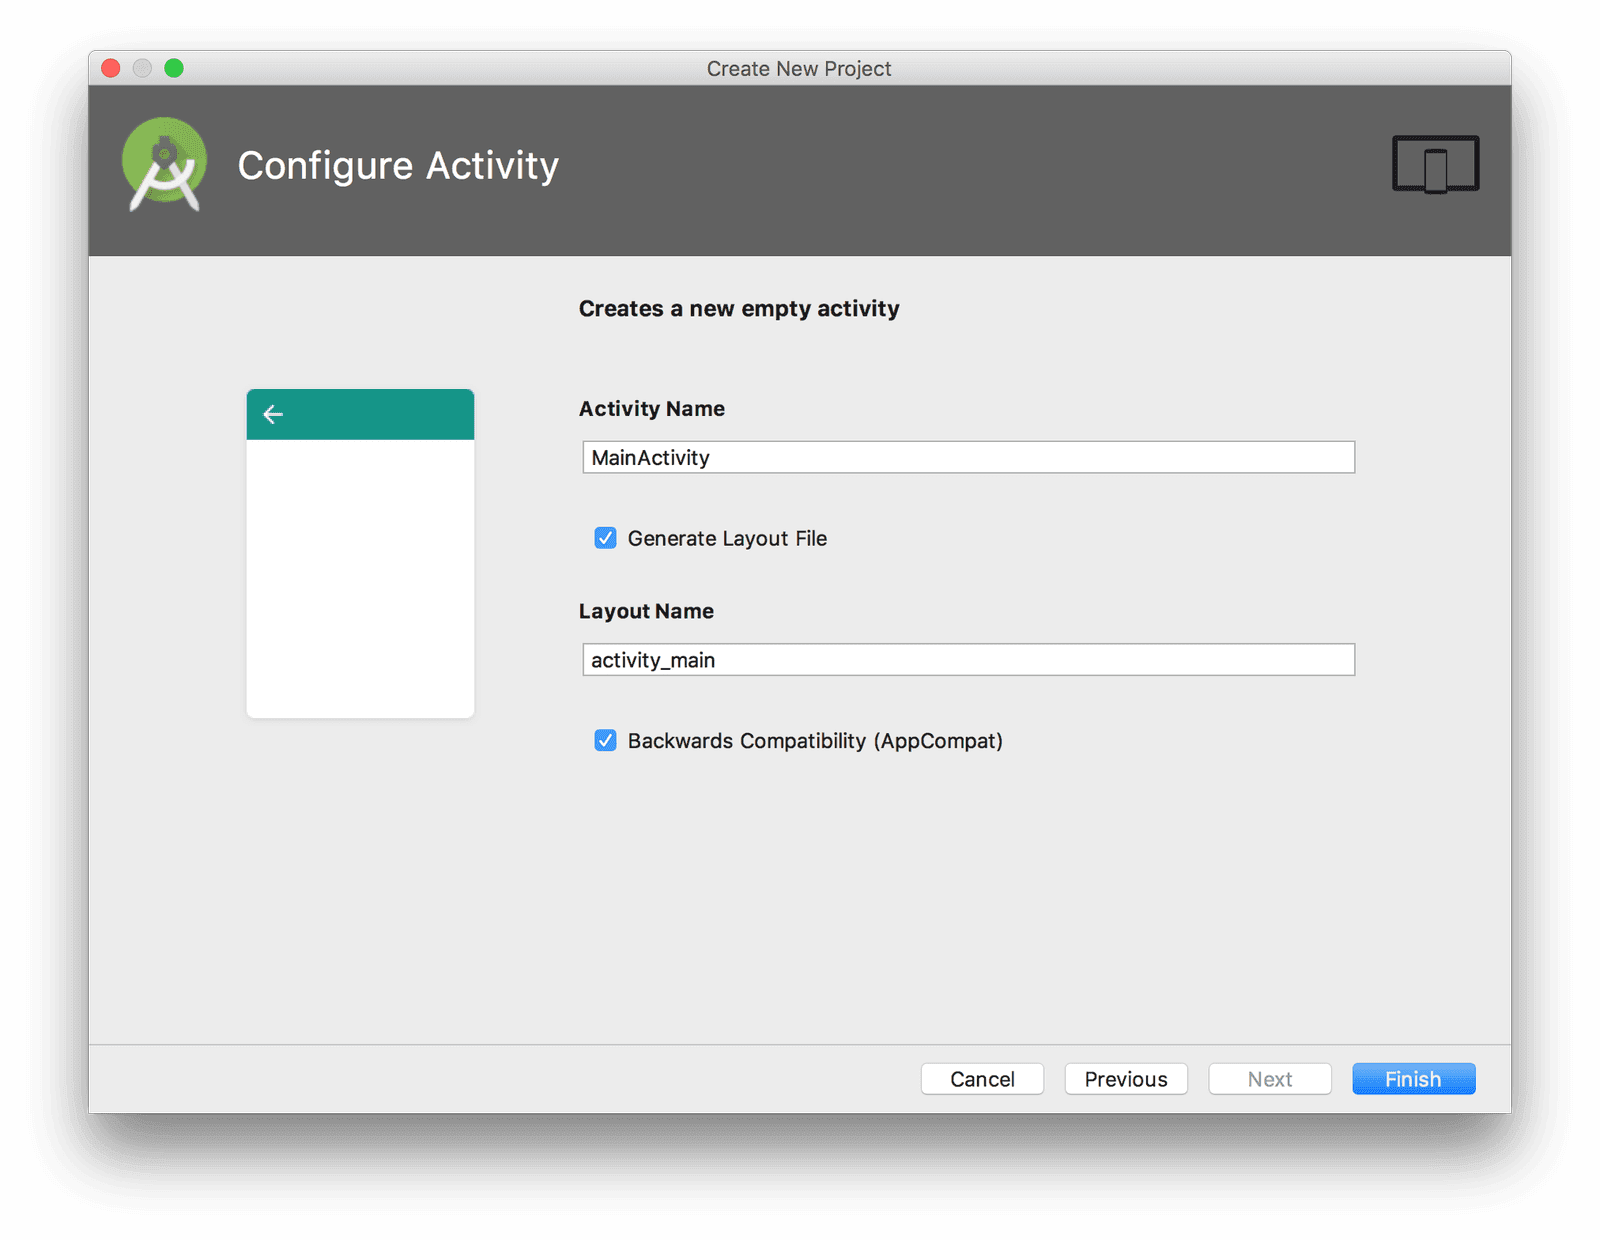
And set the Activity Name to “MainActivity” and Layout Name to “activity_main”:
Next we need to add some dependencies to our project to support Pusher. Add the following to the project level build.gradle, in the existing dependencies section:
classpath 'com.google.gms:google-services:3.2.1'
Then add the following to the dependencies section of the app level build.gradle:
1implementation 'com.google.firebase:firebase-messaging:15.0.0' 2 implementation 'com.pusher:push-notifications-android:0.10.0' 3 4 compile 'com.loopj.android:android-async-http:1.4.9' 5 compile 'com.google.code.gson:gson:2.2.4'
And this to bottom of the app level build.gradle:
apply plugin: 'com.google.gms.google-services'
Next, copy the google-services.json file we downloaded earlier into the app directory under your project. We are now ready to actually develop our specific application using these dependencies.
Finally, we need to add some permissions to our application. Open up the AndroidManifest.xml file and add the following immediately before the <application> tag:
<uses-permission android:name="android.permission.INTERNET"/>
Displaying the menu items
The main screen that we are going to show is a list of menu items, allowing the user to place an order.
Firstly, we need our main application layout. For this, update app/res/layout/activity_main.xml as follows:
1<?xml version="1.0" encoding="utf-8"?> 2 <LinearLayout xmlns:android="http://schemas.android.com/apk/res/android" 3 android:orientation="vertical" 4 android:layout_width="match_parent" 5 android:layout_height="match_parent" 6 android:background="#fff"> 7 8 <ScrollView 9 android:layout_width="match_parent" 10 android:layout_height="wrap_content"> 11 12 <LinearLayout 13 android:layout_width="match_parent" 14 android:layout_height="wrap_content" 15 android:orientation="vertical"> 16 17 <ListView 18 android:id="@+id/records_view" 19 android:layout_width="match_parent" 20 android:layout_height="500dp" 21 android:layout_marginTop="16dp"> 22 23 </ListView> 24 </LinearLayout> 25 </ScrollView> 26 27 <Button 28 android:id="@+id/button2" 29 android:layout_width="match_parent" 30 android:layout_height="wrap_content" 31 android:text="Place Order" /> 32 33 </LinearLayout>
Note: in order to paste this snippet in, the Text tab at the bottom of the screen should be selected.
Note: sometimes, copy and paste of the entire file into the Text tab will cause a blank line at the very top. This is invalid XML and needs to be removed.
This gives us a list to show our menu items, and a button with which to place the order.
Now we need a class to represent each entry in this list. Create a new class called MenuItem as follows:
1data class MenuItem( 2 val id: String, 3 val name: String 4 )
You’ll notice that this is identical to the MenuItem class on the backend. This is unsurprising since it represents the exact same data.
Next we need a layout to represent a single row in our list. For this, create a new layout resource called app/res/layout/menuitem.xml as follows:
1<?xml version="1.0" encoding="utf-8"?> 2 <LinearLayout xmlns:android="http://schemas.android.com/apk/res/android" 3 android:orientation="horizontal" android:layout_width="match_parent" 4 android:layout_height="match_parent"> 5 <TextView 6 android:id="@+id/item_name" 7 android:textColor="#000" 8 android:fontFamily="serif" 9 android:layout_height="wrap_content" 10 android:layout_width="match_parent" 11 android:layout_weight="1" 12 android:text="Name"/> 13 <Spinner 14 android:id="@+id/item_count" 15 android:layout_width="match_parent" 16 android:layout_height="wrap_content" 17 android:layout_weight="3" /> 18 </LinearLayout>
This has two entries in it - an item name and a spinner. The spinner control is effectively a dropdown, and will be used to select how many of each item to order.
Now we need to be able to render this new layout for each of our menu items. For this, create a new class called MenuItemAdapter as follows:
1class MenuItemAdapter(private val recordContext: Context) : BaseAdapter() { 2 var records: List<MenuItem> = listOf() 3 set(value) { 4 field = value 5 notifyDataSetChanged() 6 } 7 8 override fun getView(i: Int, view: View?, viewGroup: ViewGroup): View { 9 val theView = if (view == null) { 10 val recordInflator = recordContext.getSystemService(Activity.LAYOUT_INFLATER_SERVICE) as LayoutInflater 11 12 val theView = recordInflator.inflate(R.layout.menuitem, null) 13 val newMenuItemViewHolder = MenuItemViewHolder( 14 theView.findViewById(R.id.item_name), 15 theView.findViewById(R.id.item_count) 16 ) 17 val countAdapter = ArrayAdapter( 18 recordContext, 19 android.R.layout.simple_spinner_dropdown_item, 20 IntRange(0, 10).toList().toTypedArray() 21 ) 22 newMenuItemViewHolder.count.adapter = countAdapter 23 theView.tag = newMenuItemViewHolder 24 25 theView 26 } else { 27 view 28 } 29 30 val menuItemViewHolder = theView.tag as MenuItemViewHolder 31 32 val menuItem = getItem(i) 33 menuItemViewHolder.name.text = menuItem.name 34 menuItemViewHolder.id = menuItem.id 35 36 return theView 37 } 38 39 override fun getItem(i: Int) = records[i] 40 41 override fun getItemId(i: Int) = 1L 42 43 override fun getCount() = records.size 44 } 45 46 data class MenuItemViewHolder( 47 val name: TextView, 48 val count: Spinner 49 ) { 50 var id: String? = null 51 }
Amongst other things, this includes a hard-coded list of values for the spinner control - allowing the user to order up to 10 of any single item.
Finally we just need to get the data into this list. Update MainActivity by adding the following field to the class:
private lateinit var recordAdapter: MenuItemAdapter
Then initialize this by adding the following to our MainActivity class:
1override fun onResume() { 2 super.onResume() 3 recordAdapter = MenuItemAdapter(this) 4 val recordsView = findViewById<View>(R.id.records_view) as ListView 5 recordsView.setAdapter(recordAdapter) 6 7 refreshMenuItems() 8 }
Next we just need to implement the refreshMenuItems method, as follows:
1private fun refreshMenuItems() { 2 val client = AsyncHttpClient() 3 client.get("http://10.0.2.2:8080/menu-items", object : JsonHttpResponseHandler() { 4 override fun onSuccess(statusCode: Int, headers: Array<out Header>, response: JSONArray) { 5 super.onSuccess(statusCode, headers, response) 6 runOnUiThread { 7 val menuItems = IntRange(0, response.length() - 1) 8 .map { index -> response.getJSONObject(index) } 9 .map { obj -> 10 MenuItem( 11 id = obj.getString("id"), 12 name = obj.getString("name") 13 ) 14 } 15 16 recordAdapter.records = menuItems 17 } 18 } 19 }) 20 }
Note: The import for
Headershould becz.msebera.android.httpclient.Header
Note: 10.0.2.2 is the IP Address that the host machine appears when running inside the Android emulator. In reality you will want to use the real host of your service.
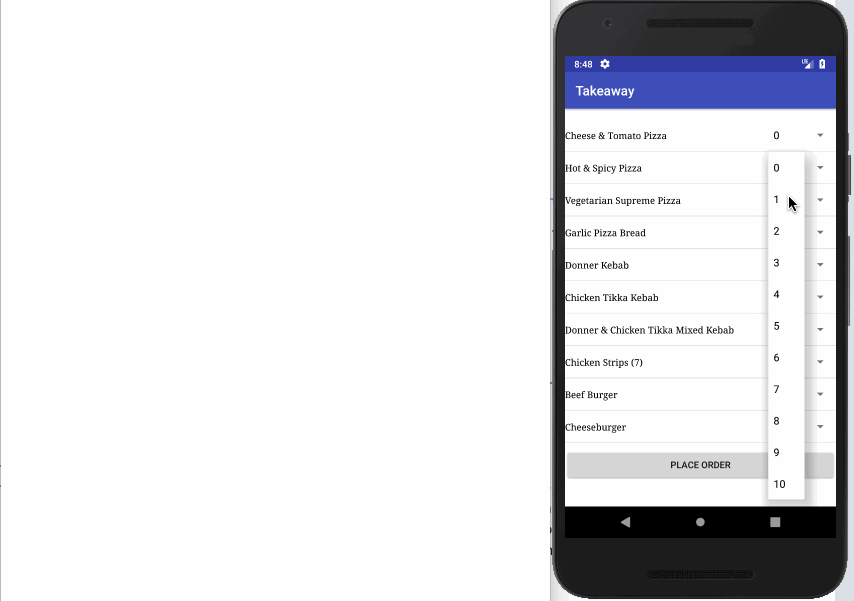
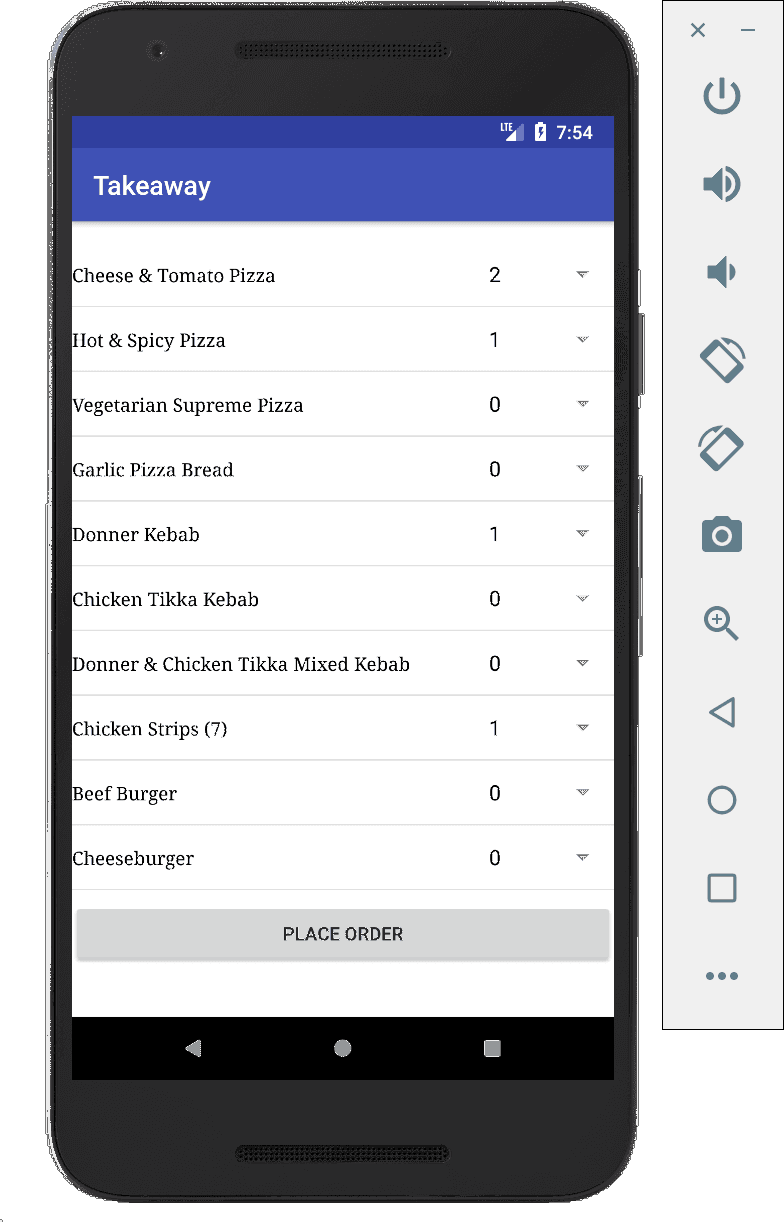
At this point we can start up the Android application and see all of the menu choices:
Placing an order
Now that we can see the list of items that can be ordered, we need to be able to place an order.
Firstly, we need to be able to get the list of items that have been selected to be ordered. This will be coming out of the MenuItemAdapter class, as this acts as the interface to the list of items.
Firstly, create a couple of fields in this class as follows:
1private val currentOrder = mutableMapOf<String, Int>() 2 3 val order: List<String> 4 get() = currentOrder.filterValues { it > 0 } 5 .map { orderItem -> List(orderItem.value) { orderItem.key } } 6 .flatten()
The first of these is a private map that will act as a mapping between each item and the number of that item to order. The second is a computed property that returns a list of the items to order, with one entry for each item. This means that if we order three pizzas, there will be three entries in this list.
Next, add a handler towards the bottom of the getView method, immediately before the return statement, to update our map of orders:
1menuItemViewHolder.count.onItemSelectedListener = object : AdapterView.OnItemSelectedListener { 2 override fun onNothingSelected(parent: AdapterView<*>?) { 3 currentOrder.remove(menuItem.id) 4 } 5 6 override fun onItemSelected(parent: AdapterView<*>?, view: View?, position: Int, id: Long) { 7 currentOrder[menuItem.id] = position 8 } 9 }
This is triggered every time a new value is selected for any item, and will cause our map to be updated to match.
Now we can use this to actually make the HTTP call to place our order. For this we need to create a new method called placeOrder in the MainActivity class, as follows:
1fun placeOrder(view: View) { 2 val items = recordAdapter.order 3 if (items.isEmpty()) { 4 Toast.makeText(this, "No items selected", Toast.LENGTH_LONG) 5 .show() 6 } else { 7 8 val request = JSONArray(items) 9 10 val client = AsyncHttpClient() 11 client.post(applicationContext, "http://10.0.2.2:8080/orders", StringEntity(request.toString()), 12 "application/json", object : JsonHttpResponseHandler() { 13 14 override fun onSuccess(statusCode: Int, headers: Array<out Header>, response: JSONObject) { 15 runOnUiThread { 16 Toast.makeText(this@MainActivity, "Order placed", Toast.LENGTH_LONG) 17 .show() 18 } 19 } 20 }) 21 } 22 }
Note: the “this@MainActivity” syntax means to get the “this” value that refers to the “MainActivity” class, as opposed to the “JsonHttpResponseHandler” inner class that we’re actually executing inside.
Then we can update our activity_main.xml file so that the Button element reads as follows:
1<Button 2 android:id="@+id/button2" 3 android:layout_width="match_parent" 4 android:layout_height="wrap_content" 5 android:text="Place Order" 6 android:onClick="placeOrder" />
This now does everything necessary to place an order on the server, including displaying an error message if the user did not select any items to order when pressing the button.
Receiving order update notifications
Now that we can place orders, we want to be notified as to the progress of the order. This will include a progress bar for the part of the process where the order is being prepared, and then simple strings to indicate that the order is out for delivery.
The first thing we need to do is enable support for receiving push notifications for our events. Add the following to the end of the onCreate method of MainActivity:
PushNotifications.start(getApplicationContext(), "BEAMS_INSTANCE_ID")
Note: remember to replace BEAMS_INSTANCE_ID with the appropriate value obtained when you registered your Pusher Beams application details.
Next we want to register to receive notifications for our order. This is done by adding the following in to the onSuccess callback method inside the placeOrder method:
1val id = response.getString("id") 2 PushNotifications.subscribe(id)
At this point, every time the order changes, the Android app will receive a push notification informing of the changes. We can now display android notifications to inform the user of the current status. Create a new method called receiveNotification in the MainActivity class as follows:
1private fun receiveNotifications() { 2 3 val notificationManager = getSystemService(Context.NOTIFICATION_SERVICE) as NotificationManager 4 5 if (Build.VERSION.SDK_INT >= Build.VERSION_CODES.O) { 6 val channel = NotificationChannel("takeaway", 7 "Pusher Takeaway", 8 NotificationManager.IMPORTANCE_DEFAULT) 9 notificationManager.createNotificationChannel(channel) 10 } 11 12 PushNotifications.setOnMessageReceivedListenerForVisibleActivity(this, object : PushNotificationReceivedListener { 13 override fun onMessageReceived(remoteMessage: RemoteMessage) { 14 Log.i("Notification", remoteMessage.data.toString()) 15 16 val pending = remoteMessage.data["itemsPending"]?.toInt() ?: 0 17 val started = remoteMessage.data["itemsStarted"]?.toInt() ?: 0 18 val finished = remoteMessage.data["itemsFinished"]?.toInt() ?: 0 19 20 val total = pending + started + finished 21 22 val notification = when(remoteMessage.data["status"]) { 23 "STARTED" -> { 24 NotificationCompat.Builder(applicationContext, "takeaway") 25 .setSmallIcon(R.mipmap.ic_launcher) 26 .setContentTitle("Your order") 27 .setContentText("Your order is being cooked") 28 .setVisibility(NotificationCompat.VISIBILITY_PUBLIC) 29 .setPriority(NotificationCompat.PRIORITY_DEFAULT) 30 .setProgress(total, finished, finished == 0) 31 } 32 "COOKED" -> { 33 NotificationCompat.Builder(applicationContext, "takeaway") 34 .setSmallIcon(R.mipmap.ic_launcher) 35 .setContentTitle("Your order") 36 .setContentText("Your order is ready") 37 .setVisibility(NotificationCompat.VISIBILITY_PUBLIC) 38 .setPriority(NotificationCompat.PRIORITY_DEFAULT) 39 .setProgress(total, total, false) 40 } 41 "OUT_FOR_DELIVERY" -> { 42 NotificationCompat.Builder(applicationContext, "takeaway") 43 .setSmallIcon(R.mipmap.ic_launcher) 44 .setContentTitle("Your order") 45 .setContentText("Your order is out for delivery") 46 .setVisibility(NotificationCompat.VISIBILITY_PUBLIC) 47 .setPriority(NotificationCompat.PRIORITY_DEFAULT) 48 } 49 "DELIVERED" -> { 50 NotificationCompat.Builder(applicationContext, "takeaway") 51 .setSmallIcon(R.mipmap.ic_launcher) 52 .setContentTitle("Your order") 53 .setContentText("Your order is outside") 54 .setVisibility(NotificationCompat.VISIBILITY_PUBLIC) 55 .setPriority(NotificationCompat.PRIORITY_DEFAULT) 56 } 57 else -> null 58 } 59 60 notification?.let { 61 notificationManager.notify(0, it.build()) 62 } 63 } 64 }) 65 }
Note: if it is ambiguous, the NotificationCompat import should be for android.support.v4.app.NotificationCompat.
And then call this new method from the onResume method:
receiveNotifications()
This gives everything for the customer to keep updated with their order. Ensure that the backend and web UI are running, and then we can test it all out together.
Conclusion
This article has hopefully shown how easy it can be to integrate Pusher technologies into your application to give real time updates to both the customer and staff user interfaces. Even though we use two totally different Pusher technologies - Pusher Channels and Pusher Beams - they work seamlessly together to give a full featured experience.
The full source code for this article is available on GitHub. Why not try extending it support more functionality - for example, multiple restaurants.


© 2024 Pusher Ltd. All rights reserved.
Pusher Limited is a company registered in England and Wales (No. 07489873) whose registered office is at MessageBird UK Limited, 3 More London Riverside, 4th Floor, London, United Kingdom, SE1 2AQ.