- Products

- Developers
- User stories
- Blog
- Pricing

How to stream user tweets with Zapier and React
Introduction
In this tutorial, we’ll explore how Pusher Channels can be used in conjunction with Zapier to display updates to a user’s Twitter feed on a webpage. If you want to play around with the code as you read this tutorial, visit this GitHub repository which contains the final version of the code for you to check out and run locally.
Prerequisites
Prior experience with building React and Node.js applications is required to complete this tutorial, but you don’t need to know how to use Pusher Channels. You also need to have Node.js (version 6 and later) as well as npm (version 5 or later) installed on your machine. You can use the commands node -v and npm -v to see which versions of Node and npm you have installed.
Getting started
Create a new folder for this project in your filesystem. You can call it tweet-stream or any other name that you prefer. Open a new terminal window and cd into the new directory you just created, then run npm init -y to initialize the project with a package.json file.
Next, run the following command to install all the dependencies we’ll be needing to build the server component of the application:
npm install express body-parser cors dotenv pusher -S
Once the installation completes, create the following files in the root of your project directory: server.js and variables.env.
Sign up for Pusher
Before we can start using the features of Pusher Channels in our application, create a free sandbox Pusher account or sign in. Once your account is created, select Channels apps on the sidebar, and hit Create Channels app to create a new app. Retrieve your credentials from the API Keys tab, and then add the following to the variable.env file you just created.
1// variables.env 2 3 PORT=5000 4 PUSHER_APP_ID=<your app id> 5 PUSHER_APP_KEY=<your app key> 6 PUSHER_APP_SECRET=<your app secret> 7 PUSHER_APP_CLUSTER=<your app cluster>
Set up the server
Open up server.js in your text editor and paste in the following:
1// server.js 2 3 require('dotenv').config({ path: 'variables.env' }); 4 5 const express = require('express'); 6 const cors = require('cors'); 7 const Pusher = require('pusher'); 8 const bodyParser = require('body-parser'); 9 10 // Create an express app 11 const app = express(); 12 13 app.use(cors()); 14 app.use(bodyParser.urlencoded({ extended: false })); 15 app.use(bodyParser.json()); 16 17 const pusher = new Pusher({ 18 appId: process.env.PUSHER_APP_ID, 19 key: process.env.PUSHER_APP_KEY, 20 secret: process.env.PUSHER_APP_SECRET, 21 cluster: process.env.PUSHER_APP_CLUSTER, 22 encrypted: true, 23 }); 24 25 app.post('/', (req, res) => { 26 console.log(req.body); 27 }); 28 29 app.set('port', process.env.PORT || 5000); 30 const server = app.listen(app.get('port'), () => { 31 console.log(`Express running → PORT ${server.address().port}`); 32 });
As you can see, we’ve set up just the one route where new tweets will be posted to. For now we’re just logging the request body to the console, but we’ll revisit this section in the later parts of the tutorial.
You can start the server by running node server.js in the terminal. It should now be running on port 5000.
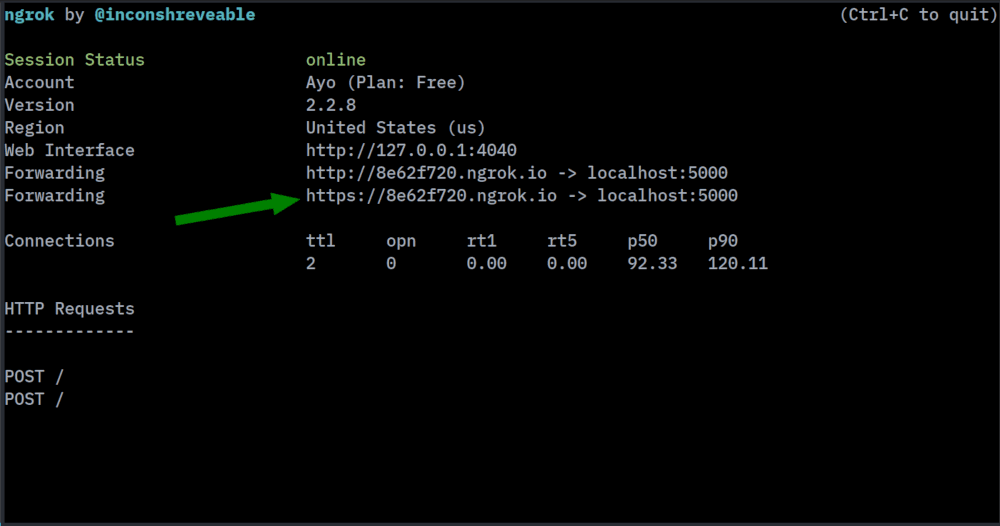
Expose your local server to the world with ngrok
To make your local server is accessible to the outside world, you can use a service like ngrok. Visit the ngrok website to find out how to install and set up ngrok on your computer. Once you have it installed, start an HTTP tunnel on port 5000 by running the following command in a new terminal window:
./ngrok http 5000
If your webhook server is listening on another port, make sure to provide the correct port when starting the HTTP tunnel. You will be given a couple of URLs but you only need the last one which is on the secure (HTTPS) protocol.
Sign up for Zapier
Zapier is a service that allows you to integrate between several applications. To use Zapier, you need to sign up for an account. Once your account is created, go here and click the Make a Zap! button to create your first Zap.
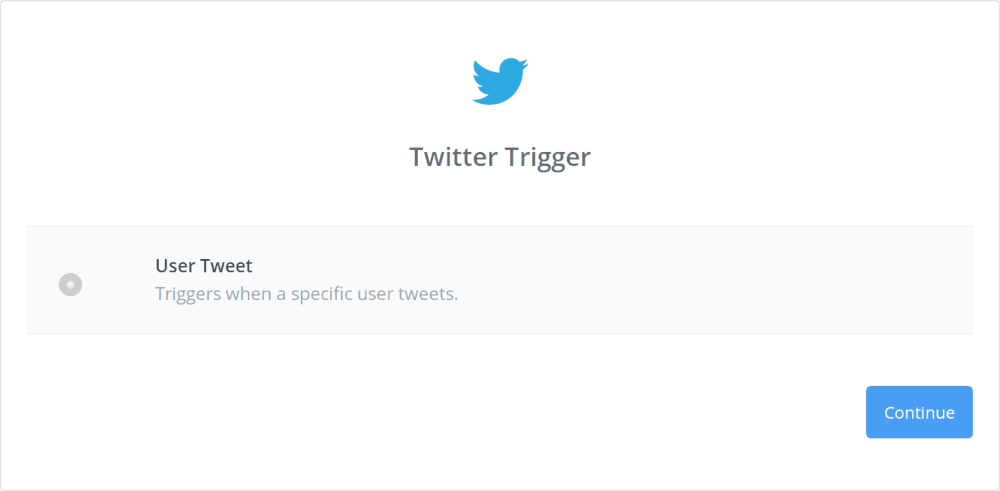
Under Choose a Trigger App, select Twitter and choose User Tweet under Twitter Trigger.
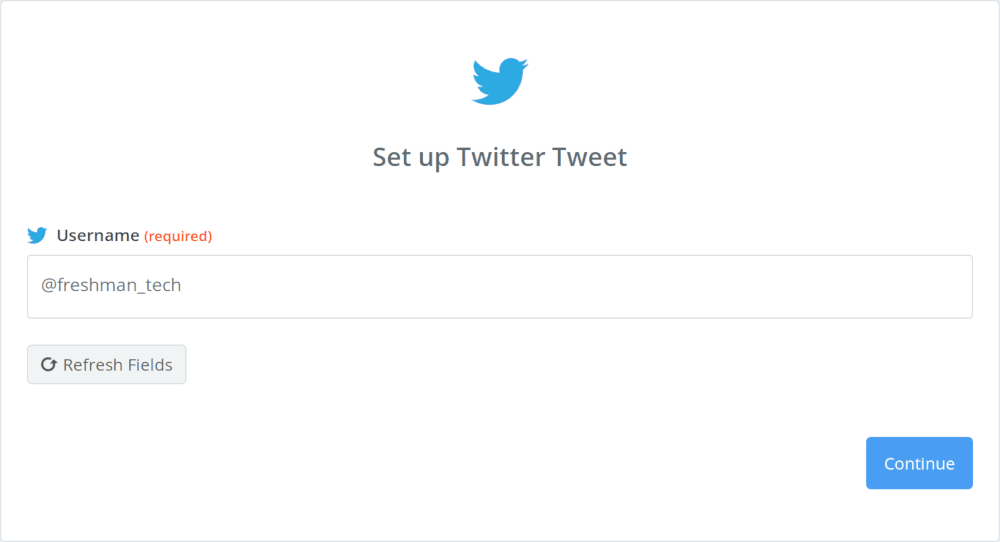
Hit the Continue button to move on to the next step. Connect a Twitter account that will be used for this Zap. You can use your existing Twitter account, or create a new one if you prefer. Once you have connected account, select it and hit Save + Continue.
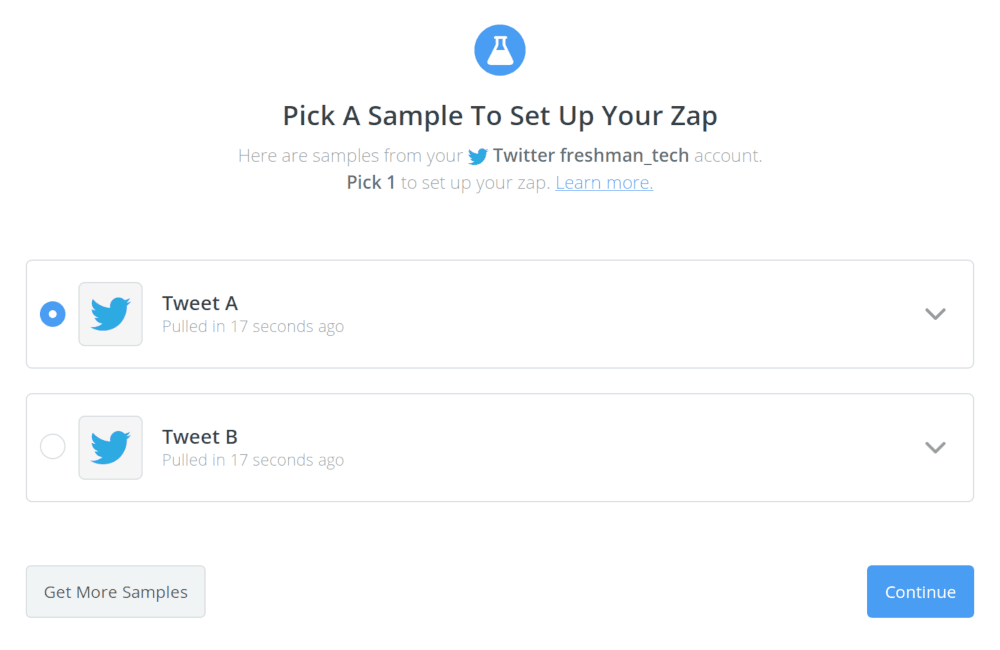
On the screen that says Pick A Sample To Set Up Your Zap, before you click Pull in Samples, make sure there is a recent enough tweet on the account you set up. Otherwise, send a tweet out before clicking the button.
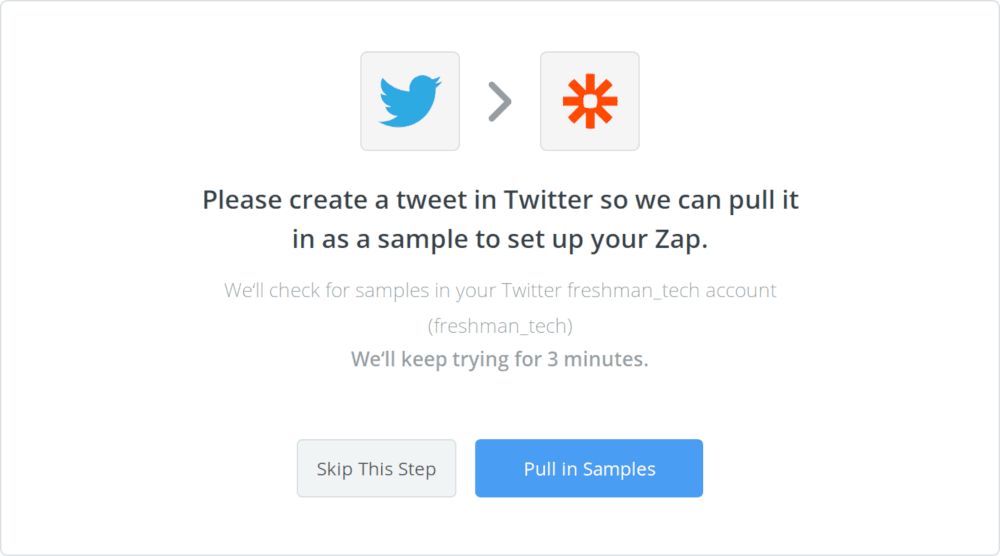
You should see the following screen once a sample tweet has been pulled from your Twitter account. Just hit the Continue button.
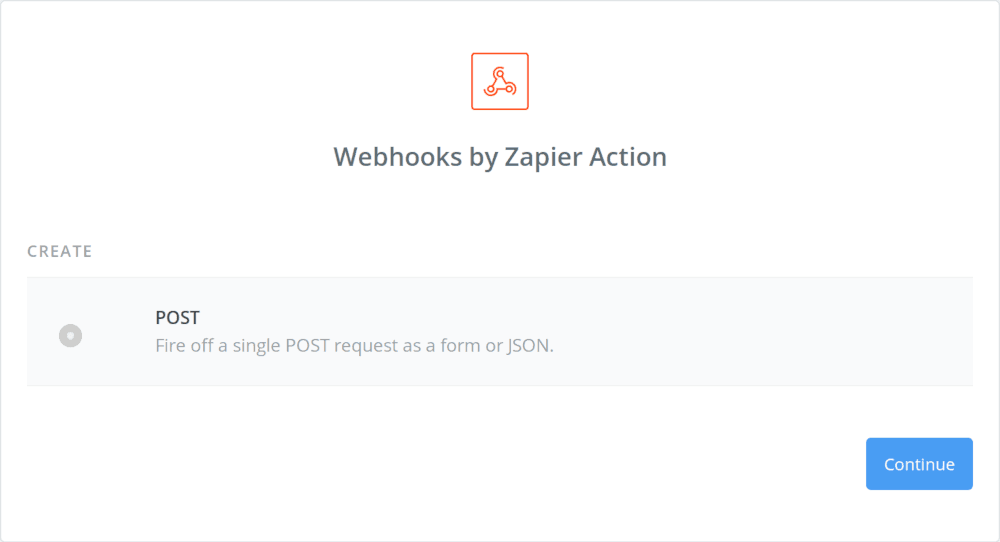
You need to setup an action step. Click the link highlighted in the screenshot below to add an action app.

Under Choose an Action app select Webhooks by Zapier Action, then select POST under the CREATE heading and click the Continue button.
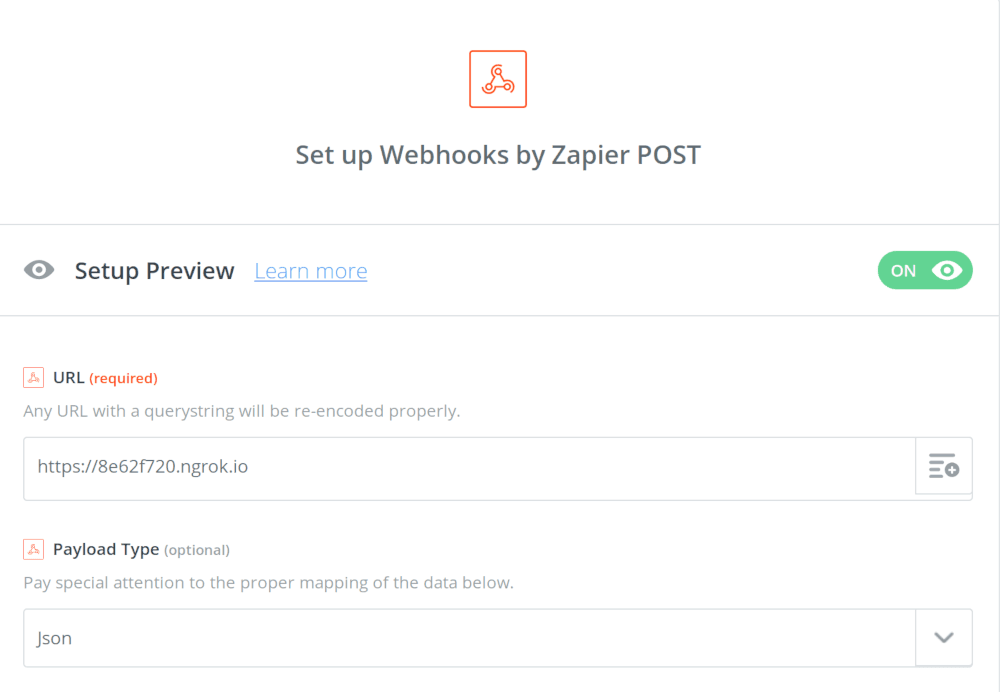
You will be asked to provided a URL under Set up Webhooks by Zapier POST. Copy the URL received from ngrok into the input field. Under advanced options, set the Payload type to Json then hit the Continue button.
On the next page, hit Send Test to Webhook by Zapier. This will send a post request to your local server along with the payload of the sample tweet pulled in earlier in the request body. Check the terminal window where the server is running. You should see some JSON output in the terminal.
Finally, hit Skip test on the left hand side and Finish on the right. You will be redirected to a page confirming the successful setup of your first Zap.
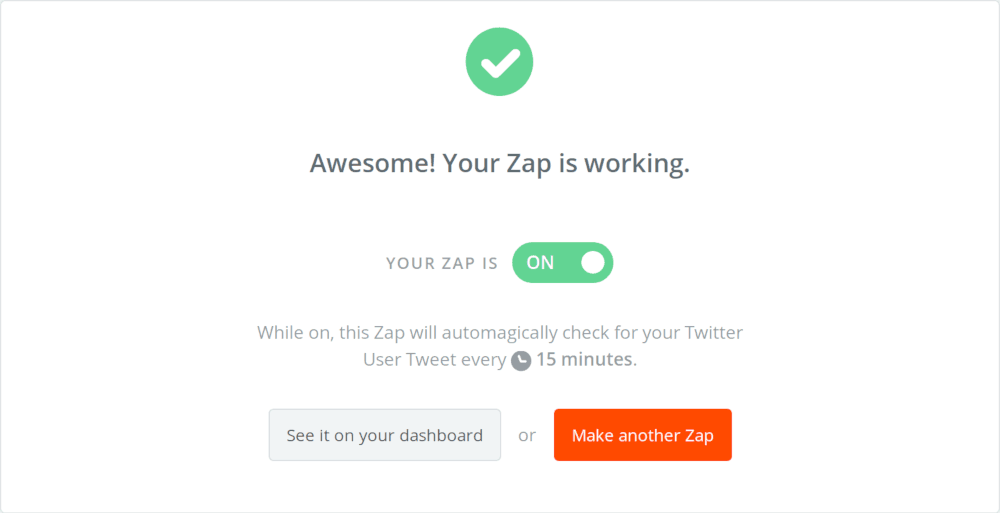
The 15 minute interval is a limitation of Zapier’s free and entry level plans. With a paid plan, you can take it to as low as 5 minutes.
Create the application frontend
Let’s work on the app frontend a bit. We need to install the create-react-app package globally so that we can use it to bootstrap a new React app. Use the following command below to install create-react-app:
npm install create-react-app -g
Next, cd in to your project directory and run create-react-app client to create a new React app in a new directory called client. Once the installation process completes, cd into the newly created client directory and run yarn start to start the development server. The application will be available for you to view it at http://localhost:3000.
Launch another terminal window, and cd into the client directory. Then run the following command to install the other dependencies we’ll be using to build the React app.
npm install react-timeago pusher-js -S
Next, open up client/src/App.js in your favorite text editor and change its contents to look like this:
1// client/src/App.js 2 3 import React, { Component } from 'react'; 4 import Pusher from 'pusher-js'; 5 import TimeAgo from 'react-timeago'; 6 import './App.css'; 7 8 class App extends Component { 9 state = { 10 tweets: [], 11 }; 12 13 componentDidMount() { 14 const pusher = new Pusher('<your app key>', { 15 cluster: '<your app cluster>', 16 encrypted: true, 17 }); 18 19 const channel = pusher.subscribe('tweets'); 20 channel.bind('new-tweet', data => { 21 const { tweets } = this.state; 22 tweets.push(data.payload); 23 24 this.setState({ 25 tweets, 26 }); 27 }); 28 } 29 30 render() { 31 const { tweets: tweetArr } = this.state; 32 33 const Tweet = (tweet, index) => ( 34 <div className="tweet" key={index}> 35 <p className="user"> 36 <span className="screen-name">{tweet.user__name}</span> 37 <span className="username">{tweet.user__screen_name}</span> 38 </p> 39 <p className="tweet-text">{tweet.text}</p> 40 <div className="meta"> 41 <div> 42 <span className="retweets">Retweets: {tweet.retweet_count}</span> 43 <span className="likes">Likes: {tweet.favorite_count}</span> 44 </div> 45 <a href={tweet.url}> 46 <TimeAgo date={tweet.created_at} /> 47 </a> 48 </div> 49 </div> 50 ); 51 52 const tweets = tweetArr.map((tweet, index) => Tweet(tweet, index)); 53 54 return ( 55 <div className="App"> 56 <header className="App-header"> 57 <h1>Tweets</h1> 58 </header> 59 60 <main className="tweets">{tweets}</main> 61 </div> 62 ); 63 } 64 } 65 66 export default App;
The componentDidMount() lifecycle method houses the logic for displaying new tweets on the page. We’re opening a connection to Channels using the subscribe() method which allows us to subscribe to a new channel called tweets. Then, we listen for the new-tweet event on the tweets channel using the bind method and update the application state once we receive a tweet update.
Don’t forget to retrieve your Channels credentials from the API Keys tab in the dashboard, and then replace the <your app key> and <your app cluster> placeholders in App.js with the appropriate values.
Add the styles for the app
Let's add the styles for the app’s frontend. Open up client/src/App.css in your editor and replace its contents with the following styles:
1// client/src/App.css 2 3 body { 4 font-family: Helvetica, "Helvetica Nueue", sans-serif; 5 } 6 7 .App { 8 text-align: center; 9 } 10 11 .tweets { 12 width: 100%; 13 max-width: 700px; 14 margin: 30px auto; 15 } 16 17 .tweet { 18 margin-bottom: 20px; 19 border: 1px solid #ccc; 20 padding: 15px; 21 text-align: left; 22 } 23 24 .screen-name { 25 font-weight: bold; 26 display: inline-block; 27 margin-right: 10px; 28 } 29 30 .username::before { 31 content: '@'; 32 } 33 34 .retweets { 35 display: inline-block; 36 margin-right: 10px; 37 } 38 39 .meta { 40 display: flex; 41 justify-content: space-between; 42 }
Trigger updates from the server
Inside the server.js file, change the root route to look like this:
1// server.js 2 3 app.post('/', (req, res) => { 4 pusher.trigger('tweets', 'new-tweet', { 5 payload: req.body, 6 }); 7 });
Zapier will hit this route for each new tweet that is posted to the Twitter account you connected, and include the tweet payload in the request body. We can then trigger a new update on the tweets channel with the tweet payload included.
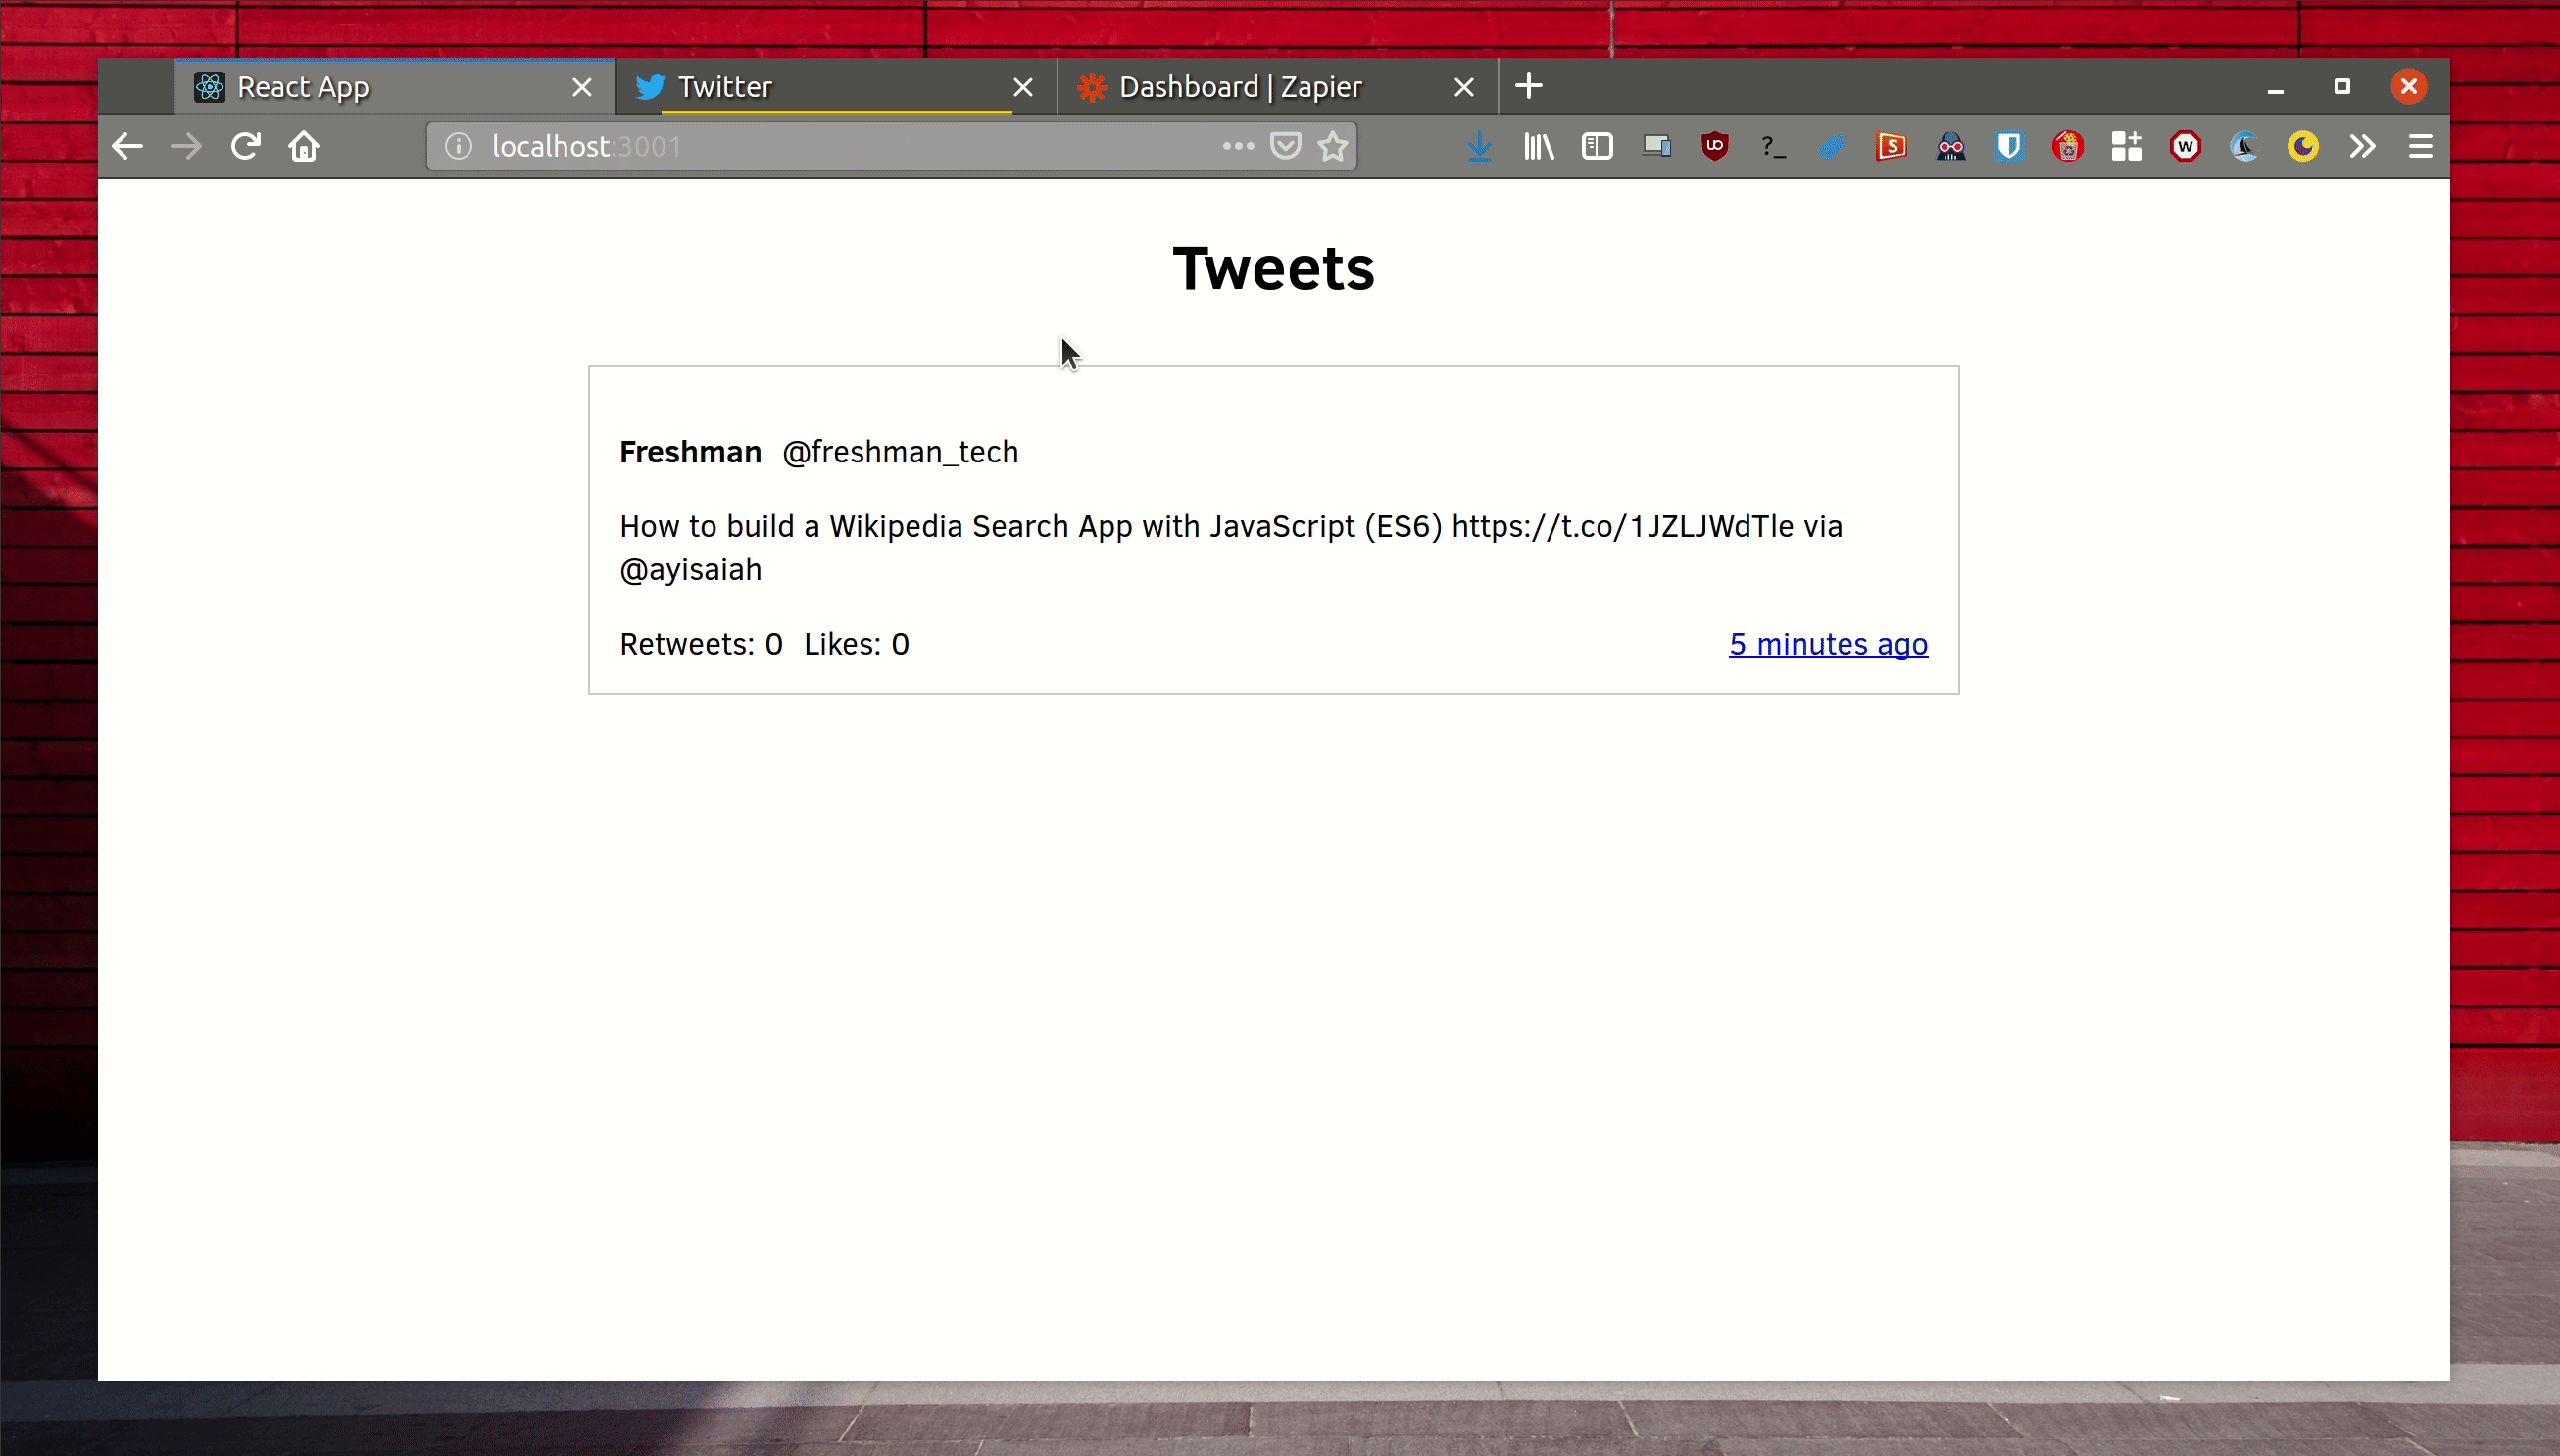
Kill the server using Ctrl-C and run node server.js again from the root of your project directory. Then send a few tweets using your Twitter account. After about 15 minutes, you should see the new tweets on the page.
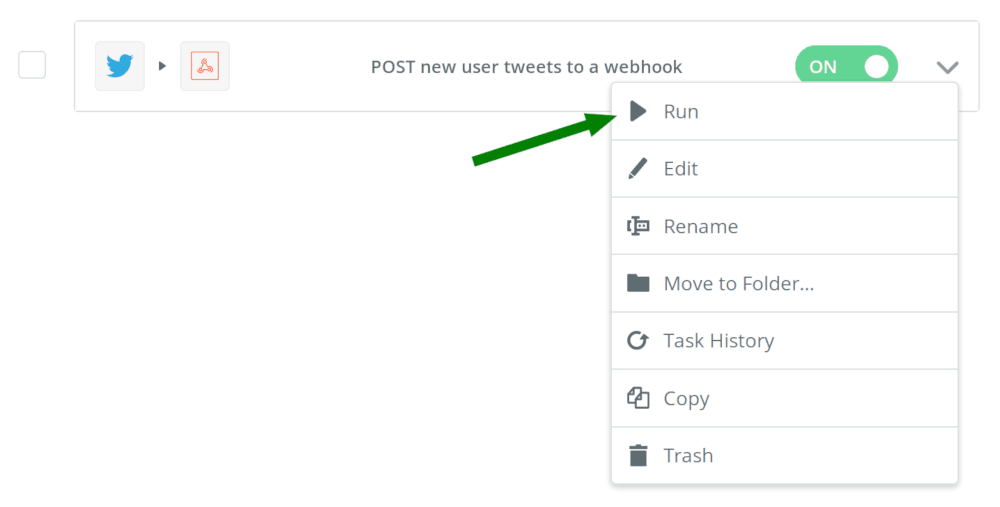
You can also trigger the update manually by going to the Zapier dashboard, find the Zap you created and hit the Run button as shown the screenshot above.
Conclusion
I have explained how to set up Zapier to get fetch user tweets every 15 minutes and how to display new updates on a webpage with Pusher Channels. If you want to dig into other things you can do with Channels, make sure to check out its exhaustive documentation. To grab the complete code used in this tutorial, please visit this GitHub repository.


© 2024 Pusher Ltd. All rights reserved.
Pusher Limited is a company registered in England and Wales (No. 07489873) whose registered office is at MessageBird UK Limited, 3 More London Riverside, 4th Floor, London, United Kingdom, SE1 2AQ.