- Products

- Developers
- User stories
- Blog
- Pricing

Build a live score feed Chrome extension
Introduction
Introduction
In this tutorial, we will look into how to build a Chrome extensionand also integrate realtime updates using the Pusher Channels API.
Sometimes, a traditional website isn’t the optimal channel for conveying realtime updates, because the updated event needs to be utilized instantaneously. The process of loading up a new webpage and waiting for it to update with data can be quite inconvenient to the consumer who doesn’t want to have to leave the current tab to retrieve data.
Chrome extensions are basically little websites that add extra functionality to Chrome and can be accessed from all open tabs on the Chrome browser. Under the hood, a Chrome extension is some HTML, CSS, and JavaScript that has access to the JavaScript APIs that Chrome exposes.
What we will build
We will build a simple Chrome extension that displays score updates on an NFL game. We will not key into an API but simulate the scores and cause them to progress randomly. For the sake of this tutorial, we will assume that the game being played is Indianapolis Colts vs Tennessee Titans and the extension will display updates in realtime once it is started.
By the end of this article, we will have built this Chrome extension that triggers Chrome notifications whenever there is an update on the game:
The source code to this tutorial is available here on GitHub.
Prerequisites
To follow along with this tutorial, you will need to have the following:
- An IDE of your choice like Visual Studio Code
- Node.js and NPM installed on your computer. Installation instructions.
- Basic knowledge of Node.js and vanilla JS.
If you have all of the above requirements, we can proceed.
Skip the next section if you already signed up with Pusher and created an application.
Setting up a Pusher account
We will need Pusher to power the realtime updates on the extension so you need to create an account here if you don’t already have one. After signing up, create a new Pusher channels application.
While creating the application, fill in some information about the project. Select Vanilla JS for the frontend tech stack and Node.js for the backend tech. When the application is created, note the application’s credentials; we will need them to integrate Pusher into the extension.
Setting up the Node.js backend
The first thing we want to do here is to create a new folder to house the entire project. Create a new directory called realtime-nfl-scores.
Next, launch your terminal and cd into the directory you just created. In there, create an index.js file. This will be the file that will contain the Node.js code.
Next, Let’s initialize the directory for npm:
$ npm init -y
The command above will generate a package.json file in the root of the project. Next, lets install some dependencies for the application. These dependencies are:
- Express - A minimalist web framework for Node.js.
- Dotenv - A package to load environment variables from a
.envfile into process.env.
To install them, run the following command in your terminal:
1$ npm install express --save 2 $ npm install dotenv --save 3 $ npm install pusher --save
Because we have Dotenv installed, we can create a .env file in the root directory of the project and use the environment variables in our code. We will access the variables using process.env. Create a .env file in the root of the project and paste the following contents into the file:
1// File: ./.env 2 NODE_ENV=development 3 PUSHER_APP_ID=PUSHER_APP_ID 4 PUSHER_KEY=PUSHER_APP_KEY 5 PUSHER_SECRET=PUSHER_APP_SECRET 6 PUSHER_CLUSTER=PUSHER_APP_CLUSTER
⚠️ Replace
PUSHER_*keys with your app credentials.
Open the index.js file and update it with the code below:
1// File: ./index.js 2 const express = require("express"); 3 const app = express(); 4 const Pusher = require("pusher"); 5 6 require("dotenv").config(); 7 8 const pusher = new Pusher({ 9 appId: process.env.PUSHER_APP_ID, 10 key: process.env.PUSHER_KEY, 11 secret: process.env.PUSHER_SECRET, 12 cluster: process.env.PUSHER_CLUSTER 13 }); 14 15 const simulate = () => { 16 let Colts = { 17 name: "Colts", 18 score: 0 19 }; 20 21 let Titan = { 22 name: "Titan", 23 score: 0 24 }; 25 26 const generateNumber = () => Math.floor(Math.random() * 2); 27 28 setInterval(() => { 29 Colts.score = Colts.score + generateNumber(); 30 Titan.score = Titan.score + generateNumber(); 31 pusher.trigger("realtime-updates", "scores", [Colts, Titan]); 32 }, 3500); 33 } 34 35 app.get("/start", simulate); 36 37 app.listen(3000, () => console.log("Listening on port 3000"));
In the snippet above, we created a new Express application, configured DotEnv and initialized a new Pusher variable. Next, we registered a new instance of the Pusher variable using the variables that we previously stored in the .env file.
We defined a simulate function to generate a random number between 0 and 1 every 3.5 seconds, then trigger a new scores event (sending over the generated data) on the realtime-updates channel.
We defined a single GET endpoint called start and this is the endpoint that’s responsible for starting the generating of pseudo scores and triggering events. Finally, we specified that the server should listen for requests on port 3000.
This is all the code we need for the backend, let’s move on to building the frontend.
Building the frontend
In this section, we are going to start building the Chrome extension. The first thing we want to do is create a separate folder for the extension. Create a new folder called frontend and cd into it in your terminal.
All Chrome extensions require a manifest file. The manifest file tells Chrome everything it needs to know about the extension. Create a manifest.json file inside the extension project directory and paste the following into it:
1// File: ./manifest.json 2 { 3 "manifest_version": 2, 4 "name": "Real-time NFL score", 5 "version": "1.0", 6 "description": "A simple Chrome extension to simulate the NFL scores in real-time", 7 "content_security_policy": "script-src 'self' https://js.pusher.com/4.2/pusher.min.js https://stats.pusher.com; object-src 'self'", 8 "browser_action": { 9 "default_icon": "./img/icon.png", 10 "default_popup": "popup.html" 11 }, 12 "permissions": ["notifications", "activeTab"] 13 }
Most of the keys in this JSON file are self-explanatory, let's go over the ones that are not:
content_security_policy: We register two remote origins that we want the extension to execute scripts from. To learn more aboutcontent_security_policyread here.browser_action: We specify what the default icon of the extension is (we will create one shortly) and what HTML page should be displayed when the extension is opened.permissions: We specify in this section that we need to access the activeTab and Notifications.
Setting the default icon
You’ll notice that we specified a path to the default icon in the manifest file but didn’t create the folder or the file yet, so let’s do that now. Create a new folder and call it img. In the img directory, we will save an image (a png) file as icon.png.
You can use any image of your choice! We just want something that looks nice for an extension’s default icon. We have an icon you can use in the repo but it should not be used without permission.
Setting up the UI
In the manifest file, we indicated that an HTML file called popup.html should be displayed when the extension is opened. So, let’s create the file now in the root of the frontend directory and paste the following code into the file:
1<!-- File: ./popup.html --> 2 <!DOCTYPE html> 3 <html> 4 <head> 5 <link 6 rel="stylesheet" 7 href="https://stackpath.bootstrapcdn.com/bootstrap/4.1.3/css/bootstrap.min.css" 8 /> 9 <style> 10 @import url("https://fonts.googleapis.com/css?family=Kosugi+Maru"); 11 body { 12 height: 130px; 13 width: 260px; 14 font-family: "Kosugi Maru", sans-serif; 15 } 16 </style> 17 <title>NFL score</title> 18 </head> 19 <body> 20 <nav class="navbar navbar-dark bg-dark"> 21 <a class="navbar-brand" id="scores" href="#">Real-time NFL scores </a> 22 </nav> 23 <div class="container text-center mt-2"> 24 <div id="score_label"><p id="results">----</p></div> 25 </div> 26 <script src="https://js.pusher.com/4.2/pusher.min.js"></script> 27 <script src="popup.js"></script> 28 </body> 29 </html>
The code above is an HTML description to display a simple Bootstrap layout for the extension. In the bottom of the code, we linked to two scripts:
pusher.min.js- This is the official Pusher JavaScript SDK.popup.js- This is a script we will create shortly to handle the extension’s events.
We need the pusher.min.js script to interact with the Pusher API on the client-side, in other words, bind to events and subscribe to channels.
Binding to events and triggering notifications
Let’s create the popup.js file in the root of the frontend directory and paste the following code into the file:
1// File: ./popup.js 2 const pusher = new Pusher("PUSHER_APP_KEY", { 3 cluster: "PUSHER_APP_CLUSTER", 4 encrypted: true 5 }); 6 7 document.getElementById("scores").addEventListener("click", () => { 8 fetch("http://localhost:3000/start"); 9 }); 10 11 const channel = pusher.subscribe("realtime-updates"); 12 13 channel.bind("scores", data => { 14 const [teamOne, teamTwo] = data 15 16 document.getElementById("results").innerHTML = ` 17 <span>${teamOne.name}</span> - ${teamOne.score}<br/> 18 <span>${teamTwo.name}</span> - ${teamTwo.score}<br /> 19 `; 20 21 notify(teamOne, teamTwo); 22 }); 23 24 const notify = (first_team, second_team) => { 25 26 if (first_team.score !== 0 && second_team.score !== 0) { 27 const notificationId = "notify" 28 29 const options = { 30 type: 'basic', 31 iconUrl: './img/icon.png', 32 title: `${first_team.name} vs ${second_team.name}`, 33 message: `There's been a score update on the game between ${first_team.name} and ${second_team.name}.` 34 }; 35 36 chrome.notifications.create(notificationId, options); 37 chrome.notifications.clear(notificationId); 38 } 39 };
Replace the PUSHER_* keys with your credentials from the Pusher dashboard.
In the snippet above, we created a new instance of the Pusher object then we registered a click event listener on the link tag that says Real-time NFL scores.
The event listener further makes a request to http://localhost:3000/start on the Node.js backend server using the fetch API. We want this link tag to be the control for the simulation, so that a click on this link when the extension is open will start the simulation.
Next, we subscribed to the realtime-updates channel and bound to the scores event. In the bind method, we registered a callback that updates the innerHTML of the extension with the scores received from Pusher and lastly, we made a call to the notify function.
The notify function receives two objects, the teams currently playing, and uses them in setting the options object, then it makes a call to Chrome’s Notification API.
Testing out the application
We can easily test the extension by opening the Chrome browser and visiting the address: chrome://extensions:
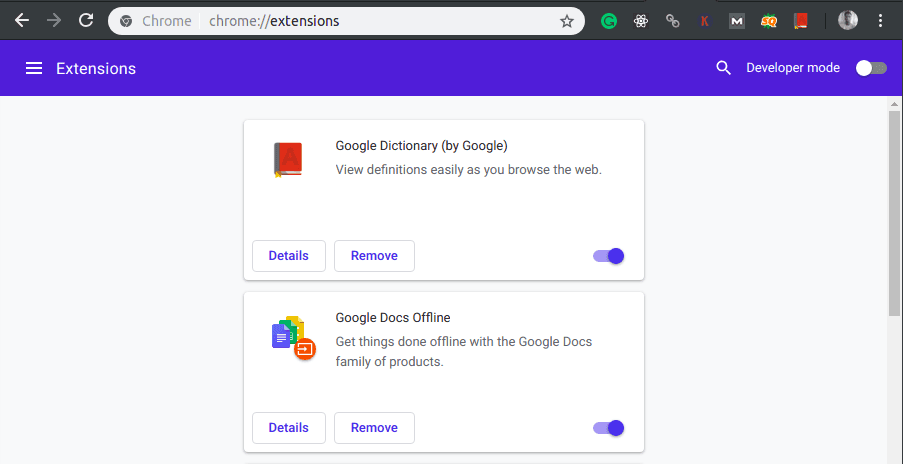
Once the page opens, turn on the Developer mode option by clicking on the switch by the extreme right of the top of the screen:

Turning on the developer mode made three new options to appear at the top of the screen:
- Load unpacked
- Pack extension
- Update
If we click on the Load unpacked option, we will be asked to select the folder where the unpacked extension lives. So, select the frontend folder.
After selecting the folder, we should be able to see our extension (at the extreme right) with its icon on the extensions tab of the browser:
Now we can start the backend server to test the application. cd to the realtime-nfl-scores project directory and run this command:
$ node index.js
Once we have the backend server running, we can load up the extension on the Chrome browser, click on the Real-time NFL scores link and watch the realtime updates and notifications flood in:
That’s all. The extension is up and running and we can now see the simulated updates on the game between Indianapolis Colts vs Tennessee Titans.
Conclusion
In this tutorial, we learned how to use Vanilla JavaScript to build a Chrome extension and hit an endpoint on the Node.js web server using the fetch API.
The source code to the application is available on GitHub.


© 2024 Pusher Ltd. All rights reserved.
Pusher Limited is a company registered in England and Wales (No. 07489873) whose registered office is at MessageBird UK Limited, 3 More London Riverside, 4th Floor, London, United Kingdom, SE1 2AQ.