- Products

- Developers
- User stories
- Blog
- Pricing

Send push notifications in a social network iOS app - Part 1: Build the backend
- Introduction
- Prerequisites
- Creating our Pusher application
- Configure APNs
- Creating your Pusher application
- Building the backend
- Configuring our database
- Creating our migrations, models, and controllers
- Creating our application’s routes
- Installing Laravel Passport
- Adding push notification support
- Building our iOS application using Swift
- Creating our storyboard
- How the storyboard scenes are connected
- Creating our models
- Creating our services
- Conclusion
Introduction
Push notifications are a great way to engage users of your application. It lets you send notifications when certain events happen on your service. This can lead to re-engagement.
While building a social network app, you'll need to send push notifications to your users. These notifications will help users know when certain events happen in your application. For instance, you can send push notifications to a user when someone comments on their photo.
As powerful as push notifications are, they are a double-edged sword. Most users will uninstall your application if they feel like they are being spammed.
Over the course of two articles, we will see how we can build a social networking iOS application. We will add push notifications to the user when someone comments on a photo they uploaded. Then we'll add settings so users can specify when they want to receive notifications.
Prerequisites
To follow along in this tutorial you need to have the following:
- A Mac with Xcode installed.
- Knowledge of using Xcode.
- Knowledge of the Swift programming language.
- Knowledge of PHP and Laravel.
- Laravel CLI installed on your machine.
- SQLite installed on your machine. Refer to the installation guide.
- A Pusher Beams API Key. Create a free sandbox Pusher account or sign in.
- CocoaPods installed on your machine. Visit installation guide.
Creating our Pusher application
⚠️ To use push notifications, you have to be a part of the Apple Developer program. Also, push notifications do not work on simulators so you will need an actual iOS device to test.
Pusher Beams has first-class support for native iOS applications. Your iOS app instances subscribe to Interests; then your servers send push notifications to those interests. Every app instance subscribed to that interest will receive the notification, even if the app is not open on the device at the time.
This section describes how you can set up an iOS app to receive transactional push notifications about news updates through Pusher.
Configure APNs
Pusher relies on the Apple Push Notification service (APNs) to deliver push notifications to iOS application users on your behalf. When we deliver push notifications, we use your key that has APNs service enabled. This page guides you through the process of getting the key and how to provide it to Pusher.
Head over to the Apple Developer dashboard and then create a new key as seen below:
When you have created the key, download it. Keep it safe as we will need it in the next section.
⚠️ You have to keep the generated key safe as you cannot get it back if you lose it.
Creating your Pusher application
The next thing you need to do is create a new Pusher Beams application from the Pusher dashboard.
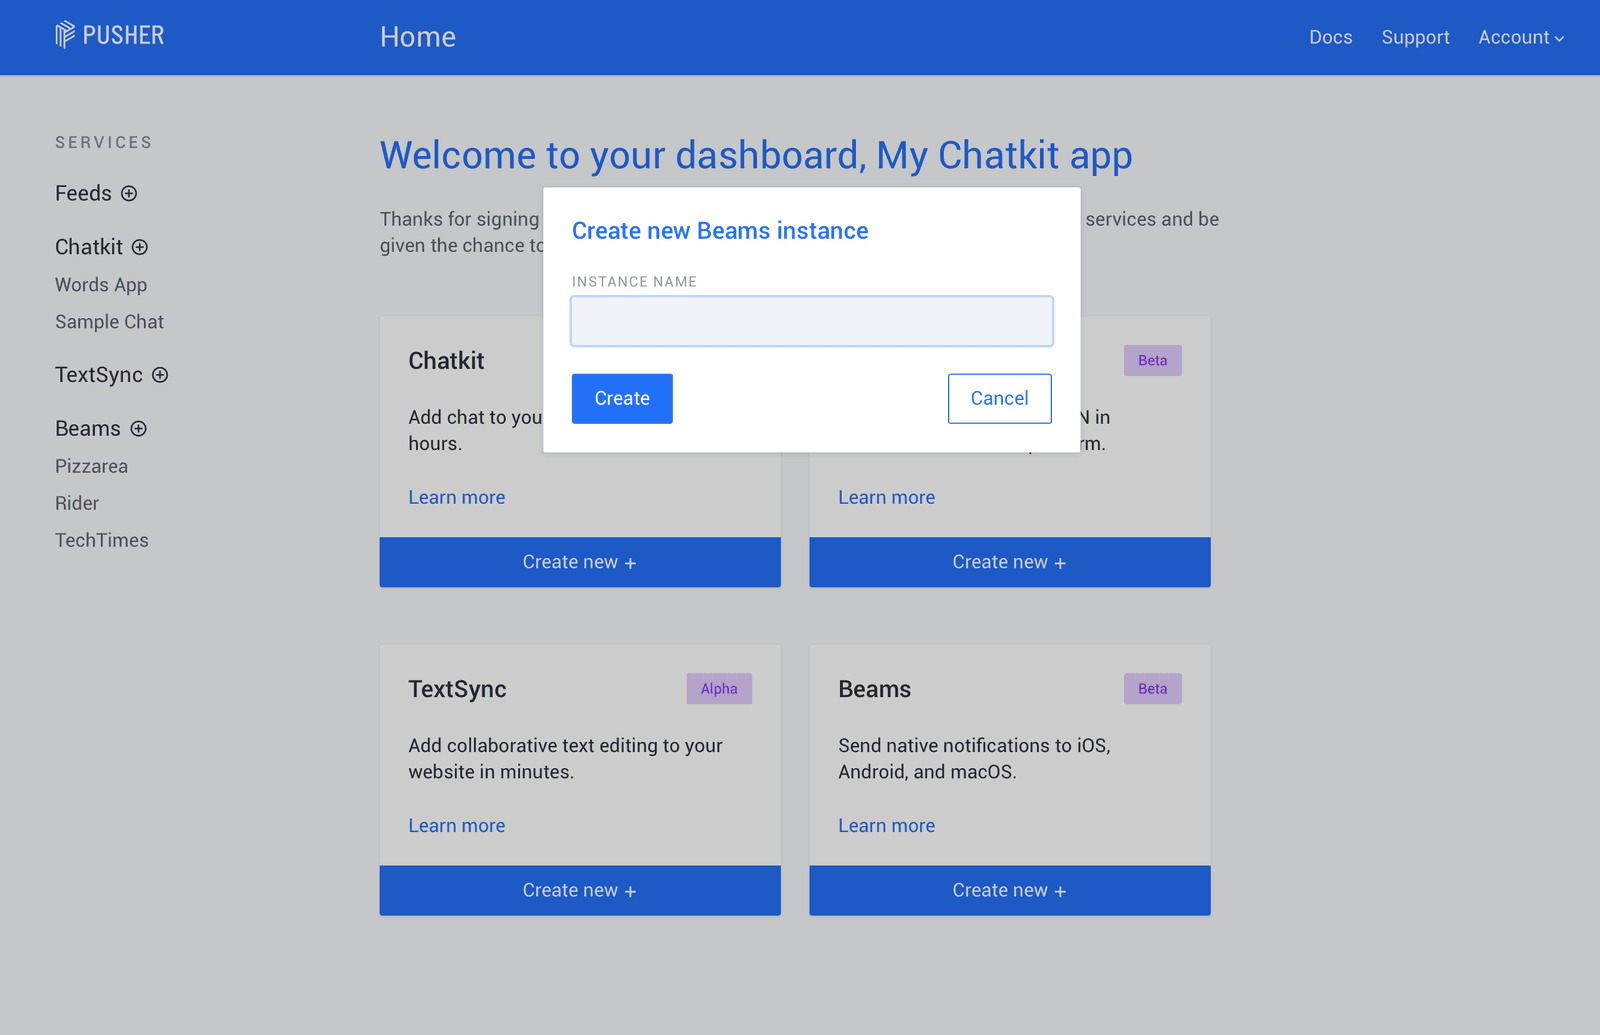
When you have created the application, you should be presented with a quick start that will help you set up the application.
To configure your Beams instance, you will need to get the key with APNs service enabled by Apple. This is the same key as the one we downloaded in the previous section. Once you’ve got the key, upload it.
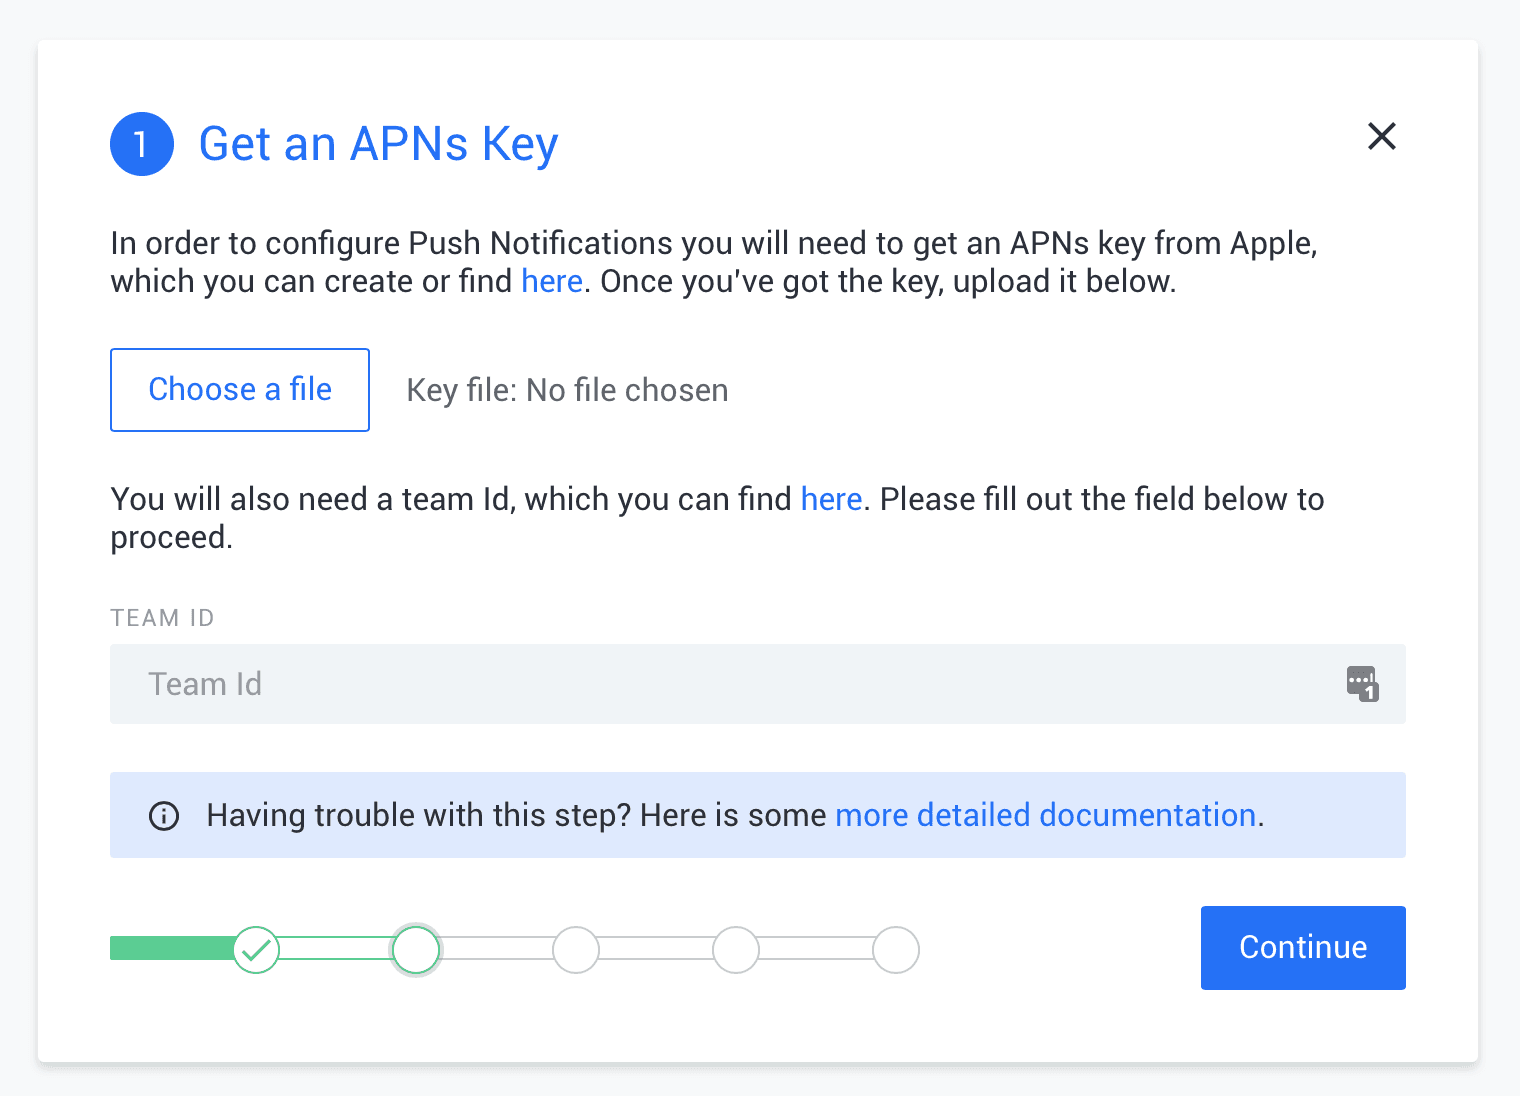
Enter your Apple Team ID. You can get the Team ID from here. You can then continue with the setup wizard and copy the instance ID and secret key for your Pusher application.
Building the backend
Before we start building the iOS application, let’s build the backend API using Laravel. To get started we need to set up our Laravel application. Run the command below using your terminal:
$ Laravel new gram
This will create a new Laravel application in the gram directory.
Configuring our database
Our application will need to connect to a database and we will be using SQLite as our database of choice as it's the easiest to set up.
To get started, create a new database.sqlite file in the database directory. Next open the .env file that comes with the Laravel project and replace the following lines:
1DB_CONNECTION=mysql 2 DB_HOST=127.0.0.1 3 DB_PORT=3306 4 DB_DATABASE=homestead 5 DB_USERNAME=homestead 6 DB_PASSWORD=secret
With:
1DB_CONNECTION=sqlite 2 DB_DATABASE=/full/path/to/database.sqlite
Now we have a connection to the database.
Creating our migrations, models, and controllers
When you want to create a migration, model, and controller, you should use the command below:
$ php artisan make:model ModelName -mc
Using the above command as a template, create the following models, migrations, and controllers:
PhotoPhotoCommentUserFollowUserSetting
In that order.
After running the commands, we should have migrations in the database/migrations directory, models in the app directory, and controllers in the app/Http/Controllers directory.
Let’s update the migrations. Open the *_create_photos_table.php migration and replace the up method with the following:
1public function up() 2 { 3 Schema::create('photos', function (Blueprint $table) { 4 $table->increments('id'); 5 $table->unsignedInteger('user_id'); 6 $table->foreign('user_id')->references('id')->on('users'); 7 $table->string('image'); 8 $table->string('image_path'); 9 $table->string('caption')->nullable(); 10 $table->timestamps(); 11 }); 12 }
Open the *_create_photo_comments_table.php migration and replace the up method with the following:
1public function up() 2 { 3 Schema::create('photo_comments', function (Blueprint $table) { 4 $table->increments('id'); 5 $table->unsignedInteger('photo_id'); 6 $table->foreign('photo_id')->references('id')->on('photos'); 7 $table->unsignedInteger('user_id'); 8 $table->foreign('user_id')->references('id')->on('users'); 9 $table->text('comment'); 10 $table->timestamps(); 11 }); 12 }
Open the *_create_user_follows_table.php migration and replace the up method with the following:
1public function up() 2 { 3 Schema::create('user_follows', function (Blueprint $table) { 4 $table->increments('id'); 5 $table->unsignedInteger('follower_id'); 6 $table->foreign('follower_id')->references('id')->on('users'); 7 $table->unsignedInteger('following_id'); 8 $table->foreign('following_id')->references('id')->on('users'); 9 $table->timestamps(); 10 }); 11 }
Open the *_create_user_settings_table.php migration and replace the up method with the following:
1public function up() 2 { 3 Schema::create('user_settings', function (Blueprint $table) { 4 $table->increments('id'); 5 $table->unsignedInteger('user_id'); 6 $table->foreign('user_id')->references('id')->on('users'); 7 $table->enum('notification_comments', ['Off', 'Following', 'Everyone']) 8 ->default('Following'); 9 }); 10 }
That’s all for the migrations. Execute the migrations by running the command below:
$ php artisan migrate
When that’s done, we can update our models. Open the Photo model in the app directory and replace the contents with the following:
1<?php 2 3 namespace App; 4 5 use Illuminate\Database\Eloquent\Model; 6 7 class Photo extends Model 8 { 9 protected $hidden = ['image_path']; 10 11 protected $with = ['user', 'comments']; 12 13 protected $fillable = ['user_id', 'caption', 'image', 'image_path']; 14 15 public function user() 16 { 17 return $this->belongsTo(User::class); 18 } 19 20 public function comments() 21 { 22 return $this->hasMany(PhotoComment::class)->orderBy('id', 'desc'); 23 } 24 }
In the model above we have the user and comments methods, which are relationships to the User model and the PhotoComment model.
Open the PhotoComment class in the app directory and replace the content with the following:
1<?php 2 3 namespace App; 4 5 use Illuminate\Database\Eloquent\Model; 6 use Illuminate\Notifications\Notifiable; 7 8 class PhotoComment extends Model 9 { 10 use Notifiable; 11 12 protected $with = ['user']; 13 14 protected $fillable = ['photo_id', 'user_id', 'comment']; 15 16 protected $casts = ['photo_id' => 'int', 'user_id' => 'int']; 17 18 public function scopeForPhoto($query, int $id) 19 { 20 return $query->where('photo_id', $id); 21 } 22 23 public function user() 24 { 25 return $this->belongsTo(User::class); 26 } 27 }
In the model above we are using the Notifiable trait because we want to be able to send push notifications when new comments are made on photos later in the article. We also have a scopeForPhoto method, which is an Eloquent query scope. We also have a user method, which is a relationship to the User model.
Open the User model in the app directory and replace the content with the following:
1<?php 2 3 namespace App; 4 5 use Illuminate\Notifications\Notifiable; 6 use Illuminate\Foundation\Auth\User as Authenticatable; 7 8 class User extends Authenticatable 9 { 10 use Notifiable; 11 12 protected $fillable = ['name', 'email', 'password']; 13 14 protected $hidden = ['password', 'remember_token']; 15 16 public function allowsCommentsNotifications(User $actor) 17 { 18 $status = strtolower($this->settings->notification_comments); 19 20 switch ($status) { 21 case 'everyone': return true; 22 case 'following': return $this->isFollowing($actor); 23 default: return false; 24 } 25 } 26 27 public function isFollowing(User $user): bool 28 { 29 return $this->following->where('following_id', $user->id)->count() > 0; 30 } 31 32 public function scopeOtherUsers($query) 33 { 34 return $query->where('id', '!=', auth()->user()->id); 35 } 36 37 public function following() 38 { 39 return $this->hasMany(UserFollow::class, 'follower_id'); 40 } 41 42 public function followers() 43 { 44 return $this->hasMany(UserFollow::class, 'following_id'); 45 } 46 47 public function settings() 48 { 49 return $this->hasOne(UserSetting::class); 50 } 51 }
In the model above we have six methods:
allowsCommentsNotificationschecks to see if the owner of the photo has settings that permit notifications to be sent to them when there is a new comment.isFollowingchecks if a user is following another user.scopeOtherUsersis an Eloquent query scope.following,followersandsettingsare methods that define relationships with other models.
Open the UserFollow model in the app directory and replace the content with the following:
1<?php 2 3 namespace App; 4 5 use Illuminate\Database\Eloquent\Model; 6 7 class UserFollow extends Model 8 { 9 protected $fillable = ['follower_id', 'following_id']; 10 }
Finally, open the UserSetting model in the app directory and replace the content with the following:
1<?php 2 3 namespace App; 4 5 use Illuminate\Database\Eloquent\Model; 6 7 class UserSetting extends Model 8 { 9 protected $fillable = ['notification_comments']; 10 11 protected $hidden = ['id', 'user_id']; 12 13 public $timestamps = false; 14 15 public function scopeForCurrentUser($query) 16 { 17 return $query->where('user_id', auth()->user()->id); 18 } 19 }
Above we have the scopeForCurrentUser method, which is an Eloquent query scope.
We set the
$timestampsproperty to false to instruct Eloquent not to attempt to automatically manage thecreated_atandupdated_atfields as we do not have them in the user settings table.
One last thing we want to do is, create a new setting automatically when a user is created. For this, we will use an Eloquent event. Open the AppServiceProvider class in the app/Providers directory and replace the boot method with the following:
1public function boot() 2 { 3 \App\User::created(function ($user) { 4 $user->settings()->save(new \App\UserSetting); 5 }); 6 }
As seen above, when a new user is created, a new user setting is saved to the user.
Next, let’s update the logic for the controllers. Open the PhotoController.php in the app/Http/Controllers directory and replace the contents with the following:
1<?php 2 3 namespace App\Http\Controllers; 4 5 use App\Photo; 6 use Illuminate\Http\Request; 7 use Illuminate\Support\Facades\Storage; 8 9 class PhotoController extends Controller 10 { 11 public function index() 12 { 13 $photos = Photo::orderBy('id', 'desc')->paginate(20); 14 15 return response()->json($photos->toArray()); 16 } 17 18 public function store(Request $request) 19 { 20 $data = $request->validate([ 21 'caption' => 'required|between:1,1000', 22 'image' => 'required|image|mimes:jpeg,gif,png', 23 ]); 24 25 $path = Storage::disk('public')->putFile('photos', $request->file('image')); 26 27 $data = array_merge($data, [ 28 'user_id' => $request->user()->id, 29 'image' => asset("storage/{$path}"), 30 'image_path' => storage_path('app/public') . "/{$path}", 31 ]); 32 33 $photo = Photo::create($data); 34 35 return response()->json([ 36 'status' => 'success', 37 'data' => $photo->load(['user', 'comments']) 38 ]); 39 } 40 }
In the PhotoController above we have two methods. The index displays all the available photos, and the store saves a new photo to disk and database.
For the photos saved to be available to the public, we need to link the storage directory to the public directory. To do so run the command below:
$ php artisan storage:link

The command above will create a symlink from the public/storage directory to the storage/app/public directory that our photos will be uploaded to.
Open the PhotoCommentController.php in the app/Http/Controllers directory and replace the contents with the following:
1<?php 2 3 namespace App\Http\Controllers; 4 5 use App\Photo; 6 use App\PhotoComment; 7 use Illuminate\Http\Request; 8 use App\Notifications\UserCommented; 9 10 class PhotoCommentController extends Controller 11 { 12 public function index(Request $request) 13 { 14 $photo = Photo::with('comments')->findOrFail($request->route('photo')); 15 16 return response()->json(['data' => $photo->comments]); 17 } 18 19 public function store(Request $request, Photo $photo) 20 { 21 $data = $request->validate(['comment' => 'required|string|between:2,500']); 22 23 $comment = PhotoComment::create([ 24 'photo_id' => $photo->id, 25 'comment' => $data['comment'], 26 'user_id' => $request->user()->id, 27 ]); 28 29 if ($photo->user->allowsCommentsNotifications($request->user())) { 30 $comment->notify(new UserCommented($request->user(), $photo, $comment)); 31 } 32 33 return response()->json([ 34 'status' => 'success', 35 'data' => $comment->load('user') 36 ]); 37 } 38 }
In the PhotoCommentController we have two methods. The index method displays all the comments for a single photo and the store creates a new comment.
In the store method on line 30, we have a call to a notify method and passes a nonexistent UserCommented class. This class is a Laravel notification class. We will create this class later in the article. It’s needed to send notifications to the user when comments are made.
Create a UserController by running the command below:
$ php artisan make:controller UserController
Next open the UserController.php in the app/Http/Controllers directory and replace the contents with the following:
1<?php 2 3 namespace App\Http\Controllers; 4 5 use App\User; 6 use Illuminate\Support\Facades\Hash; 7 8 class UserController extends Controller 9 { 10 public function index() 11 { 12 $users = []; 13 14 User::with('followers')->otherUsers()->get()->each(function ($user, $index) use (&$users) { 15 $users[$index] = $user; 16 $users[$index]['follows'] = auth()->user()->isFollowing($user); 17 }); 18 19 return response()->json(['data' => $users]); 20 } 21 22 public function create(Request $request) 23 { 24 $credentials = $request->validate([ 25 'name' => 'required|string|max:255', 26 'email' => 'required|string|email|max:255|unique:users', 27 'password' => 'required|string|min:6', 28 ]); 29 30 $credentials['password'] = Hash::make($credentials['password']); 31 32 $user = User::create($credentials); 33 34 $token = $user->createToken(config('app.name')); 35 36 $data = ['user' => $user, 'access_token' => $token->accessToken]; 37 38 return response()->json(['data' => $data, 'status' => 'success']); 39 } 40 }
The UserController has two methods, one is the index method that returns all the users on the service, and the second is the create method that registers a new user and returns an access token that will be used for making authorized requests on behalf of the user.
Open the UserFollowController.php in the app/Http/Controllers directory and replace the contents with the following:
1<?php 2 3 namespace App\Http\Controllers; 4 5 use App\User; 6 use App\UserFollow; 7 use Illuminate\Http\Request; 8 9 class UserFollowController extends Controller 10 { 11 public function follow(Request $request) 12 { 13 $user = User::findOrFail($request->get('following_id')); 14 15 16 if ($request->user()->isFollowing($user) == false) { 17 $request->user()->following()->save( 18 new UserFollow($request->only('following_id') 19 )); 20 } 21 22 return response()->json(['status' => 'success']); 23 } 24 25 public function unfollow(Request $request) 26 { 27 $user = User::findOrFail($request->get('following_id')); 28 29 $request->user()->following()->whereFollowingId($user->id)->delete(); 30 31 return response()->json(['status' => 'success']); 32 } 33 }
The controller above simply follows or unfollows a user.
Open the UserSettingController.php in the app/Http/Controllers directory and replace the contents with the following:
1<?php 2 3 namespace App\Http\Controllers; 4 5 use App\UserSetting; 6 use Illuminate\Http\Request; 7 8 class UserSettingController extends Controller 9 { 10 public function index() 11 { 12 return response()->json(UserSetting::forCurrentUser()->first()); 13 } 14 15 public function update(Request $request) 16 { 17 $settings = $request->validate([ 18 'notification_comments' => 'in:Off,Following,Everyone', 19 ]); 20 21 $updated = $request->user()->settings()->update($settings); 22 23 return response()->json(['status' => $updated ? 'success' : 'error']); 24 } 25 }
In the controller above we return all the settings available for a user in the index method and then we update the settings for the user in the update method.
Creating our application’s routes
Since we have created our controllers, let’s create our routes that link the URL to controllers. Open the routes/api.php file and replace the contents with the following:
1<?php 2 3 Route::post('/register', 'UserController@create'); 4 5 Route::group(['middleware' => 'auth:api'], function () { 6 Route::get('/users/settings', 'UserSettingController@index'); 7 Route::put('/users/settings', 'UserSettingController@update'); 8 Route::post('/users/follow', 'UserFollowController@follow'); 9 Route::post('/users/unfollow', 'UserFollowController@unfollow'); 10 Route::get('/users', 'UserController@index'); 11 Route::get('/photos/{photo}/comments', 'PhotoCommentController@index'); 12 Route::post('/photos/{photo}/comments', 'PhotoCommentController@store'); 13 Route::resource('/photos', 'PhotoController')->only(['store', 'index']); 14 });
Above we have defined routes for our application. Each route points to a controller and a method in that controller that will handle the route. The route group above has a middleware applied, auth:api, this will make sure that every request to a route inside the group has to be authorized.
To manage authorization, let’s install Laravel passport.
Installing Laravel Passport
Since we have many requests that require authorization, let’s install Laravel Passport. In the root directory of your project and run the following command:
$ composer require laravel/passport
This will install Laravel Passport to the project. Open the User model in the app directory and use the HasApiTokens trait:
1<?php 2 3 // [...] 4 5 use Laravel\Passport\HasApiTokens; 6 7 class User extends Authenticatable 8 { 9 use HasApiTokens, Notifiable; 10 11 // [...] 12 }
Next open the AuthServiceProvider class in the app/Providers directory and update it to the following:
1<?php 2 3 // [...] 4 5 use Laravel\Passport\Passport; 6 7 class AuthServiceProvider extends ServiceProvider 8 { 9 // [...] 10 11 public function boot() 12 { 13 // [...] 14 15 Passport::routes(); 16 } 17 }
Open the config/auth.php configuration file and set the driver option of the api authentication guard to passport. This will instruct your application to use Passport's TokenGuard when authenticating incoming API requests:
1'guards' => [ 2 // [...] 3 4 'api' => [ 5 'driver' => 'passport', 6 'provider' => 'users', 7 ], 8 ],
To complete the installation, run the commands below, which will perform a migration and install Laravel Passport to your application:
1$ php artisan migrate 2 $ php artisan passport:install

Passport is successfully installed after the commands finish execution. The passport:install command will create two files in the storage directory: oauth-public.key and oauth-private.key. These keys will be used to sign and validate access tokens.
⚠️ Copy and save the client ID and secret for the second client as you will need it later in the article.
Adding push notification support
The next thing we want to do is add push notification support. For this, we will be using Pusher Beams. For convenience, we will be using a PHP library that is a Laravel supported wrapper for the Pusher Beams PHP library.
In your terminal run the following command:
$ composer require neo/pusher-beams
When the installation is completed, open the .env file and add the following keys to the file:
1PUSHER_BEAMS_SECRET_KEY="PUSHER_BEAMS_SECRET_KEY" 2 PUSHER_BEAMS_INSTANCE_ID="PUSHER_BEAMS_INSTANCE_ID"
💡 You need to replace the
PUSHER_BEAMS_SECRET_KEYandPUSHER_BEAMS_INSTANCE_IDkeys with the keys gotten from your Pusher dashboard.
Open the broadcasting.php file in the config directory and add the following keys to the pusher connection array:
1'connections' => [ 2 'pusher' => [ 3 // [...] 4 5 'beams' => [ 6 'secret_key' => env('PUSHER_BEAMS_SECRET_KEY'), 7 'instance_id' => env('PUSHER_BEAMS_INSTANCE_ID'), 8 ], 9 10 // [...] 11 ], 12 ],
Next, create a new notification class where we will add our push notification. In your terminal run the command below to create the class:
$ php artisan make:notification UserCommented
This will create a new UserCommented class in the app/Notifications directory. Open the file and replace the contents with the following:
1<?php 2 3 namespace App\Notifications; 4 5 use Illuminate\Bus\Queueable; 6 use Illuminate\Notifications\Notification; 7 use Neo\PusherBeams\PusherBeams; 8 use Neo\PusherBeams\PusherMessage; 9 use App\User; 10 use App\PhotoComment; 11 use App\Photo; 12 13 class UserCommented extends Notification 14 { 15 use Queueable; 16 17 public $user; 18 19 public $comment; 20 21 public $photo; 22 23 public function __construct(User $user, Photo $photo, PhotoComment $comment) 24 { 25 $this->user = $user; 26 $this->photo = $photo; 27 $this->comment = $comment; 28 } 29 30 public function via($notifiable) 31 { 32 return [PusherBeams::class]; 33 } 34 35 public function toPushNotification($notifiable) 36 { 37 return PusherMessage::create() 38 ->iOS() 39 ->sound('success') 40 ->title('New Comment') 41 ->body("{$this->user->name} commented on your photo: {$this->comment->comment}") 42 ->setOption('apns.aps.mutable-content', 1) 43 ->setOption('apns.data.attachment-url', $this->photo->image); 44 } 45 46 public function pushNotificationInterest() 47 { 48 $id = $this->photo->id; 49 50 $audience = strtolower($this->user->settings->notification_comments); 51 52 return "photo_{$id}-comment_{$audience}"; 53 } 54 }
In the class above we are extending a Notification class and we have implemented the toPushNotification method, which will be used to send the push notification when required. In the via method, we specify what channels we want to send the notification through and in the pushNotificationInterest we specify the interest we want to publish the push notification to.
If you remember earlier, we invoked the notification on line 30 of the PhotoCommentController.
💡 Read more about Laravel Notifications and how it works.
That’s it. The backend application is complete. To start serving the application, run the following command:
$ php artisan serve
This will start a PHP server running on port 8000.
Building our iOS application using Swift
Now that we have a backend server that can serve us all the information we want and also send push notifications, let us create our iOS application, which will be the client application.
Launch Xcode and create a new ‘Single Page App’ project. Let's call it Gram. When the project is created, exit Xcode and cd to the root of the project using a terminal. In the root of the project create a Podfile and paste the following into the file:
1platform :ios, '11.0' 2 3 target 'Gram' do 4 use_frameworks! 5 6 pod 'Alamofire', '~> 4.7.1' 7 pod 'PushNotifications', '~> 0.10.6' 8 pod 'NotificationBannerSwift' 9 end
Then run the command below to start installing the dependencies we defined above:
$ pod install
When the installation is complete, we will have a new .xcworkspace file in the root of the project. Double-click the workspace file to relaunch Xcode.
Creating our storyboard
Next, let’s create our storyboard. Open your Main.storyboard file. We want to design it to look similar to this:
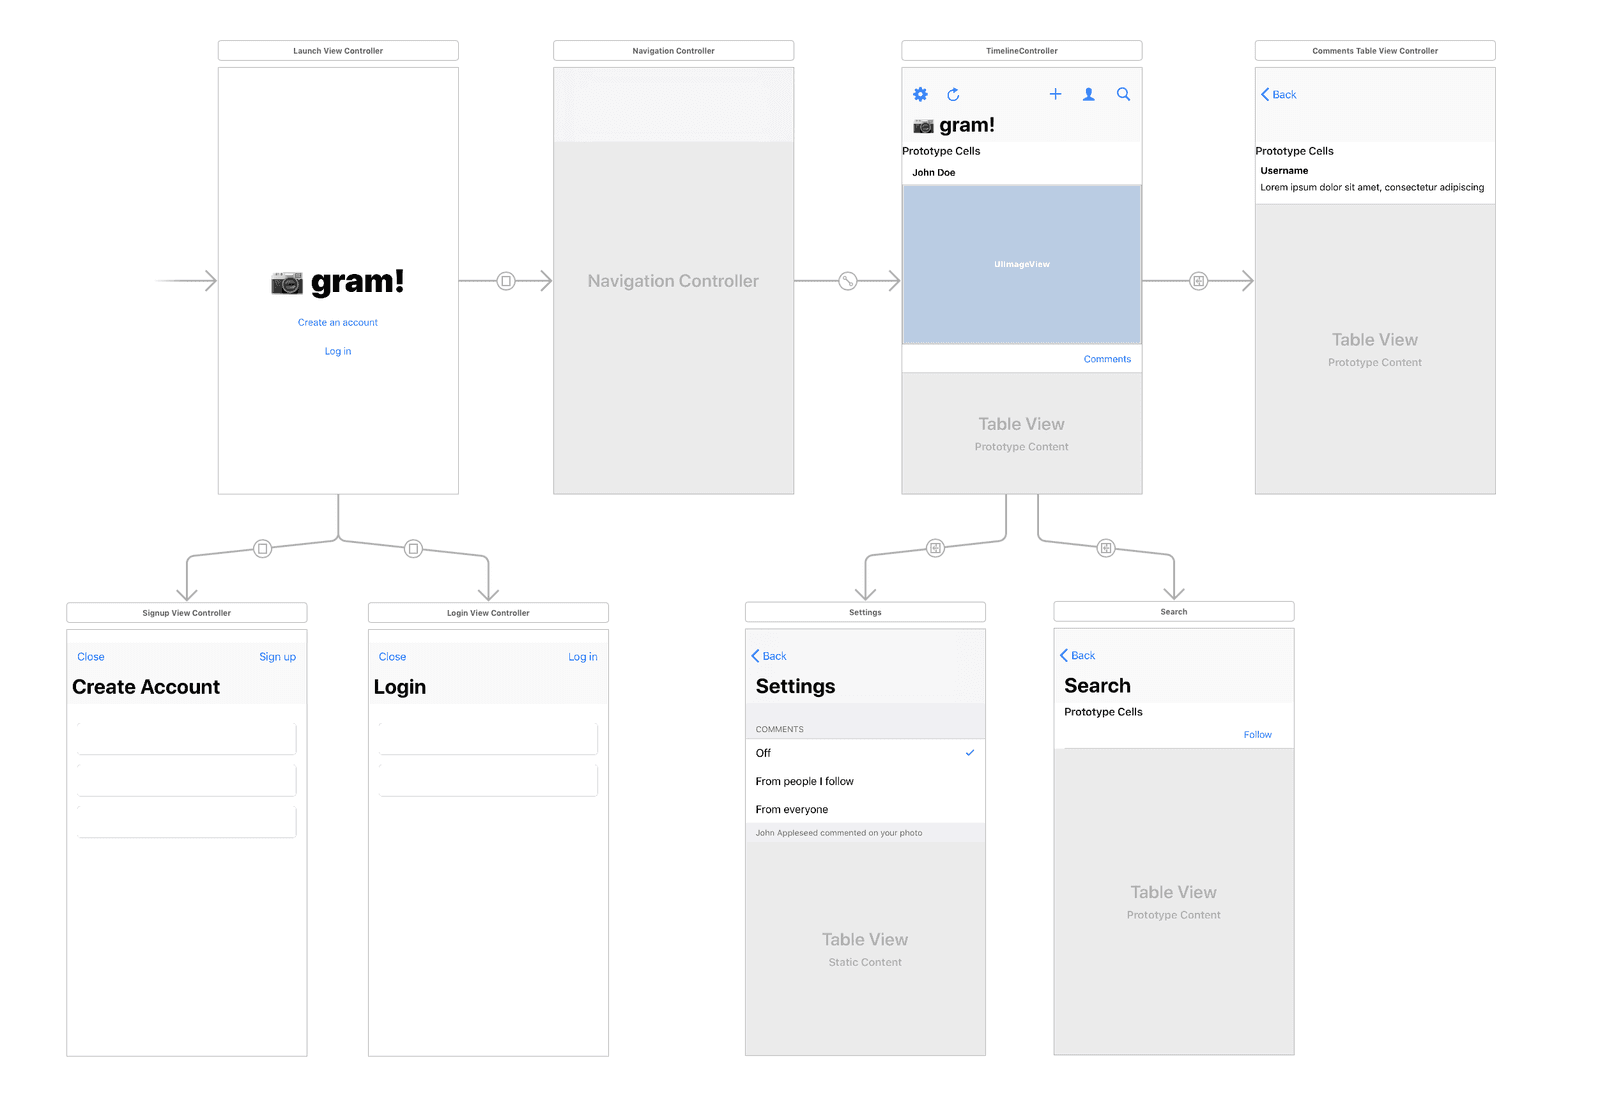
How the storyboard scenes are connected
The first scene we have a launch view controller. This controller connects to the login scene, register scene or the main navigation controller depending on the login status of the user. The login and register scenes are basic and they simply authenticate the user.
The main navigation controller connects to the main controller that displays the timeline. From that scene, there are connections to the settings scene, the search scene, and the view comments scene. Each segue connection is given an identifier so we can present them from the controller code.
When you are done creating the storyboard, let’s create the custom classes for each storyboard scene.
Creating our models
To help us with managing our API’s JSON responses we will be using Codable in Swift 4. This will make it extremely easy for us to manage the responses from the API.
Create a new file named Models.swift and paste this in the file:
1import Foundation
2
3 typealias Users = [User]
4 typealias Photos = [Photo]
5 typealias PhotoComments = [PhotoComment]
6
7 struct User: Codable {
8 var id: Int
9 var name: String
10 var email: String
11 var follows: Bool?
12 }
13
14 struct Photo: Codable {
15 var id: Int
16 var user: User
17 var image: String
18 var caption: String
19 var comments: PhotoComments
20 }
21
22 struct PhotoComment: Codable {
23 var id: Int
24 var user: User
25 var photo_id: Int
26 var user_id: Int
27 var comment: String
28 }
Creating our services
Our services will contain code that we will need to make calls to the API and also other functionality that interacts with the application view.
Create a new class SettingsService and paste the following code into the file:
1import Foundation
2
3 class SettingsService: NSObject {
4
5 static let shared = SettingsService()
6 static let key = "gram.settings.notifications"
7 var settings: [String: String] = [:];
8
9 private var allSettings: [String: String] {
10 set {
11 self.settings = newValue
12 }
13 get {
14 if let settings = loadFromDefaults(), settings["notification_comments"] != nil {
15 return settings
16 }
17
18 return [
19 "notification_comments": Setting.Notification.Comments.following.toString()
20 ];
21 }
22 }
23
24 override private init() {
25 super.init()
26 self.settings = self.allSettings
27 }
28
29 func loadFromDefaults() -> [String: String]? {
30 return UserDefaults.standard.dictionary(forKey: SettingsService.key) as? [String: String]
31 }
32
33 func loadFromApi() {
34 ApiService.shared.loadSettings { settings in
35 if let settings = settings {
36 self.allSettings = settings
37 self.saveSettings(saveRemotely: false)
38 }
39 }
40 }
41
42 func updateCommentsNotificationSetting(_ status: Setting.Notification.Comments) {
43 self.allSettings["notification_comments"] = status.toString()
44 saveSettings()
45 }
46
47 func saveSettings(saveRemotely: Bool = true) {
48 UserDefaults.standard.set(settings, forKey: SettingsService.key)
49
50 if saveRemotely == true {
51 ApiService.shared.saveSettings(settings: settings) { _ in }
52 }
53 }
54 }
In the class above we have defined the settings service. The class is how we manage settings for our application. In the allSettings setter, we attempt to fetch the settings from the local store and if we cant, we return some sensible defaults.
We have the loadFromDefaults method that loads the settings locally from the UserDefaults, the loadFromApi class that loads settings from the API using the ApiService, the updateCommentsNotificationSetting, which updates the comment notification settings. Finally, we have the saveSettings method that saves the comment locally and remotely.
In the same file, add the following enum to the bottom:
1enum Setting {
2 enum Notification {
3 enum Comments: String {
4 case off = "Off"
5 case everyone = "Everyone"
6 case following = "Following"
7
8 func toString() -> String {
9 return self.rawValue
10 }
11 }
12 }
13 }
The enum is basically a representation of the available settings for our comment notifications.
The next service we want to define is the AuthService. This service is used to authenticate users of our service. Create a new AuthService class and paste the following code into it:
1import Foundation
2
3 class AuthService: NSObject {
4 static let key = "gram-token"
5 static let shared = AuthService()
6
7 typealias AccessToken = String
8 typealias LoginCredentials = (email: String, password: String)
9 typealias SignupCredentials = (name: String, email: String, password: String)
10
11 override private init() {
12 super.init()
13 }
14
15 func loggedIn() -> Bool {
16 return getToken() != nil
17 }
18
19 func logout() {
20 UserDefaults.standard.removeObject(forKey: AuthService.key)
21 }
22
23 func getToken() -> AccessToken? {
24 return UserDefaults.standard.string(forKey: AuthService.key)
25 }
26
27 func saveToken(_ token: AccessToken) -> AuthService {
28 UserDefaults.standard.set(token, forKey: AuthService.key)
29 return self
30 }
31
32 func deleteToken() -> AuthService {
33 UserDefaults.standard.removeObject(forKey: AuthService.key)
34 return self
35 }
36
37 func then(completion: @escaping() -> Void) {
38 completion()
39 }
40 }
The class above is fairly straightforward and it provides methods for authentication. It has the getToken and saveToken, which essentially retrieves and saves the access token gotten after authenticating the user.
Next, let’s create our final service, the ApiService. Create a new class ApiService and paste the following into the file:
1import Foundation
2 import Alamofire
3
4 class ApiService: NSObject {
5
6 static let shared = ApiService()
7
8 override private init() {
9 super.init()
10 }
11 }
Now that we have the base of the class, let’s start adding methods to the class. Since it is a large class, we will split adding the methods over a few paragraphs.
In the class, let’s add our first set of methods, which will handle authentication:
1func login(credentials: AuthService.LoginCredentials, completion: @escaping(AuthService.AccessToken?, ApiError?) -> Void) {
2 let params = [
3 "username": credentials.email,
4 "password": credentials.password,
5 "grant_type": "password",
6 "client_id": AppConstants.API_CLIENT_ID,
7 "client_secret": AppConstants.API_CLIENT_SECRET
8 ]
9
10 request(.post, url: "/oauth/token", params: params, auth: false) { data in
11 guard let data = data else { return completion(nil, .badCredentials) }
12 guard let token = data["access_token"] as? String else { return completion(nil, .badResponse) }
13
14 completion(token, nil)
15 }
16 }
17
18 func signup(credentials: AuthService.SignupCredentials, completion: @escaping(AuthService.AccessToken?, ApiError?) -> Void) {
19 let params = [
20 "name": credentials.name,
21 "email": credentials.email,
22 "password": credentials.password
23 ]
24
25 request(.post, url: "/api/register", params: params, auth: false) { data in
26 guard let res = data, let data = res["data"] as? [String:AnyObject] else {
27 return completion(nil, .badCredentials)
28 }
29
30 guard let token = data["access_token"] as? String else {
31 return completion(nil, .badResponse)
32 }
33
34 completion(token, nil)
35 }
36 }
Next let’s add the methods for loading users, loading posts, loading comments and adding comments to the ApiService class:
1func fetchUsers(completion: @escaping(Users?) -> Void) {
2 request(.get, url: "/api/users") { data in
3 if let data = self.responseToJsonStringData(response: data) {
4 if let obj = try? JSONDecoder().decode(Users.self, from: data) {
5 return completion(obj)
6 }
7 }
8
9 completion(nil)
10 }
11 }
12
13 func fetchPosts(completion: @escaping(Photos?) -> Void) {
14 request(.get, url: "/api/photos") { data in
15 if let data = self.responseToJsonStringData(response: data) {
16 if let obj = try? JSONDecoder().decode(Photos.self, from: data) {
17 return completion(obj)
18 }
19 }
20
21 completion(nil)
22 }
23 }
24
25 func fetchComments(forPhoto id: Int, completion: @escaping(PhotoComments?) -> Void) {
26 request(.get, url: "/api/photos/\(id)/comments") { data in
27 if let data = self.responseToJsonStringData(response: data) {
28 if let obj = try? JSONDecoder().decode(PhotoComments.self, from: data) {
29 return completion(obj)
30 }
31 }
32
33 completion(nil)
34 }
35 }
36
37 func leaveComment(forId id: Int, comment: String, completion: @escaping(PhotoComment?) -> Void) {
38 request(.post, url: "/api/photos/\(id)/comments", params: ["comment": comment]) { data in
39 if let res = data, let data = res["data"] as? [String: AnyObject],
40 let json = try? JSONSerialization.data(withJSONObject: data, options: []),
41 let jsonString = String(data: json, encoding: .utf8),
42 let jsonData = jsonString.data(using: .utf8),
43 let obj = try? JSONDecoder().decode(PhotoComment.self, from: jsonData) {
44 return completion(obj)
45 }
46
47 completion(nil)
48 }
49 }
In the methods above, you’ll notice we decode the JSON response from the API into the appropriate model object. This makes it easier to work with in our controllers.
The next methods we will add will be to follow or unfollow a user, load settings for a user and update settings for a user. Add the methods below to the ApiService:
1func toggleFollowStatus(forUserId id: Int, following: Bool, completion: @escaping(Bool?) -> Void) {
2 let status = following ? "unfollow" : "follow"
3
4 request(.post, url: "/api/users/\((status))", params: ["following_id": id]) { data in
5 guard let res = data as? [String: String], res["status"] == "success" else {
6 return completion(false)
7 }
8
9 completion(true)
10 }
11 }
12
13 func loadSettings(completion: @escaping([String: String]?) -> Void) {
14 request(.get, url: "/api/users/settings") { data in
15 guard let settings = data as? [String: String] else {
16 return completion(nil)
17 }
18
19 completion(settings)
20 }
21 }
22
23 func saveSettings(settings: [String: String], completion: @escaping(Bool) -> Void) {
24 request(.put, url: "/api/users/settings", params: settings) { data in
25 guard let res = data as? [String: String], res["status"] == "success" else {
26 return completion(false)
27 }
28
29 completion(true)
30 }
31 }
The next method we want to add is the uploadImage method. This method is responsible for taking the selected image and caption and sending it to the API for uploading. Add the method below to the ApiService class:
1func uploadImage(_ image: Data, caption: String, name: String, completion: @escaping(Photo?, ApiError?) -> Void) {
2 let url = self.url(appending: "/api/photos")
3
4 // Handles multipart data
5 let multipartHandler: (MultipartFormData) -> Void = { multipartFormData in
6 multipartFormData.append(caption.data(using: .utf8)!, withName: "caption")
7 multipartFormData.append(image, withName: "image", fileName: name, mimeType: "image/jpeg")
8 }
9
10 Alamofire.upload(
11 multipartFormData: multipartHandler,
12 usingThreshold: UInt64.init(),
13 to: url,
14 method: .post,
15 headers: requestHeaders(),
16 encodingCompletion: { encodingResult in
17 let uploadedHandler: (DataResponse<Any>) -> Void = { response in
18 if response.result.isSuccess,
19 let resp = response.result.value as? [String: AnyObject],
20 let data = resp["data"] as? [String: AnyObject],
21 let json = try? JSONSerialization.data(withJSONObject: data, options: []),
22 let jsonString = String(data: json, encoding: .utf8),
23 let jsonData = jsonString.data(using: .utf8),
24 let obj = try? JSONDecoder().decode(Photo.self, from: jsonData) {
25 return completion(obj, nil)
26 }
27
28 completion(nil, .uploadError(nil))
29 }
30
31 switch encodingResult {
32 case .failure(_): completion(nil, .uploadError(nil))
33 case .success(let upload, _, _): upload.responseJSON(completionHandler: uploadedHandler)
34 }
35 }
36 )
37 }
Next let’s add the class’ helper methods.
1private func url(appending: URLConvertible) -> URLConvertible {
2 return "\(AppConstants.API_URL)\(appending)"
3 }
4
5 private func requestHeaders(auth: Bool = true) -> HTTPHeaders {
6 var headers: HTTPHeaders = ["Accept": "application/json"]
7
8 if auth && AuthService.shared.loggedIn() {
9 headers["Authorization"] = "Bearer \(AuthService.shared.getToken()!)"
10 }
11
12 return headers
13 }
14
15 private func request(_ method: HTTPMethod, url: URLConvertible, params: Parameters? = nil, auth: Bool = true, handler: @escaping ([String: AnyObject]?) -> Void) {
16 let url = self.url(appending: url)
17
18 Alamofire
19 .request(url, method: method, parameters: params, encoding: JSONEncoding.default, headers: requestHeaders(auth: auth))
20 .validate()
21 .responseJSON { resp in
22 guard resp.result.isSuccess, let data = resp.result.value as? [String: AnyObject] else {
23 return handler(nil)
24 }
25
26 handler(data)
27 }
28 }
29
30 func responseToJsonStringData(response data: [String: AnyObject]?) -> Data? {
31 if let res = data, let data = res["data"] as? [[String: AnyObject]] {
32 if let json = try? JSONSerialization.data(withJSONObject: data, options: []) {
33 if let jsonString = String(data: json, encoding: .utf8), let data = jsonString.data(using: .utf8) {
34 return data
35 }
36 }
37 }
38
39 return nil
40 }
The url method takes a URL path and appends the base API URL to it. The requestHeaders method attaches the appropriate headers to the request sent by Alamofire. The request method is a wrapper around Alamofire that sends requests to the API for us. The responseToJsonStringData converts the data from our JSON file into a JSON string which can then be decoded into one of our Codable models.
One final thing we want to add to the bottom of the ApiService class is the enum for ApiErrors. In the same file at the bottom, add the following code:
1enum ApiError: Error {
2 case badResponse
3 case badCredentials
4 case uploadError([String: [String]]?)
5 }
That’s all for the ApiService and indeed all the applications services. In the next part we will continue building our iOS application.
Conclusion
In this first part of the article, we have seen how we can create an API for our social network application using Laravel. We also integrated push notifications on the server side using Pusher Beams.
In the next part, we will build the client IOS application using Swift. We will also integrate push notifications to our social network application using Pusher Beams.
The source code to the application is on GitHub.


© 2024 Pusher Ltd. All rights reserved.
Pusher Limited is a company registered in England and Wales (No. 07489873) whose registered office is at MessageBird UK Limited, 3 More London Riverside, 4th Floor, London, United Kingdom, SE1 2AQ.