- Products

- Developers
- User stories
- Blog
- Pricing

Building a social app with online presence using Ionic
Introduction
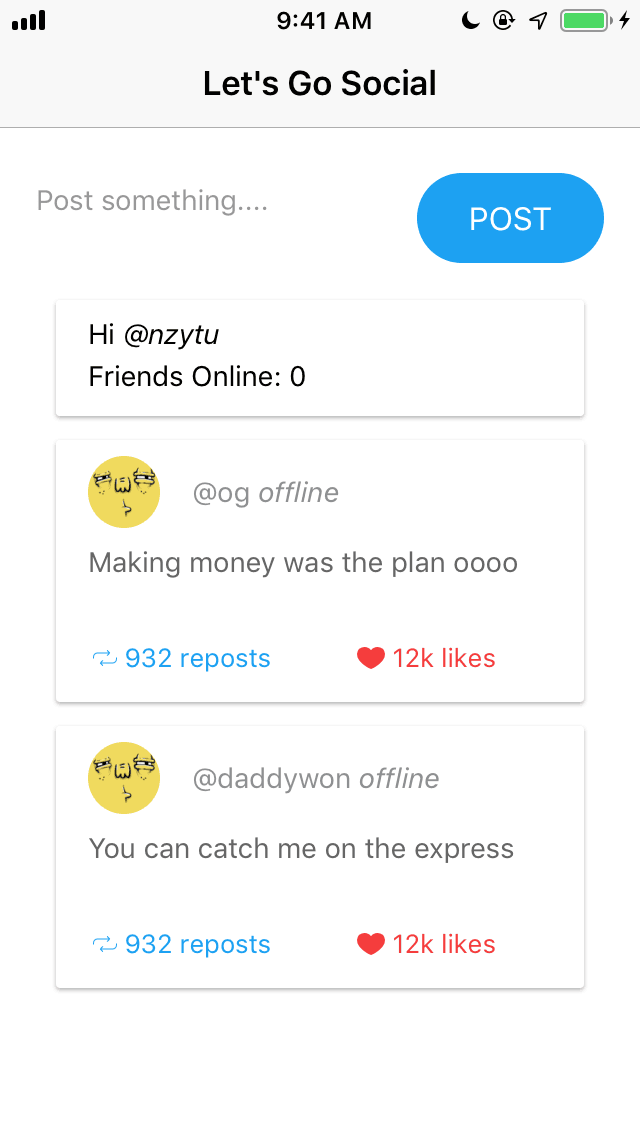
In this tutorial, we are going to explore how to build a simple social application using Ionic and Pusher. Ionic will be used to create the mobile demo and Pusher Channels to add online functionality. At the end of this tutorial, you will have built an application that looks like this:
A while back on Twitter, the official Twitter handle teased their followers with a sample of an interesting idea they were exploring. They were exploring the possibility of letting you know who on your Twitter feed is online. This is something very different and it got a lot of mixed reactions because we know Twitter for for likes and retweets but not “online five minutes ago”. In other messaging applications we use, it is important to know if who you’re interacting with is online. As a developer, you are likely curious about how this all works.
Requirements
To be follow through this article properly, you’ll need the following:
- Basic knowledge of JavaScript
- Ionic installed on your machine, you can read up on how to do that here
- Node.js installed on your machine
- NPM installed on your machine
Getting started
To get started, create a new ionic application using the command:
ionic start twi-clone blank
This creates a starter ionic project in a folder titled twi-clone. To see the demo application at work, go to your terminal and run the command:
1cd twi-clone 2 ionic serve
This serves the Ionic application. Navigate your browser to http://locahost:8100 and you should get a view that looks like this:

Building the backend server
The backend server of our application will be responsible for doing the following:
- Sharing users’ posts
- Authenticating new users on the presence channel
Create a /server folder in your project:
1mkdir server 2 cd server
Install the Node modules that we will need to power the backend server:
npm install express body-parser pusher
expresswill power the web serverbody-parserto handle incoming requestspusherto add realtime functionality and online presence
Afterwards, create a server.js file in the server/ directory:
touch server.js
Edit the server.js file to look as follows:
1// server/server.js 2 3 const express = require('express') 4 const bodyParser = require('body-parser') 5 const Pusher = require('pusher'); 6 7 // create a express application 8 const app = express(); 9 10 // initialize pusher 11 let pusher = new Pusher({ 12 appId: 'PUSHER_APP_ID', 13 key: 'PUSHER_APP_KEY', 14 secret: 'PUSHER_APP_SECRET', 15 cluster: 'PUSHER_APP_CLUSTER', 16 encrypted: true 17 }); 18 19 app.use(bodyParser.json()); 20 app.use(bodyParser.urlencoded({ extended: false })); 21 // to Allow CORS 22 app.use((req, res, next) => { 23 res.header('Access-Control-Allow-Origin', '*'); 24 res.header( 25 'Access-Control-Allow-Headers', 26 'Origin, X-Requested-With, Content-Type, Accept' 27 ); 28 next(); 29 }); 30 31 [...]
We include the necessary JavaScript libraries and then create a new Pusher object using your Pusher application credentials.
To obtain your Pusher credentials, create a new account here. Afterwards, you’ll be redirected to your Pusher dashboard. Go ahead and create a new project, obtain your
PUSHER_APP_ID,PUSHER_APP_KEY,PUSHER_APP_SECRET,PUSHER_APP_CLUSTERand add them to yourserver.jsfile.
Afterwards, we specify some application middleware to handle incoming requests. The backend server will have two routes:
/pusher/auth- will be used to authenticate users joining the presence channel/create-post- will be used when a new post is created.
With Pusher, when a new client tries to join a presence channel, a POST request is first made to authenticate the new client. In this case, a random string is created to identify the client and this makes up the presenceData object. The presenceData , channel and socketId are then passed to Pusher to authenticate the client.
The /create-post route accepts the incoming data and then triggers a new-post event to the presence-channel.
In later parts of the article, we will see how the channel is created in our Ionic application
Add the code below to your server/server.js file:
1// server/server.js 2 [...] 3 4 app.post('/pusher/auth', (req, res) => { 5 let socketId = req.body.socket_id; 6 let channel = req.body.channel_name; 7 random_string = Math.random().toString(36).replace(/[^a-z]+/g, '').substr(0, 5); 8 let presenceData = { 9 user_id: random_string, 10 user_info: { 11 username: '@' + random_string, 12 } 13 }; 14 let auth = pusher.authenticate(socketId, channel, presenceData); 15 res.send(auth); 16 }); 17 18 app.post('/create-post', (req, res) => { 19 // trigger a new post event via pusher 20 pusher.trigger('presence-channel', 'new-post', { 21 'username': req.body.username, 22 'content': req.body.content 23 }) 24 res.json({ 'status': 200 }); 25 }); 26 27 let port = 3128; 28 app.listen(port); 29 console.log('listening');
Now that the backend server is created, you can run it by entering the command:
node server.js
Now, let’s look at how to build the rest of the application.
Creating the interface
The starter application created a default homepage which we will then update to fit our particular use case. Update your home.html file to look like this:
1<!-- src/pages/home/home.html --> 2 3 <ion-header> 4 <ion-navbar> 5 <ion-title style="text-align: center"> 6 Let's Go Social 7 </ion-title> 8 </ion-navbar> 9 </ion-header> 10 11 <ion-content padding> 12 <form (ngSubmit)="submitPost()"> 13 <div class="compose-post-area"> 14 <ion-textarea class="post-compose" placeholder="Post something...." [(ngModel)]="post.content" name="content"></ion-textarea> 15 <button ion-button round class="tweet-post" type="submit">POST</button> 16 </div> 17 </form> 18 <div> 19 <ion-card> 20 <ion-item> 21 <h3>Hi <i>@{{ current_user }}</i> </h3> 22 <h3>Friends Online: {{ get_users_online() }}</h3> 23 </ion-item> 24 </ion-card> 25 26 <div *ngFor="let post of post_list"> 27 <ion-card> 28 <ion-item> 29 <ion-avatar item-start> 30 <img src="https://api.adorable.io/avatars/100/avatar.png" alt=""> 31 </ion-avatar> 32 <p>@{{ post.username }} <i>{{ isOnline(post.username) }} </i></p> 33 </ion-item> 34 35 <ion-card-content> 36 <p>{{ post.content }}</p> 37 </ion-card-content> 38 39 <ion-row> 40 <ion-col> 41 <button ion-button ion-start clear small> 42 <ion-icon name="repeat"></ion-icon> 43 <div> 932 reposts</div> 44 </button> 45 </ion-col> 46 <ion-col> 47 <button ion-button ion-start clear small color="danger"> 48 <ion-icon name="heart"></ion-icon> 49 <div> 12k likes</div> 50 </button> 51 </ion-col> 52 </ion-row> 53 </ion-card> 54 </div> 55 </div> 56 </ion-content>
The page also has the following styling:
1# src/page/home/home.scss 2 3 .compose-post-area{ 4 display: flex; 5 align-items: center; 6 } 7 8 ion-content{ 9 background-color: #FAFAFA; 10 }
We have seen the interface of the application. To add any functionality to our application, we need to edit the home.ts file to look like this:
1// src/app/pages/home/home.ts 2 3 import { Component } from '@angular/core'; 4 import { NavController, AlertController } from 'ionic-angular'; 5 6 @Component({ 7 selector: 'page-home', 8 templateUrl: 'home.html' 9 }) 10 export class HomePage { 11 // this will represent a new post by a user 12 post: any = {}; 13 // this will represent your default pusher presence channel 14 presence_channel: any; 15 // this will represent the username of the current user 16 current_user; 17 // this will online a list of users online 18 users_online = {}; 19 // list of default posts 20 post_list = [ 21 { 22 'username': 'og', 23 'content': 'Making money was the plan oooo' 24 }, 25 { 26 'username': 'daddywon', 27 'content': 'You can catch me on the express' 28 } 29 ]; 30 31 constructor(public navCtrl: NavController) { 32 [...] 33 } 34 35 [...] 36 37 }
We can see that the home page component contains the variables that were referenced in the homepage template.
Creating the Pusher service
To know the number of friends online and when someone who shares a post is online, let’s make use of Presence Channels by Pusher. To use Pusher in our Ionic application, we need to install the library using the command:
npm install pusher-js
Now, let’s create a simple Pusher provider. To do this, head over to your terminal and run the command:
ionic generate provider pusher-service
Now, a pusher-service provider has been created. In the pusher-service.ts create a new Pusher object in the constructor by specifying the PUSHER_APP_KEY, PUSHER_APP_CLUSTER and the authEndpoint created on our backend server earlier in the article.
Afterwards, subscribe to the presence-channel . The init() function is then responsible for returning the created presence channel which is to be used in our home.ts file. Update your pusher-service.ts to look like this:
1// src/providers/pusher-service/pusher-service.ts 2 3 import { HttpClient } from '@angular/common/http'; 4 import { Injectable } from '@angular/core'; 5 import Pusher from 'pusher-js'; 6 7 @Injectable() 8 export class PusherServiceProvider { 9 presenceChannel; 10 11 constructor(public http: HttpClient) { 12 let pusher = new Pusher('PUSHER_APP_KEY', { 13 authEndpoint: 'http://localhost:3128/pusher/auth', 14 cluster: 'PUSHER_APP_CLUSTER' 15 }); 16 17 this.presenceChannel = pusher.subscribe('presence-channel'); 18 } 19 20 public init() { 21 return this.presenceChannel; 22 } 23 }
Update your app.module.ts to ensure that the Pusher provider and the HttpClientModule are loaded:
1// src/app/app.module.ts 2 3 import { BrowserModule } from '@angular/platform-browser'; 4 import { ErrorHandler, NgModule } from '@angular/core'; 5 import { IonicApp, IonicErrorHandler, IonicModule } from 'ionic-angular'; 6 import { SplashScreen } from '@ionic-native/splash-screen'; 7 import { StatusBar } from '@ionic-native/status-bar'; 8 9 import { MyApp } from './app.component'; 10 import { HomePage } from '../pages/home/home'; 11 import { PusherServiceProvider } from '../providers/pusher-service/pusher-service'; 12 import { HttpClientModule } from '@angular/common/http'; 13 14 @NgModule({ 15 declarations: [ 16 MyApp, 17 HomePage 18 ], 19 imports: [ 20 BrowserModule, 21 HttpClientModule, 22 IonicModule.forRoot(MyApp) 23 ], 24 bootstrap: [IonicApp], 25 entryComponents: [ 26 MyApp, 27 HomePage 28 ], 29 providers: [ 30 StatusBar, 31 SplashScreen, 32 { provide: ErrorHandler, useClass: IonicErrorHandler }, 33 PusherServiceProvider 34 ] 35 }) 36 export class AppModule { }
Now, let’s go back to the home page component.
Adding realtime functionality and online presence with Pusher
We are going to update the home.ts file to allow users know when other users are online. We first get the Pusher Channel using the Pusher provider we created earlier and then listen for the pusher:subscription_succeeded event. Once the client has successfully subscribed to the presence-channel, a members object is returned that contains information about the people subscribed to the presence-channel.
We also listen for a new-post event on the presence-channel. When a new-post event is triggered, the post_list is then updated to contain the new post. At this point, your home.ts should look like this:
1// src/pages/home/home.ts 2 import { Component } from '@angular/core'; 3 import { NavController, AlertController } from 'ionic-angular'; 4 import { PusherServiceProvider } from '../../providers/pusher-service/pusher-service'; 5 import { HttpClient } from '@angular/common/http'; 6 7 @Component({ 8 selector: 'page-home', 9 templateUrl: 'home.html' 10 }) 11 export class HomePage { 12 // this will represent a new post by a user 13 post: any = {}; 14 // this will represent your default pusher presence channel 15 presence_channel: any; 16 // this will represent the username of the current user 17 current_user; 18 // this will online a list of users online 19 users_online = { 20 }; 21 // list of default posts 22 post_list = [ 23 { 24 'username': 'og', 25 'content': 'Making money was the plan oooo' 26 }, 27 { 28 'username': 'daddywon', 29 'content': 'You can catch me on the express' 30 } 31 ]; 32 33 constructor(public navCtrl: NavController, private pusher: PusherServiceProvider, private http: HttpClient, public alertCtrl: AlertController) { 34 let self = this 35 this.presence_channel = this.pusher.init(); 36 // update the list of users online 37 this.presence_channel.bind('pusher:subscription_succeeded', function (members) { 38 console.log(members); 39 self.users_online = members.members; 40 self.current_user = members.myID; 41 }) 42 43 this.presence_channel.bind('new-post', function (body) { 44 self.post_list.unshift(body); 45 }) 46 } 47 48 [...] 49 }
Finally, we have three other methods in the component:
get_users_online()which returns the number of users that are currently onlineisOnline()that checks if a particular user is currently onlinesubmitPost()that submits a post by a user
Add the methods to your home.ts file:
1// src/pages/home/home.ts 2 3 [...] 4 5 get_users_online() { 6 return Object.keys(this.users_online).length - 1; 7 } 8 9 isOnline(username: string) { 10 if (username in this.users_online) { 11 return 'online' 12 } else { 13 return 'offline' 14 } 15 } 16 17 submitPost() { 18 let self = this; 19 // make a post request to the server 20 let body = { 21 'username': this.current_user, 22 'content': this.post.content 23 } 24 25 const alert = this.alertCtrl.create({ 26 title: 'Post Shared!', 27 subTitle: `Users online to see your post: ${self.get_users_online()}`, 28 buttons: ['OK'] 29 }); 30 31 // submit post to the backend server to trigger pusher event 32 this.http.post('http://localhost:3128/create-post', body).subscribe(() => { 33 alert.present(); 34 }); 35 } 36 }
Recall in the home.html interface, we had the following form:
1<form (ngSubmit)="submitPost()"> 2 <div class="compose-post-area"> 3 <ion-textarea class="post-compose" placeholder="Post something...." [(ngModel)]="post.content" name="content"></ion-textarea> 4 <button ion-button round class="tweet-post" type="submit">POST</button> 5 </div> 6 </form>
When the POST button is clicked, the submitPost() function is called and the post content and username of the current user are sent to the /create-post of the backend server which then triggers the new-post event on the presence-channel and the post_list is updated accordingly.
To see it all at work, serve your Ionic application using the command:
npm start # or ionic serve
Ensure your backend server is on.
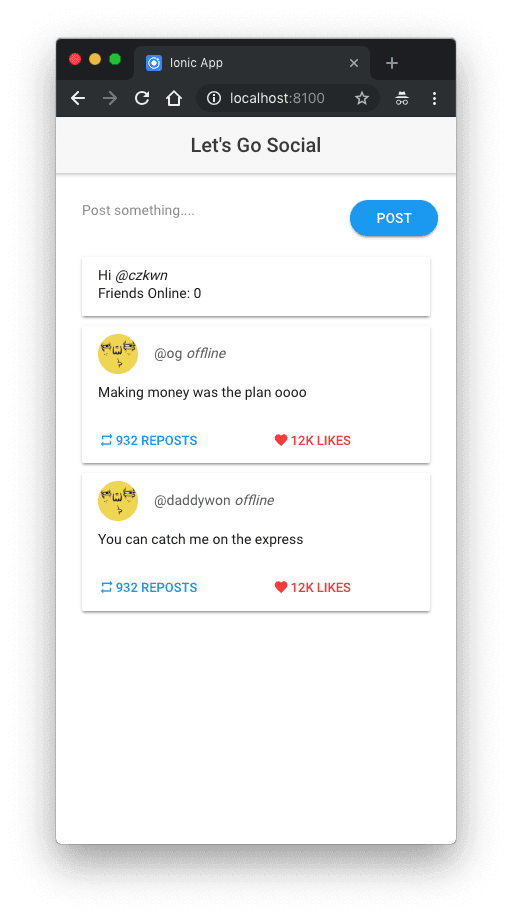
Navigate on your browser to http://localhost:8100 and you should get an experience that looks like this:
Testing your Ionic application on a mobile device
If you’re building with Ionic, you generally don’t intend to have your application on your browser. Rather, you’d want to have it running on mobile devices. Before you do that, you should serve the backend of your application on a tunnel using ngrok. Head over here and follow the download instructions for your platform.
After you’ve had it installed, tunnel your backend server using the command:
ngrok http 3128
You should get a view that looks like this:
1ngrok by @inconshreveable (Ctrl+C to quit) 2 3 Session Status online 4 Session Expires 7 hours, 59 minutes 5 Version 2.2.8 6 Region United States (us) 7 Web Interface http://127.0.0.1:4040 8 Forwarding http://b3b88c11.ngrok.io -> localhost:3128 9 Forwarding https://b3b88c11.ngrok.io -> localhost:3128 10 11 Connections ttl opn rt1 rt5 p50 p90 12 0 0 0.00 0.00 0.00 0.00
This means that you can now access your backend server using the public URL → https://b3b88c11.ngrok.io
Update the authEndpoint of your pusher-service.ts to use the new public URL:
1// src/providers/pusher-service/pusher-service.ts 2 [...] 3 let pusher = new Pusher('9effdb6e1245bda33b17', { 4 authEndpoint: 'https://b3b88c11.ngrok.io/pusher/auth', 5 cluster: 'mt1' 6 }); 7 [...]
Also update the POST request in the submitPost of your home.ts file:
1// src/pages/home/home.ts 2 [...] 3 // submit post to the backend server to trigger pusher event 4 this.http.post('http://localhost:3128/create-post', body).subscribe(() => { 5 alert.present(); 6 }); 7 [...]
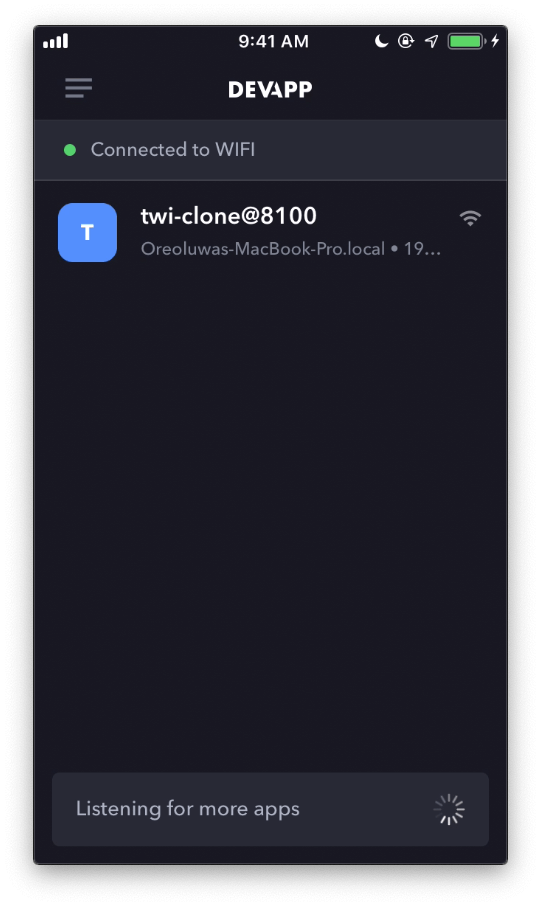
To test the application on your mobile device, download the IonicDevApp on your mobile device. Ensure that your device and computer are on the same network and you should see this demo application listed there:
Now, testing with the device, we get the following:
Conclusion
In this tutorial, we saw how to use Pusher Channels and Ionic to build a social media application that lets you know who’s online and how many online friends your post reach when they’re shared. There are many more use cases for Pusher Channels, so feel free to use concepts shared here in your own application. Here’s a link to the GitHub repository.


© 2024 Pusher Ltd. All rights reserved.
Pusher Limited is a company registered in England and Wales (No. 07489873) whose registered office is at MessageBird UK Limited, 3 More London Riverside, 4th Floor, London, United Kingdom, SE1 2AQ.