- Products

- Developers
- User stories
- Blog
- Pricing

Mastering styled text in Flutter
- Introduction
- Introduction
- Prerequisites
- Setup
- Unicode
- Coded messages
- Unicode to the rescue
- Further reading
- Dart strings
- Code units
- Runes
- Grapheme clusters
- Hexadecimal notation
- Substrings
- Text styling with the Text widget
- Text size
- Text color
- Background color
- Bold
- Italic
- Shadow
- Underline
- Spacing
- Font
- Using themes
- Text styling with the RichText widget
- Basic example
- Styling programmatically
- Clickable spans
- Final notes
- Conclusion
Introduction
Introduction
In this tutorial we are going to start with an overview of Dart strings and Unicode. Next we'll move on to styling text for your app, first for entire strings and then for spans within a string.
Prerequisites
To go through this tutorial you should have the Flutter development environment set up and know how to run an app. I'm using Android Studio with the Flutter 1.1 plugin, which uses Dart 2.1.
Setup
Create a new Flutter app. I'm calling mine flutter_text.
Open main.dart and replace the code with the following:
1import 'package:flutter/material.dart'; 2 3 void main() => runApp(MyApp()); 4 5 class MyApp extends StatelessWidget { 6 @override 7 Widget build(BuildContext context) { 8 return MaterialApp( 9 debugShowCheckedModeBanner: false, 10 home: Scaffold( 11 appBar: AppBar(title: Text('Styling text')), 12 body: Container( 13 child: Center( 14 child: _myWidget(context), 15 ), 16 ), 17 ), 18 ); 19 } 20 } 21 22 // modify this widget with the example code below 23 Widget _myWidget(BuildContext context) { 24 String myString = 'I ❤️ Flutter'; 25 print(myString); 26 return Text( 27 myString, 28 style: TextStyle(fontSize: 30.0), 29 ); 30 }
Note the _myWidget() function at the end. You can modify or replace it using the examples below. The more you experiment on your own, the more you will learn.
If you are already familiar with concepts like grapheme clusters and Dart strings, you can skip down to the text styling sections below.
Unicode
Coded messages
When I was a kid I liked to write "secret" messages in code, where 1=a, 2=b, 3=c and so on until 26=z. A message using this code might be:
9 12 9 11 5 6 12 21 20 20 5 18
To make the code even more secret you could shift the numbers, where 1=b, 2=c, 3=d and so on until it wrapped around where 26=a. As long as my friend and I had the same code key, we could decode each other's messages. The wrong code key, though, would give garbled nonsense.
Computers are similar, except most of the time we don't want secret messages. We want to make our messages easy to decode, so we agree on a code key, or should I say, a standard. ASCII was an early example of this, where the code key was 97=a, 98=b, 99=c, and so on. That worked fine for English but ASCII only had 128 codes (from 7 bits of data) and that wasn’t enough for all of the characters in other languages. So people made other code keys with more numbers. The problem was that the numbers overlapped and when you used the wrong decoding key you ended up with garbled nonsense.
Unicode to the rescue
Unicode is an international standard that assigns unique code numbers for the characters of every language in the world. The code numbers are called code points. In addition to what we normally think of as characters, there are also code points for control characters (like a new line), diacritical marks (like the accent over an é), and pictures (like 😊). As long as everyone agrees to use this code standard, there are no more fewer garbled messages.
Unicode is just a long list of code points. Saving these code points or sending them is another matter. To help you understand this, take my secret message from above as an example. If I write it as a string of numbers without whitespace and try to send it to you, you get:
9129115612212020518
This is almost impossible to decode now. Does 912 mean 9, 1, 2 or does it mean 9, 12? It's the same situation with Unicode. We have to use an agreed upon means to save and send Unicode text, or else it would be very difficult to decode. There are three main ways to do it: UTF-8, UTF-16, and UTF-32. UTF stands for Unicode Transformation Format, and each method of encoding has its advantages and disadvantages.
- UTF-8 saves each code point using one to four bytes of data.
- UTF-16 saves each code point as two or four bytes of data. One 16-bit code unit is big enough to uniquely reference a lot of Unicode code points, but not big enough for all of them (emojis, for example). In order to save code points with numbers higher than 16 bits (that is, higher than the number 65,535), UTF-16 uses two 16-bit code units (called surrogate pairs) to map the other code points.
- UTF-32 saves each code point using four bytes of data. It provides a direct one-to-one mapping of UTF-32 code units to Unicode code points.
When working with UTF-16 code units, you need to be careful not to forget about the other half of a surrogate pair. And even if you are working with UTF-32, you shouldn't assume that a single code point is the same as what a user perceives to be a character. For example, country flags (like 🇨🇦) are made of two code points. An accented character (like é) can also optionally be made from two code points. In addition to this, there are emoji with skin tone (like ���👩🏾, 2 code points) and family emoji (like 👨👩👧, 5 code points).
So as a programmer, it is better not to think of UTF code units or Unicode code points as characters themselves. That will lead to bugs (for example, when trying to move the cursor one place to the left). Instead, you should think about what Unicode calls a grapheme cluster. These are user-perceived characters. So 🇨🇦, é, 👩🏾, and 👨👩👧 are each a single grapheme cluster because they each look like a single character even though they are made up of multiple Unicode code points.
Further reading
If you find this interesting or would like a deeper understand of the issues related to Unicode, I encourage you to read the following articles:
- Let’s Stop Ascribing Meaning to Code Points
- Dark corners of Unicode
- Strings in Swift 4 (Although this article is about Swift, it has an excellent discussion of the issues involved.)
Dart strings
Let's move on from talking about Unicode in a general way to seeing how Dart uses it.
Code units
In Dart, strings are sequences of UTF-16 code units. That makes string manipulation look deceptively easy because you can get the string value of a code unit by a random integer index:
1String myString = 'Flutter'; 2 String myChar = myString[0]; // F
But this creates bugs if you split a surrogate pair.
1String myString = '🍎'; // apple emoji 2 List<int> codeUnits = myString.codeUnits; // [55356, 57166] 3 String myChar = myString[0]; // 55356 (half of a surrogate pair)
This will throw an exception if you try to display myChar in a Text widget.
Runes
A better alternative is to work with code points, which are called runes in Dart.
1String myString = '🍎π'; 2 3 List<int> codeUnits = myString.codeUnits; // [55356, 57166, 960] 4 int numberOfCodeUnits = myString.length; // 3 5 int firstCodeUnit = myString.codeUnitAt(0); // 55356 6 7 Runes runes = myString.runes; // (127822, 960) 8 int numberOfCodPoints = runes.length; // 2 9 int firstCodePoint = runes.first; // 127822
Grapheme clusters
Even runes will fail when you have grapheme clusters composed of multiple code points.
1String myString = '🇨🇦'; 2 Runes runes = myString.runes; // (127464, 127462) 3 int numberOfCodePoints = runes.length; // 2 4 int firstCodePoint = runes.first; // 127464 5 String halfFlag = String.fromCharCode(firstCodePoint); // 🇨
Displaying the halfFlag string in your app won't crash it, but users will perceive it as a bug since it only contains one of the two regional indicator symbols used to make the Canadian flag.
Unfortunately, at the time of this writing, there is no support for grapheme clusters in Dart, though there is talk of implementing it. You should still keep them in mind while writing tests and working with strings, though.
Hexadecimal notation
If you are starting with a Unicode hex value, this is how you get a string:
1String s1 = '\u0043'; // C 2 String s2 = '\u{43}'; // C 3 String s3 = '\u{1F431}'; // 🐱 (cat emoji) 4 String s4 = '\u{65}\u{301}\u{20DD}'; // é⃝ = "e" + accent mark + circle 5 int charCode = 0x1F431; // 🐱 (cat emoji) 6 String s5 = String.fromCharCode(charCode);
Substrings
The String documentation (here and here) is pretty good, and you should read it if you haven't already. I want to review substrings before we go on to text styling, though, since we will be using it later.
To get a substring you do the following:
1String myString = 'I ❤️ Flutter.'; 2 int startIndex = 5; 3 int endIndex = 12; 4 String mySubstring = myString.substring(startIndex, endIndex); // Flutter
You can find index numbers with indexOf():
int startIndex = myString.indexOf('Flutter');
OK, that's enough background information. Let's get on to styling text in Flutter.
Text styling with the Text widget
We are going to look first at styling strings in a Text widget. After that we will see how to style substrings within a RichText widget. Both of these widgets use a TextStyle widget to hold the styling information.
Replace _myWidget() with the following code:
1Widget _myWidget(BuildContext context) { 2 return Text( 3 'Styling text in Flutter', 4 style: TextStyle( 5 fontSize: 30.0, 6 ), 7 ); 8 }
Or, if you would like to compare multiple style settings at once, you can use the following column layout.
1Widget _myWidget(BuildContext context) { 2 return Column( 3 mainAxisAlignment: MainAxisAlignment.center, 4 children: <Widget>[ 5 Text( 6 'Styling text in Flutter', 7 style: TextStyle( 8 fontSize: 8, 9 ), 10 ), 11 Text( 12 'Styling text in Flutter', 13 style: TextStyle( 14 fontSize: 12, 15 ), 16 ), 17 Text( 18 'Styling text in Flutter', 19 style: TextStyle( 20 fontSize: 16, 21 ), 22 ), 23 ], 24 ); 25 }
Note that I am setting the TextStyle using the style property of the Text widget. I will modify the TextStyle options below. Try them out yourself by pressing hot reload between every change. You may want to leave a large font size (like fontSize: 30) for some of the later examples below so that you can see what is happening.
Text size

1TextStyle( 2 fontSize: 30.0, 3 )
When fontSize is not given, the default size is 14 logical pixels. Logical pixels are independent of a device's density. That is, the text should appear to be to be basically the same size no matter what the pixel density of a user's device may be. However, this font size is also multiplied by a textScaleFactor depending on the user's preferred font size.
If you wish to disable accessibility scaling, you can set it on the Text widget. (I’m very impressed that Flutter has accessibility enabled by default, and I definitely don’t suggest that you disable it without reason. In some rare cases, though, an oversized font might break a layout…in which case it would still probably be better to redesign your layout rather than disable accessibility.)
1// This text will always display at 30.0 logical pixels, no matter 2 // what the user's preferred size is. 3 Text( 4 'Some text', 5 textScaleFactor: 1.0, // disables accessibility 6 style: TextStyle( 7 fontSize: 30.0 8 ), 9 )
You can also use the theme data to set the text size. See the section on themes below.
Text color
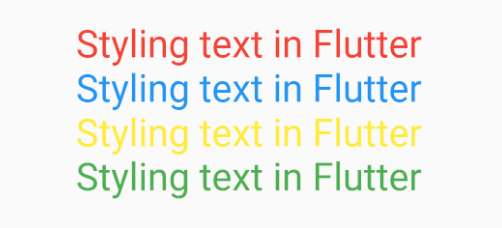
1TextStyle( 2 color: Colors.green, 3 )
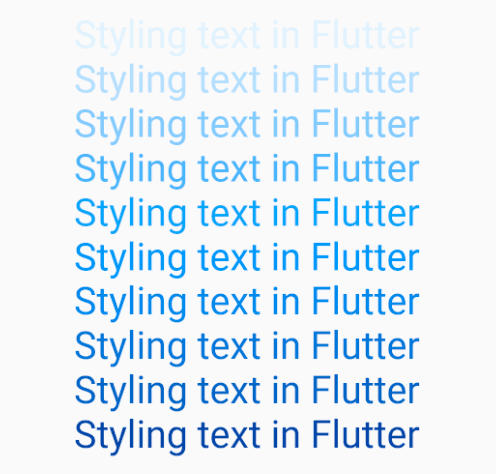
In addition to predefined colors like Colors.green and Colors.red, you can also set shades on a color, like Colors.blue[100] or Colors.blue[700].
Background color
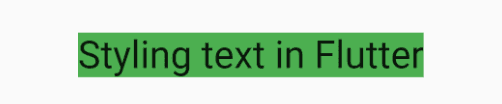
1Widget _myWidget(BuildContext context) { 2 Paint paint = Paint(); 3 paint.color = Colors.green; 4 return Text( 5 'Styling text in Flutter', 6 style: TextStyle( 7 background: paint, 8 fontSize: 30.0, 9 ), 10 ); 11 }
For a Text widget you could also just wrap it in a Container and set the color on the Container.
Bold
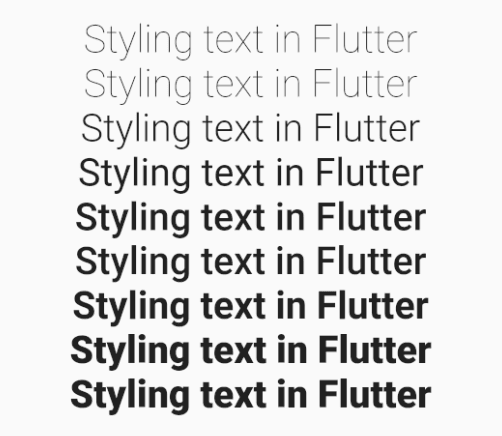
1TextStyle( 2 fontWeight: FontWeight.bold, 3 )
You can set the weight with numbers like FontWeight.w100 where w400 is the same as normal and w700 is the same as bold.
Italic
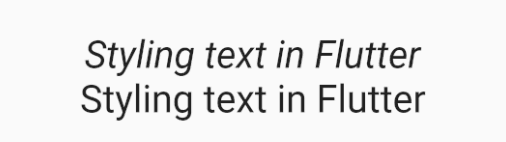
1TextStyle( 2 fontStyle: FontStyle.italic, 3 )
The only choices are italic and normal.
Shadow
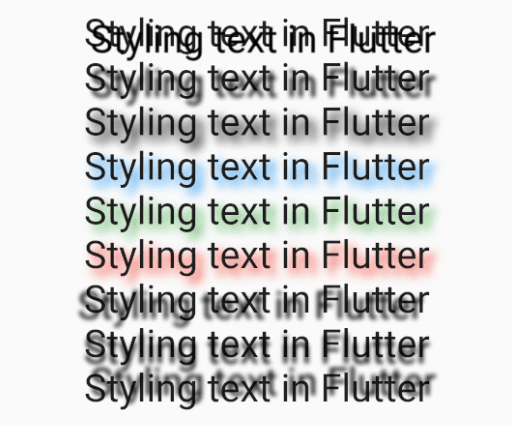
1TextStyle( 2 shadows: [ 3 Shadow( 4 blurRadius: 10.0, 5 color: Colors.blue, 6 offset: Offset(5.0, 5.0), 7 ), 8 ], 9 )
When setting the shadow you can change the blur radius (bigger means more blurry), color, and offset. You can even set multiple shadows as if there were more than one light source.

1TextStyle( 2 shadows: [ 3 Shadow( 4 color: Colors.blue, 5 blurRadius: 10.0, 6 offset: Offset(5.0, 5.0), 7 ), 8 Shadow( 9 color: Colors.red, 10 blurRadius: 10.0, 11 offset: Offset(-5.0, 5.0), 12 ), 13 ], 14 )
I'm not sure if more than one shadow is useful or not, but it is interesting.
Underline
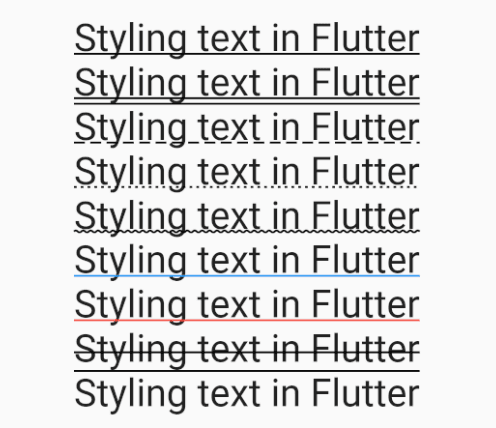
1TextStyle( 2 decoration: TextDecoration.underline, 3 decorationColor: Colors.black, 4 decorationStyle: TextDecorationStyle.solid, 5 )
The decoration can be underline, lineThrough, or overline. The last line of text in the image above has an overline.
The choices for decorationStyle are solid, double, dashed, dotted, and wavy.
Spacing
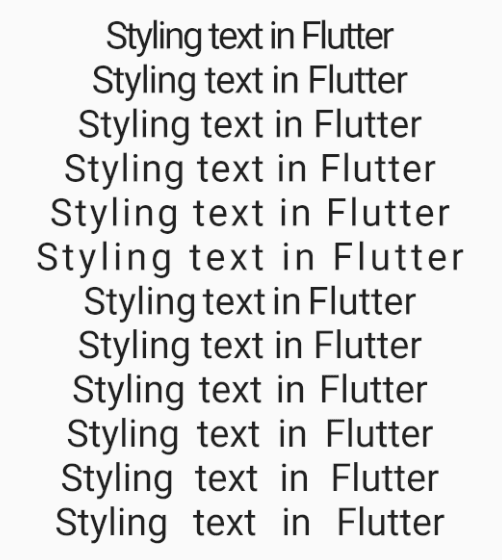
1TextStyle( 2 letterSpacing: -1.0, 3 wordSpacing: 5.0, 4 )
In the example image, the six lines on top use letter spacing ranging from -2.0 to 3.0. The six lines on bottom use word spacing ranging from -3.0 to 12.0. A negative value moves the letters or words closer together.
Font

Using a custom font requires a few more steps:
- Add a directory called
assetsto the root of your project. - Copy a font into it. (I downloaded the Dancing Script font from here, unzipped it, and renamed the regular one to
dancing_script.ttf.) - In
pubspec.yamlregister the font:
1flutter: 2 fonts: 3 - family: DancingScript 4 fonts: 5 - asset: assets/dancing_script.ttf
- Set the font in your widget:
1TextStyle( 2 fontFamily: 'DancingScript', 3 )
- Do a full stop and restart.
See this post for more help.
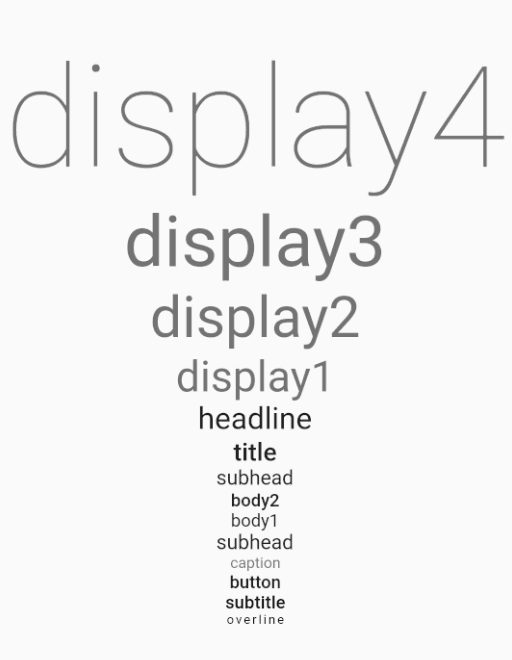
Using themes
Our root widget is a MaterialApp widget, which uses the Material Design theme. Through the BuildContext we have access to its predefined text styles. Instead of creating our own style with TextStyle, you can use a default one like this:

1Text( 2 'Styling text in Flutter', 3 style: Theme.of(context).textTheme.title, 4 )
That was the default style for titles. There are many more defaults for other types of text. Check them out:
If a style is not specified, Text uses the DefaultTextStyle. You can use it yourself like this:
1Text( 2 'default', 3 style: DefaultTextStyle.of(context).style, 4 )
DefaultTextStyle gets its style from the build context.
See the documentation for more about using themes.
Text styling with the RichText widget
The final thing I want to teach you is how to style part of a text string. With a Text widget the whole string has the same style. A RichText widget, though, allows us to add TextSpans that include different styles.
Basic example

Replace _myWidget() with the following code:
1Widget _myWidget(BuildContext context) { 2 return RichText( 3 text: TextSpan( 4 // set the default style for the children TextSpans 5 style: Theme.of(context).textTheme.body1.copyWith(fontSize: 30), 6 children: [ 7 TextSpan( 8 text: 'Styling ', 9 ), 10 TextSpan( 11 text: 'text', 12 style: TextStyle( 13 color: Colors.blue 14 ) 15 ), 16 TextSpan( 17 text: ' in Flutter', 18 ), 19 ] 20 ) 21 ); 22 }
Note: An alternate way to make text with styled spans is to use the
Text.rich()constructor, which has the same default style as the Text widget.
RichText takes a TextSpan tree. Every very TextSpan takes more TextSpan children, which inherit the style of their parent. To make the word "text" blue, I had to divide the string into three TextSpans. I used a color for the style, but I could have just as easily used any of the other styles that we have already looked at. Try adding a few more styles yourself.
Styling programmatically
In a real application we would probably have a longer string. For example, let's highlight every occurrence of "text" in the following string:
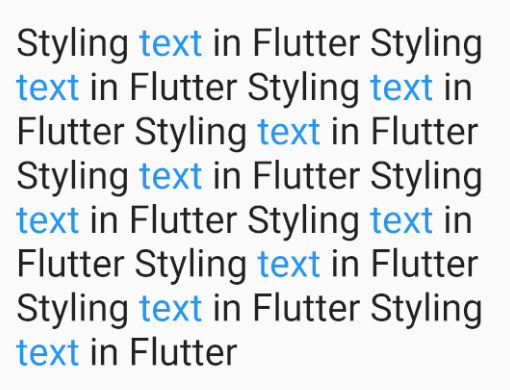
To do that we have to look at the string and find the indexes of the text that we want to style. Then we use substring to cut the string up and put it in a list of TextSpans.
Replace _myWidget() with the following code:
1Widget _myWidget(BuildContext context) { 2 3 final String myString = 4 'Styling text in Flutter Styling text in Flutter ' 5 'Styling text in Flutter Styling text in Flutter ' 6 'Styling text in Flutter Styling text in Flutter ' 7 'Styling text in Flutter Styling text in Flutter ' 8 'Styling text in Flutter Styling text in Flutter '; 9 10 final wordToStyle = 'text'; 11 final style = TextStyle(color: Colors.blue); 12 final spans = _getSpans(myString, wordToStyle, style); 13 14 return RichText( 15 text: TextSpan( 16 style: Theme.of(context).textTheme.body1.copyWith(fontSize: 30), 17 children: spans, 18 ), 19 ); 20 } 21 22 List<TextSpan> _getSpans(String text, String matchWord, TextStyle style) { 23 24 List<TextSpan> spans = []; 25 int spanBoundary = 0; 26 27 do { 28 29 // look for the next match 30 final startIndex = text.indexOf(matchWord, spanBoundary); 31 32 // if no more matches then add the rest of the string without style 33 if (startIndex == -1) { 34 spans.add(TextSpan(text: text.substring(spanBoundary))); 35 return spans; 36 } 37 38 // add any unstyled text before the next match 39 if (startIndex > spanBoundary) { 40 spans.add(TextSpan(text: text.substring(spanBoundary, startIndex))); 41 } 42 43 // style the matched text 44 final endIndex = startIndex + matchWord.length; 45 final spanText = text.substring(startIndex, endIndex); 46 spans.add(TextSpan(text: spanText, style: style)); 47 48 // mark the boundary to start the next search from 49 spanBoundary = endIndex; 50 51 // continue until there are no more matches 52 } while (spanBoundary < text.length); 53 54 return spans; 55 }
Experiment with changing the search word and style.
In this example we searched for plain text, but you can also do pattern matching using regular expressions.
Clickable spans
You can make a span clickable by adding a TapGestureRecognizer:
1TextSpan( 2 text: spanText, 3 style: style, 4 recognizer: TapGestureRecognizer() 5 ..onTap = () { 6 // do something 7 }, 8 )
This would allow you to open a URL, for example, if used along with the url_launcher plugin.
Final notes
Here are a few more related concepts that I didn't have time or space to cover:
- If you have HTML text, you can format it by using a plugin. None of the plugins I tested render everything perfectly, but the best one seemed to be flutter_html_view.
- If you need to style text that you are painting on a canvas, check out the TextPainter class.
- For converting text into UTF-8, you can import
dart:convert.
Conclusion
Text seems like it should be so simple, but it really isn't. Language is messy and dealing with it as a programmer can be difficult. Much progress has been made in recent years, though. Unicode has solved a lot of problems. Dart and Flutter also give us a lot of tools to manipulate and style text. I expect to see these tools improve even more in the future.
The source code for this project is available on GitHub.
By the way, in case you were curious but lazy, my secret message was "I like Flutter".


© 2024 Pusher Ltd. All rights reserved.
Pusher Limited is a company registered in England and Wales (No. 07489873) whose registered office is at MessageBird UK Limited, 3 More London Riverside, 4th Floor, London, United Kingdom, SE1 2AQ.