- Products

- Developers
- User stories
- Blog
- Pricing

Getting started with Vapor and push notifications
Introduction
Introduction
In this tutorial, we’re going to look into how we setup Vapor to send push notifications using Pusher Beams. We will build a simple iOS application that registers an interest. Also, a Vapor server that handles a simple GET and POST request to send a push notification to our device.
Prerequisites
- A basic understanding of Vapor - please complete my “Getting started with Vapor” Part One and Part Two.
- Xcode 10+
- MacOS
- Vapor 3.0 - Install instructions here.
- An iOS device for testing notifications.
- An understanding of iOS development and Xcode environment.
- CocoaPods - Install instructions here.
- A REST client such as Postman and a basic understanding of how to use it.
- Pusher account. Create a free sandbox Pusher account or sign in.
Setting up our Vapor backend
Creating our Vapor project
From terminal and your working directory enter the following command to create your Vapor application.
1$ vapor new PizzaPush 2 $ cd PizzaPush
Now we will build your application before opening it in Xcode. Remember your first build could take some time to complete.
$ vapor build
Now open your project in Xcode. Remember to open using Xcode you must run the following command in terminal:
$ vapor xcode -y
Also remember to change the run scheme to be the “run” scheme in case it is not already set to this.
Adding our dependency
We need to add the Pusher Beams package to our Swift Package Manager (SPM). Start by opening the Package.swift file from the project navigator. This is our dependencies management file, a bit like our Podfile or Cartfile in iOS development.
Below the line that gives us our Vapor package dependency:
.package(url: "https://github.com/vapor/vapor.git", from: "3.0.0"),
Add the following to add our Pusher Beams dependency:
.package(url: "git@github.com:pusher/push-notifications-server-swift.git", .branch("master")),
We need to tell SPM what dependencies each target should have we do this by editing targets section in the same file. Find the line:
.target(name: "App", dependencies: ["FluentSQLite", "Vapor"]),
Edit it so that it becomes:
.target(name: "App", dependencies: ["FluentSQLite", "Vapor", "PushNotifications"]),
We’ve added the name of our dependency to the array of dependencies for the app target. For more information on the dependency go here and for more information relating to SPM go here. Your Package.swift file should now look something like this:
1// Package.swift
2 // swift-tools-version:4.0
3 import PackageDescription
4
5 let package = Package(
6 name: "PizzaPush",
7 dependencies: [
8 // 💧 A server-side Swift web framework.
9 .package(url: "https://github.com/vapor/vapor.git", from: "3.0.0"),
10 .package(url: "git@github.com:pusher/push-notifications-server-swift.git", .branch("master")),
11 // 🔵 Swift ORM (queries, models, relations, etc) built on SQLite 3.
12 .package(url: "https://github.com/vapor/fluent-sqlite.git", from: "3.0.0")
13 ],
14 targets: [
15 .target(name: "App", dependencies: ["FluentSQLite", "Vapor", "PushNotifications"]),
16 .target(name: "Run", dependencies: ["App"]),
17 .testTarget(name: "AppTests", dependencies: ["App"])
18 ]
19 )
Now we need to close Xcode and install the package and reopen it. It’s best practice in Vapor to create and install files outside of our Xcode project using command line tools and then reopen Xcode using the toolbox command. After closing Xcode run the following command in terminal in our working directory.
$ swift build
Reopen Xcode by running:
$ vapor xcode -y
Creating a Pusher Beams instance
Sign in or create an account to access the Pusher dashboard and create a new Pusher Beams instance.
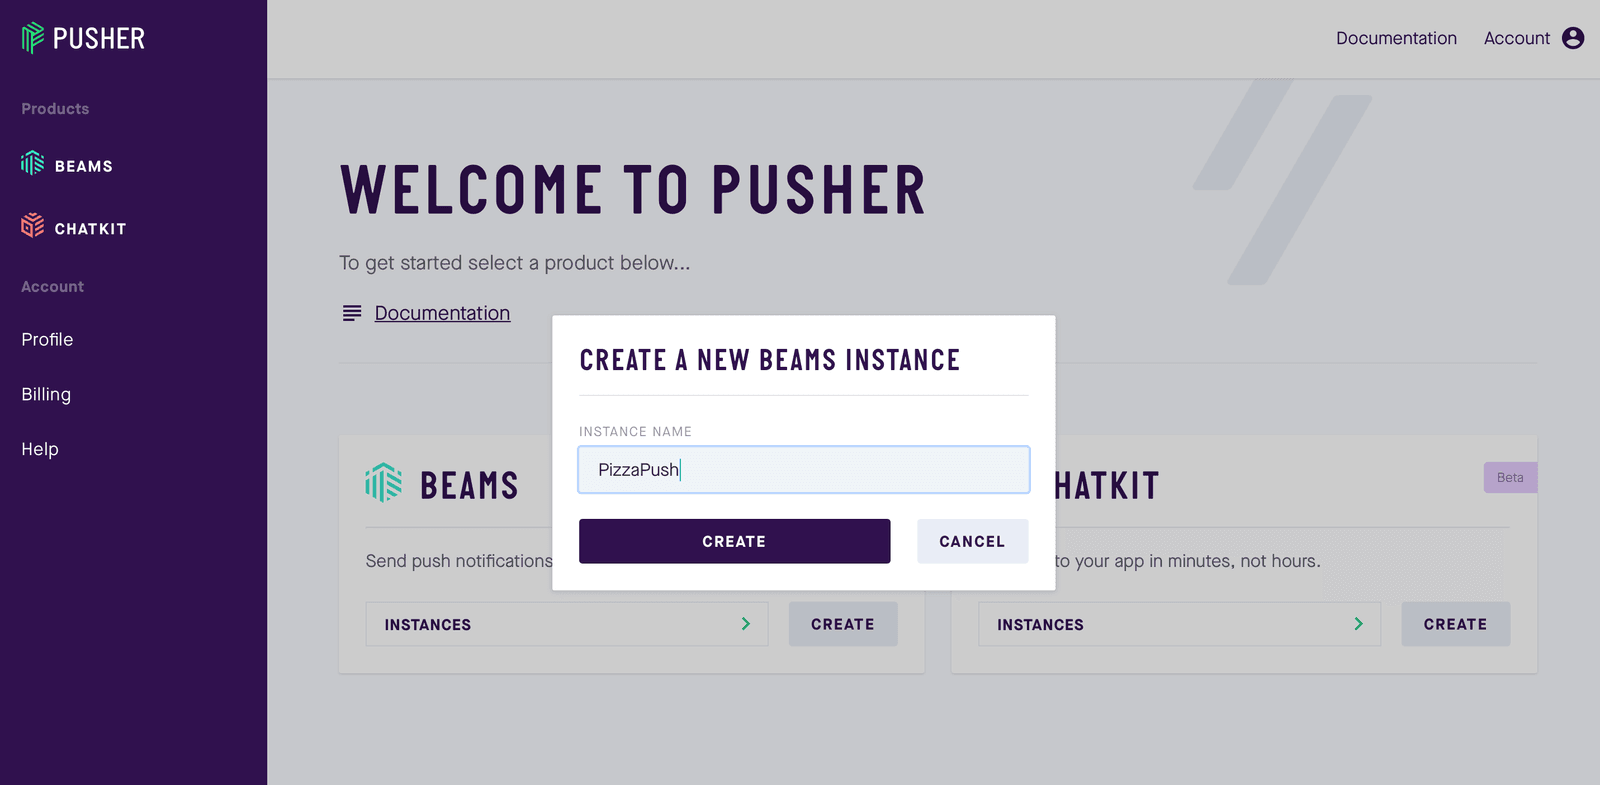
Complete step one of the iOS setup guide, we will pick up the remainder later on in this tutorial. Press the X to exit the setup guide and you will be returned to your dashboard for that instance. Scroll to the bottom of this page and you will find your Pusher Beams instance ID and secret key, make note of these you will need them later.
Creating our routes
Open your routes.swift file and replace the contents with the following:
1//../Sources/App/routes.swift
2 import Vapor
3 // 1
4 import PushNotifications
5 /// Register your application's routes here.
6 public func routes(_ router: Router) throws {
7 // 2
8 router.get("push") { req -> String in
9 do {
10 try PushNotificationService.send(message: "Hello, new pizza offers are available!")
11 return "Push Success"
12 } catch {
13 return "Push Failed"
14 }
15 }
16
17 // 3
18 router.post(PizzaOffer.self, at: "push/offer/") { req, data -> String in
19 do {
20 try PushNotificationService.send(message: "Hello, \(data.pizzaName) has this offer: \(data.pizzaOffer)")
21 return "Push Success"
22 } catch {
23 return "Push Failed"
24 }
25 }
26 }
27
28 // 4
29 struct PizzaOffer: Content {
30 let pizzaName: String
31 let pizzaOffer: String
32 }
33
34 //5
35 class PushNotificationService {
36 // 6
37 class func send(message: String) throws {
38 let pushNotifications = PushNotifications(instanceId: "YOUR_INSTANCE_ID" , secretKey:"YOUR_SECRET_KEY")
39 let interests = ["pizza"]
40 let publishRequest = [
41 "apns": [
42 "aps": [
43 "alert": [
44 "title": "Pizza Offer",
45 "body": message
46 ]
47 ]
48 ]
49 ]
50 try pushNotifications.publish(interests, publishRequest, completion: { publishID in
51 print("Published \(publishID)")
52 })
53 }
54 }
1 - We need to import the new PushNotifications dependency we have just installed. 2 - Here we create a new GET route that is capable of sending a generic push notification using a wrapper we class we have created below. 3 - Here we create a new POST route that is capable of sending a more specific push notification based on the data that is passed in but still using the same wrapper class. 4 - This is the structure that our post request is expecting the data to arrive in. 5 - This is our wrapper class. Here we create an instance of the dependency we have installed using the Pusher Beams instances ID and secret key you created earlier. We only have one interest in our app (which is Pizza). We create a publish request using for APNs using the message that is passed in using the method call and we then publish this using our dependency.
Creating our iOS application
Now that we have created our routes, we need to have a user that has actually registered for notifications and signed up for the pizza interest so we can test out our implementation. We’re going to create a very basic app that doesn’t actually show anything to the user except for the notification on the lock screen.
Project setup
Create a new single view iOS application using Xcode and name it something like PizzaPush-iOS. Once the project is created we need to install the Beams SDK. Open the terminal and go to the working directory of the newly created project and run the following command.
$ pod init
Open the newly created Podfile and add the following pod:
pod 'PushNotifications'
In the terminal run:
$ pod install
Make sure you close your Xcode project and reopen the newly created Xcode Workspace before continuing. Within your project capabilities make sure you have switched on the Push Notifications capability. Also turn on the Background Modes capability and tick the box for Remote Notifications.
Open your AppDelegate.swift file and replace its contents with the following. Remembering to replace the instance ID with your own.
1import UIKit
2 import PushNotifications
3
4 @UIApplicationMain
5 class AppDelegate: UIResponder, UIApplicationDelegate {
6
7 var window: UIWindow?
8
9
10 let pushNotifications = PushNotifications.shared
11
12 func application(_ application: UIApplication, didFinishLaunchingWithOptions launchOptions: [UIApplication.LaunchOptionsKey: Any]?) -> Bool {
13 self.pushNotifications.start(instanceId: "YOUR_INSTANCE_ID")
14 self.pushNotifications.registerForRemoteNotifications()
15 try? self.pushNotifications.subscribe(interest: "pizza")
16
17 return true
18 }
19
20 func application(_ application: UIApplication, didRegisterForRemoteNotificationsWithDeviceToken deviceToken: Data) {
21 self.pushNotifications.registerDeviceToken(deviceToken)
22 }
23
24 func application(_ application: UIApplication, didReceiveRemoteNotification userInfo: [AnyHashable: Any], fetchCompletionHandler completionHandler: @escaping (UIBackgroundFetchResult) -> Void) {
25 self.pushNotifications.handleNotification(userInfo: userInfo)
26 }
27
28 }
You can now run the application on your iOS device and accept to receive notifications. The SDK will then manage registering our interest in pizza.
Test our integration
Now we can begin testing our integration. If you have closed your Vapor project reopen it in the usual way in Xcode and hit the run button. You should see a message in the console saying it has started and is listening on http://localhost:8080. To begin our first make sure the iPhone is on the lock screen and using your web browser visit: http://localhost:8080/push. You should receive a notification for Pizza Push with a title saying “Offer” and a generic message “Hello, new pizza offers are available!”
Our second test requires us to use Postman (or another REST client) to pass data through. Open postman or your equivalent REST client and set it up so that it looks like this.
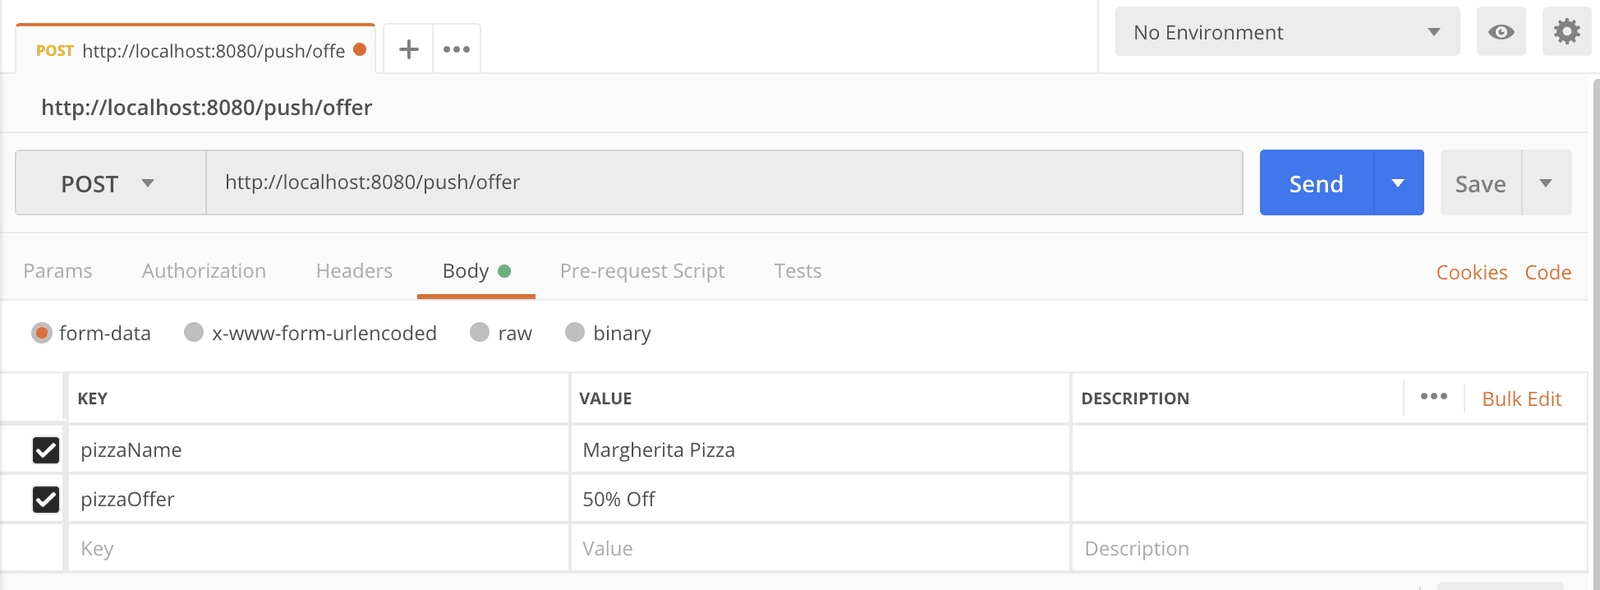
If you press the send button you should receive a push notification on your iOS Device that now has the message “Hello, Margherita Pizza has this offer: 50% off”. You could change the name of the pizza or the offer to customize this offer making for more powerful push notifications.
Conclusion
We’ve learnt how to add a dependency the Beams server side SDK as a dependency to Vapor and setup some basic routes that can publish notifications to an iOS app that has registered for the interests. We’ve seen a couple of basic push notification examples that could be customized for different routes and receive different parameters to create different notifications for users.
Now that you have a basic understanding of the setup you should be able to go on and create your own routes that may handle more complex logic and display more complicated push notifications to users.
The source code for the Vapor project can be found here and for the iOS project here.


© 2024 Pusher Ltd. All rights reserved.
Pusher Limited is a company registered in England and Wales (No. 07489873) whose registered office is at MessageBird UK Limited, 3 More London Riverside, 4th Floor, London, United Kingdom, SE1 2AQ.