- Products

- Developers
- User stories
- Blog
- Pricing

Getting started with webpack - Part 3: Bundling other file types
Introduction
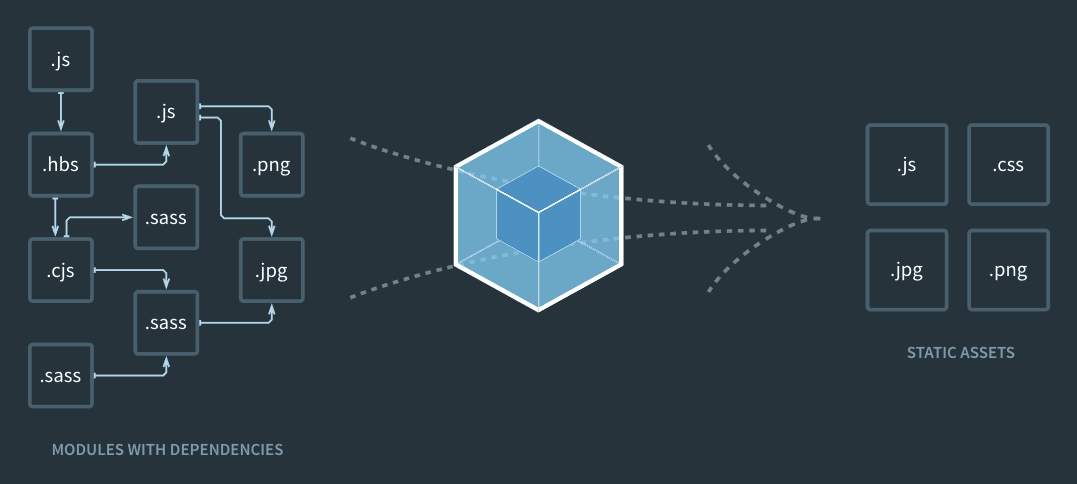
In this part of the series, we will dig deeper into webpack and see what else is possible. We will specifically try to load other file types using webpack. As seen in the image below, webpack can handle other file types other than JavaScript.
In the previous part of the series, we learned how to configure webpack and define some defaults. We also learned how modules work in ES6 and we applied what we learned in code.
Let’s get started.
NOTE: Source code of the application is available on GitHub.
Prerequisites
To follow along in this series, you need the following requirements:
- Completed all previous parts of the series.
- Basic knowledge of JavaScript.
- Basic knowledge of the CLI.
- A text editor. VS Code is recommended.
- Node.js (>=6.11.5) and npm installed locally.
Let’s continue with the series.
Introducing loaders in webpack
By default, webpack has support for loaders. This is how webpack knows what to do with specific file types.
IMPORTANT: Loaders are transformations that are applied on the source code of a module. They allow you to pre-process files as you
importor “load” them. Thus, loaders are kind of like “tasks” in other build tools and provide a powerful way to handle front-end build steps. Loaders can transform files from a different language (like TypeScript) to JavaScript or inline images as data URLs. Loaders even allow you to do things likeimportCSS files directly from your JavaScript modules! - webpack documentation
With loaders, we will be able to tell webpack how to handle some other file types other than JavaScript. We will explore that in a bit but right now let’s see what loaders look like in code.
To get started with loaders, you need to install them using npm as they don’t come bundled with webpack by default. To install the TypeScript loader, you need to run the command below for example:
$ npm install --save ts-loader
This will install the loader and you can then instruct webpack to use it now that it is available to your application.
Loaders in webpack configuration file
To use a loader, you need to update the webpack configuration file and tell webpack which loader to use and for which file type. For example:
1module.exports = { 2 module: { 3 // [...] 4 5 rules: [ 6 { 7 test: /\.ts$/, 8 use: 'ts-loader' 9 } 10 ] 11 12 // [...] 13 } 14 };
In the code above, we see that we have a new rules key. The value being an array of rules. Each rule is an object containing at least the test and use key:
1{ 2 test: /\.ts$/, 3 use: 'ts-loader' 4 }
The test key is a regular expression that tells webpack to match TypeScript files, that is files that have the .ts extension. The use property has a string value that tells webpack the loader to use for this file type. In this case, we are using the ts-loader we installed earlier.
The use property can also take an array of loaders instead of the single loader passed as a string. For example:
1{ 2 test: /\.ts$/, 3 use: [ 4 'yet-another-loader', 5 'another-loader', 6 'ts-loader' 7 ] 8 }
With this, webpack will know how to handle .ts files and will bundle it when it comes across it. In the example above, webpack will use all three loaders, starting from the bottom one.
If you need to specify options for a specific loader, you can also do so using this syntax:
1{ 2 test: /\.ts$/, 3 use: [ 4 { loader: 'yet-another-loader' }, 5 { 6 loader: 'another-loader', 7 options: { 8 // loader options... 9 } 10 }, 11 { loader: 'ts-loader' } 12 ] 13 }
Loaders get called from last to first. This means if you have multiple loaders defined in an array, the last one on that list will be the first one executed and the first one will be the last one executed. As in the example above, the
ts-loaderwill be called first, thenanother-loader, and finally, theyet-another-loaderloader.
Inline loaders
In addition to adding your loaders to the configuration file, which is recommended, you can load them inline.
When importing your file, you can specify the loaders that will be used for the file. To add them, separate loaders from the resource with !. Each part is resolved relative to the current directory:
import Styles from 'style-loader!css-loader?modules!./styles.css';
You can pass options to the loader with a query parameter, for example: ?foo=bar&bar=baz. You can also pass a JSON object, for example ?{"key":"value","foo":"bar"}.
While this method works, putting the loaders in your webpack configuration file is still the best way to handle webpack loaders.
CLI loaders
One final way to use loaders in webpack is through the command line. You can run the following command to bind the loaders
$ webpack --module-bind ts-loader --module-bind 'css=style-loader!css-loader'
This uses the ts-loader for .ts files, and the style-loader and css-loader for .css files.
Writing your own loaders
If you have a specific use case and you cannot find a loader for it in the npm repository, then you can look at the documentation on how to create your own webpack loader.
Adding a loader to our existing project
If you still have the code from part two, we will be using that as a base for this part. If you do not have it locally, download the code for the project from GitHub here.
In this part, we will be using loaders to handle the styling of our project. To get started, we will install the loaders we would be using. Run the following command to install the appropriate loaders:
$ npm install sass-loader node-sass css-loader style-loader --save-dev
Above, we are installing quite a few packages:
-
sass-loader- we need the sass-loader to load Sass files and convert them to CSS.The sass-loader…requires you to install either Node Sass or Dart Sass on your own. This allows you to control the versions of all your dependencies, and to choose which Sass implementation to use. - GitHub repository’s readme
-
node-sass- allows you to natively compile .scss files to CSS. -
css-loader- we need the css-loader to handle the CSS generated from the sass-loader. -
style-loader- we need the style-loader to actually add the CSS loaded to the page.
After running the command, your package.json file should now be automatically updated with the new dependencies:
1// File: ./package.json 2 { 3 // [...] 4 5 "devDependencies": { 6 "css-loader": "^2.0.0", 7 "node-sass": "^4.11.0", 8 "sass-loader": "^7.1.0", 9 "style-loader": "^0.23.1", 10 11 // [...] 12 } 13 14 // [...] 15 }
Next, open your webpack configuration file and update the configuration with the rules key as seen below:
1// File: ./webpack.config.js 2 let webpack = require('webpack'); 3 let path = require('path'); 4 5 module.exports = { 6 mode: 'development', 7 8 entry: path.resolve(__dirname + '/src/index.js'), 9 10 output: { 11 path: path.resolve(__dirname + '/dist/assets'), 12 filename: 'bundle.js' 13 }, 14 15 module: { 16 rules: [ 17 { 18 test: /\.scss$/, 19 use: [ 20 'style-loader', 21 'css-loader', 22 'sass-loader' 23 ] 24 } 25 ] 26 } 27 28 };
As seen, we added the rules key so we can specify the loaders we want to use with the project. In this case, we are using the three loaders we installed earlier. Remember, the loaders are called from last to first in this list.
This means that the sass loader will first compile the .scss file to .css. Then the css-loader will be called to load the .css file, then finally, the style-loader will make sure it is injected into the final code.
Next, open the dist``/index.html file and replace the contents with the following code:
1<!-- File: ./dist/index.html --> 2 <!DOCTYPE html> 3 <html lang="en"> 4 <head> 5 <meta charset="UTF-8" /> 6 <meta name="viewport" content="width=device-width, initial-scale=1.0" /> 7 <meta http-equiv="X-UA-Compatible" content="ie=edge" /> 8 <title>Webpack Sample</title> 9 </head> 10 <body> 11 <div class="container"> 12 <h1></h1> 13 </div> 14 <script src="./assets/bundle.js"></script> 15 </body> 16 </html>
Above, the only change we made is wrapping the h1 tag inside a .container and removing the default content of the h1 tag.
Next, open the src/index.js file which contains the script for our page that is to be bundled and replace the code with the following:
1// File: ./src/index.js 2 import generateRandomString from './utilities/random'; 3 4 import './style.scss'; 5 6 document.addEventListener('DOMContentLoaded', function () { 7 var randomString = `Random String: <span>${generateRandomString()}</span>`; 8 9 window.setTimeout(function () { 10 document.getElementsByTagName('h1')[0].innerHTML = randomString 11 }, 0); 12 });
Above, we made a few minor changes to what the script was before:
- We
imported the.scssfile directly to the JavaScript file. When webpack sees this import, it’ll match the file extension.scssand run the loaders that match the extension. - We added a
spanaround the randomly generated string. This is so we can style it separately.
Finally, create a new file in the src directory called style.scss and paste the following code in:
1/* File: ./src/style.scss */ 2 body { 3 margin: 0; 4 padding: 0; 5 } 6 7 .container { 8 max-width: 900px; 9 padding: 0 16px; 10 margin: 50px auto 0; 11 12 h1 { 13 margin: 0; 14 text-align: center; 15 color: #272727; 16 font-family: -apple-system, BlinkMacSystemFont, 'Segoe UI', Roboto, 'Open Sans', 17 'Helvetica Neue', sans-serif; 18 19 span { 20 color: #999; 21 } 22 } 23 }
Above, we have the Sass file that we want to use as the style to the page. Save it and run the following command below to install all the dependencies and then bundle our assets:
1$ npm install 2 $ npm run build
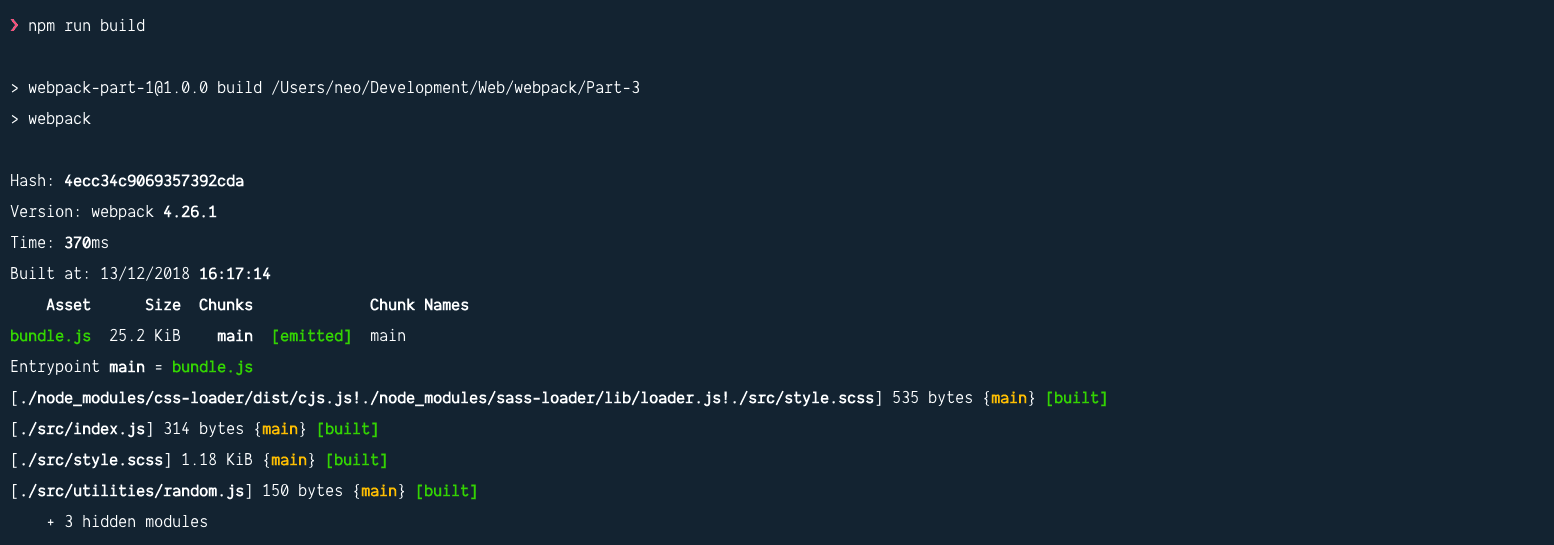
As seen above, the style.scss file is built successfully without issues. When the build is complete, you can now run the Node.js web server with the following command:
$ node dist/server.js
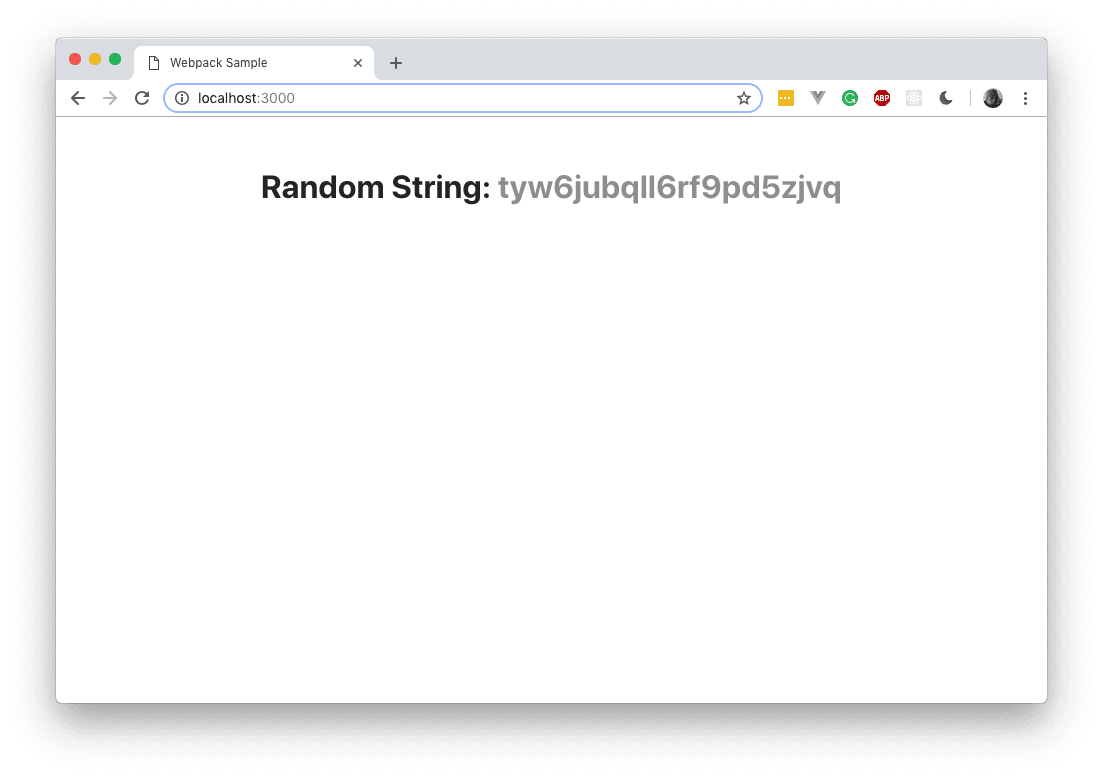
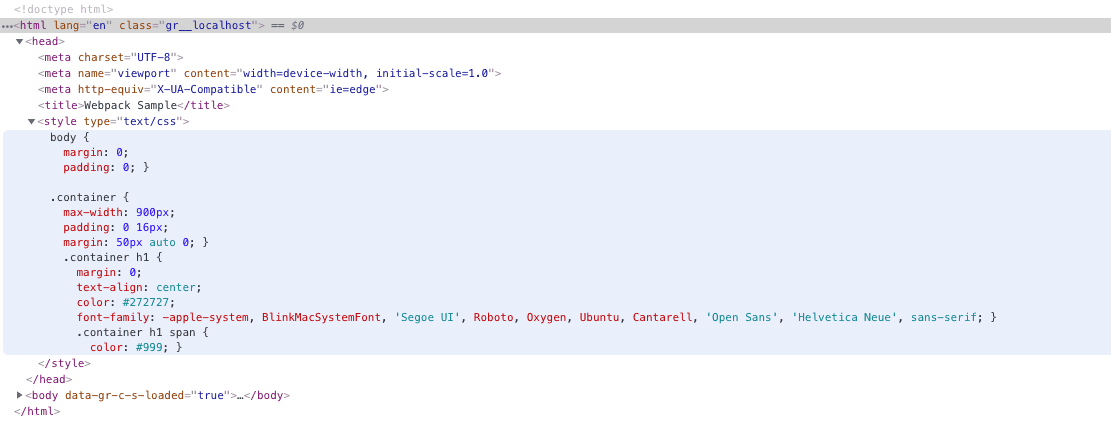
You should see the application running as shown above in http://localhost:3000. If you Inspect Element and look at the source code, you’ll see that the style has been bundled and injected into the web page by webpack.
Conclusion
In this tutorial of the series, we have learned how to use loaders to handle other asset files especially stylesheets. We also learned how loaders work. However, Webpack is a lot more powerful than this. We will dive a little deeper in the next part.
The source code to this application is available on GitHub.


© 2024 Pusher Ltd. All rights reserved.
Pusher Limited is a company registered in England and Wales (No. 07489873) whose registered office is at MessageBird UK Limited, 3 More London Riverside, 4th Floor, London, United Kingdom, SE1 2AQ.